 Published: May 12, 2023
 A software developer’s day-to-day looks different every day, but the main goal stays the same: Deliver good-quality products fast.
To do that, your software development team has to:
- Stay focused
- Write efficient code
- Deal with bugs faster
To actually improve their workflow, you need to understand how they spend their time.
Insights into that will guide you on what needs improvement and whether your team needs support or additional resources at any point in the process.
- Software developers can add their clients to Clockify to track billable hours and bill their clients.
- Software development teams track their time using a timer, manually, or with an auto tracker.
- Another benefit of using Clockify is that it integrates with GitLab, GitHub, Jira, and other apps developers use.
- With Clockify Reports, you can compare your tracked billable and non-billable hours.
How do software developers use Clockify by CAKE.com?
Whenever you get a new project with a limited budget and a firm deadline, you must make sure the workflow is neat and organized.
This is what your typical workflow in Clockify by CAKE.com would look like.
1. Create your custom client database
For accurate client billing, you need to tie the work done on a project to its client. So, the first step is to include a new client in your database.
To create a new client, go to the “Clients” tab on the Clockify dashboard and click on “Add new Client”.
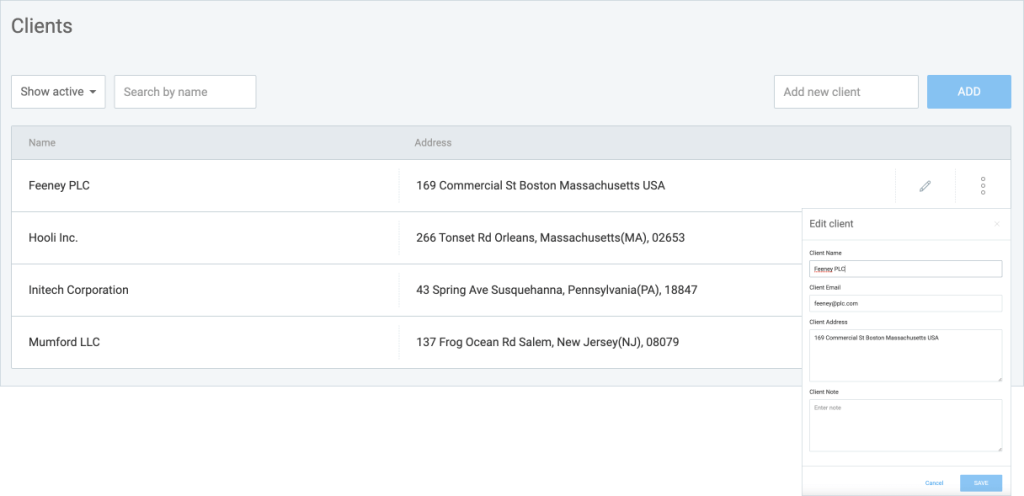
Each client has a name, contact information, an address for invoicing, and any other custom details you might need to note.
Once you have your client database ready, you can associate projects with them for easier tracking and accurate billing.
2. Create projects
Now you can start creating the pipeline of your projects.
To create a project in Clockify, you need to give it a name, a client, a color to visually separate it from other projects, and define it as public or private to control visibility.
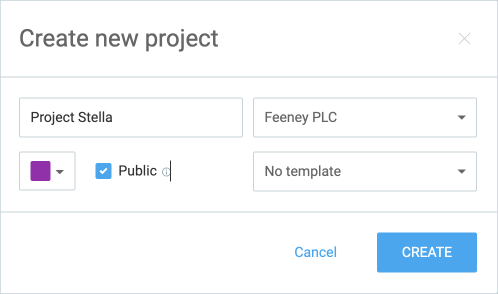
While public projects are visible to all, private projects are for selected team members only – others won’t be able to track time on it.
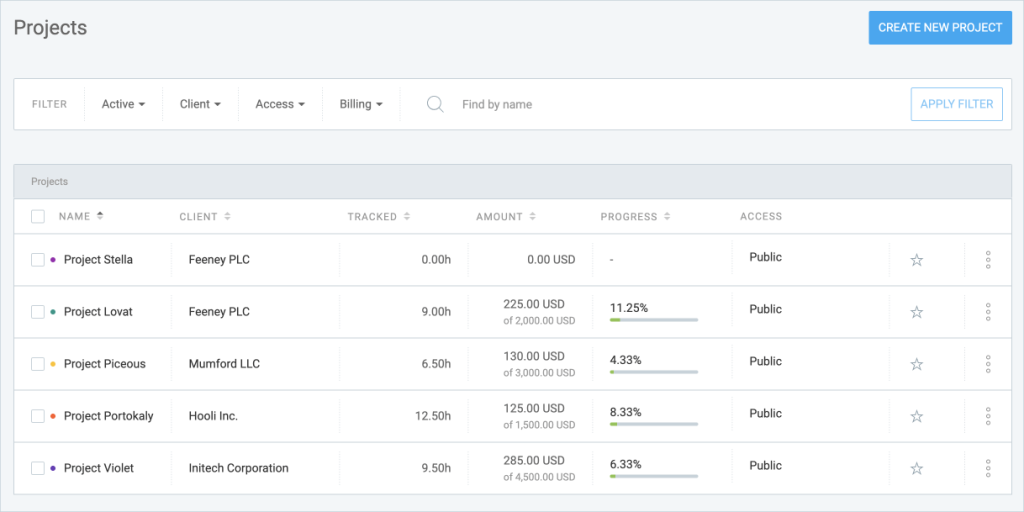
Your final project database will show an overview of the most important project information along with the progress bar that will constantly change as people track time on it.
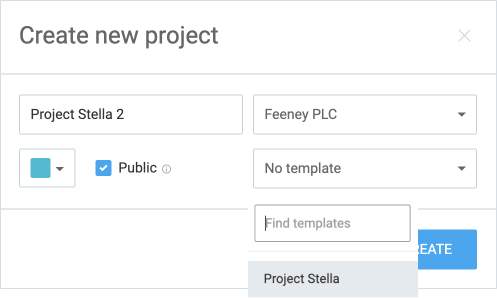
If you often work on the same projects (e.g. multiple mini-projects for the same client) and your tasks are all the same, you can save a project as a template and quickly create a new one from that template.
3. Organize and add team members
Managing people and assigning them projects is easier if you organize people in teams/groups.
First, you want to make sure each team member has a billable and cost rate set. This is the basis for managing costs and profitability.
Billable rate is an hourly rate used to bill your clients for the total hours spent working on a project, and cost rate is an hourly labor cost used to calculate team paychecks.
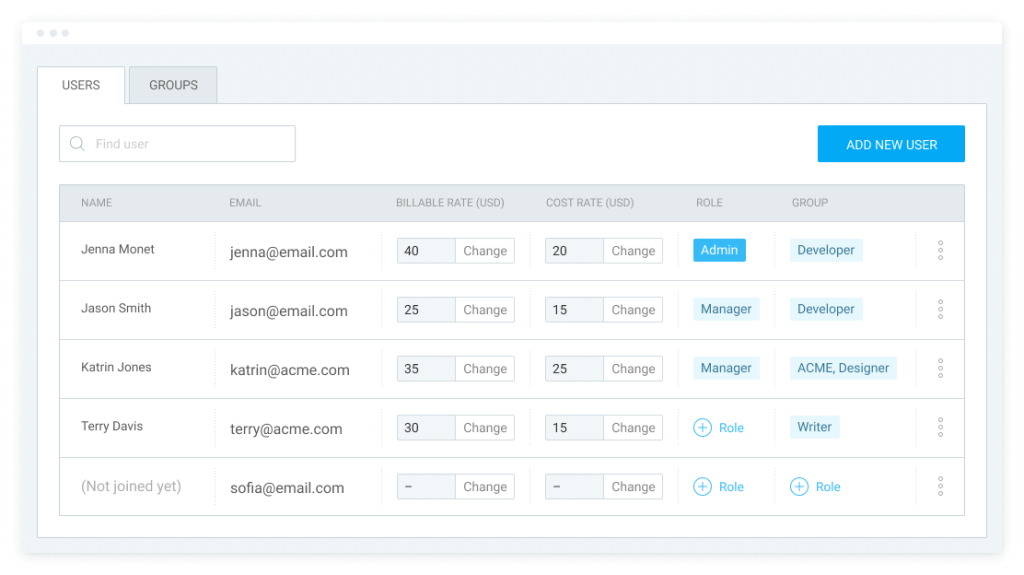
In Clockify by CAKE.com, projects and tasks can have their own billable rate which will be the same for all team members tracking work on that project or task.
But, you can get even more specific and set the project’s member hourly rate – a different rate for different members working on the same project.
For example, you will probably assign a senior and a junior software developer to work together on the same project, and they will have different billable rates.
See exactly how to set billable hourly rates for your team.

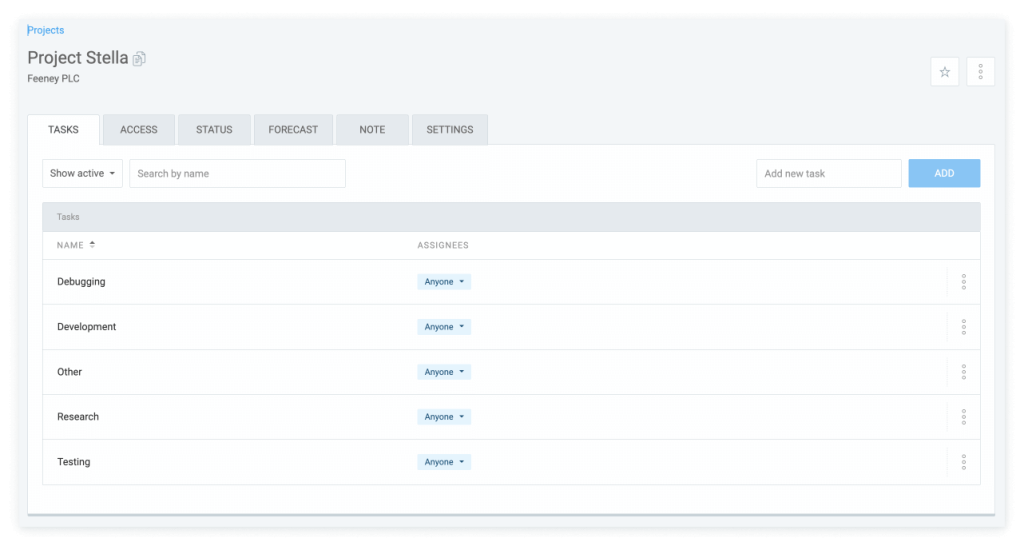
4. Split projects into manageable tasks
In many cases, certain tasks are billed differently or some work needs to be completed without being billed.
For example, the research performed prior to the development, or regular meetings with clients to track and review progress are not usually billed.
That’s why you need to create different types of tasks, and set them to be billable or non-billable.
This way you and the client will be able to accurately track the process and be transparent about where the whole team spent most of their time.
For example, if each team member spends a lot of time on internal communication, then maybe you should consider implementing an alternative tool that will speed up their collaboration.
This gives you insights into what can be improved for future projects.
As your team begins to track time on each of these tasks, you will be able to follow the progress.
5. Control deadline & budget
To regularly track the progress on each task or project and stay in line with the deadline and budget, you should set time and budget estimates for your projects or tasks.
Estimates can be set in total for the whole project, e.g. total budget for the project is $10,000.
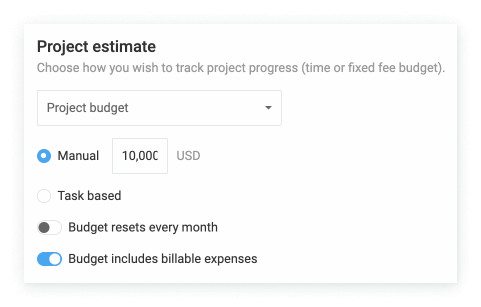
Or you can set task-based estimates, e.g. each task will take 20 hours to complete, which could be useful for sprint planning.
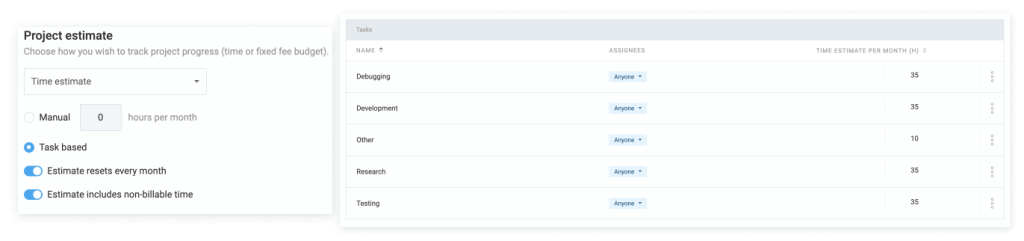
You can manipulate manual or task-based estimates for both project time and project budget.
If it’s difficult to predict estimates for the whole project, you can set them for just a month in advance and set them to reset monthly to revisit and change them every month.
The monthly estimate reset is also useful if you have a retainer contract with some clients.
You can distribute the total budget evenly throughout the year to make sure you stay within the limit each month.
6. Schedule tasks across the team
With the scheduling feature, you can assign tasks to team members and set deadlines. This will help keep your team organized and ensure that work is completed on time.
In Clockify, there are two ways of making schedules:
- Project scheduling
- Team scheduling
On the project-scheduling view, you can first determine the total number of hours dedicated to that project, and then proceed to assign team members.
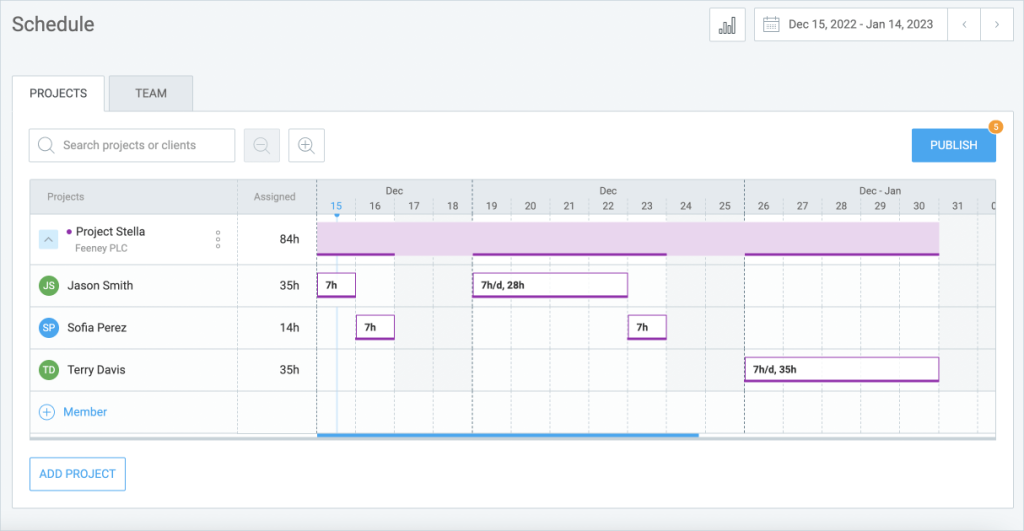
On the team-scheduling view, you should allocate each team member a certain number of hours, and then allocate their time to different projects.
Depending on the previously set daily capacity for each member, and the hours you’ve scheduled them, the labels on the team view will vary between full, open, and over.
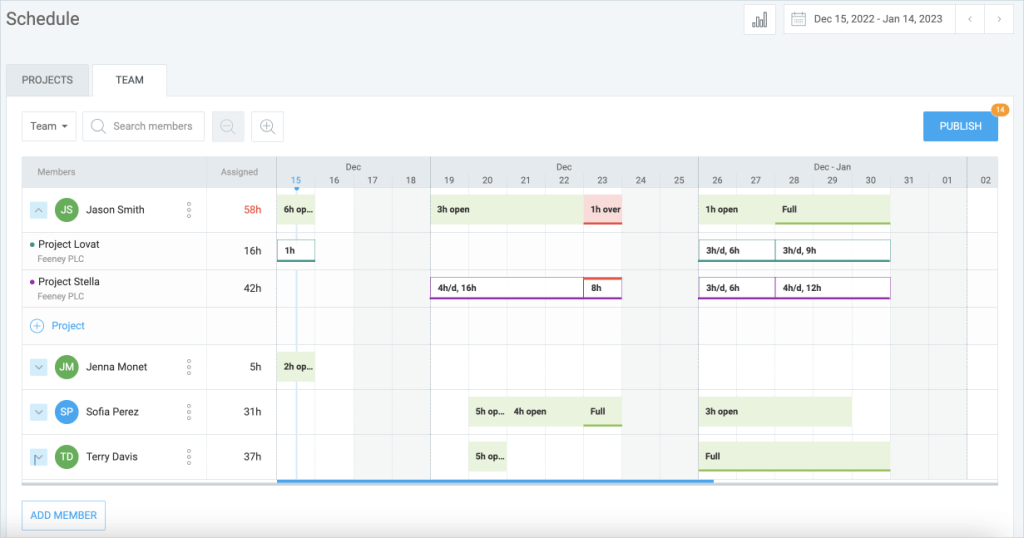
Either way, whichever view is fitting for you, you will see the same information in both views.
If your team works in sprints, you can easily schedule time blocks of the same duration with a duplicate option or drag & drop, in both views.
7. Start tracking time
Your team can use the Clockify timer to track their work, the timesheet to manually enter time entries, or the auto-tracker to automatically run the timer when they turn on the computer.
The auto-tracker will automatically count the time you spend on each web page or app, so it is especially useful when switching between tools and tabs.
You can set it to start tracking time as soon as you turn on the computer, so you won’t have to remember to start the timer yourself.
Then, you can review the recorded time slots (visible only to you) and choose which ones you want to save as time entries on Clockify and edit them if needed.
The timesheet mode allows you to enter the total hours spent on projects.
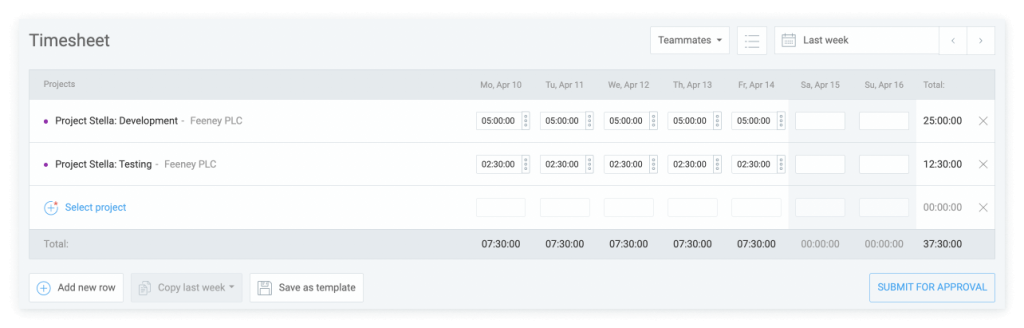
For example, if you know that you will work on one project or a task the whole week, the quickest way to record your working hours, in that case, will be through a timesheet.
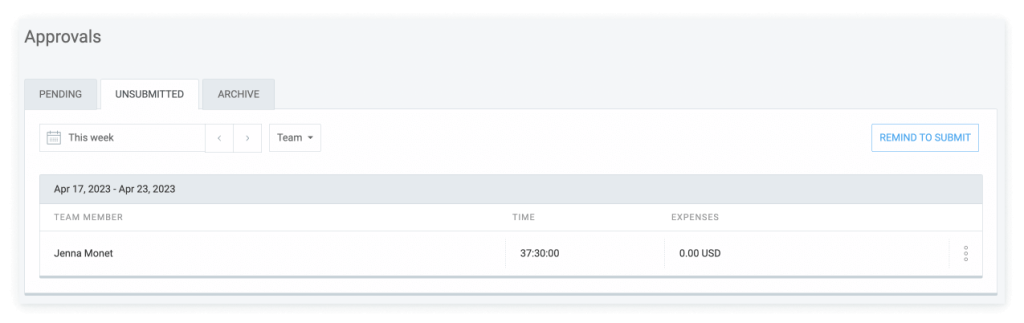
Timesheets can be submitted for review and approval, to make sure hours and tasks on the project are recorded as agreed.
For example, you could use submitting & reviewing timesheets to check if all tasks are correctly marked as billable or non-billable, to avoid billing clients for the unbillable tasks.
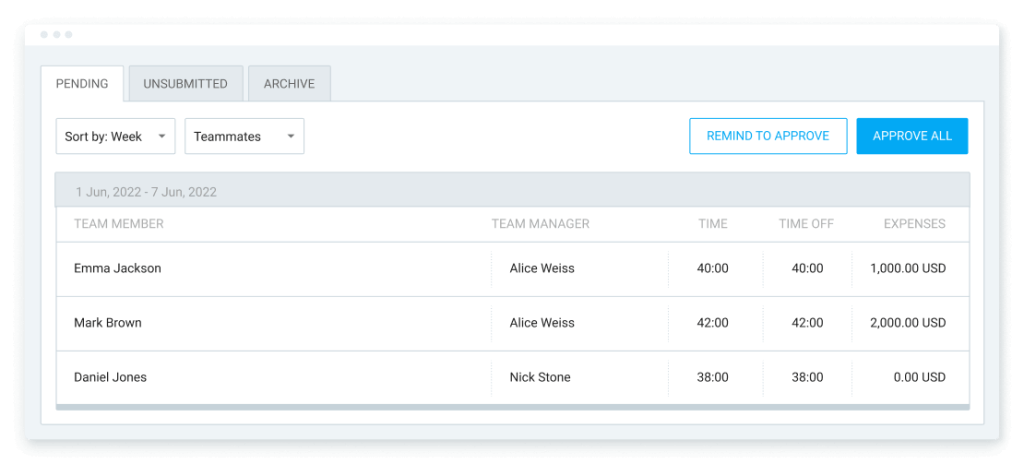
You can even remind team members to submit their timesheets, and managers to approve them.
You can also lock timesheets to be locked after a certain date to avoid any additional changes.
Once approved, timesheets cannot be edited.
The tracker feature lets you start and stop the timer when you finish the work done on a specific task, and mark it as billable or non-billable.
You can use the timer mode with a button, or use the manual mode to enter start and end times yourself.
As you start and stop the timer, time entries will populate your timesheet.
8. Integrate with other apps
Clockify integrates with software development tools such as Gitlab, Github, Jira, and many other apps you might use on a daily basis.
Connecting Clockify with other apps will allow you to track time directly from these tools and synchronize data for streamlined project management.
For example, to track time in Jira, you can use the API key or Clockify browser extension (Chrome, Firefox, Edge).
You can use the Clockify browser extension to track time on any web tool you use for your work.
If you wanna go one step further and extend Clockify functionality to meet your exact needs, see how you can develop your own add-ons and apply them to your Clockify account.
9. Track progress
Once the estimates are set, and the team started tracking time on tasks, you will be able to visually track progress.
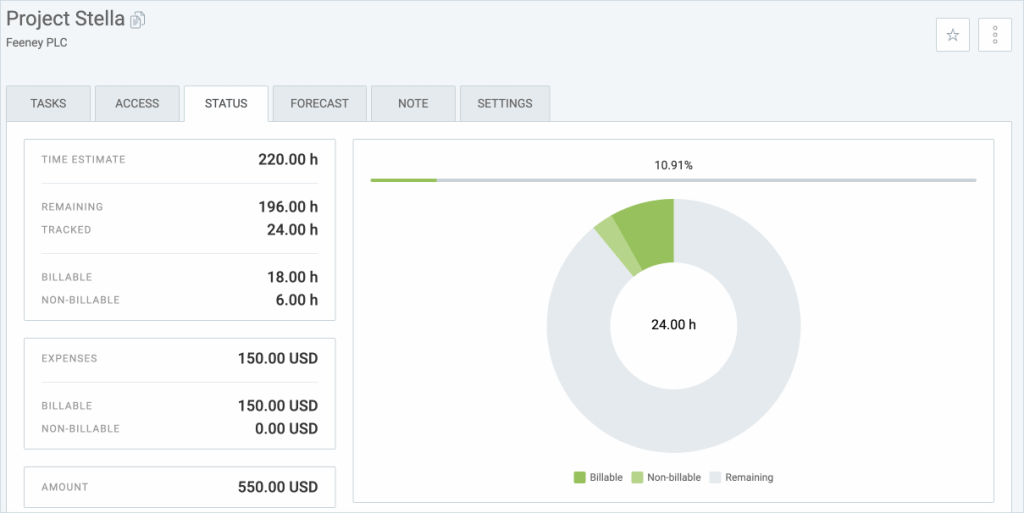
Recorded expenses will also be displayed here and distracted from the total budget.

The forecasting tab will show you whether you will stay under the deadline and budget, based on the tracked time, scheduled hours, and estimates.
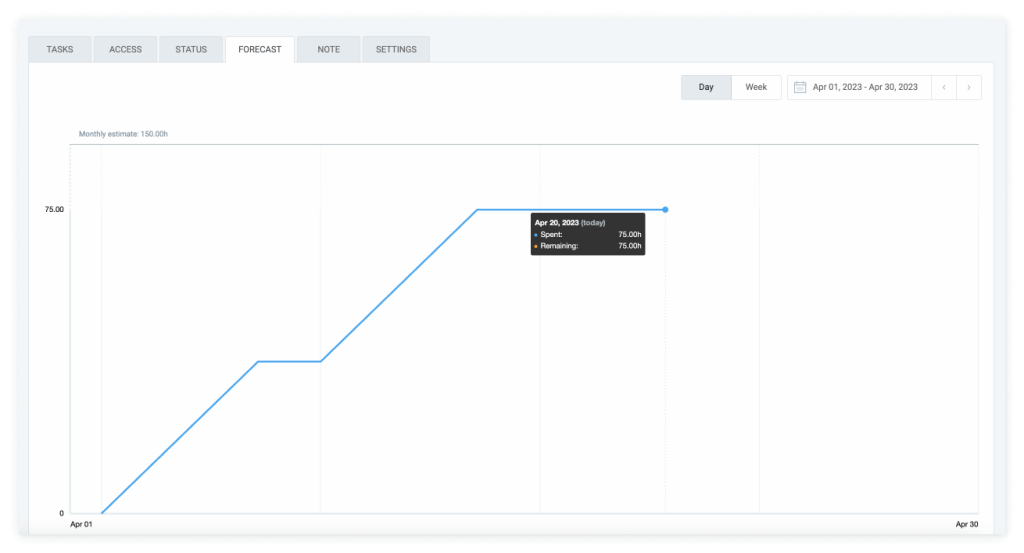
This will give you insights on whether you need to re-schedule your team or agree with the client to change the estimates.

Also, it will help you determine when the project will end and when team members are available to begin another project.
10. Record expenses
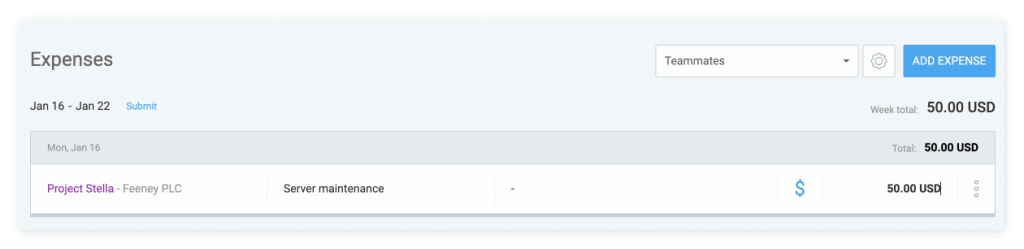
Working on a project sometimes requires additional expenses you have to bill, too.
Depending on the type of software development project, your team may need to incur expenses for hosting, server maintenance, and other infrastructure-related expenses.
Since expenses like that are usually a one-time expense (or for a long period of time), you will need to include them in your invoices, but not as a regular task on a project.
Clockify lets you record all your expenses which can later be included in an invoice you send to clients.
11. Get detailed reports
You can use reports to identify areas where your team may need more support or resources, by looking at where they are spending too much time.
You can compare the hours spent on non-billable versus billable activities, and calculate your utilization rate to evaluate the profitability of your team or certain project types.
Reports in Clockify by CAKE.com give you the ability to filter out the work done on specific projects or clients, to display only billable or non-billable tasks, or work done by specific members or teams.
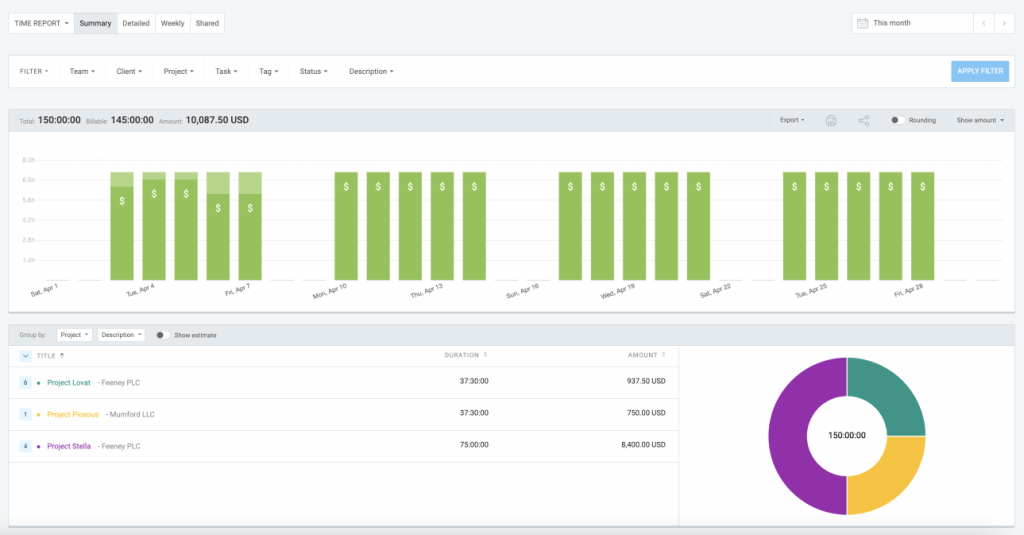
You can round time entries up, down, or to the nearest value to have clean reports before sharing them with a client.
You can set auto-reporting if you want to receive certain reports daily, weekly or monthly.
Just filter out the information you want to include in the report and set up the sharing option.
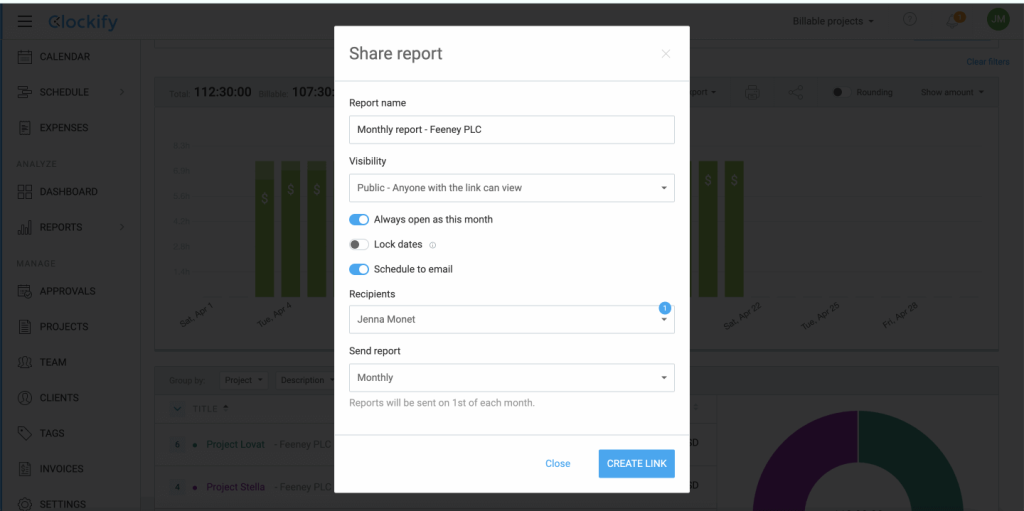
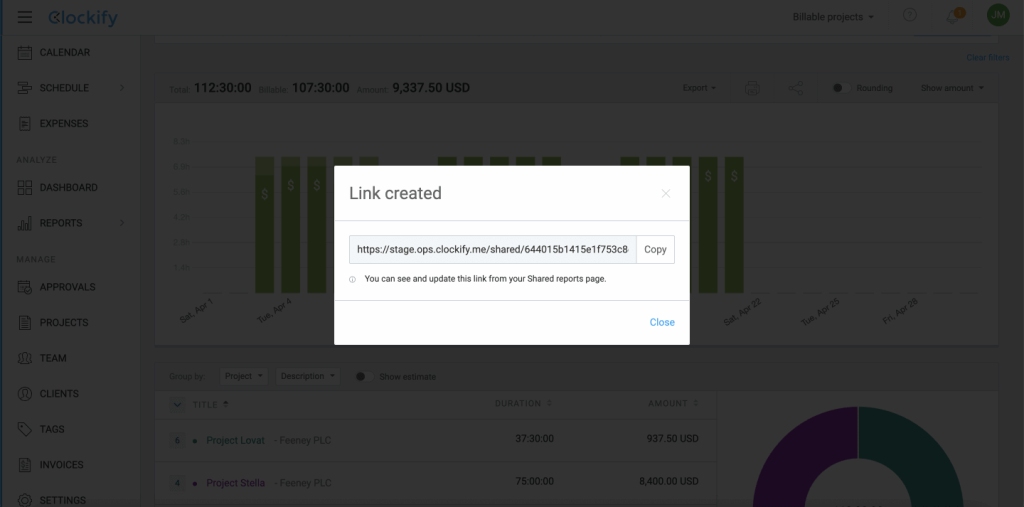
If the report is set as public, you will be able to share reports with clients or anyone outside of your Clockify workspace by sending them the generated public link.
12. Bill clients
Before billing your clients at the end of each billing period (e.g., weekly, bi-weekly, or monthly), you need to make sure that all recorded hours are correct and all the right tasks are marked as billable.
You can use the time audit feature to examine which time entries have suspicious duration, and which ones have no project or task tied to them.
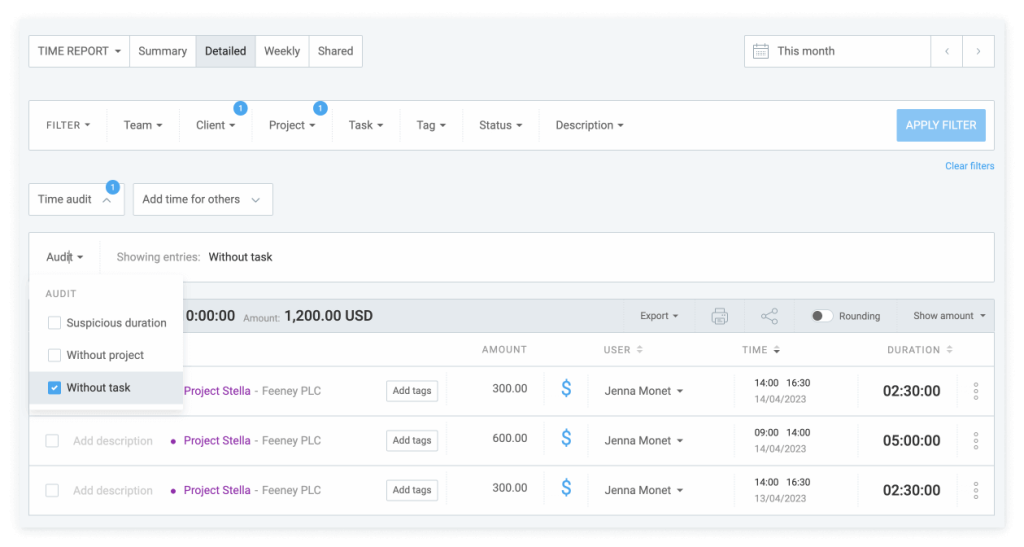
Each time entry can be edited in the Detailed Report by an Admin. Once everything is correct, you can proceed to invoice your client.
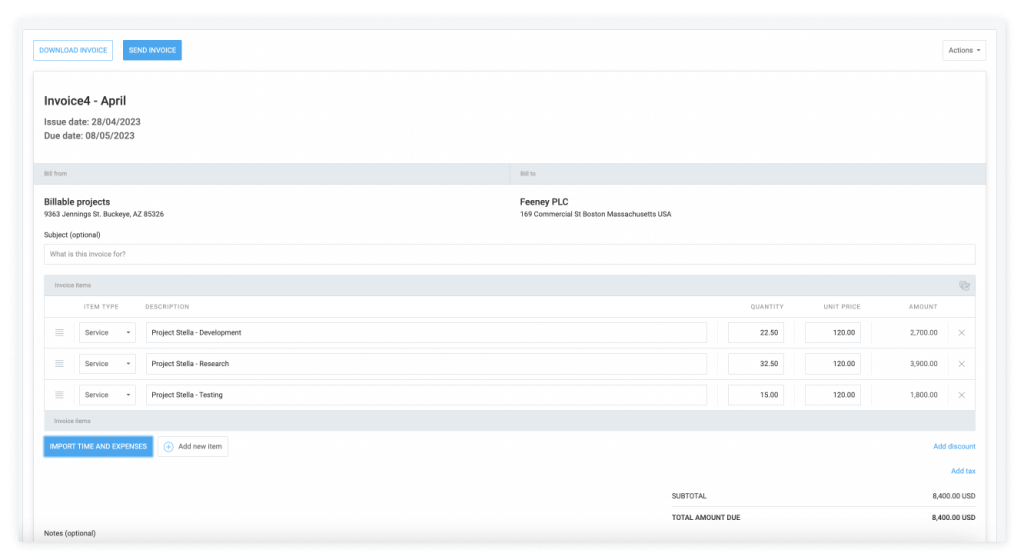
You can customize your invoices with your company branding and include all the details of the work done and the time spent on each task.
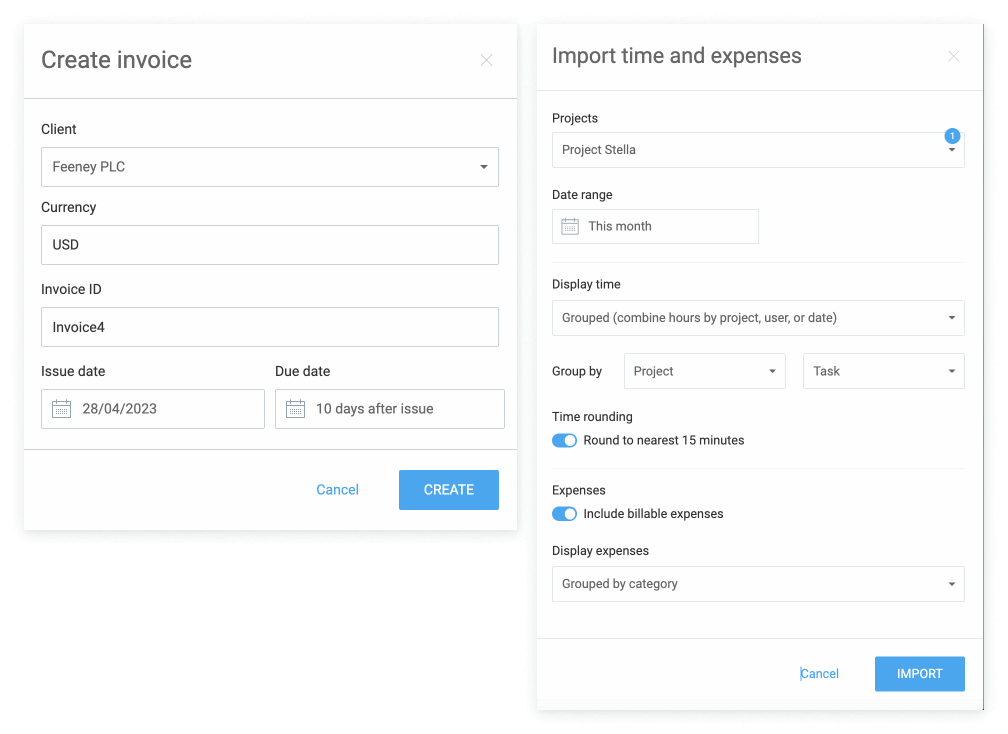
Invoices in Clockify allow you to import billable time and expenses, to count in the taxes or discounts before concluding the invoice.
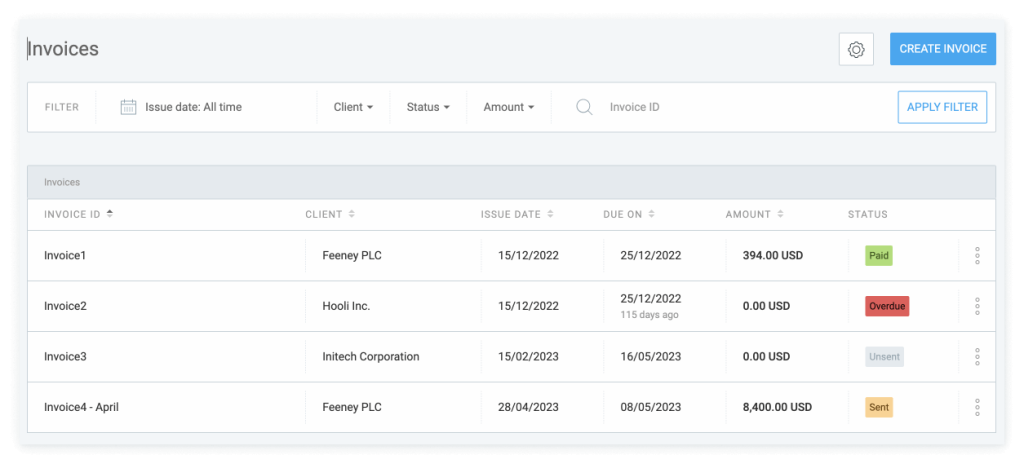
After it’s created and shared with a client, you can track the invoice status in the list.
FAQs
What are the key steps for a software development team to set up a workflow in Clockify by CAKE.com?
Software teams often have a multi-layered process when it comes to early-stage development, starting from defining goals and project scope to finalizing the necessary preparations. Your software team can set up a workflow in Clockify by:
- Defining and creating development projects,
- Adding tasks to the project,
- Setting task estimates and reminders,
- Adding team members and splitting the workload,
- Tracking time on projects and tasks, and
- Generating reports once the project is finished.
Does Clockify integrate with popular software development tools like Jira and GitHub?
Clockify can be integrated with over 100 web applications, including software development tools like Jira and GitHub. Apart from that, you can also integrate Clockify with Wrike, Monday, HubSpot, and many more.
How can I use Clockify to analyze my team’s productivity accurately?
The ultimate goal of Clockify is to accurately track time and boost your productivity. Thanks to its advanced insights, Clockify users can easily identify time wasters and inefficient periods, and even categorize tasks by importance. Track your time, use Clockify’s detailed reports, and export the findings to analyze with your team.
The role of Clockify by CAKE.com in your Software Development team
Overall, Clockify is a valuable tool for software development teams looking to improve their project management and time tracking processes.
Clockify gives your team the ability to:
- Categorize work by projects
- Create custom tasks
- Track billable and non-billable tasks
- Integrate with other tools and track time while using them
- Regularly update clients on progress and demonstrate it visually
- Forecast project completion and plan for future projects
- Bill clients for the services
- Gain insights on productivity to improve the process
By using Clockify by CAKE.com, you can better manage your team’s time and resources and ensure that your projects are completed on time and within budget.
Check out how Keen, a development agency, benefits from Clockify, or jump straight to the pricing to see which plan is the best option for your team.
How we reviewed this post: Our writers & editors monitor the posts and update them when new information becomes available, to keep them fresh and relevant.