Clockify’s free plan offers plenty of features that fit perfectly with your day-to-day workflows.
However, if your business and team are growing, this guide will help you learn more about how to get the most out of Clockify.
Clockify’s extra features: Overview
TRACKING
Targets & Reminders
Clockify lets you set different time-tracking targets for different teams or members.
Example: Your part-time employees might need to track only 4 hours a day, while full-time employees need to track 8 hours a day, and 40 hours a week.
You can send out reminders to team members who haven’t logged enough hours, or who have logged too many hours on a certain day, week, or month.
For each reminder, you choose who will be notified – only those team members, their team managers, or all admins.
Breaks
In the same way you track the time you spend on work, you can also track the time you spend on breaks.
If you’re using a tracker, you just need to switch from tracker mode to break mode and start the clock.
The same goes for when you’re tracking time through a kiosk. Just click a break button, and the timer will start ticking.
And, in the timesheet, you choose the default break project you’ve previously set for tracking breaks and enter the time you spent on a break.
Custom fields & Required fields
If you want to keep track of additional information for time entries or in user profiles, you can create custom time fields and custom user fields.
Custom fields can be in the form of a text, number, link, switch button, or a single or multiple selection list.
Custom time entry fields will be visible in the tracker part, and custom user fields will be visible in the user profile.
You can also choose for which projects a custom time entry field will be visible, and determine its default value.
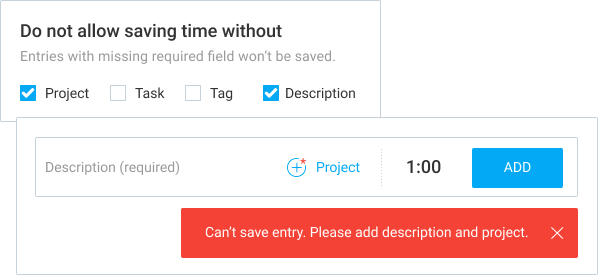
Clockify will prevent users from saving incomplete entries if some of the fields are marked as required (works both for default and custom fields).
Import time
If you’ve been using another way of noting your team’s work hours, and you want to continue where you left off, Clockify gives you the option to import your timesheets (in CSV format).
Kiosk customization & PIN
A kiosk is a way to track time in Clockify. It can be used on any device with an internet connection.
Kiosk customization lets you add your company’s logo and choose how long the kiosk is open when launched.
This is useful when different teams have different shift schedules, so you can set multiple kiosk stations across different locations and customize the length of active sessions.
Personal PIN codes let your team members log in to track their time on a kiosk with their PIN code, which increases overall security and accuracy of time tracking.

QuickBooks integration
Clockify integrates with QuickBooks, so you can send recorded time from Clockify for billing and accounting in QuickBooks.
By connecting Clockify with QuickBooks, you will be able to sync users and customers, and automatically add any missing information (users, or customers/projects).
REPORTING
Estimates & Alerts
Clockify gives you a way to stay on top of project deadlines and budgets by setting up their time and budget estimates.
Time estimates can be set in total for the whole project completion, or you can set it for each task on a project if you want to track the progress in more detail.
Both options can be set to reset every month, so each time a new month starts, dedicated hours to that project or a task will renew.
If your time estimate is set for the whole project, you can choose whether that time will include non-billable hours.
This way you ensure that non-billable activities (e.g. meetings) don’t take away from the overall time you have at your disposal to complete the project.
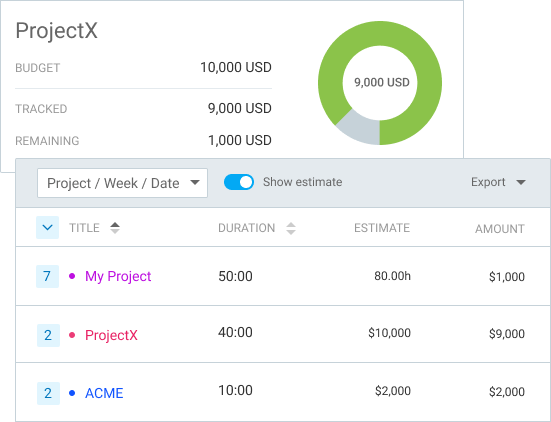
The budget estimate works the same. It can be set for the whole project in total, or as task-based.
It can reset every month – which is great for retainer contracts.
The budget can also include billable expenses if a portion of it is allocated for occasional expenses.
Then, by tracking your billable activities and billable expenses, you will be able to see the current status and remaining budget.
Labor cost & profit
Clockify gives you a way of tracking your total generated revenues and labor costs, so you have an accurate representation of your business’s profitability – at any given time period.
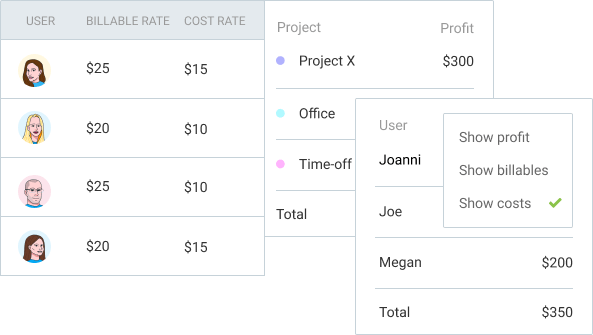
To set the ground for profit analysis, you first need to set up billable rates (for revenues) and cost rates (for costs).
Your profitability can be tracked for the whole organization, per team member, team, project, task, client, or team member on a project.
Depending on how detailed you want your profit analysis to be, you can set more or less specific billable rates and cost rates.
As your team tracks time on their work, Clockify will pick up the rates information and you will be able to see revenues, costs, and profits in Reports, and export them for further analysis.
Team reports
There are two types of Team reports in Clockify: Attendance and Assignment reports.
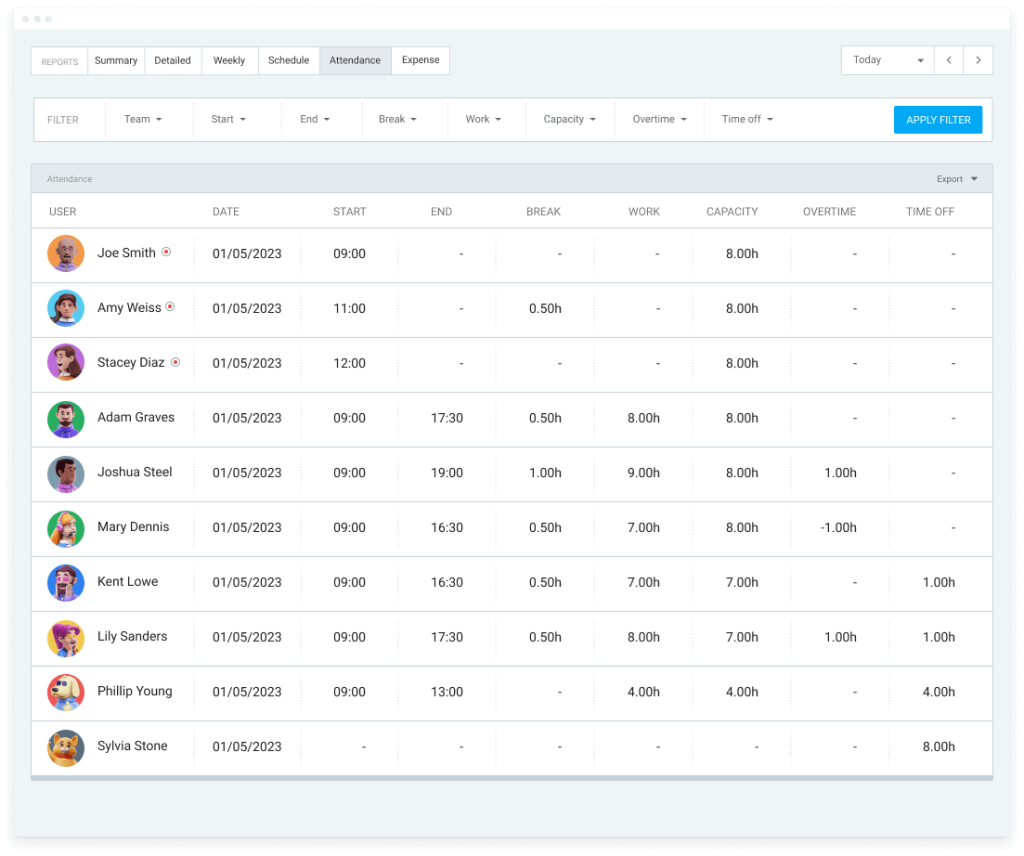
The Attendance report shows you the daily start and end time for each member, allows you to compare the team’s work capacity with the actual hours worked, and see their daily time off.
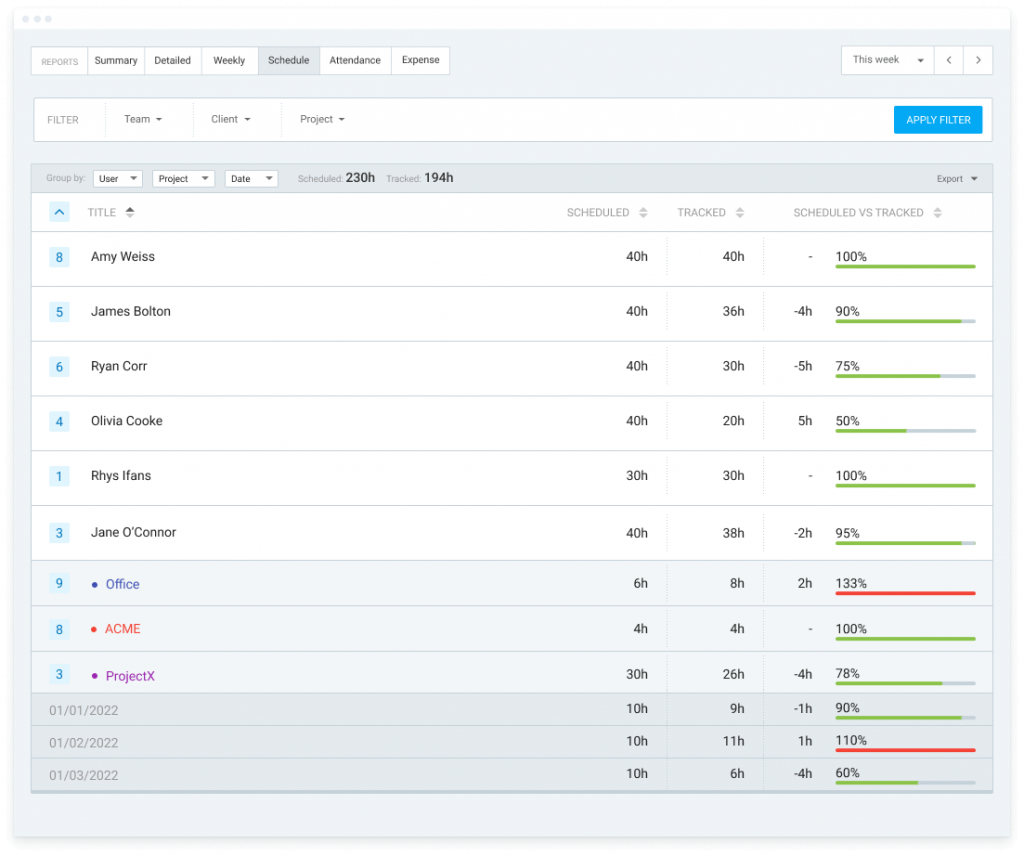
The Assignments report shows you the difference between the scheduled and tracked hours, with a progress bar demonstrating the difference visually.
Both reports give you the option to filter out displayed information in multiple ways, and export reports in a customized view.
Example: Attendance report can show you overtime hours for certain team members only, that are larger than 1h and smaller than 3h, or overtime hours that are exactly 2h long.
Example: Assignments report can show you the progress for multiple projects of one client. Or the comparison between the progress pace of different teams allocated to similar projects.
Expense report
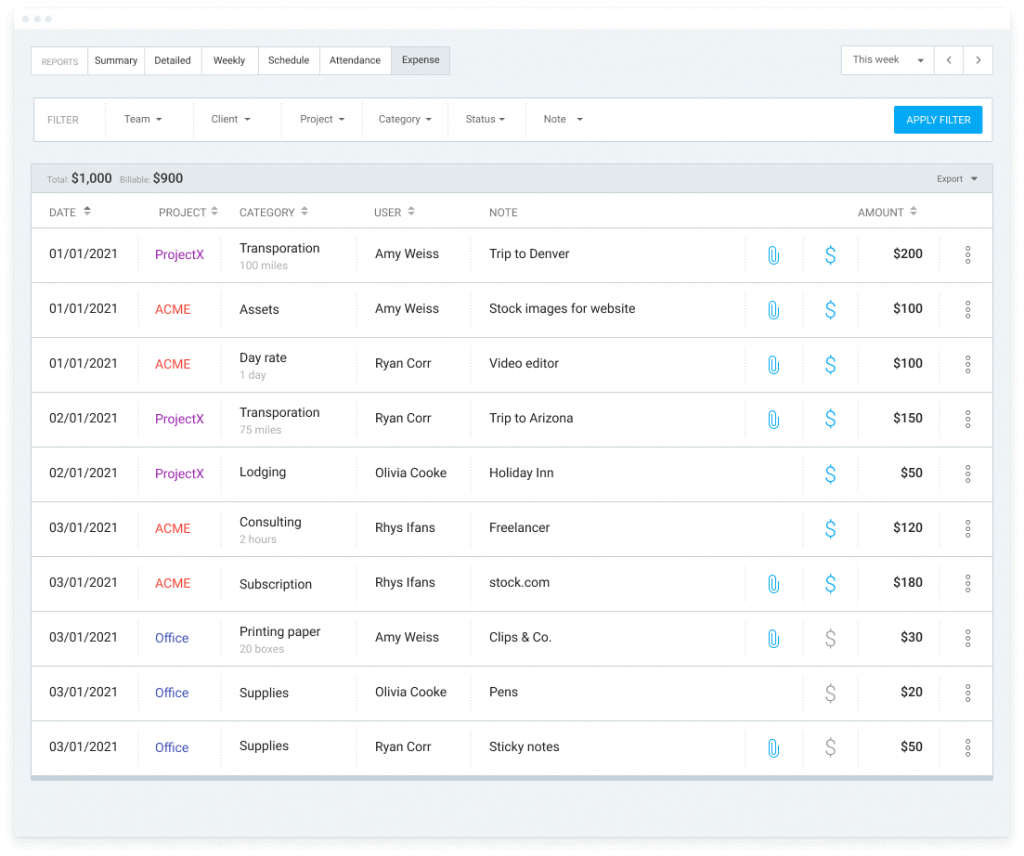
All your expenses will be visible on the Expense report, where you can filter them by team, client, project, category, status, note, or date. This report can also be exported.
GPS tracking
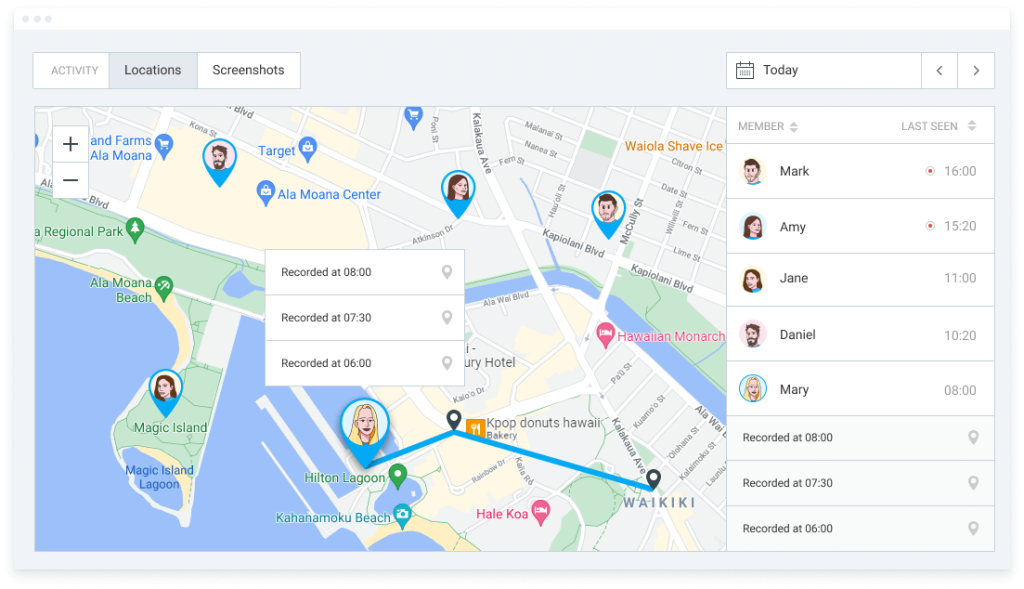
GPS tracking lets you see where your on-field employees currently are (e.g. which client site), and when was the last time they were active.
This is possible only if your team is using the Clockify app on their mobile (iOS, Android).
You can also use the GPS tracking feature to replay the team’s daily routes and check if their transportation routes or allocation on sites could be optimized.
Audit log & Time audit
With a time audit, you can find all entries that are too short/long or are missing information such as a project or a task.

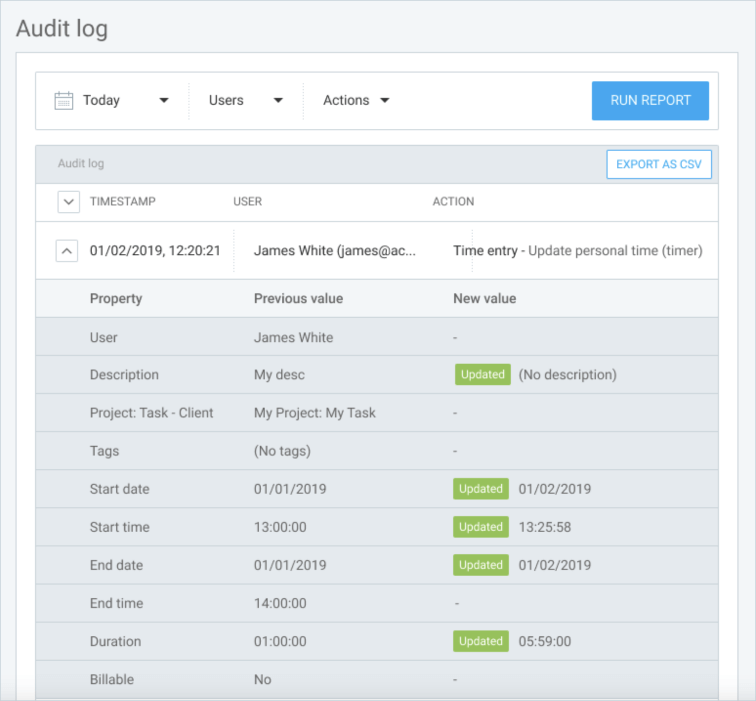
The Audit log shows you all the changes made to a time entry by a certain user on a particular date.
This is useful when you have to provide a justification for afterward changes to an already recorded and approved timesheet.
For example, government agencies like DCAA require you to keep precise records with audit trails for all changes.
You can run audits for a particular date or time period, for a specific user, or for an action that was made (e.g. creation, edits, deletion).
Audit logs older than 1 year are automatically deleted, so you can regularly export your audit log reports as CSV files.
Scheduled reports
Scheduled reports give you a way to receive custom reports every day, week, or month, without repeating the process of filtering and exporting data regularly.
The report will be received via email, and you can choose who will receive it and how often.
Project templates
If your team often works on similar projects, you can organize work much easier with project templates.
When you create your typical project for the first time, save it as a template, so next time you’re adding a new project, you can choose this template as a basis.
The newly created project will inherit its task structure and settings, but you will be able to edit it further.
Forecasting
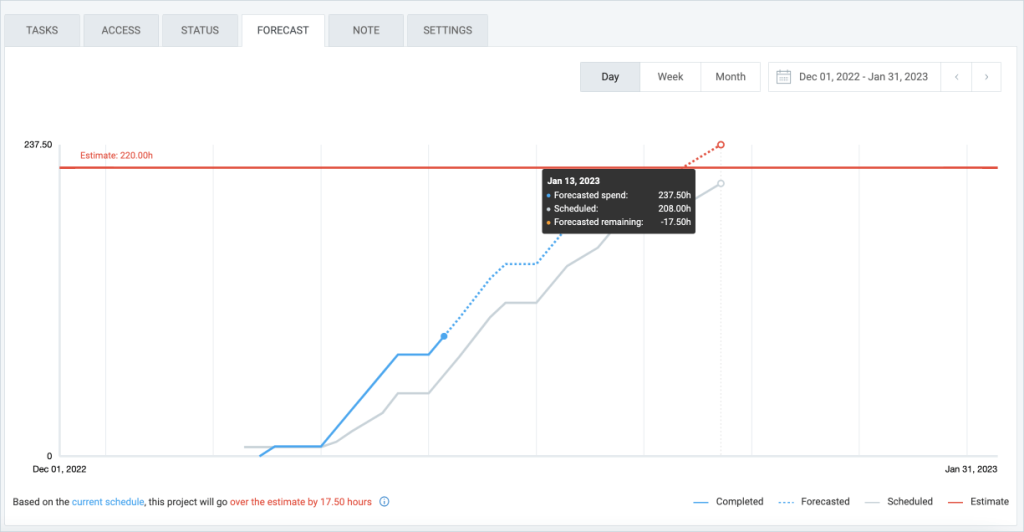
Clockify forecasting gives you a way to track and foresee your progress on a project.
It takes into consideration the estimates, schedules, and tracked time to warn you if and by how much you will exceed the deadline or remain within it.
Based on that, you can then adjust the estimates, or re-schedule your team.
Customize reports & Time rounding
Besides filtering, Clockify gives you the option to customize reports even further every time you export them.
You can choose which columns to display in reports, no matter if it’s in CSV, Excel, or PDF format.
For example, if you’re sharing the report with a client, you might want to exclude the information on employee IDs or any notes a time entry has.
You can also round time entries up, down, or to the nearest value so reports provide a quick and easy overview.
Screenshots
The screenshotting option is available only on Clockify desktop apps (Windows, Mac).
Screenshots are taken only while the timer is running and can’t be taken without the user’s knowledge (if active, all users receive a notification).
Screenshots are taken every 5 minutes and are by default blurred for privacy and security reasons, but they can also be taken in higher resolution.
Decimal format
Activating decimal format will enable you to see, enter, and export time in decimal format.
When you export your data it will be displayed as such, so you get the prepared numbers for further calculations or analysis.
MANAGEMENT
Time off
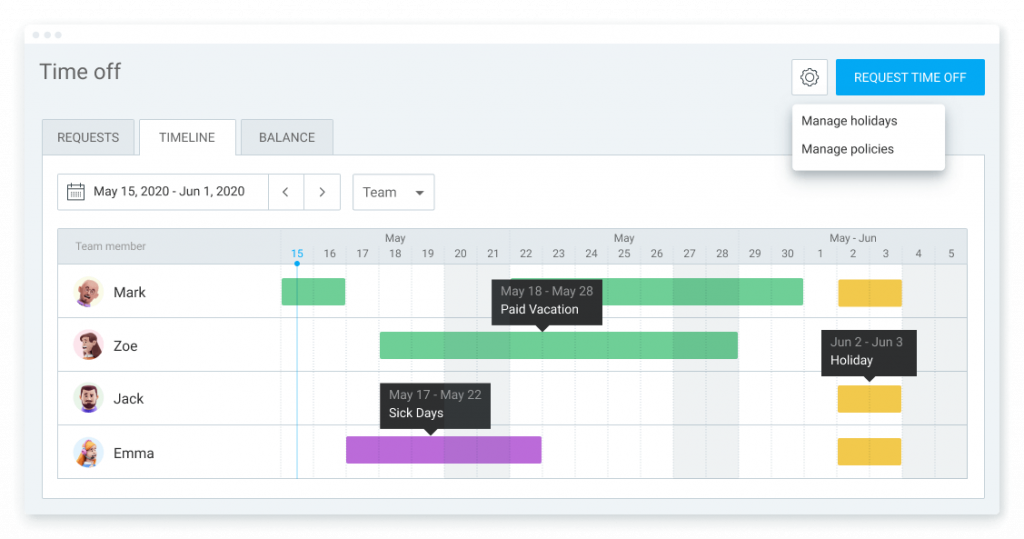
Your team’s time off is managed through Holidays and Policies. The difference is that Holidays don’t require the approval process, unlike Policies which usually do.
Both Holidays and Policies will have a dedicated color to distinguish them easily, and a list of people they apply to.
Holidays can be set to repeat annually on selected dates. And Policies can be customized even further, by choosing if they will:
- be expressed in days or hours,
- require approval,
- have a negative balance so users can request time off even if they don’t have accrued days,
- automatically accrue each year, and
- be possible to request half a day off.
Time off requests can be filtered by status (pending, approved, rejected), team member, and date or time period, and then exported for your internal log.
Request time off with Clockify
The Timeline tab gives you an overview of who is absent, for how long, and based on which time off policy or holiday.
The Balance tab shows how many days team members have used and how many time off days they have left.
You can also manually add or remove time off days from their balance, see their history of time off changes, and export data for your internal logs.
Approval
No matter what type of business you’re in, you’re bound to need some kind of approval, whether it’s for work hours, team time off, or expenses.
Example: If the law requires that recorded work hours should be reviewed by at least two people (e.g. employee and manager), timesheet approval will make sure this is respected.
However your team tracks their time, their work hours will be visible in the Timesheet section.
From there, they can review it and submit the timesheet for manager approval.
Submitted timesheets and expenses will have a “pending approval” label, so you know they’ve already been submitted.
You can review pending requests and reject or approve them one by one, or glance over the main information and approve all timesheets with one click.
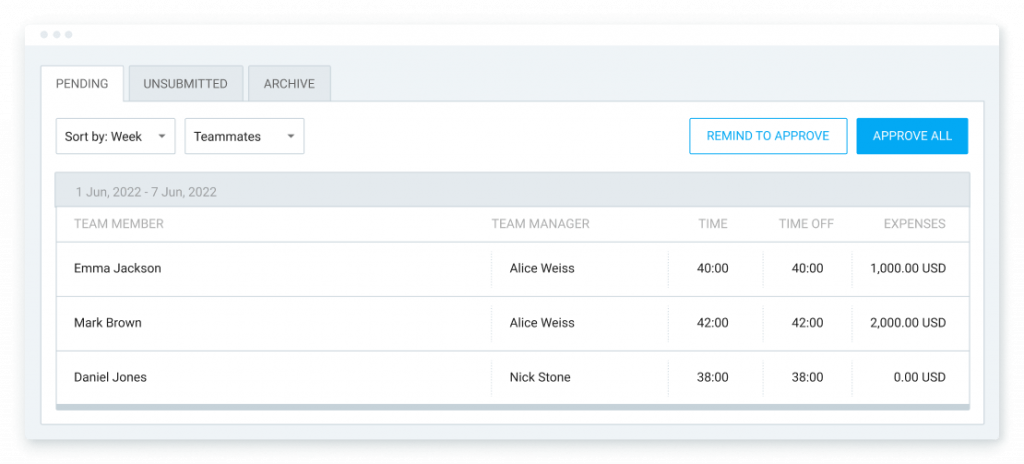
Example: Say you work 40 hours a week and someone submits a timesheet with 37 hours, and you see that the employee took 3 hours off that week, you can instantly know this timesheet can be approved.
Pending requests can show more details and be edited if you just click on them.
You can also remind Team Managers to approve their team’s timesheets and remind all members who haven’t, to submit their timesheets.
All approved or rejected timesheets and expenses will be visible in the Archive tab, where you can filter them by date, team, and status.
Scheduling
In Clockify you can make schedules in two ways:
- by allocating people to projects (Project View)
- by allocating projects to people (Team View)
However you make your schedules, you will see the same information in both views.
In the Project View, you start by adding projects to the list and then allocating people to them.
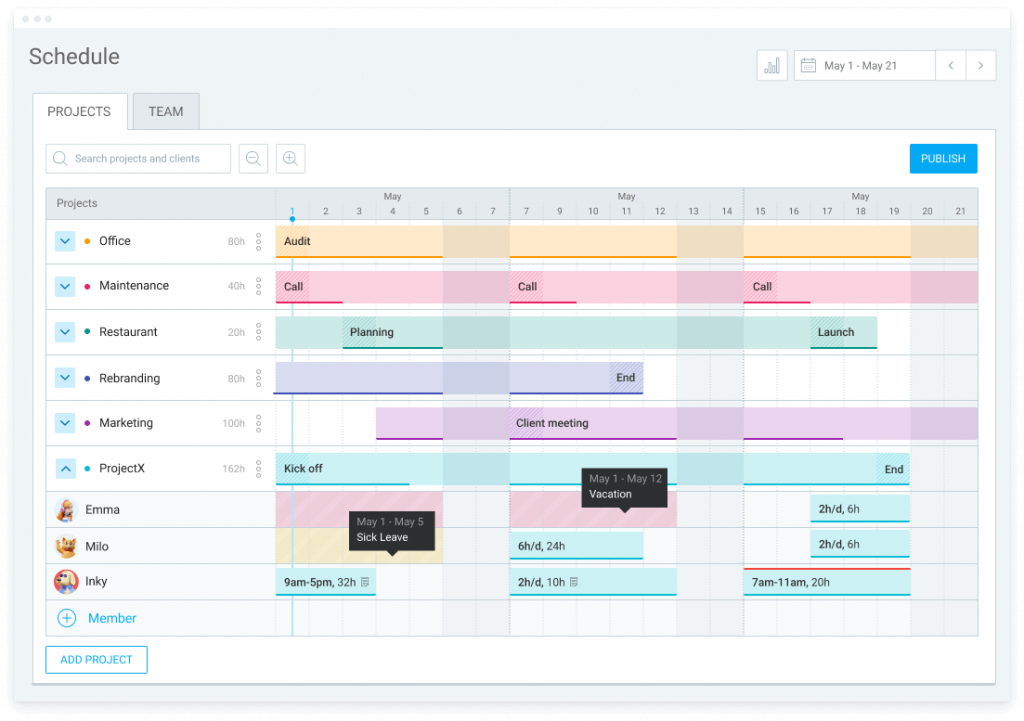
This view is perfect if your starting point is a time estimate or a project deadline, so you know how much time to allocate daily, weekly, or monthly.
Here you can also add milestones to a project timeline and mark any important dates or events.
When creating an assignment, you can set its start time, mark it as billable, repeat the assignment for “x” number of weeks, and add a personal note for more detailed instructions.
Once published, team members will be able to see their assignments in Calendar and start tracking time on them.
Team view lets you make schedules based on the team’s working capacity. Creating an assignment functions the same as in Project View.
If you schedule someone over their capacity, Clockify will warn you so you can edit the schedule or edit their capacity directly there.
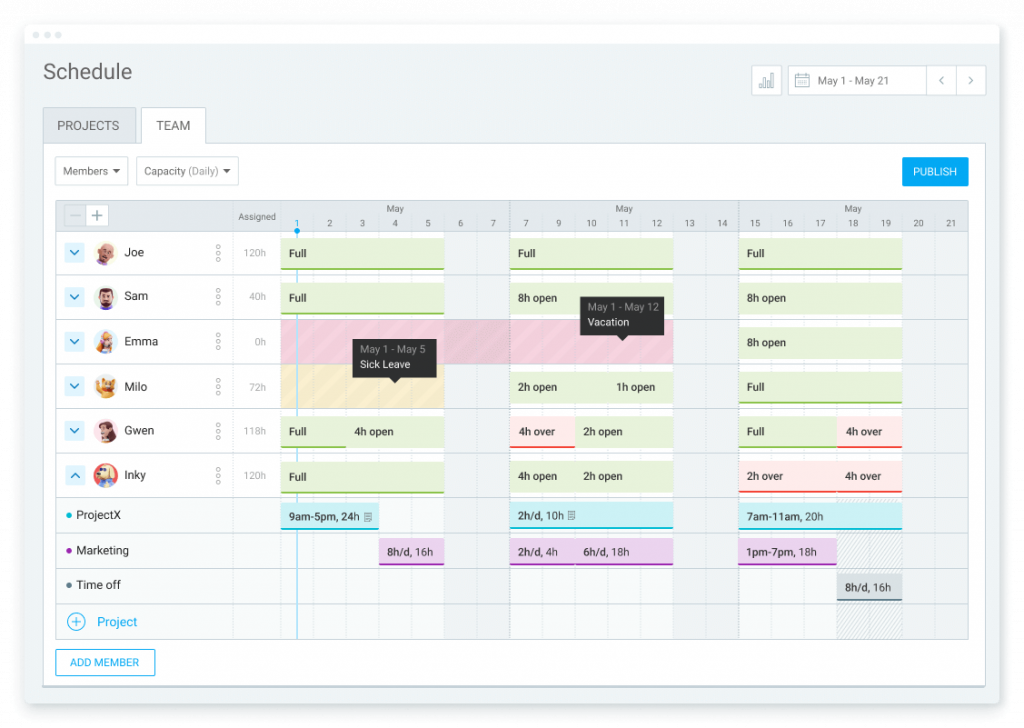
You can still schedule people over their capacity to keep track of overtime hours, and once they track time on the assignment, their overtime hours will appear in the Attendance Report.
Expenses
Whether you’re tracking expenses to bill them to clients, or for your internal recordings, they provide a significant insight into how well you manage your budgets.
Expense categories in Clockify are a way to segment your expenses, and they can represent any frequent expense type that occurs on your day-to-day.
Expenses can be recorded in sum (e.g. Lunch expense), or based on their unit price (e.g. Travel expense with a unit “gas price per mile”).
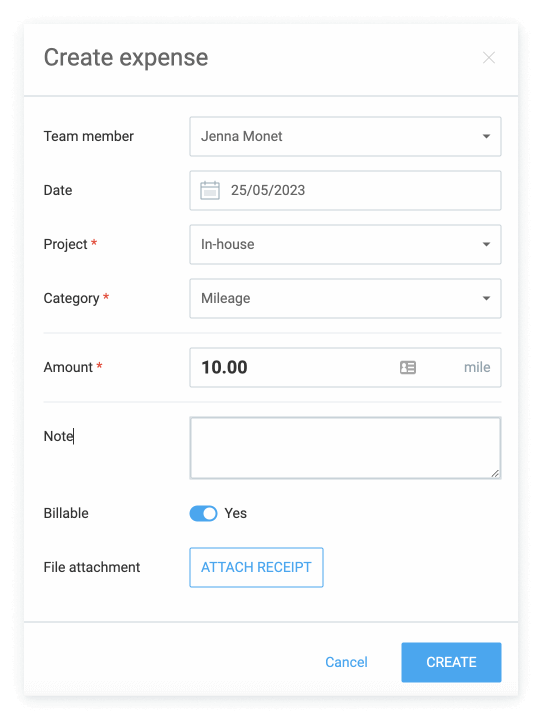
If an expense is billable, it will be included in the budget of a project that’s tied to it.
You can also submit expenses for approval if they need to be reviewed or corrected.
Invoicing
Clockify gives you a way of billing your services and expenses to clients right from the app.
Invoices are created by choosing which clients to bill, and which projects to import the billable hours and expenses from.
You can also change currencies for each invoice, control which fields will be displayed, and change the legal entity you bill from (if you have multiple).
Each invoice can include taxes or discounts you may have for that client or invoice specifically.
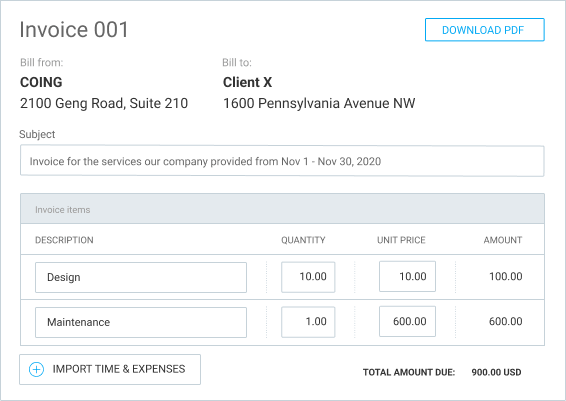
You can customize email templates when sharing an invoice, both when sending it out for the first time and when reminding people.
Once created, you will be able to track invoice status from unsent, sent, paid, partially paid, or overdue.
Partially paid invoices will have a date on which the payment was made and its amount, so you know how much remains to be paid.
Edit profiles & Bulk edit
Bulk editing allows you to edit multiple entries, projects, and users at once.
Example: You can bulk edit daily working capacity for multiple people at the same time. Or add a new task to multiple projects at once.
Lock time & Add for others
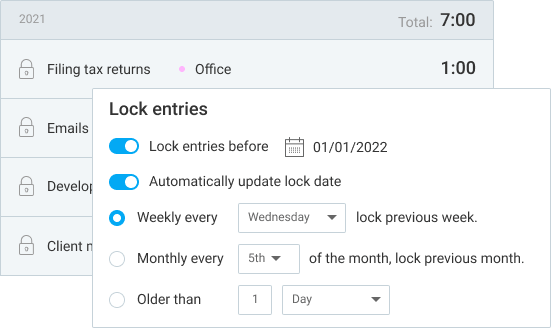
To ensure your time logs and recorded expenses stay accurate, you can use timesheet locking after a certain time period or a specific date.
This will prevent regular users from changing previous entries.
You can lock entries before a specific day in the year, automatically set weekly or monthly locking days, or lock all entries older than “x” number of days, weeks, or months.
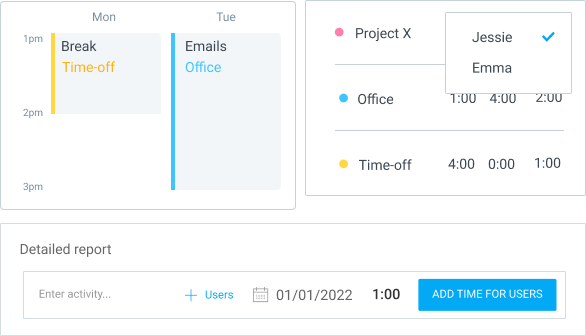
However, as an admin, you can see your team’s timesheets and add time on their behalf, even after the time has been locked.
You can do that in the member’s Timesheet or Calendar, or in the Detailed Report for multiple people at once.
Manager roles
Your processes will be better optimized if you make sure everyone has the right permissions to manage work based on their level of responsibility.
In Clockify there are multiple role levels: Owner, Admin, Project Managers, Team Managers, and Regular Users.
Each role has a different set of permissions, but Manager roles are crucial for optimal project, task, and team management.
Delegating manager roles helps you speed up the approval process (timesheet, expenses, or time off approval), and better your project management (optimal scheduling decisions, budget control, etc.).
Hide time & pages
You can set different access permissions for different users, so some users won’t be able to see other people’s entries or see projects, teams, or reports.
Example: Not all users need access to Reports, as it’s mostly used by Admins and Managers.
Single sign-on
Single sign-on (SSO) is an authentication system that enables users to log in to multiple tools with a single ID and password.
Clockify can connect to your single sign-on system, so your team can still use one way to log in to it. You would just need to add a custom subdomain for your organization.
Clockify supports SAML2 and OAuth2 protocols used by all major identity providers (OneLogin, Okta, Bitium, Azure, Rippling, JumpCloud, Google, Azure, Okta, Facebook, Github, etc.).
Two-factor Authentication
If you’re paying additional attention to security, Clockify gives you an option to enable 2FA for users to type in a code sent to their email address, prior to log-in.
Data regions
Instead of just globally, your data can be stored in different geographic regions, which is often needed for legal compliance with national laws and regulations.
While you’re creating a new account, you can choose from the following regional locations for you to store data in the USA, Australia, Germany, or the UK.
How to test out all the extra features?
If you aren’t sure Clockify’s extra features will be right for your team, you can activate a free trial for 7 days and test out features yourself. No credit card is required.
Be sure to explore all Clockify features in-depth and check out our other guides for more information.
How we reviewed this post: Our writers & editors monitor the posts and update them when new information becomes available, to keep them fresh and relevant.

