
To deliver a successful project, you’ll need to manage it properly. The best way to do this is to use tried-and-tested project management tools and techniques.
In this article, you’ll find out:
- What the best project management techniques are,
- How to use project management tools,
- When to adopt a certain project management technique or tool, and
- The examples of project management tools and techniques.
To learn all that and more, read on.
What are project management techniques?
Project management techniques are specific approaches to applying your skills, your experience, and the right tools to carry out the specific set of operations needed to meet the project’s requirements.
Simply put, the main difference between project management techniques and project management is specificity. In other words, project management techniques are specific approaches, while project management is a wider term that encompasses many different things, like planning, execution, and monitoring projects.
Track project time with Clockify
To explore further, let’s get going with the top 3 project management techniques.
Top 3 project management techniques for project managers
We’ll briefly cover our top 3 picks for project management techniques, including:
- The Classic Project Management Technique,
- Kanban Project Management Methodology, and
- Program Evaluation and Review Technique (PERT).
Try using these project management techniques — also known as project management methods — to improve your knowledge and achieve amazing results in managing your projects.
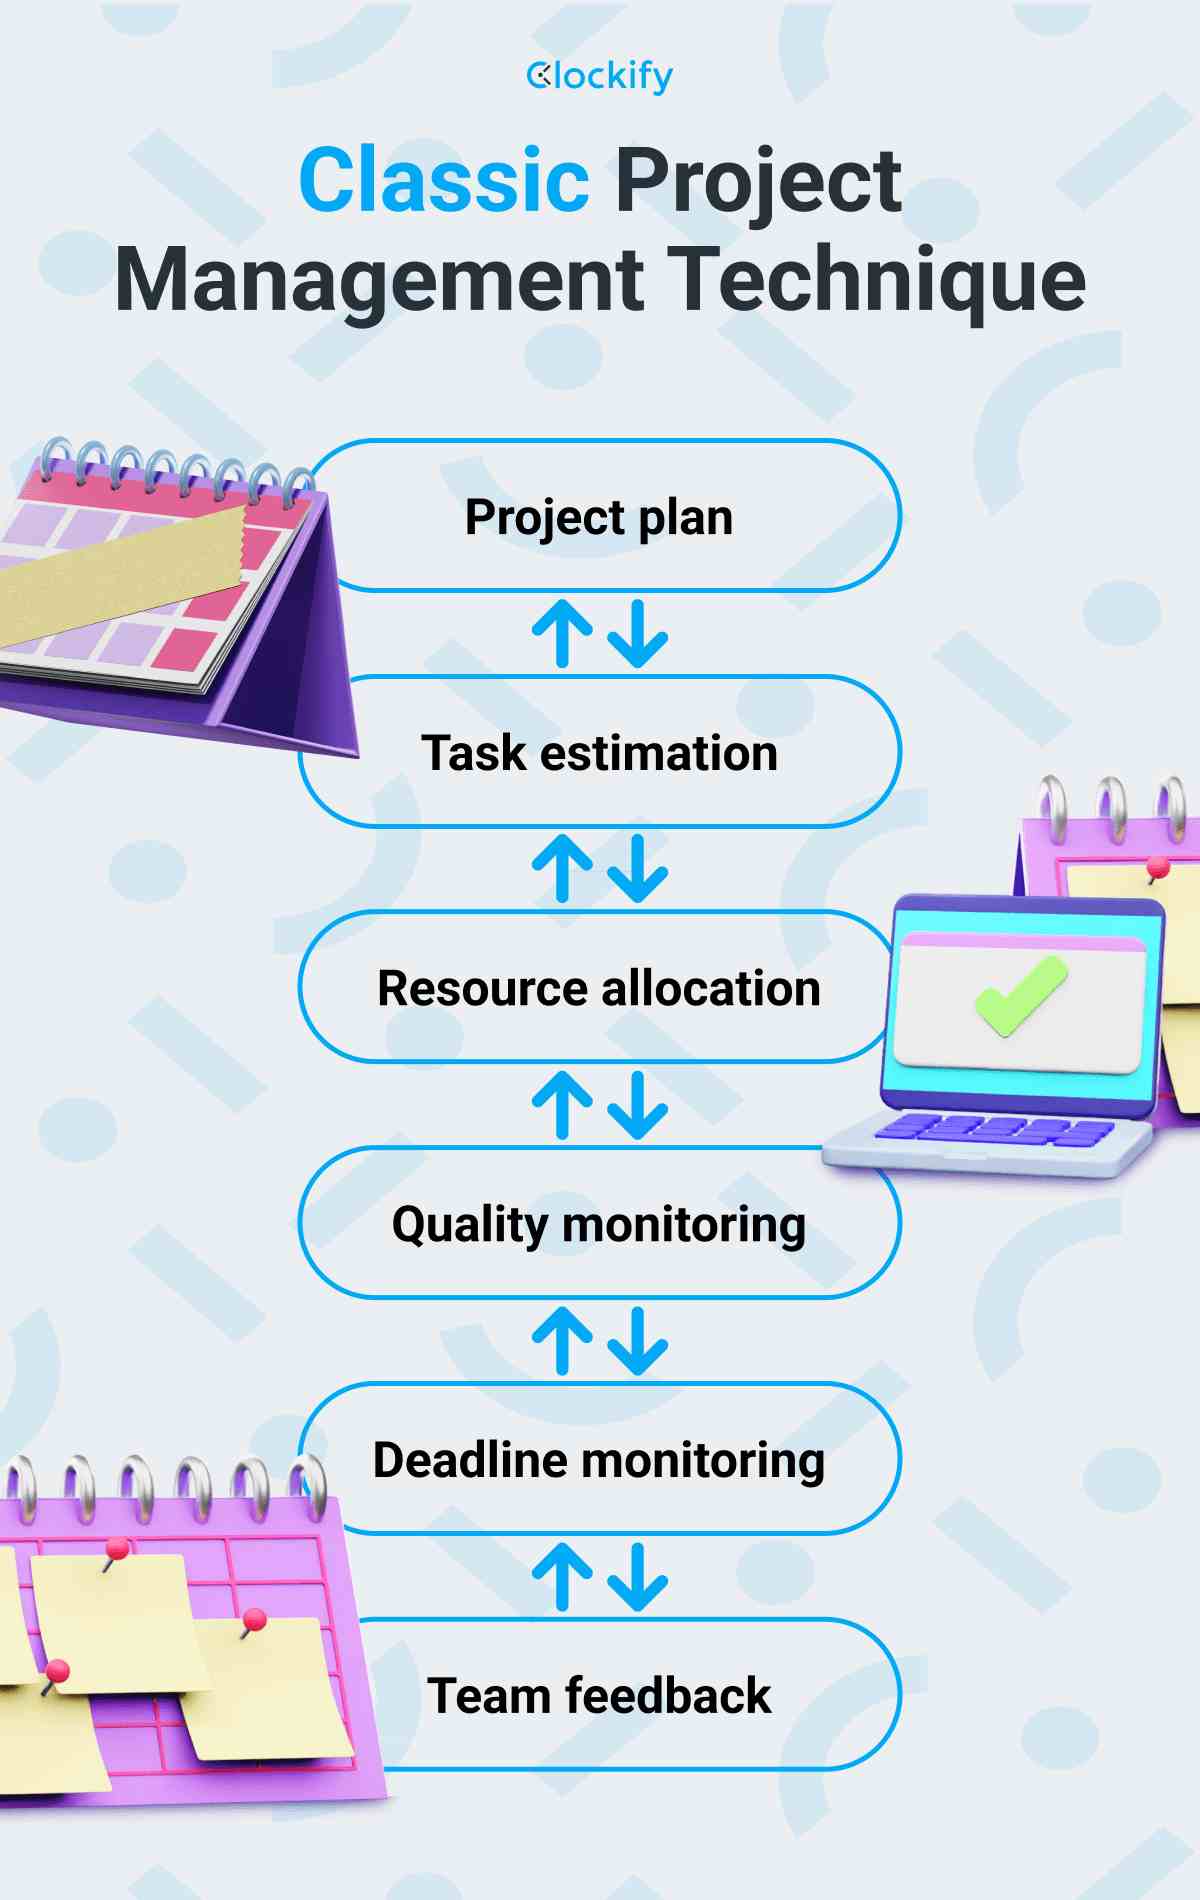
Classic Project Management Technique
The Classic Project Management Technique is one of the simplest, most popular techniques in project management. It includes a detailed plan with all the tasks and activities that should be performed. Things to be done are arranged based on their urgency and dependency.
How to use the Classic Project Management technique?
To apply this project management method successfully, follow these steps:
- Make a plan for your project for the upcoming week,
- Estimate the number and type of tasks you’ll need to work on,
- Allocate the resources effectively,
- Monitor the quality of your team’s work throughout the project,
- Monitor the team’s deadline throughout the project, and
- Provide feedback to the team throughout the project.
What is the Classic Project Management Technique best for?
The Classic Project Management Technique is best for small teams and straightforward projects that don’t require complex workflows.
Visual representation of the Classic Project Management Technique
Below you’ll find a visual representation of the stages that need to be followed in the Classic Project Management Technique, including Project plan, Resource allocation, all the way to Team feedback.
Kanban Project Management Methodology
Kanban is a popular subtype of the agile project management methodology that helps you visualize your project and then track progress on it. One of its main perks is that it facilitates work transparency.
How to use Kanban?
A simple Kanban board consists of 3 distinct columns. You move your tasks across 3 columns to signal the progress and current status of a task:
- “To Do” column — when you first define a task you need to work on in the future, you place it here,
- “Doing” column — when you start working on a task, you place it here,
- “Done” column — when you finish work on a task, you place it in this column, and
- “Backlog” column — if necessary, you can introduce the fourth column. Backlog is the place where your tasks await to be taken over.
Different modern software often delivers Kanban templates to elaborate on this simple framework.
What is the Kanban Project Management Methodology best for?
The Kanban Project Management Methodology is best for:
- Software development projects,
- HR projects that focus on recruiting, interviewing, and hiring new employees, and
- Any type of project with a well-established workflow and deadlines.
Even if you’re new to this project management methodology, you should know it’s easy to set up and use.
Visual representation of Kanban
In the image below, you can see 3 columns in the board we previously mentioned, together with the Backlog column. Backlog is where your tasks are awaiting to be taken over. Finally, you can track the sequence and implementation of tasks from left to right: from Backlog to Done.
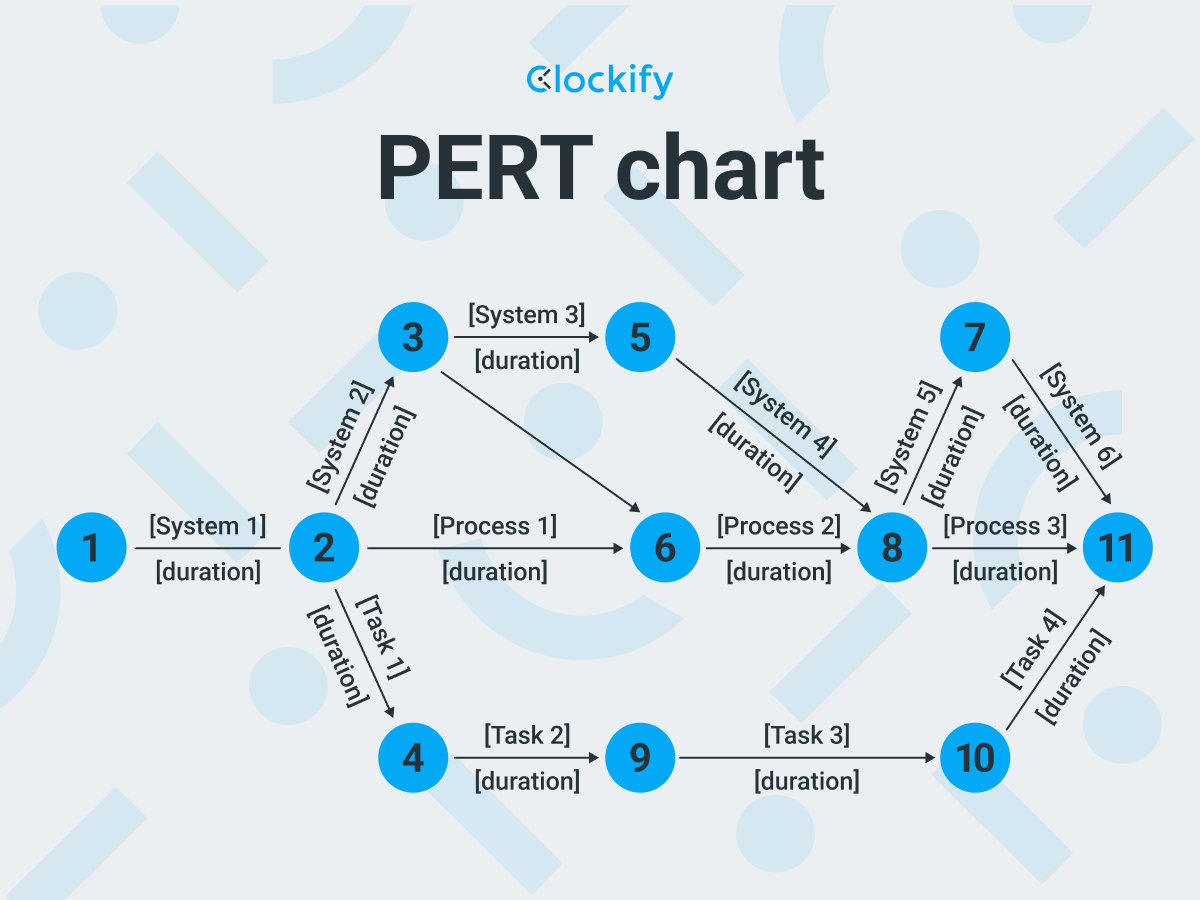
Program Evaluation and Review Technique (PERT)
The Program Evaluation and Review Technique (PERT) in project management entails visual tracking of complex, detailedly planned projects in specialized PERT charts. The emphasis of this technique is on constant task analysis, estimating the time and budget needed to successfully finish a project.
💡 Clockify Pro Tip
Find out the details of estimating time per project with this helpful guide:
How to use the Program Evaluation and Review Technique (PERT)?
To create a PERT chart, follow these steps (you can use software or draw it yourself):
- Make a thorough list of your project’s activities, tasks, or milestones (you need to identify all the tasks that you need to complete to achieve milestones, i.e. deliverables),
- Create a sequence of tasks — which tasks go first — based on their dependencies,
- Make time estimates for your tasks, such as the earliest start and finish date/time, and the amount of time needed to complete each task within a project, and
- Identify your project’s critical path that covers the most important (not all) steps to help you estimate the minimum amount of time required to complete the project.
What is the Program Evaluation and Review Technique (PERT) best for?
The Program Evaluation and Review Technique is best for:
- Complex projects with a large number of non-routine tasks, and
- Large projects with complex requirements.
If you’re new to project management, PERT may not be your best shot at implementing your project due to its complexity.
💡 Clockify Pro Tip
See how the Program Evaluation and Review Technique works in practice, coupled with a free PERT calculator:
Visual representation of the Program Evaluation and Review Technique (PERT)
In this PERT chart, you can see blue circles, i.e. nodes, which represent important milestones or events.
Arrows stand for dependent tasks that need to be completed in that order together with their durations (also shown on the arrows). Lastly, you can see diverging arrows (8-7 and 8-11), representing tasks happening at the same time.
Best project management techniques for simple projects
Moving on from project management strategies for any type of project, we have project management methods for simple projects.
You’ll recognize a simple project based on the following project parameters:
- It is expected to take less than 6 months to complete,
- It only requires part-time effort,
- It involves 10 team members or fewer,
- It is expected to cost less than $75,000,
- It has the expected cost amount readily available from the start,
- It has a single goal,
- It has a straightforward solution, and
- It has a narrow project scope.
💡 Clockify Pro Tip
To learn more about how to determine project and management costs, read our blog post about project cost management:
—
To tackle your simple projects, let’s look at 5 other project management methods.
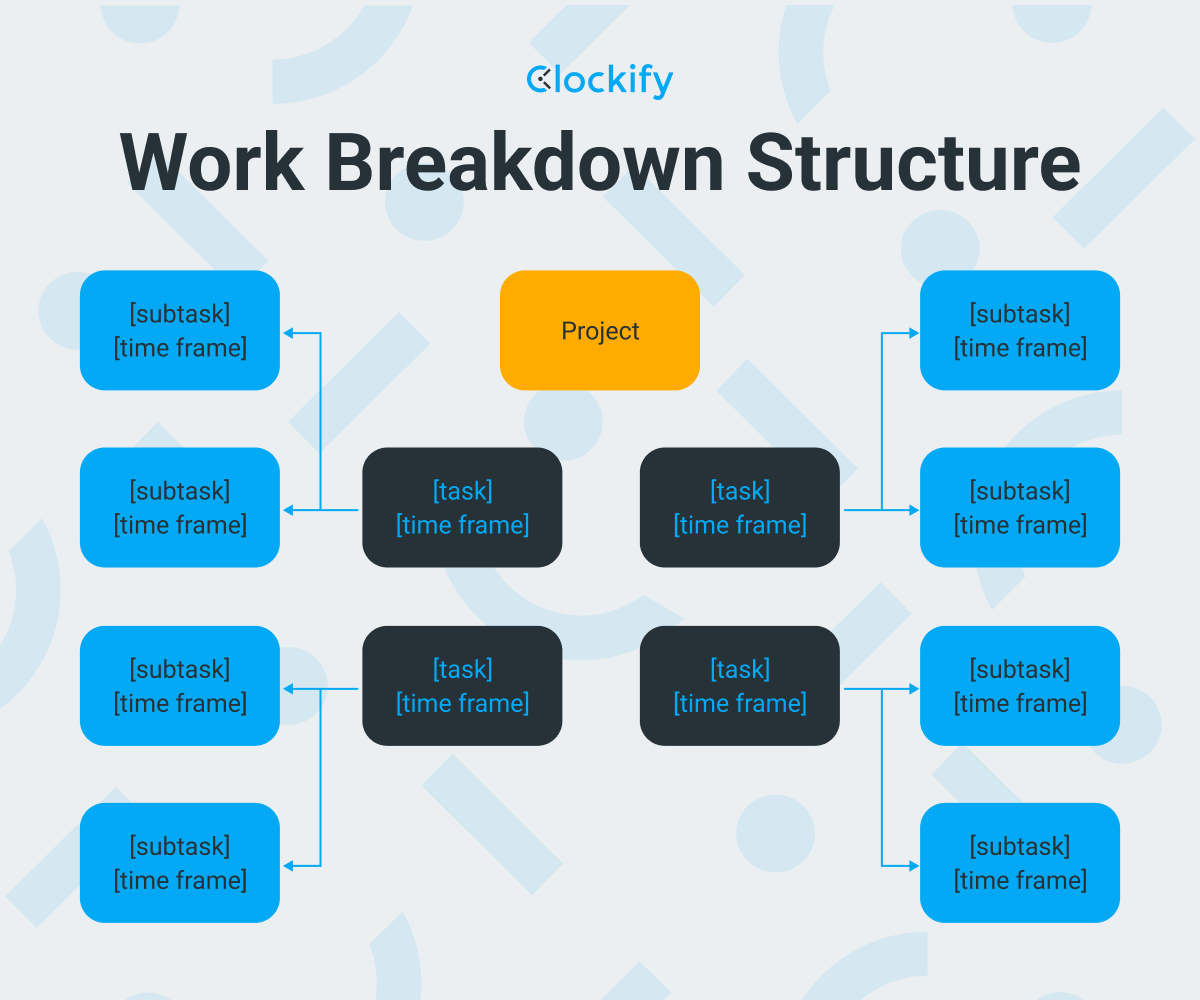
Work Breakdown Structure (WBS)
The Work Breakdown Structure (WBS) requires you to break down your project into its parts — i.e. smaller and more manageable pieces. According to A Guide to the Project Management Body of Knowledge, work decomposition needs to be done “to accomplish the project objectives and create the required deliverables.”
Within the Work Breakdown Structure, you need to properly:
- Identify,
- Estimate,
- Budget, and
- Schedule your work.
How to use the Work Breakdown Structure?
Use WBS to break down complex project tasks into smaller tasks until you can no longer subdivide these tasks. Smaller tasks are easier to work with since it’s easier to estimate the time requirements and the cost to complete them.
When you decompose your project to the lowest levels in WBS, those levels are called work packages. When you identify them, you can easily and safely estimate costs and time for the work together with controlling and managing them efficiently.
Most projects have a similar life cycle. So, you can use standard WBS templates to modify them to fit your projects.
Track project time with Clockify
What is the Work Breakdown Structure best for?
Work Breakdown Structure is best for simple projects that mostly focus on the task dependencies within the scope of the project.
Visual representation of the Work Breakdown Structure
Here, you can see all the tasks and subtasks that make up a project. You can break the project tasks down as far as you need to properly manage them.
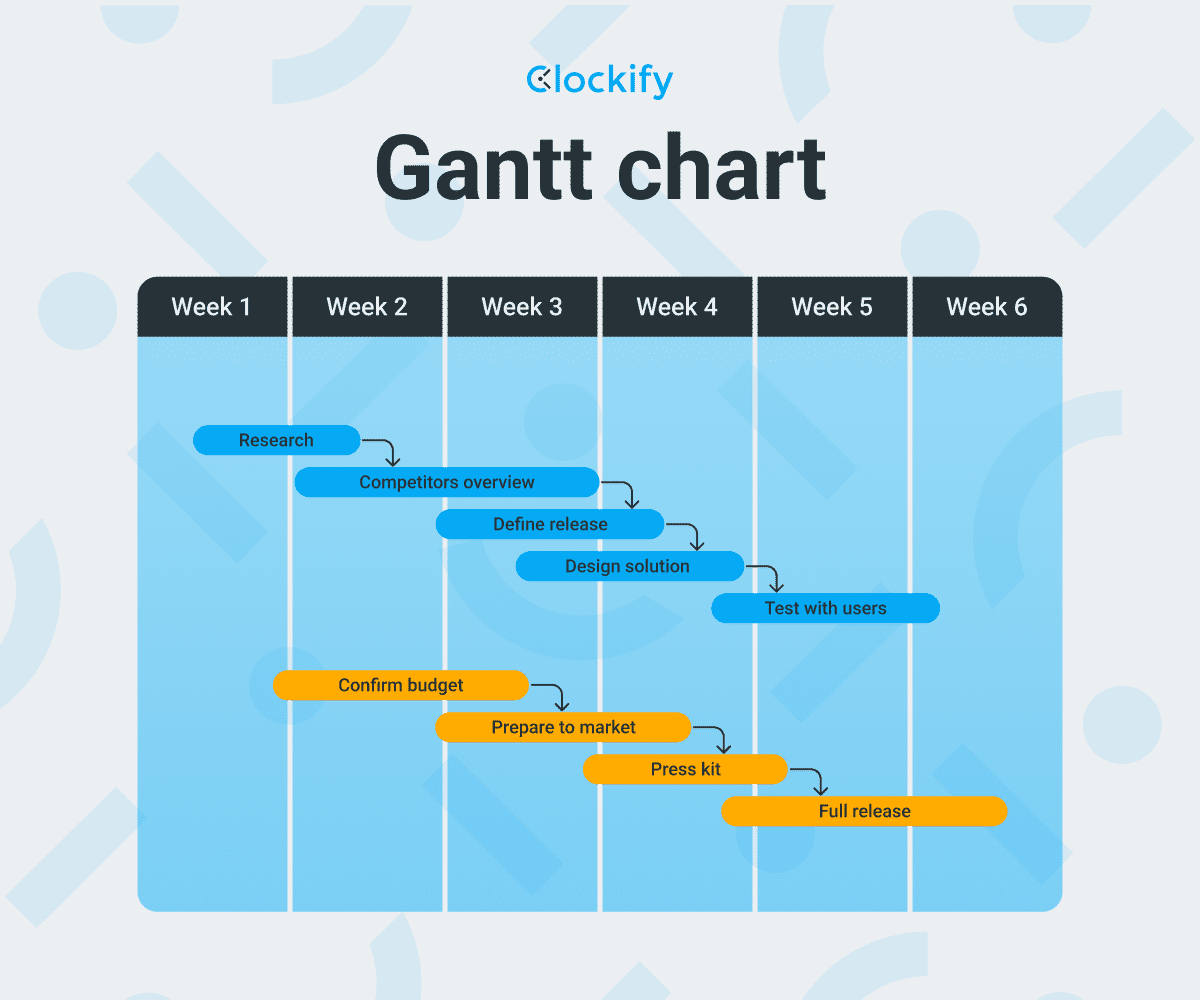
Gantt chart
A Gantt chart is one of the oldest project management techniques. It’s a horizontal bar chart that illustrates a project’s schedule. Each activity in the project is represented by a bar, and its length represents the duration of each task — its start and finish dates.
The position of the bar is also important since it stands for the scheduling of the task. If one task follows another, it means the task is dependent upon the completion of the predecessor task to get started.
You may also see other geometrical signs within the chart, such as a diamond or triangle-shaped symbol that represents an important milestone during a project. The Gantt chart is widely known for its simplicity and low cost.
How to use a Gantt chart?
Gantt charts are most useful for simple projects. You can implement your Gantt chart by:
- Setting up details of your project,
- Adding and scheduling project tasks,
- Inserting important milestones, and
- Establishing task dependencies.
Finally, you need to invite colleagues and assign them to different tasks.
What is a Gantt chart best for?
Gantt charts are best for teams who need project complexity across industries like:
- Software development,
- Design,
- Manufacturing,
- Marketing, and others.
If you’re looking for a scalable project management method, the Gantt chart offers a chance to start small and grow in complexity over time.
Visual representation of a Gantt chart
As you can see below, the bars represent tasks and the duration needed to complete each one. The length of a bar is proportional to the time it takes to complete the task. Below is a representation of 2 sets of different tasks conducted simultaneously:
Project Network Diagrams
Among the most useful project management techniques are Project Network Diagrams, representing graphically what a project looks like. In short, Project Network Diagrams show a string of arrows that connect different boxes, illustrating how project activities interact with each other.
Here are the 2 aspects of Project Network Diagrams to grasp:
- Boxes are called nodes, representing project activities, and
- Arrows describe the relationship between project activities.
Most importantly, Project Network Diagrams must have a starting point and an endpoint.
How to use Project Network Diagrams?
To make the best use of Project Network Diagrams, we recommend using one start point and one endpoint. If you have more than one, the diagram will become confusing.
Next, it’s crucial not to overlap arrows, as this will also cause confusion. Finally, stay consistent with the same nodes and arrows. Also, keep them linear and straightforward and aim to organize them from left to right.
What are Project Network Diagrams best for?
Project Network Diagrams are best for teams who need frequent communication and information sharing.
Visual representation of Project Network Diagrams
In the graph below, you’ll see how Project Network Diagrams appear on a project, including boxes and arrows that represent project activities and the relationship between them. Depending on the scope of the project, each task could take more than one day to complete.

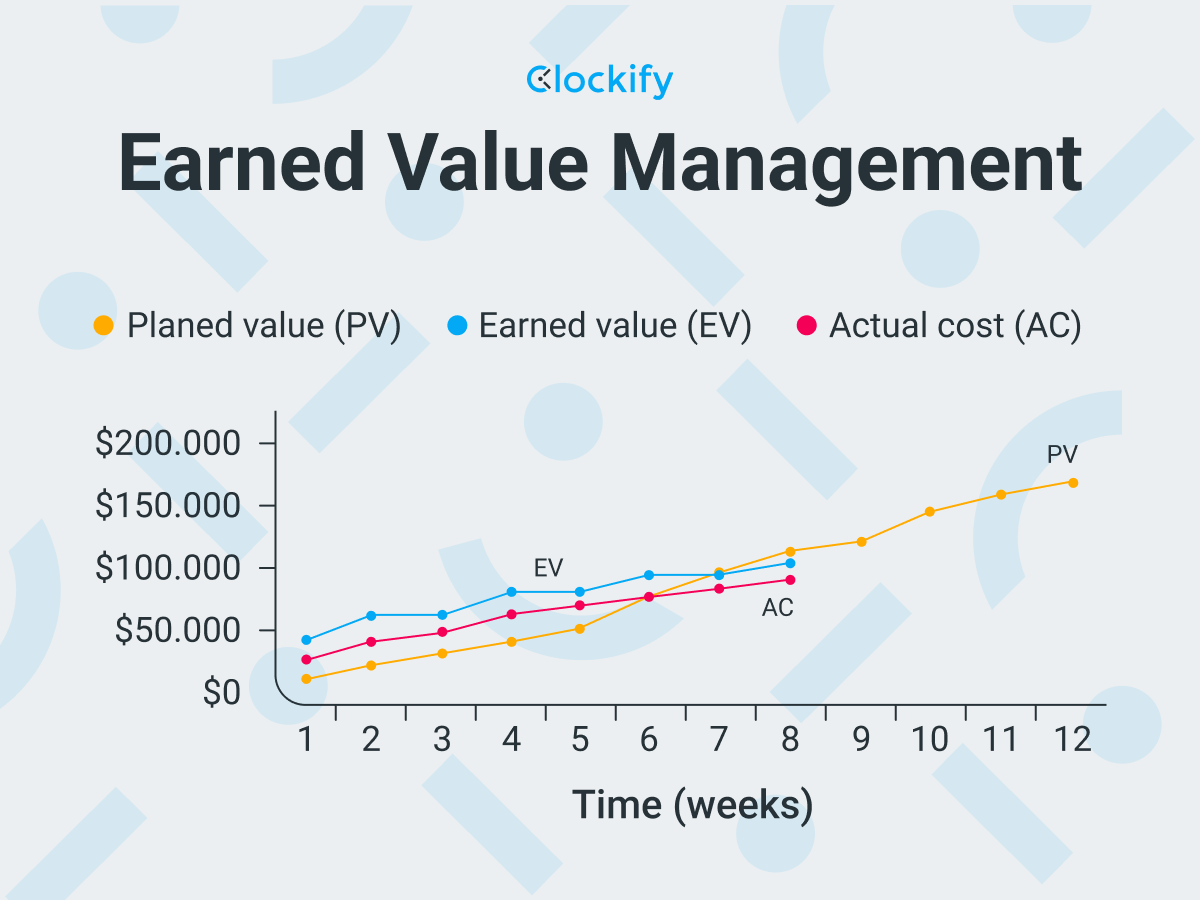
Earned Value Management (EVM)
Earned Value Management is one of the most useful project management strategies, as it neatly integrates:
- Costs,
- Scope, and
- Schedules.
As a result, Earned Value Management helps project managers measure project performance and helps predict future outcomes — also known as project forecasting. For example, a project manager can compare projects against project baselines. In other words, thanks to EVM, project managers can tell if a project is taking longer than expected.
How to use Earned Value Management (EVM)?
As the name suggests, you can calculate the costs of a project by multiplying the completed percentage (of a project) by the amount of the project budget. For example, suppose you are implementing a project that’s just 40% done. If your total project budget amounts to $100,000 — it means that your earned value is $40,000.
What is Earned Value Management best for?
Earned Value Management is best for mid-to-large companies that need to urgently reduce or control project costs.
Visual representation of Earned Value Management
In the graph below, you can compare the planned value, earned value, and actual cost of a project.
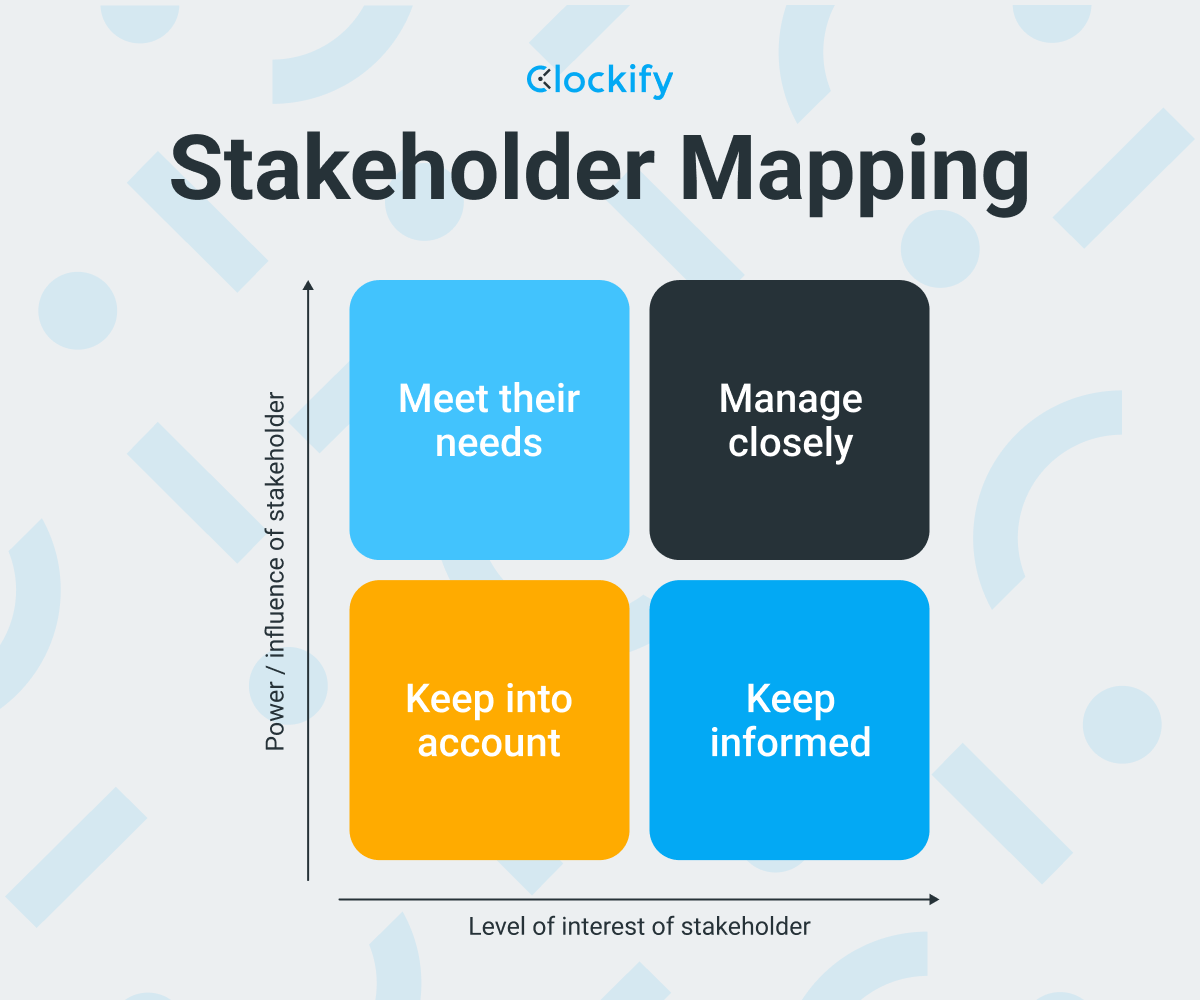
Stakeholder Mapping
Stakeholder Mapping is one of the simplest project management methods, as it allows you to get information on the individuals and companies (also called interested parties) you want support from or want to influence. Stakeholder mapping lays the foundation for dealing with stakeholders who may need to be kept informed, monitored, or satisfied.
Stakeholders may include consumers, customers, or users of a product or service. Yet, they can also entail whole markets, industries, suppliers, or investors. In other words, anyone or anything that can influence your project.
How to use Stakeholder Mapping?
Using Stakeholder Mapping is easy and straightforward. You just have to split a blank document into 4 equally sized squares. Also, consider what you want from your stakeholders or interested parties. For example, whether you want to:
- Keep them satisfied,
- Manage them closely,
- Monitor them, or
- Keep them informed.
Each of your 4 equally sized squares should be titled according to the 4 points above.
Next, simply insert the names of your stakeholders into the appropriate square.
What is Stakeholder Mapping best for?
Stakeholder Mapping is best for companies that want to keep track of their stakeholders’ influence, level of interest, and other information.
Visual representation of Stakeholder Mapping
Below you’ll find a visual representation of Stakeholder Mapping with the required fields, including mentions of Power, Influence, and Level of interest.
Power and Influence (on the Y axis) means the leverage and capacity of the stakeholder to make the project successful or a failure. Level of interest (on the X axis) simply suggests how interested the stakeholder is in impacting the project positively or negatively.
Best project management techniques for complex projects
Next up, we have complex projects and their specific project management techniques.
You’ll recognize a complex project because it is challenging to:
- Anticipate project outcomes,
- Predict project behaviors,
- Standardize the roles in your team,
- Estimate the number of elements in the project,
- Grasp the dependencies between project elements, and
- Anticipate project profitability.
So, let’s explore the best project management techniques to use with complex projects.
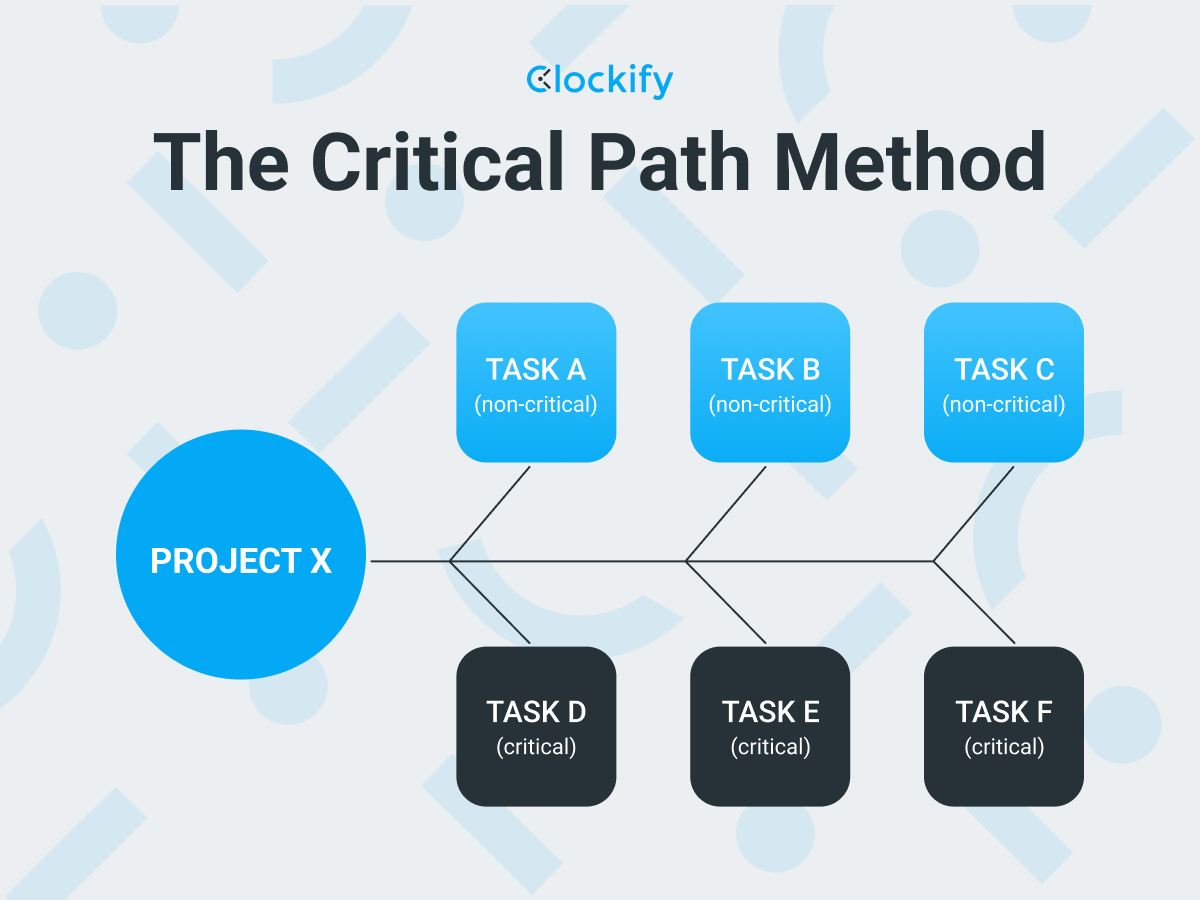
Critical Path Method (CPM)
The Critical Path Method is a scheduling algorithm for identifying critical tasks within the longest sequence of tasks in a project. These tasks are crucial for beating the project deadline and as such demand the team’s sharpest focus.
How to use the Critical Path Method (CPM)?
Here is a step-by-step guide that you need to follow to find your project’s critical path:
- Identify and categorize all project tasks,
- Define the expected duration for each task, and
- Specify the dependencies between tasks.
After that, determine the type of dependencies between tasks in the following sequence:
- Work on Task 1 and Task 2 simultaneously,
- Finish Task 1 before you can start working on Task 2, and
- Finish work on Task 1 to finish work on Task 2.
Last, schedule and work on your tasks in the order dictated by their task dependencies type.
What is the Critical Path Method (CPM) best for?
The Critical Path Method is best for projects with several interdependent tasks and projects with repetitive tasks.
In any case, the Critical Path Method is best suited for projects that have strict deadlines and timelines — e.g. software development or construction projects.
💡 Clockify Pro Tip
Get ready for any construction project with this handy expert guide for contractors:
Visual representation of the Critical Path Method (CPM)
In this visual representation, you can see what needs to be done to complete Project X. Tasks A, B, and C are non-critical, and you can complete the project if you don’t tackle these tasks.
Therefore, these are optional tasks. On the other hand, tasks D, E, and F are considered “critical,” and you must tackle them to complete the project.
Critical Chain Project Management (CCPM)
Critical Chain Project Management (CCPM) is essentially a scheduling algorithm that places great emphasis on:
- Resources needed to carry out the project,
- Dependencies that exist between tasks, and
- Buffers you need to account for to complete the project on time.
The purpose of this project management method is to help you manage your resources better, minimize the time you lose on various aspects of the project, and distribute your workload evenly.
You can use 4 types of buffers associated with CCPM:
- Project buffer is the one that makes sure the project is completed before its expected end date,
- Feeding buffer is the one that is positioned between the last task on a non-critical chain and the last task on a critical chain,
- Resource buffer is the one that makes sure the right resources are available to carry out the project processes throughout the project development, and
- Capacity buffer is the one that ensures additional resources are available in the case of unexpected issues with the budget.
💡 Clockify Pro Tip
Learn why it’s critical to understand managing capacity for projects and companies in our ultimate guide:
How to use the Critical Chain Project Management (CCPM)?
Take the following tips into consideration when creating a critical chain project process:
- Identify the most important tasks which will later become your critical path,
- Bear in mind to allocate resources accordingly (time, budget, people),
- Make sure your team functions as a well-oiled machine and focus their attention on individual tasks,
- Assign one task at a time to prevent multitasking (CCPM and multitasking don’t go hand in hand),
- Reduce the time estimates for project completion in half as this way, you can overcome procrastination within your team and avoid time wastage, and
- Create a project model with time estimates, a list of resources, buffers, and finish dates.
What is the Critical Chain Project Management (CCPM) technique best for?
The Critical Chain Project Management technique is best for:
- Companies where each team works on one project only, without any overlaps in resources, and
- Teams who have trouble keeping up with deadlines.
Finally, complex projects with limited resources can benefit the most from this project management method.
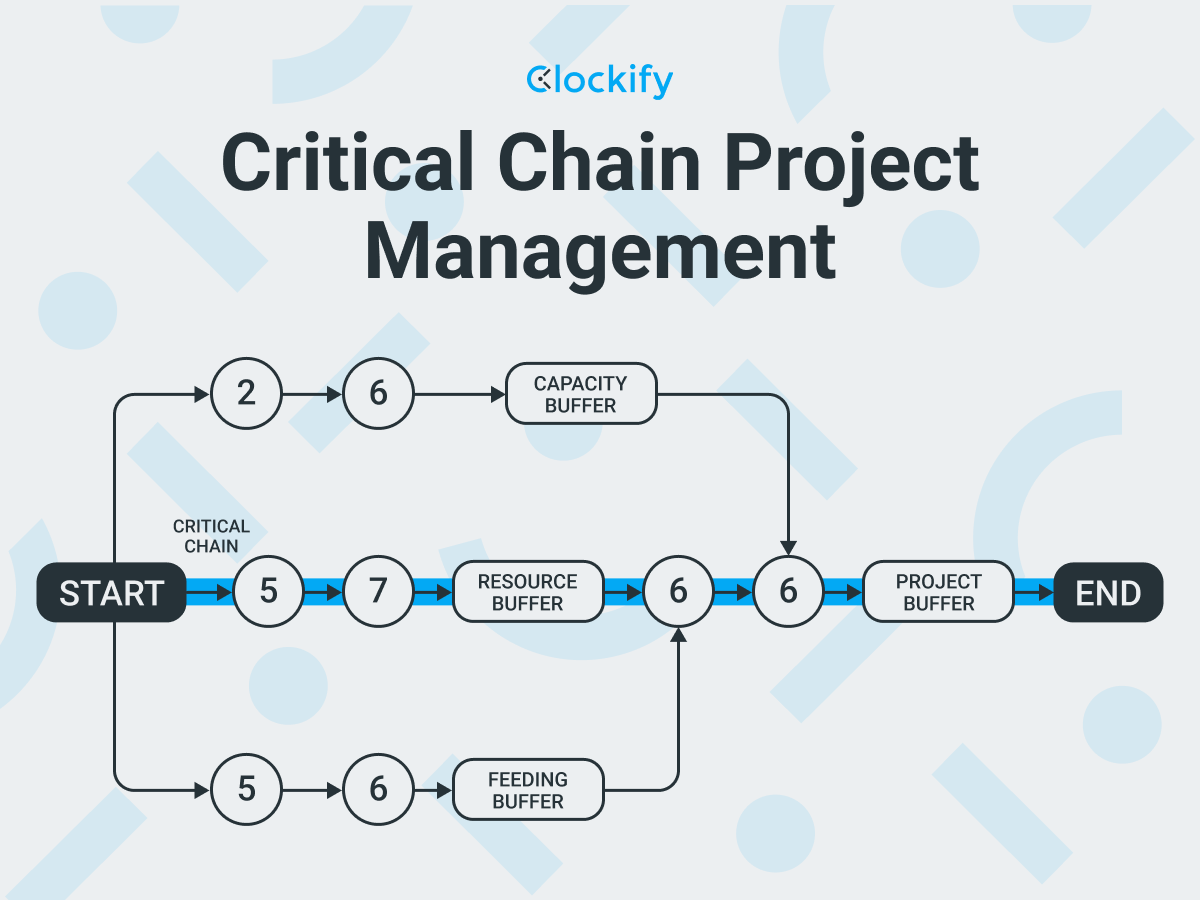
Visual representation of the Critical Chain Project Management (CCPM) technique
The CCPM technique proposes adding buffers as a type of airbag that can be used in unexpected situations.
As you can see from the picture below, each task (marked as circles in the diagram) is given a buffer that protects the project’s deadlines or any other change during a project.
Extreme Project Management (XPM)
Extreme Project Management (XPM), as its name suggests, is a project management technique made for complex and fluctuating projects that frequently change and require an extreme approach.
This technique focuses on the human side of the project — it makes use of the known principles of how people interact with each other to properly tackle and arrange collaboration.
How to use Extreme Project Management (XPM)?
In his book Extreme Project Management, Doug DeCarlo differentiates between 4 phases of Extreme Project Management:
- INitiate — in this phase, you gather your team, brainstorm, think about possible approaches, and build a strong relationship within the team. Remember that in XPM, you don’t define your project goal at the beginning but along the way. It’s not something that you can plan. Since the goal is flexible, so are the time estimates and cost of the project.
- SPeculate — this is the time for deep thinking and prioritization of deliverables. “I wonder if this would work?” is a question that you’ll be asking yourself in this phase.
- Incubate — even though you now have a list of prioritized deliverables in this phase, they aren’t fixed. In this phase, you are still going to explore and make corrections together with the client. This may result in new ideas and goal clarification. In this phase, you need to distribute work across your team.
- REview — the last phase of the XPM, where team members should attend a meeting and talk about achievements in the Incubate phase. They discuss the things they learned, revise the goal, whether the project meets client expectations, and whether it should be continued or not.
What is Extreme Project Management (XPM) best for?
The Extreme Project Management technique is best for:
- Projects with a low possibility for failure,
- Projects with short deadlines,
- Projects that aim for innovation,
- Projects with factors that are difficult to control, and
- Projects characterized by sudden, spontaneous changes.
You can unmistakably use this project management method for complex projects in most industries.
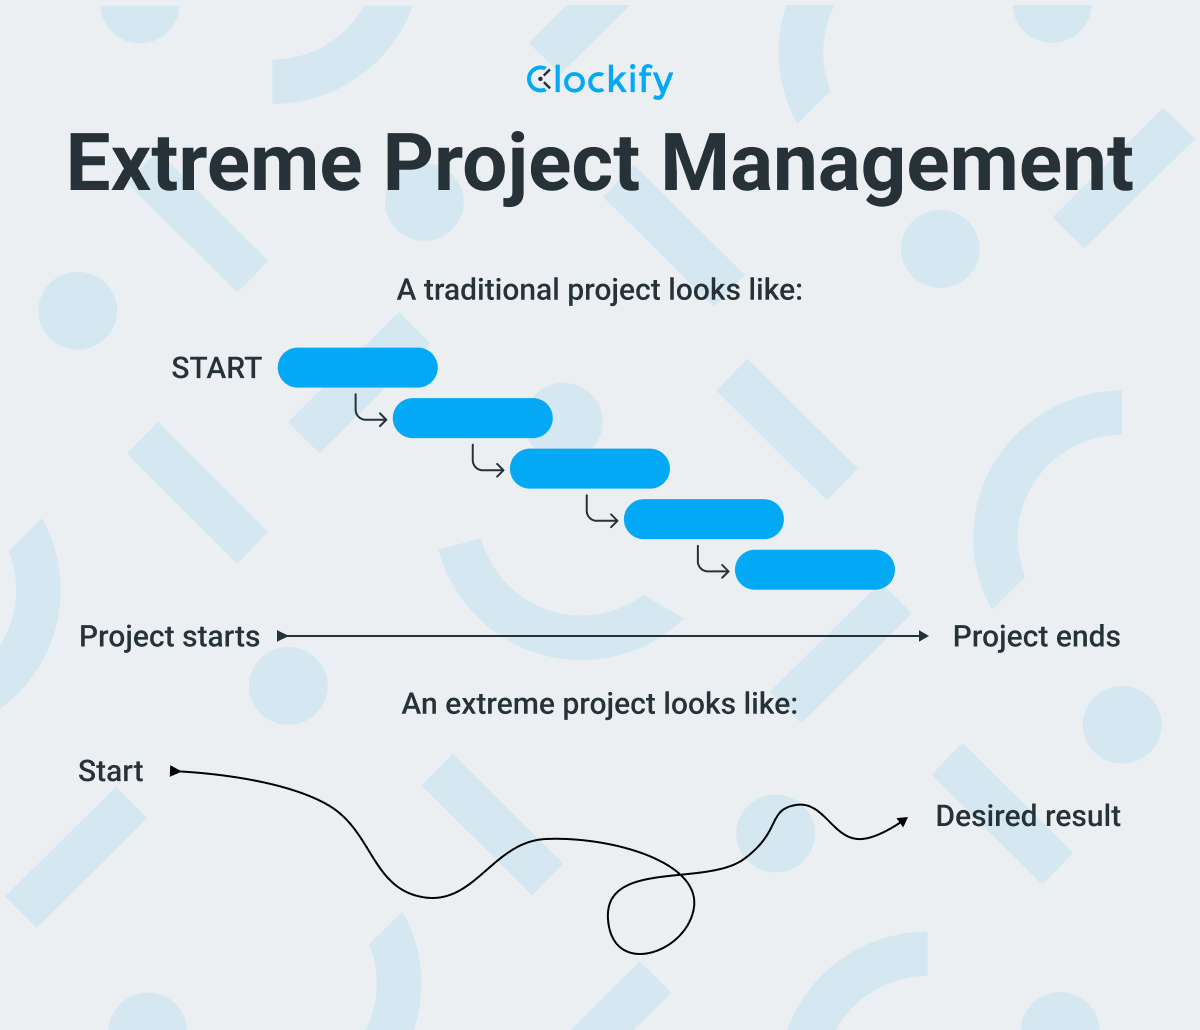
Visual representation of Extreme Project Management (XPM)
From this visual representation, you can get a better insight into XPM’s flexibility and freedom when it comes to making decisions about the approach, cost, timeframe, and scope. To fit the changing needs of a project, XPM can alter the budget, the final outcome, the overall plan, and more.
We suggest not to adapt the project to a fixed set of rules and approaches, but rather adapt the rules and approaches to the project itself until you achieve the desired result.
Projects IN Controlled Environments (PRINCE2)
Projects IN Controlled Environments (PRINCE2) is a structured project management technique that provides a framework to help divide the project into stages. It’s a project management method that consists of 7 principles, 7 themes, and 7 phases each project needs to go through.
PRINCE2 principles represent underlying rules that every project needs to stick to:
- Continued Business Justification — the business case is regularly updated to make sure that the project is still usable.
- Learning from experience — each project has a lesson log you can reference to avoid remaking already established workflows from scratch.
- Defining roles and responsibilities — team members may have several roles in a project, or share their roles with other team members. Roles are structured into 4 different levels:
- The corporate management/program management level,
- The project board level,
- The project manager level, and
- The team level.
- Managing by stages — you manage each stage of project development differently, by updating the business case, risks, and project plan.
- Managing by exception — when a specific project element (such as the project scope or project costs) changes, the question of how to continue moves to a higher level of management.
- Product focus — focus is placed on the quality and delivery of the developing product.
- Tailoring to suit the project environment — this technique is meant to fit the project environment, i.e. the size, complexity, risk estimation, and overall importance of the developing project.
How to use PRINCE2?
If you want to manage a project using PRINCE2, you need to be aware of the 7 phases each project needs to go through, including:
- Starting up a project — appointing the project manager, together with other stakeholders, preparing the business case, choosing an approach, and assembling the project brief.
- Directing a project — reviewing the project brief, confirming the approach with the rest of the stakeholders, and thinking about the risk and resource requirements.
- Initiating a project — the project manager assembles the Project Initiation Document, listing who needs to take on responsibility, why these individuals have to do it, where the project takes place, how will the project team implement the project, and when is it going to happen.
- Controlling a stage — the project manager gives authorization for any activity to be commenced or continued; the project manager also breaks down the project into smaller chunks — work packages — to avoid chaos. Each work package must go through control after completion or change.
- Managing product delivery — ensuring that all stakeholders agree on what is to be produced, its cost, and timescales — together with meeting the quality criteria. Later, they can approve them or demand changes.
- Managing a stage boundary — reviewing and approving each stage to be able to move forward. The project board must be informed of the strategic points of the project, and they are the ones who make a final decision on whether to stop or continue to the next stage.
- Closing a project — the final stage of managing a project where acceptance of the product is being confirmed and whether objectives are achieved.
What is PRINCE2 best for?
PRINCE2 is best for complex projects that have a fixed set of requirements and a complex environment.
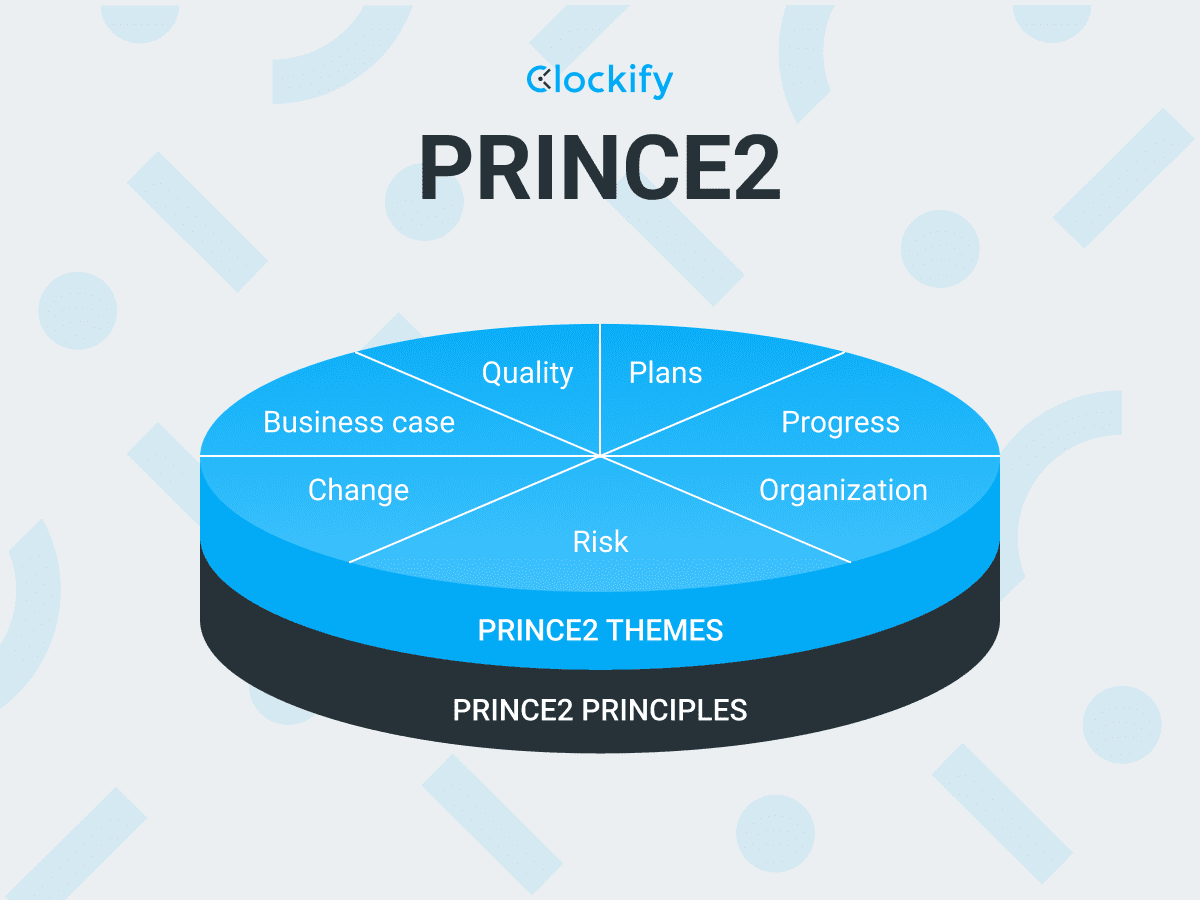
Visual representation of PRINCE2
From the visual representation below, you can see that PRINCE2 is built on its principles, i.e. guides and rules that you need to follow to successfully carry out a project. Then, PRINCE2 themes show you how to manage the project, i.e. how to put principles into practice.
Best project management techniques for software engineering
A typical software engineering project involves:
- Gathering requirements,
- Developing and testing the software, and
- Performing regular maintenance on the software product.
So, let’s examine the best project management techniques to use with software engineering projects.
Rational Unified Process (RUP)
The Rational Unified Process (RUP) is an agile management structure for software development teams that makes a project unfold over time in 4 distinct phases:
- Inception,
- Elaboration,
- Construction, and
- Transition.
Each of the 4 stages has a main objective and involves 6 development disciplines:
- Business Modeling,
- Requirements,
- Analysis and Design,
- Implementation,
- Testing, and
- Deployment.
Unless you successfully reach the main objective of the previous stage, you won’t be able to move on to the next stage.
How to use Rational Unified Process (RUP)?
To use the RUP technique efficiently, the software project must go through 4 phases of development:
- Inception is where you must create a business case that includes a project plan with its description, risk management assessments, business environment, and success factors. The inception stage is also the first milestone in the project. In case the project fails to pass this stage, it can be canceled or redesigned.
- Elaboration is when you should consider the project’s technical risks, i.e. whether you are able to build a workable system. This is the second milestone in the process, and it’s critical because it holds high risks, and it’s hard to induce changes later on.
- Construction is where major components and features are developed together with coding and testing. This stage results in user manuals and a beta version of the system that needs to be evaluated. If the product fails the testing, the next stage needs to be postponed.
- Transition is when the product is released successfully, and this is the last milestone in this process.
What is Rational Unified Process (RUP) best for?
Rational Unified Process is best for software development projects with a predictable time frame for completion and a predictable end budget.
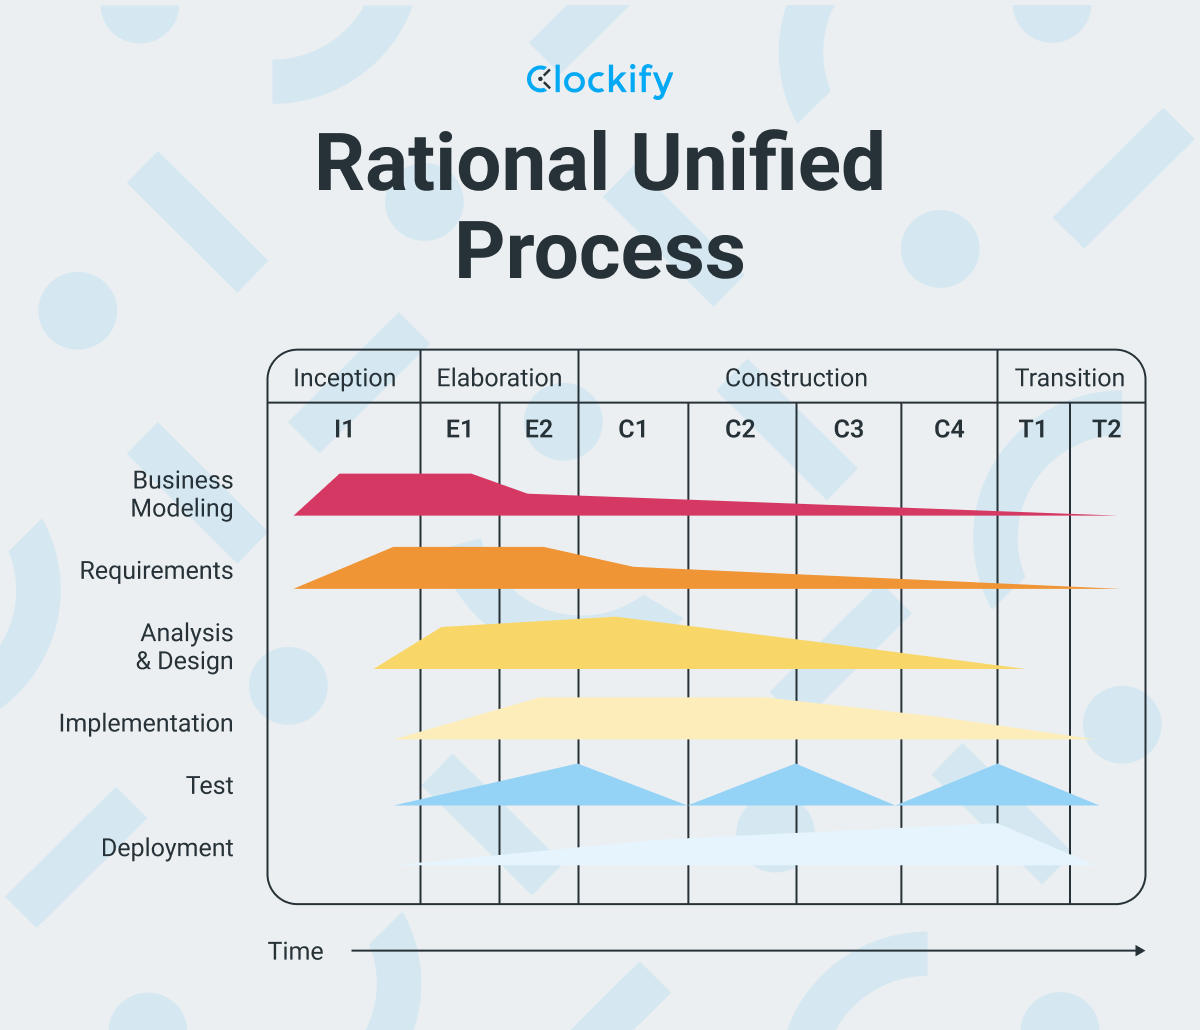
Visual representation of Rational Unified Process (RUP)
In the graph below, you can see all 4 phases of the project development in RUP. You can also notice that some phases (Elaboration, Construction, and Transition) have more iterations that focus on producing technical deliverables to achieve each phase goal.
Agile Project Management
Agile Project Management is a project management method for software development that emphasizes self-organization and cross-functionality in a team — as well as customer satisfaction.
Track your projects with Clockify
How to use Agile Management?
You need to follow several principles to successfully use Agile Project Management:
- Instead of implementing specific processes and tools, this technique emphasizes interactions between individuals in a team,
- Instead of compiling comprehensive documentation for the product, this technique emphasizes creating fully-working software,
- Instead of focusing on contract negotiations, this technique emphasizes utilizing client collaboration to facilitate the development procedure, and
- Instead of following a strict project plan, this technique emphasizes the best ways the team can respond to changes in the project.
For better understanding, follow the steps:
- Divide projects into short sprints,
- Adapt your project plans as you work and aim for constant improvement,
- Encourage the team to be self-organized, and
- Produce maximum value and functionality from the service/product.
What is Agile Project Management best for?
Agile Project Management is best for:
- Projects without strict deadlines but with a general idea of the final outcome/product,
- Projects that imply unexpected changes, and
- Projects that depend on efficient team collaboration rather than efficient project planning.
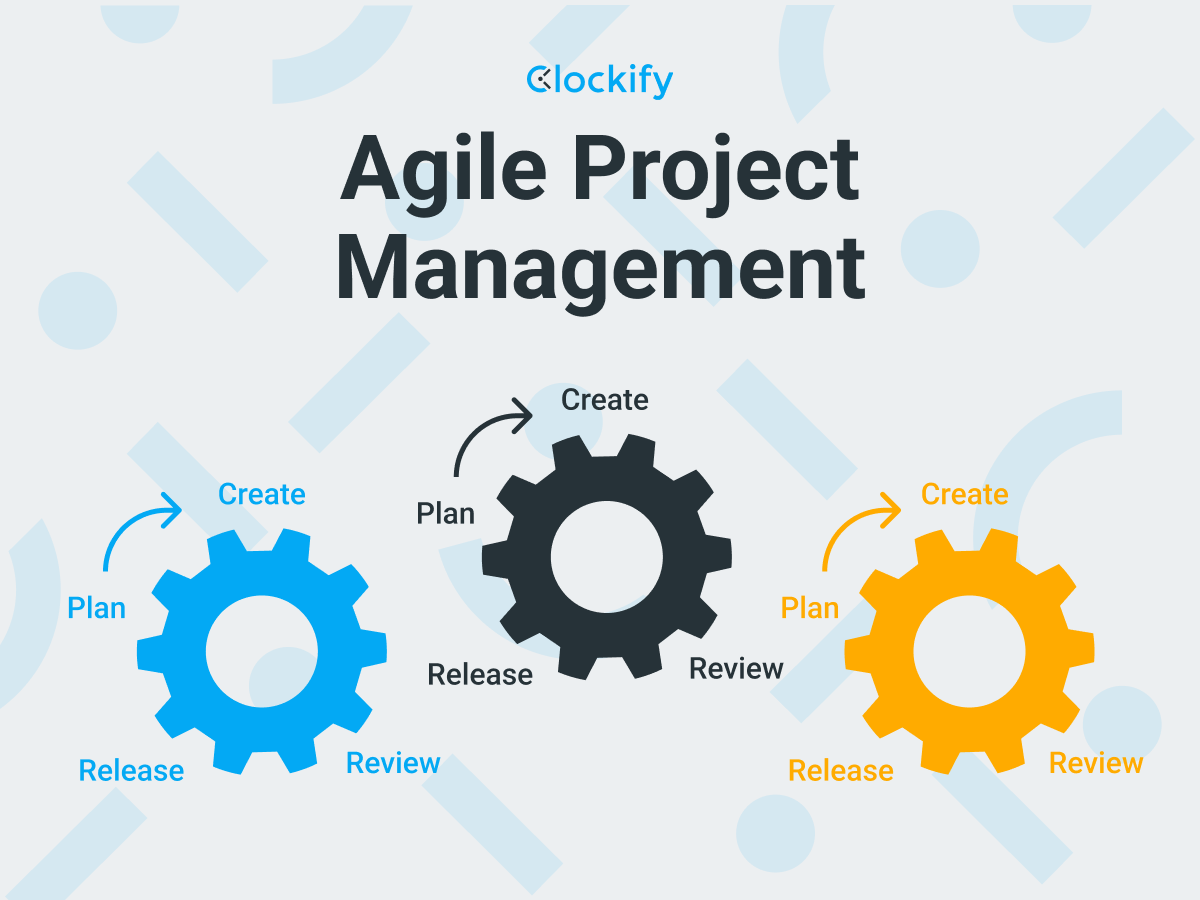
Visual representation of Agile Management
As you can see, Agile Project Management is an iterative process whose ultimate goal is to respond to changes. For example, each project is made of planning, creating, reviewing, and releasing products. When a project fails, the same process starts from scratch, from planning to creating, reviewing, and releasing.
Scrum Methodology
Just like Kanban, Scrum is another popular subtype of the agile project management methodology. The aim of the Scrum Methodology is to help software development teams deliver working software more frequently, with the help of incremental and iterative practices.
Project progress is measured by following the sequence of short, time–boxed periods named sprints. The end of each sprint suggests the completion of one scheduled amount of work.
How to use Scrum Methodology?
Here are 6 steps to running a project using the Scrum Methodology:
- Assign your team who will develop, produce, or perform any other responsibilities to create an end product (a Scrum master, a product owner).
- Create a product backlog by making a list of the tasks that need to be done, also known as stories.
- Create sprints or designate a short period where the work is broken down into more manageable components. Also, add stories from the backlog here.
- Host a daily meeting called a daily scrum or stand-up meeting. The whole team talks about the progress and tackles issues.
- Host a sprint review meeting that takes place at the end of a sprint. All critical stakeholders need to be present to discuss results, gather data, and make plans for improvements or changes.
- Repeat the 2 previous steps until you complete the final sprint and create deliverables.
What is Scrum Methodology best for?
The Scrum Methodology is best for complex and ambiguous projects. Traditionally, these are software development projects, but the Scrum Methodology can also be an efficient approach for marketing projects and leadership teams.
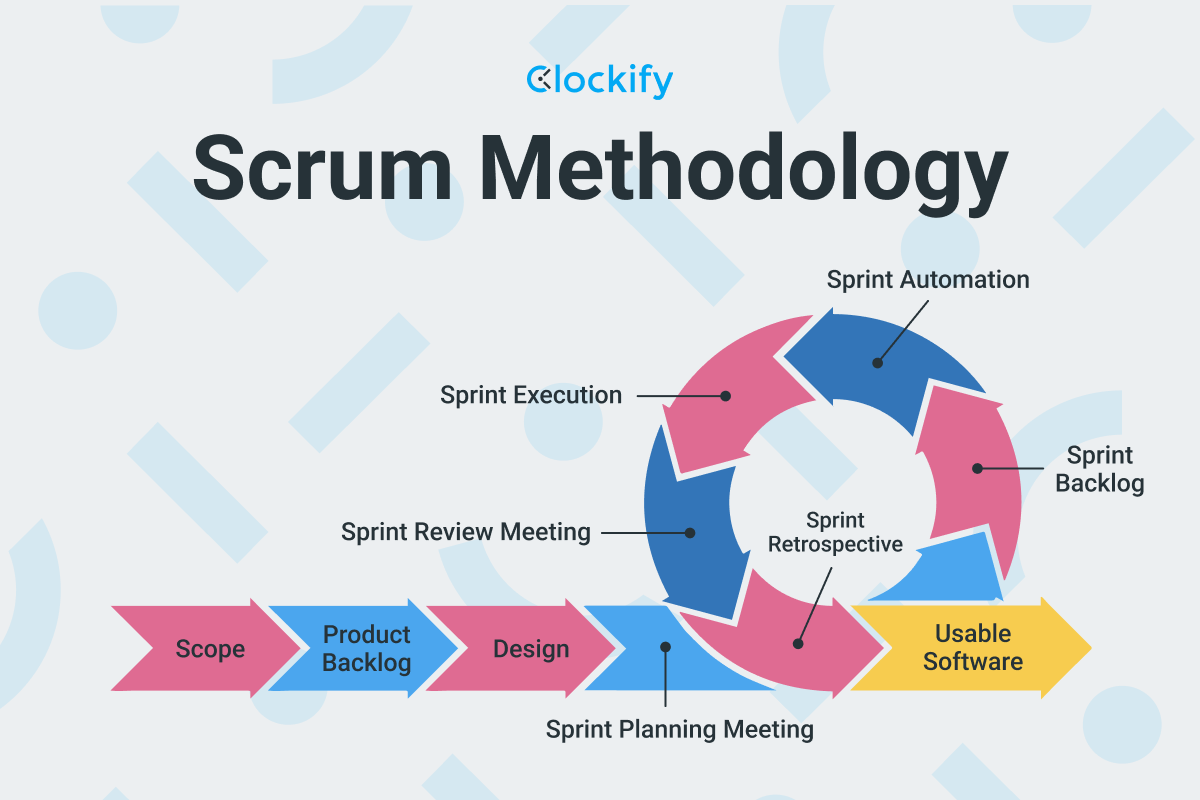
Visual representation of Scrum Methodology
The steps to running a successful Scrum project are presented in the following image, together with other activities needed to complete the project.
With Scrum Methodology, you start by looking at the scope, product backlog, and design. The next step entails getting into sprint mode, automating and reviewing your sprints. Finally, everything ends with software that users can benefit from.
Extreme Programming (XP)
Extreme Programming (XP) is a specific agile software development framework. The main aim of XP is to help the team produce higher-quality software while using less time to manage project releases and satisfy customers’ needs.
Extreme Programming mandates the following project-related activities and principles:
- Maintain constant communication with an emphasis on face-to-face discussions, coupled with whiteboard drawing.
- Do the simplest thing that works with a focus on doing only what’s necessary and addressing only the current project requirements.
- Provide regular feedback with an emphasis on the build-gather-adjust work cycle. The team builds a feature, gathers feedback about the feature, and adjusts the feature based on the feedback.
- Act with courage with a focus on accepting difficulties, acting on feedback, reacting quickly, and asking controversial questions when needed.
- Promote respect with an emphasis on providing respectful feedback to others and accepting respectful feedback from others.
How to use Extreme Programming (XP)?
To make sure you are using Extreme Programming correctly, follow the steps:
- Plan — this is where a customer writes user stories, which is a brief explanation of customer requirements for particular features.
- Communicate — since project management is mostly about communication, the next step is where the project manager builds a smooth-running team.
- Restructure and iterate — start from the easiest design first and move on to the complex ones. Create smaller and more manageable components to keep your code brief but comprehensive.
- Code — now is the time to implement code. Since XP uses the Collective Ownership model, it’s not dependent on individual developers, and the code is owned collectively.
- Review and test — finally, every step of the process must go through thorough and repetitive testing prior to code release. This is where pair negotiation and pair programming are essential.
What is Extreme Programming (XP) best for?
Extreme Programming is best for:
- Dynamic, ever-changing software development projects,
- Co-located development teams, and
- Risky projects with fixed time frames.
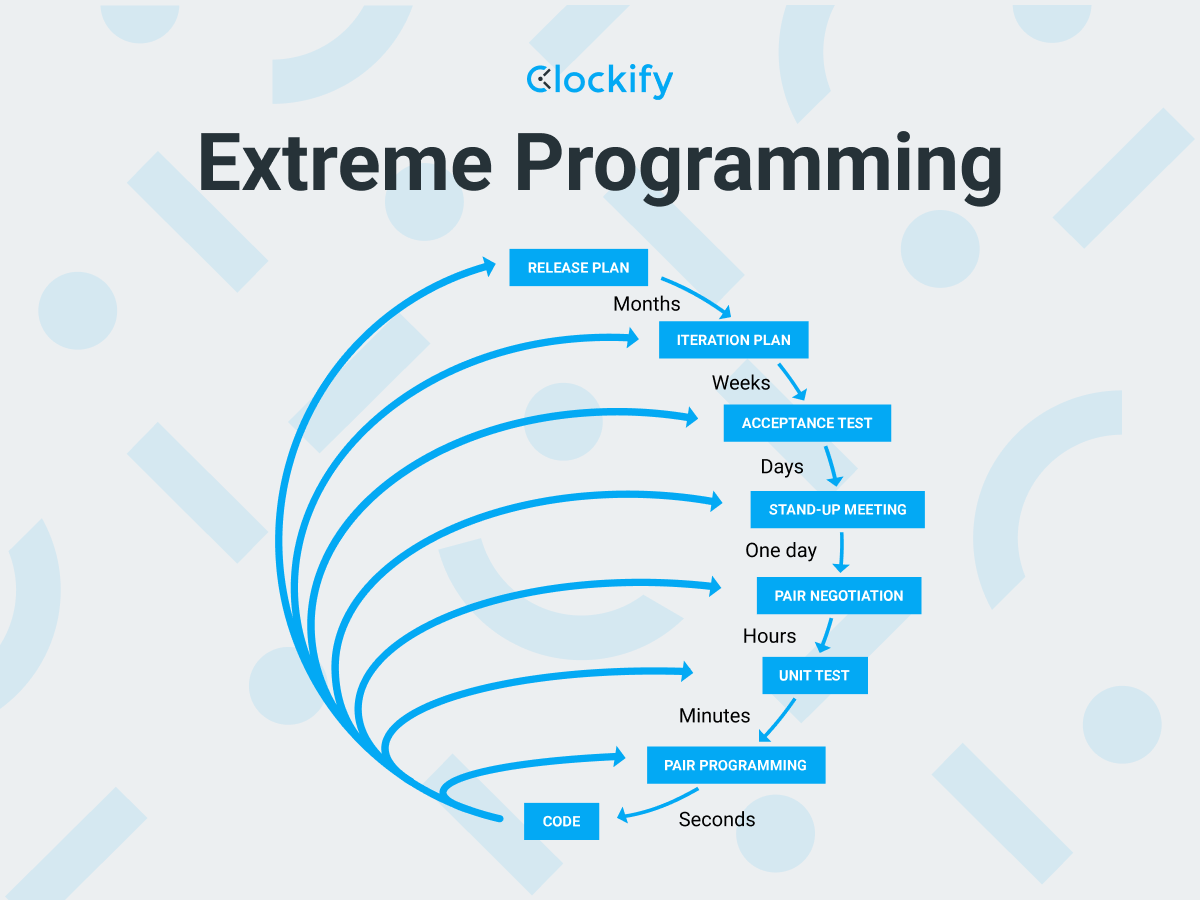
Visual representation of Extreme Programming (XP)
You can see the steps explained below, including the last stage — pair programming. Pair programming allows team members to work in pairs on a single computer. This strengthens collective ownership, helping team members learn from each other.
The Waterfall Technique
Among the most beneficial project management techniques is the Waterfall Technique, which entails a sequential execution of tasks. In other words, you can only move on to the next step if you’ve finished with the previous one.
This project management technique mandates that you have a clear idea of what the project requires and how it will unfold before you start working on it. Once you’ve moved on to the next step, you can’t go back to the previous and make corrections.
How to use the Waterfall Technique?
The concrete steps will depend on the type of project but usually involve:
- Analyzing and identifying software requirements,
- Designing the best approach to develop the software according to the requirements,
- Implementing suitable solutions to problems by writing appropriate code,
- Testing out the code and verifying that it works the way you intended, and
- Carrying out regular maintenance to make sure the code keeps working the way it was intended.
What is the Waterfall Technique best for?
The Waterfall Technique is best for:
- Short software development projects,
- Software development projects that have predetermined requirements, and
- Creative project management.
Finally, you can use the Waterfall Technique for any project with a strict work structure.
Schedule your work with Clockify
Visual representation of the Waterfall Technique
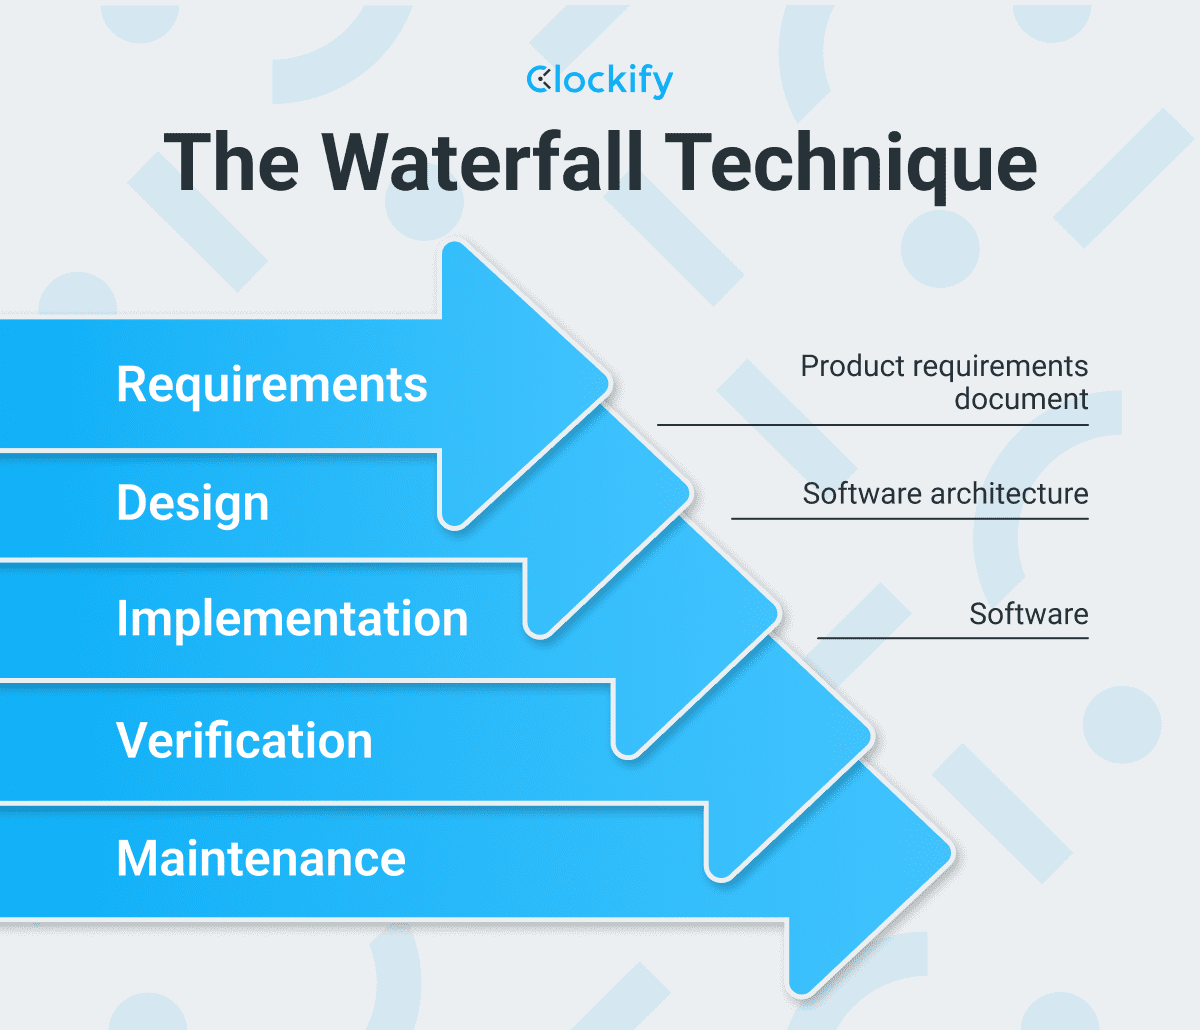
The visual representation below shows that the Waterfall Technique only allows you to go forward and not to a previous phase. It respects strict order and includes Requirements, Design, Implementation, Verification, and Maintenance.
The Waterfall Technique has an approach that starts from the requirements and works towards design, implementation, verification, and maintenance. If requirements aren’t met, design can’t start, and so on.
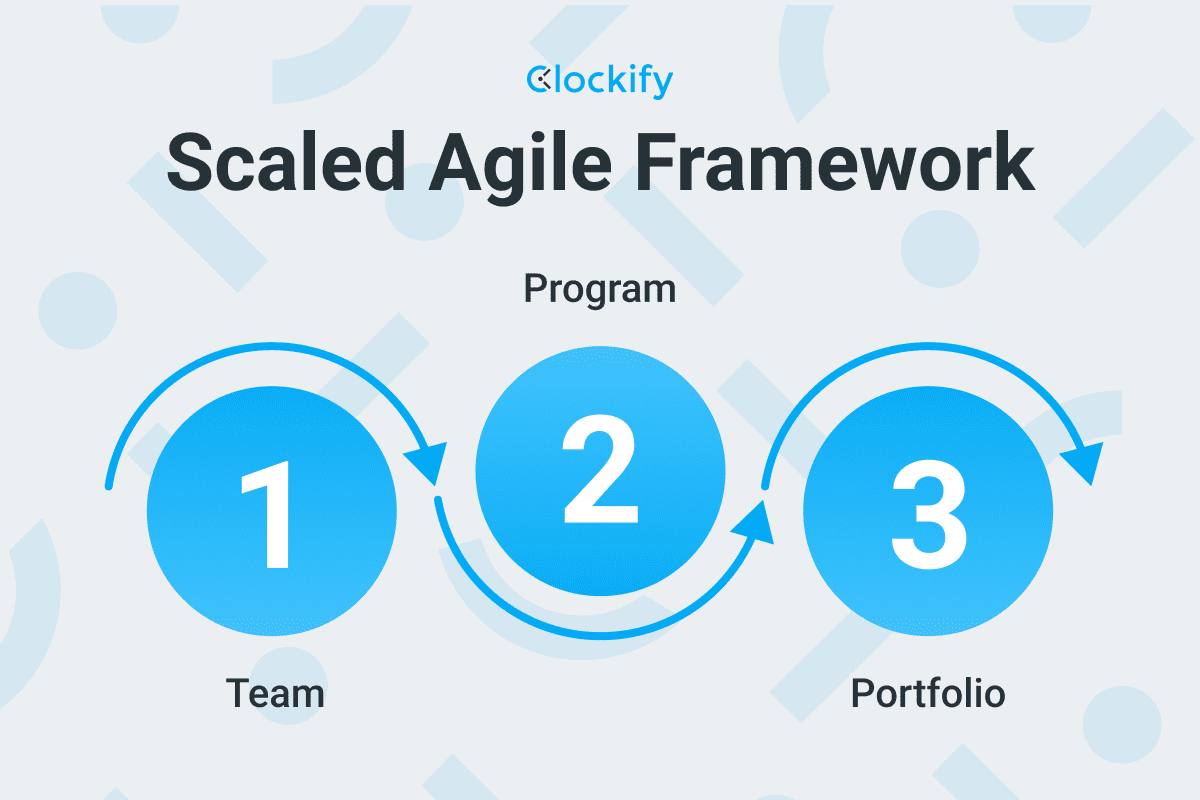
Scaled Agile Framework (SAFe)
Scaled Agile Framework (SAFe) is one of the most useful project management techniques for implementing agile projects at scale. SAFe is a set of workflow and organization patterns meant for facilitating software development.
Scaled Agile Framework takes into account the size and requirements of each project. In short, SAFe contains 3 organizational levels, including:
- Portfolio — where management provides clear objectives and goals for the whole project at hand,
- Program — where up to 10 members are selected as those responsible for project deliverables, and
- Team — where the 10 team members use iterative methods and split their work into 2-week sprints.
As companies grow, they can use the Scaled Agile Framework to productively and efficiently adopt new technologies, respond to market changes, and address customers’ needs.
How to use Scaled Agile Framework (SAFe)?
To implement the Scaled Agile Framework, follow the steps below:
- Reach the tipping point in your organization,
- Train lean-agile employees who will implement the methodology (also called change agents),
- Educate managers and leaders,
- Establish a lean-agile center of excellence in the company,
- Specify value streams and Agile Release Trains (also called ARTs),
- Create a plan for implementation,
- Get ready for the launch of ARTs,
- Educate teams and launch ARTs,
- Monitor the execution of ARTs,
- Launch more value streams and ARTs,
- Spread to the portfolio, and
- Maintain and enhance.
What is Scaled Agile Framework (SAFe) best for?
Scaled Agile Framework is best for companies that want to scale their operations and grow in time — no matter their current size.
Visual representation of Scaled Agile Framework
In the graph below, you can see how SAFe’s 3 organizational levels work jointly, one after another. You need all 3 levels working together to make SAFe efficient, including Portfolio, Program, and Team:
Project management tools
Regardless of the specific project management technique you’re using and the type of project you’re working on, you’ll still need to tackle and carry out certain general tasks and processes.
Namely, you’ll have to:
- Organize and plan the project workflow,
- Schedule the project in some capacity,
- Manage your time properly,
- Communicate and collaborate with your team, and
- Handle the accounting and finance aspects of the project.
Now, the best way to do all that is to use tried-and-tested tools in project management.
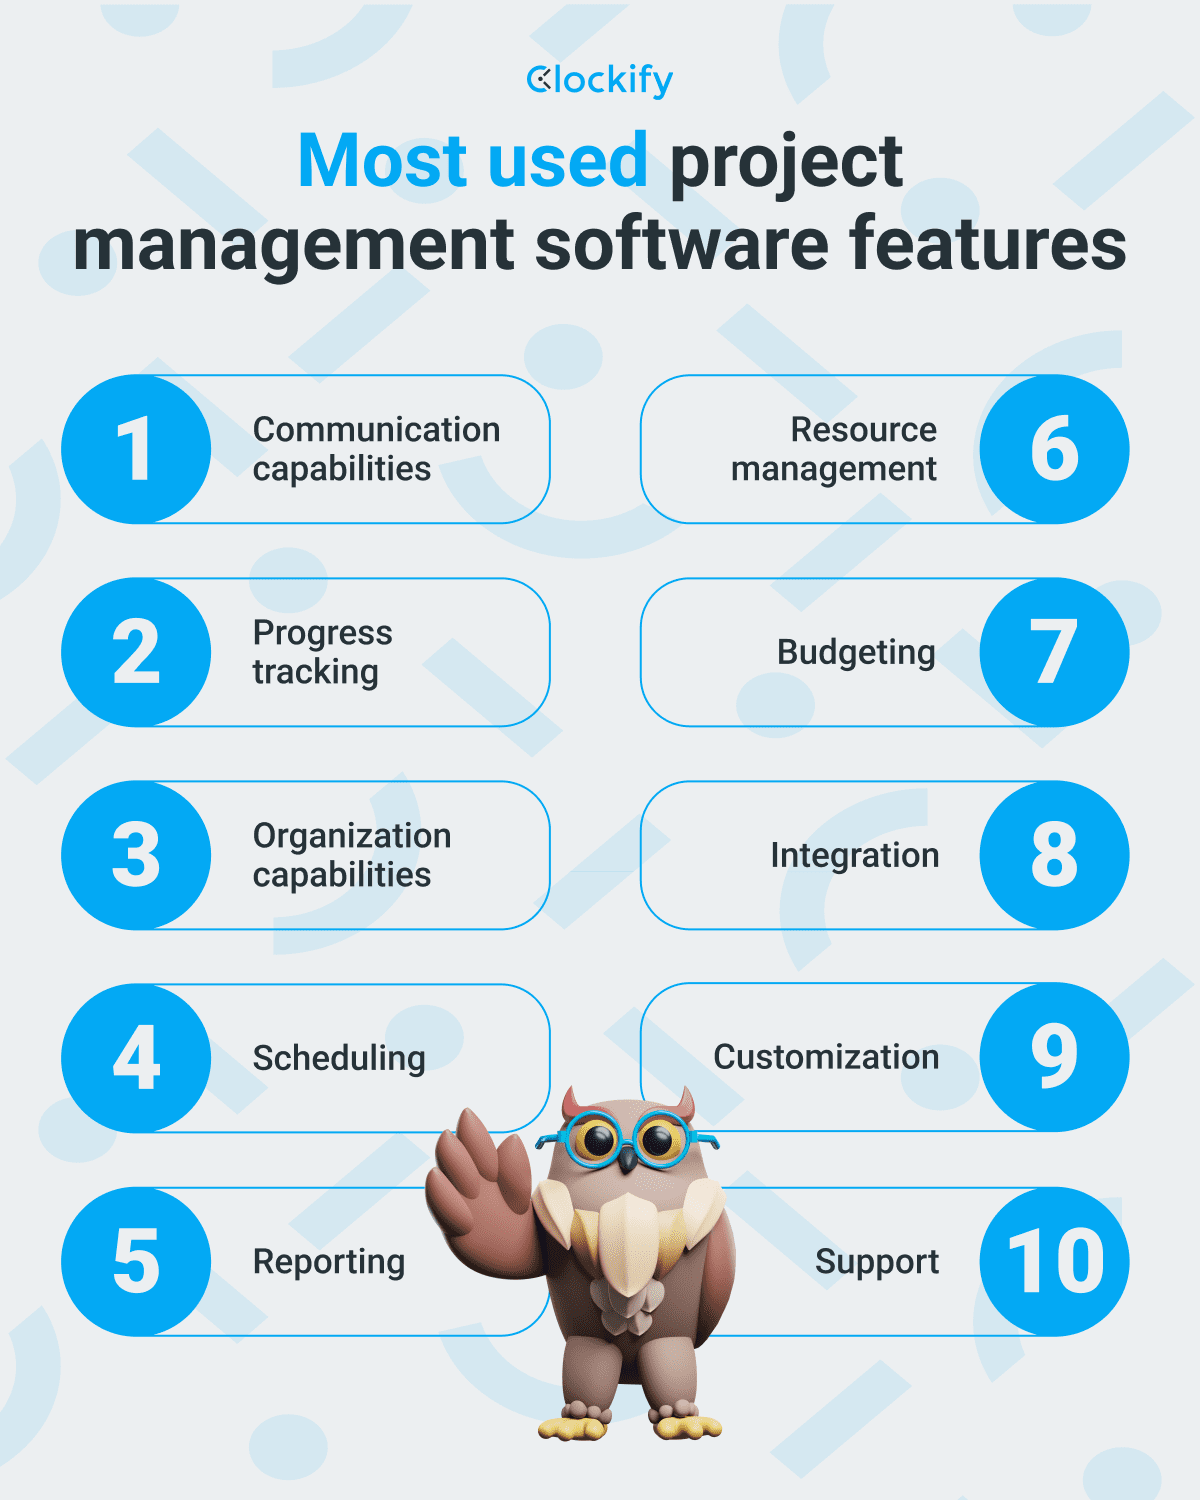
According to project management statistics on PM features, the set of tools you use should offer functionalities like:
- Communication capabilities,
- Progress tracking,
- Organization capabilities,
- Scheduling,
- Reporting,
- Resource management,
- Budgeting,
- Integration,
- Customization, and
- Support.
For a beautiful illustration, look at the table below:
So, let’s cover the best tools for project planning with the said features, including:
- Project management planning tool,
- Project scheduling tool,
- Project tracking tool,
- Team collaboration tool,
- Project collaboration tool, and
- Project finance and accounting tool.
Plaky — best for project management planning
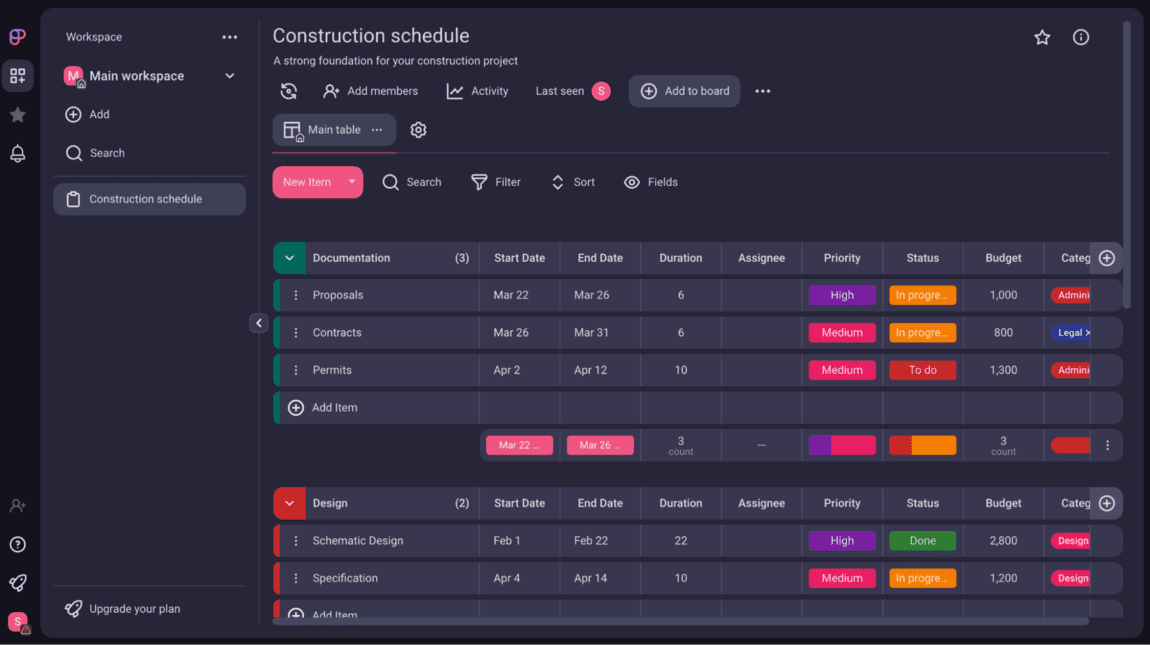
To organize and plan your workflow, you can use Plaky, an intuitive and colorful task management tool.
Personally speaking, Plaky allows me to organize and plan my tasks and track their progress across aptly named columns.
With Plaky, I can see who works on what, which things are in progress, and where they are in the process. The app keeps me connected with my team, and everyone is informed about the status of tasks. For example, a Plaky card may have the following groups of tasks:
- To do,
- Doing,
- Review, and
- Ready to publish.
The amazing thing about Plaky is that it can be applied to various industries, and you can make custom columns that suit your projects.
Apart from that, I benefited from Plaky’s flexibility, as it helped me design my work with filters, boards, tags, and due dates sections. It’s an all-in-one task management tool.
Google Calendar — best for project scheduling
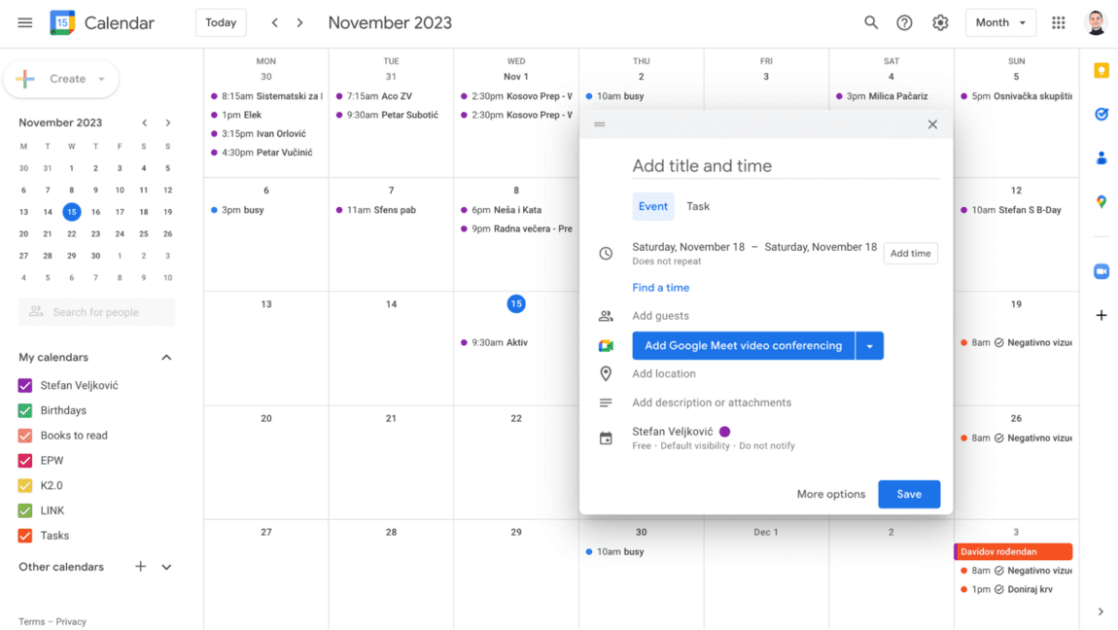
To schedule your workflow, you can use Google Calendar, a simple scheduling calendar that comes with your Gmail account.
Speaking as a frequent user of Google Calendar, the app lets me schedule video calls and communicate with my team with the goal of successfully finishing any project.
With Google Calendar, I never miss an appointment since I receive reminders about upcoming activities. Apart from the said features, this planning tool allows me to:
- Create to-do lists,
- Customize my calendar with add-ons,
- Tailor events to my liking, and more.
Another thing I enjoy about Google Calendar is that the app never has any glitches and I can mark my events as Personal, Work, or any other tag I choose.
Finally, Google Calendar allows me to have a daily, weekly, monthly, or yearly view of my events.
Clockify by CAKE.com — best for tracking time spent on projects
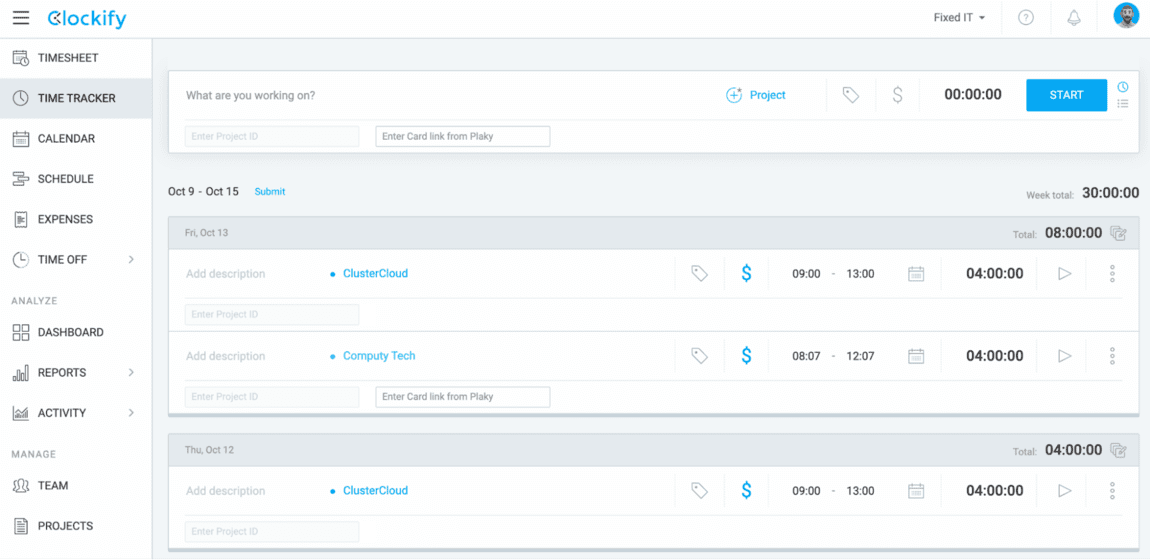
To properly manage and track your time spent on projects, you can use Clockify by CAKE.com, a time tracking tool that lets you have unlimited projects. With the free version of the app, you get plenty of powerful features, such as project status, project access, import projects, and more.
When I started using Clockify a while back, I was surprised by how easily I could manage and track projects in a convenient, transparent, and user-friendly way. What’s more, I was able to track my team’s time and progress, and also:
- Set budgeting, and
- Make precise time estimates for projects.
Today, Clockify allows my team to track the time we spend on project-related tasks as we work (or after we’re done working) and generate reports of our time use. Finally, I can employ the reports to identify where we could make improvements in our workflow.
For even more insights, Clockify gives me the opportunity to export projects into Excel and CSV formats. This capability is especially useful for the times when I need to compare the performance of one project to another. With this Clockify feature, I can get data like names, status, visibility, tasks, project manager, and many more.
Clockify also brings to the table many different plans with various features, so it’s easy to pick the one that fits your workflow best.

Pumble by CAKE.com — best for team communication
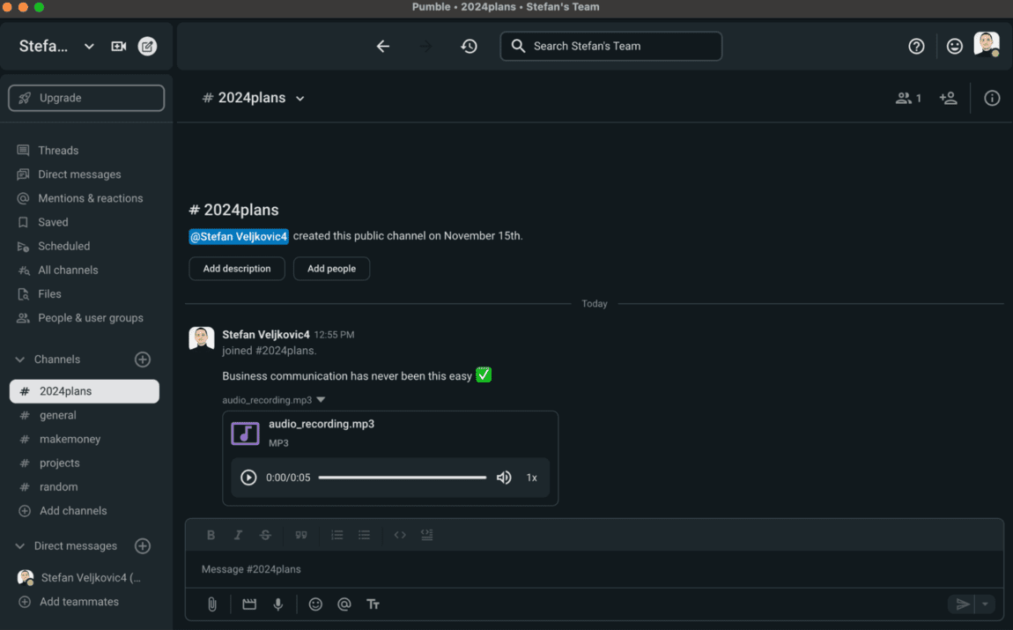
Pumble is an efficient team communication and collaboration tool. It also has a free version which is available for an unlimited number of users and with free message history. When I need to tie my projects to my business communication, I can give my colleagues a quick call or attach project-relevant files in a flash.
Personally speaking, Pumble allows me to have private 1-on-1 conversations with my team members using:
- Private channels,
- Group chats,
- User groups, or
- Public conversations.
I can simply create a channel, add members, and customize it to my liking.
With Pumble, I can centralize all communication with my team in one place — and easily refer to past conversations, links, files, and filter by channel or person. I can also customize my personal profile information and turn notifications off, which I mostly need for deep work sessions.
Finally, Pumble lets me send voice messages, and the Google add-on allows me to schedule Pumble video calls in Google Calendar.
Smartsheet — best for data entry and analysis
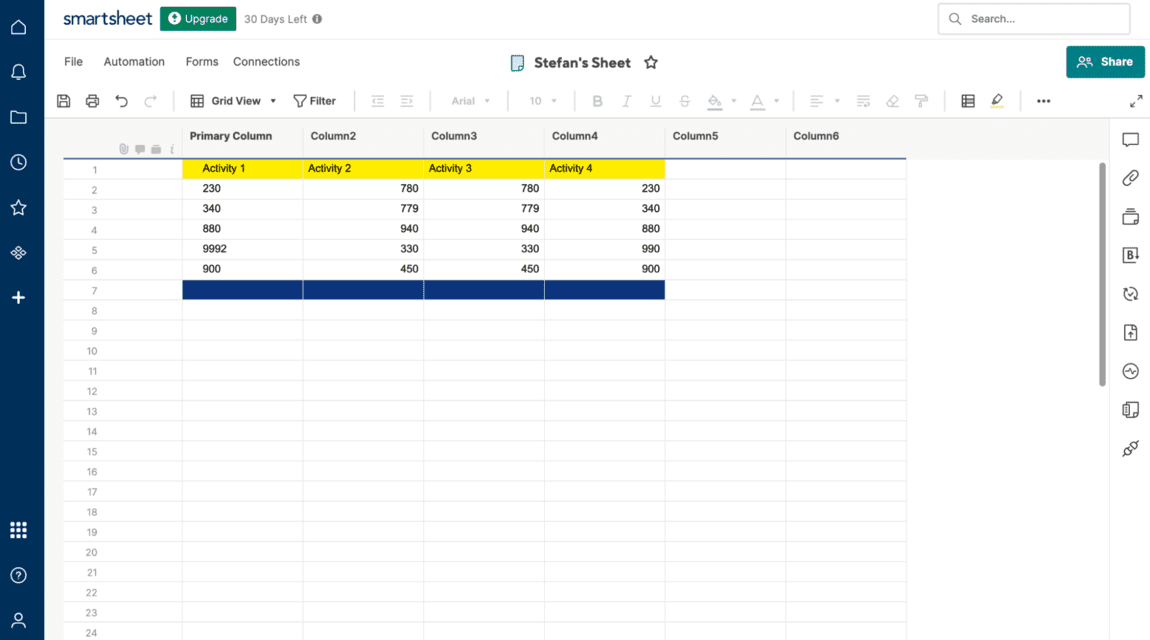
To collaborate with your team on data entry and statistical analysis, you can use Smartsheet, an online spreadsheet with many capabilities. I’ve been using Smartsheet for a little while, but I have noticed that it’s very useful to:
- Add and calculate data,
- Create charts,
- Share data with collaborators, and
- Analyze project statistics.
In the app, multiple team members can manipulate data simultaneously — and all my changes are saved instantly and automatically.
What’s more, Smartsheet is a bit more intuitive and user-friendly than Google Sheets. Another interesting aspect of Smartsheet is that it lets me automate workflows for repetitive tasks.
Finally, I can also see how the app helps me better collaborate on sorting data and reporting on project budgets.
Xero — best for accounting and finance tasks
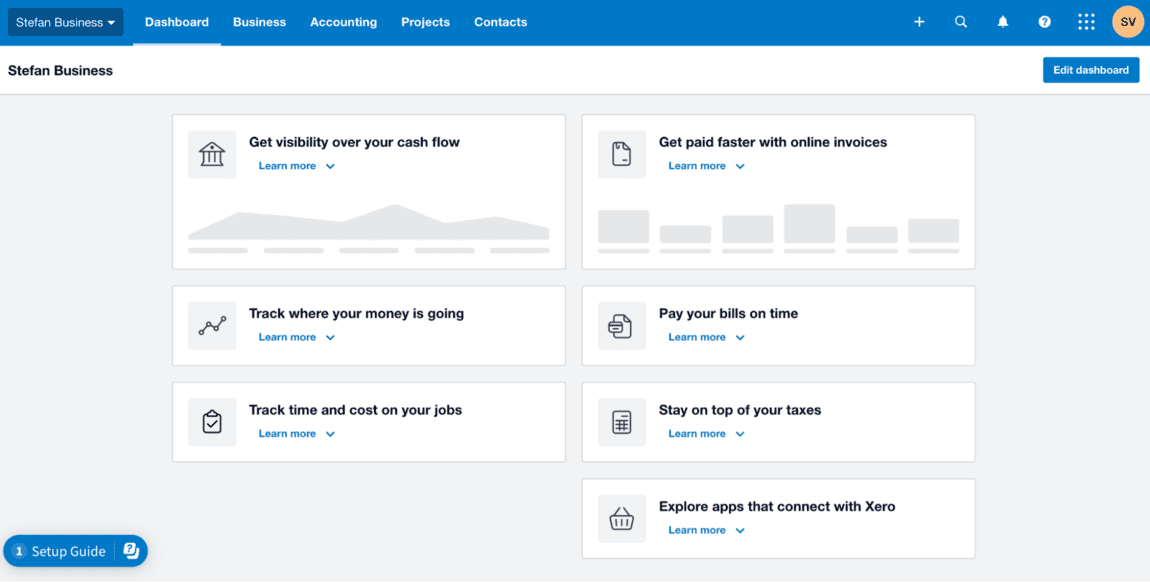
To handle your project-related finance and accounting tasks, you can use Xero, a piece of software. I’ve been exploring Xero for a short time, but I’ve found that it allows me to:
- Track income and expenses,
- Manage invoices and inventory, and
- Analyze finances.
Xero also comes with other useful features that help me to produce in-depth financial reports and forecast cash flow. These are beneficial when I want to see when money is flowing in and out.
Apart from that, the app offers handy categories for Taxes and balances, Projects, Financial Performance, and others.
Finally, Xero is a great way to compare months, quarters, and years — and see which projects have performed well.
In any case, the app seems quite intuitive and easy to use, although I’m not a finance person per se.
💡 Clockify Pro Tip
For more great accounting software tools, check out our comprehensive guide:
Use CAKE.com Bundle to improve project planning and execution
Managing a project usually means switching between separate apps for tasks, time, and communication. Each app solves one piece of the puzzle, but paying for all of them separately adds up.
The CAKE.com Bundle solves this. One subscription gives you 3 connected tools built for project work:
- Plaky for tracking tasks, deadlines, and project boards
- Clockify for logging time spent on each task
- Pumble for team updates and quick questions
One login covers all 3 tools — and the productivity suite costs less than subscribing to separate apps (53% less).
How we reviewed this post: Our writers & editors monitor the posts and update them when new information becomes available, to keep them fresh and relevant.