Clockify is time tracking software that helps you track hours on projects, analyze progress, get budget alerts, and schedule future work hours across projects.
A project is “a piece of planned work or an activity which is done over a period of time and intended to achieve a particular purpose”.
Whatever the type, each project will impose a certain budget and a deadline on your team.
And how well you manage project deadlines and budgets will majorly impact project success.
Besides, you also have to effectively manage task distribution between the team, so everyone knows exactly what they’re doing.
Plus, add to that the constant communication and collaboration happening between your team members during the project.
What if you had everything in one place to help the whole team manage projects successfully?
How to manage projects in Clockify?
Clockify offers a complete set of features to manage projects from their start to finish.
1. Create a project and assign a client
When your team is starting a new project, the first thing you should do is to create it in your base.

And if that project brings in a new client too, you would need to add a new client first.
Then, the work you do on the project is traceable to the client you will later bill for your services.
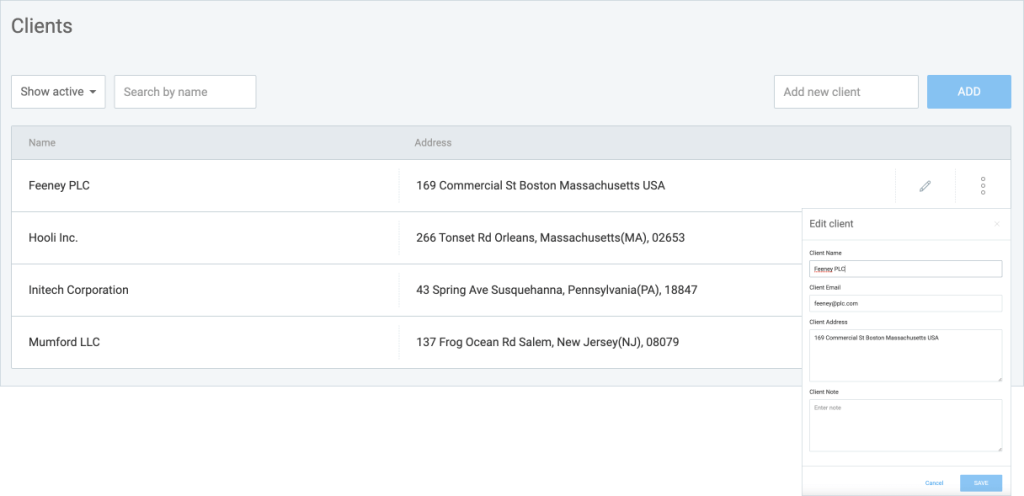
See how to create projects and clients in Clockify. There’s an option to import clients and projects from your Excel files.
2. Set estimates and reminders
As each project has a deadline and a limited budget at your disposal, it’s good to keep everyone reminded of this crucial part of successful project completion.
In Clockify, you can set time and budget estimates for each project or task you’re working on.

Based on these estimates, you will be able to later visually track progress.
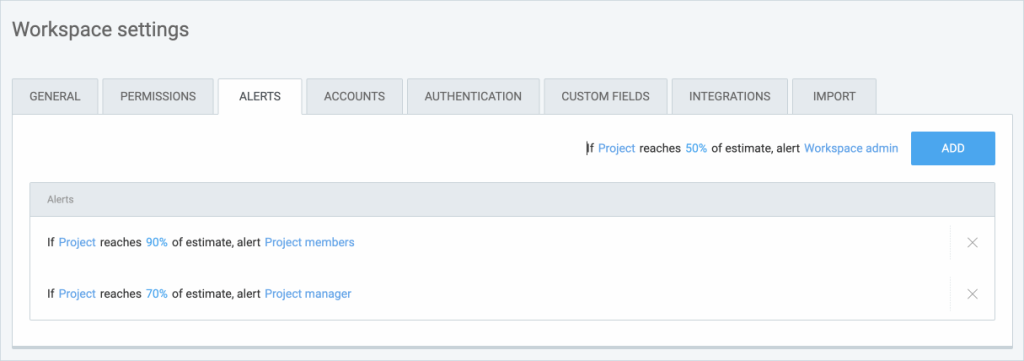
You can also set reminders whenever a project reaches a certain percentage of an estimate.
3. Split the project into tasks
A common way to deal with a project is to split it into smaller portions so each team or team member knows exactly what they need to do.
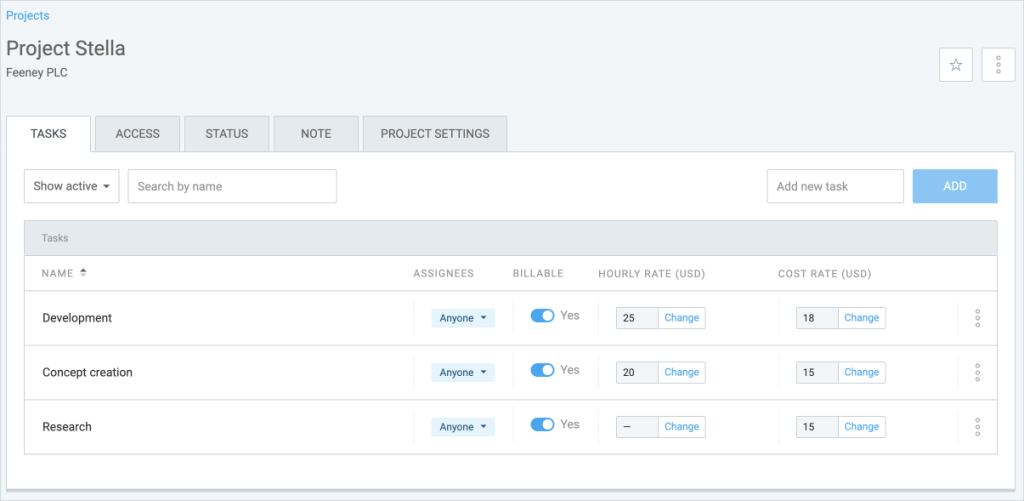
If a task is done, click on the three dots and mark them as done.
In Clockify you can add as many tasks your team needs – specific or general ones.
For each task, you can set a billable hourly rate (to see the earnings that task brings) and cost rate (to see the cost working on that task generates).
4. Organize & add team members
Managing human resources is one of the most important parts of managing projects. You need to know the labor cost and profit generated while working on a project.
Check whether you have enough human resources in the team to complete the project and if you decide to add new people, just add their email addresses and assign them an adequate team role.
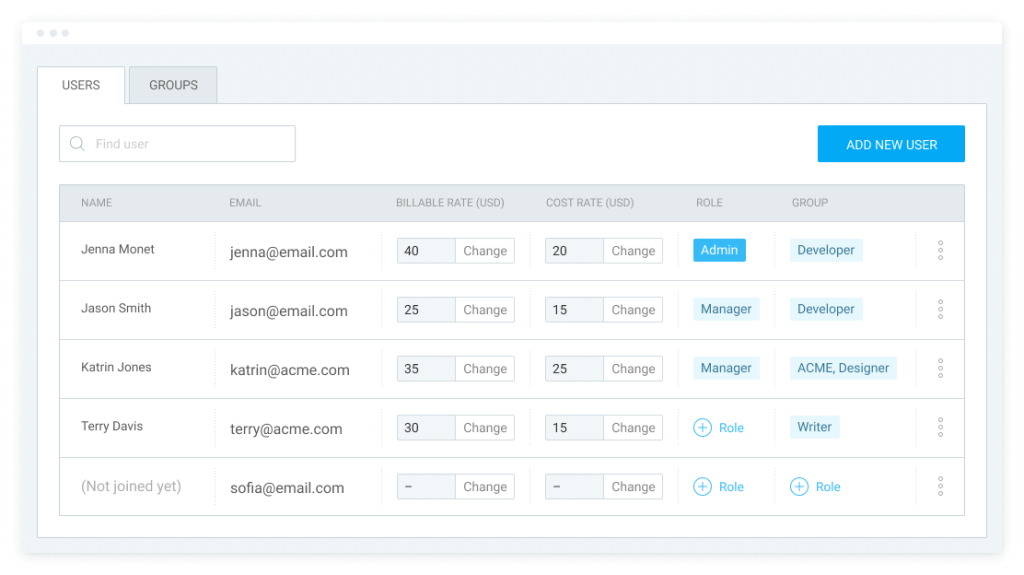
Here, you can also split your team members into groups for easier task management. With groups, you can assign tasks to the whole group instead of adding each individual.
Cost rates demonstrate the amount of money a working hour of a particular team member costs, while billable rates show the amount of money earned per their working hour.
See how to manage rates to calculate profitability and overall labor costs.
For example, in Clockify there is a difference between admins, managers, and regular users.
- Admins: can see and edit everything
- Regular users: mostly track time
- Managers: can manage projects and approve timesheets
Each of these has different roles and permissions, and they can have different rates, as well.
5. Assign tasks across your team
You can organize people per project, or distribute projects per team member/group, whatever is easier for you.
In both cases, Clockify will allow you to switch between the Project and Team view, keeping the same information you entered.
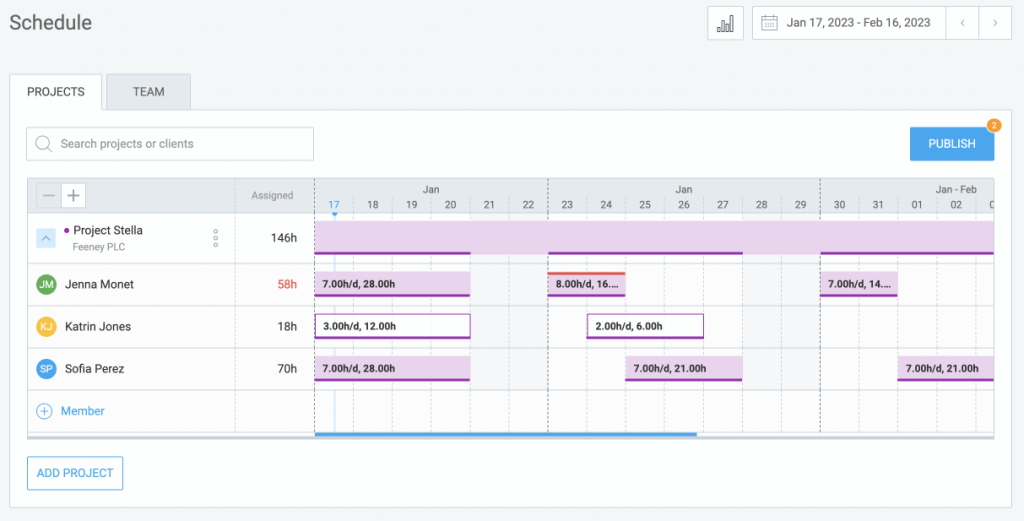
Underlined projects show that some team member is assigned to work on that particular project on that day, so you have a quick overview of the schedule.
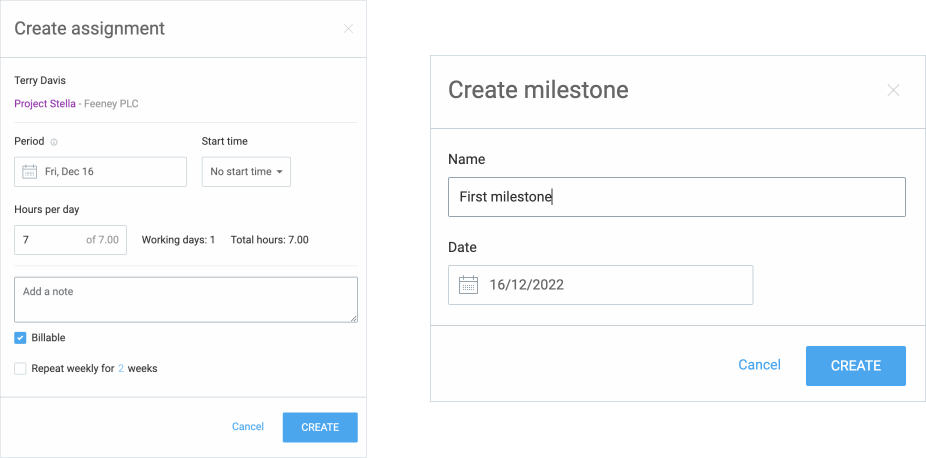
To create a new assignment for a user, just hover over a day and create a new task (user line).
And if you want to set up a project milestone, hover over the colored part of the day (project line).
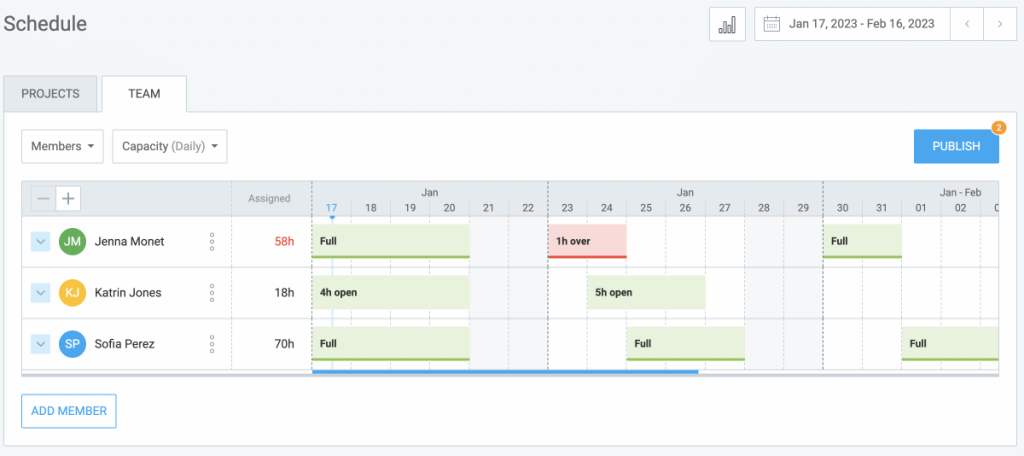
If you switch to Team view, you will see overall team availability – who has free hours, who is booked to the fool capacity (time tracking target), and who is overbooked.
6. Track project billable and non-billable hours
There needs to be transparency between you and your clients about the time spent on billable tasks (e.g. design, development) and non-billable tasks (e.g. meetings, error fixing), so everything you do on a project should be properly tracked.
Your team can track the hours they spend working on each project, with a:
- Tracker,
- Timesheet, or
- Auto-tracker.
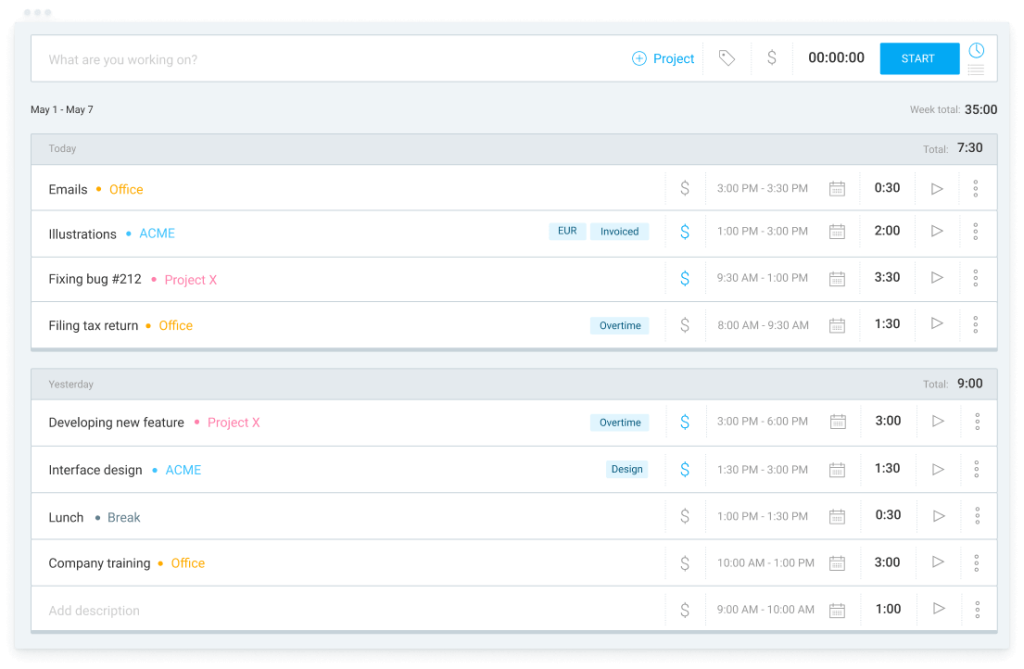
With the tracker, you can specify what tasks you are working on. The timer records the beginning and end of your activity, adding to your entries log after you enter a description of your work, the project, and the client.
The manual mode allows you to manually enter the start and end times of past, present, or future tasks.
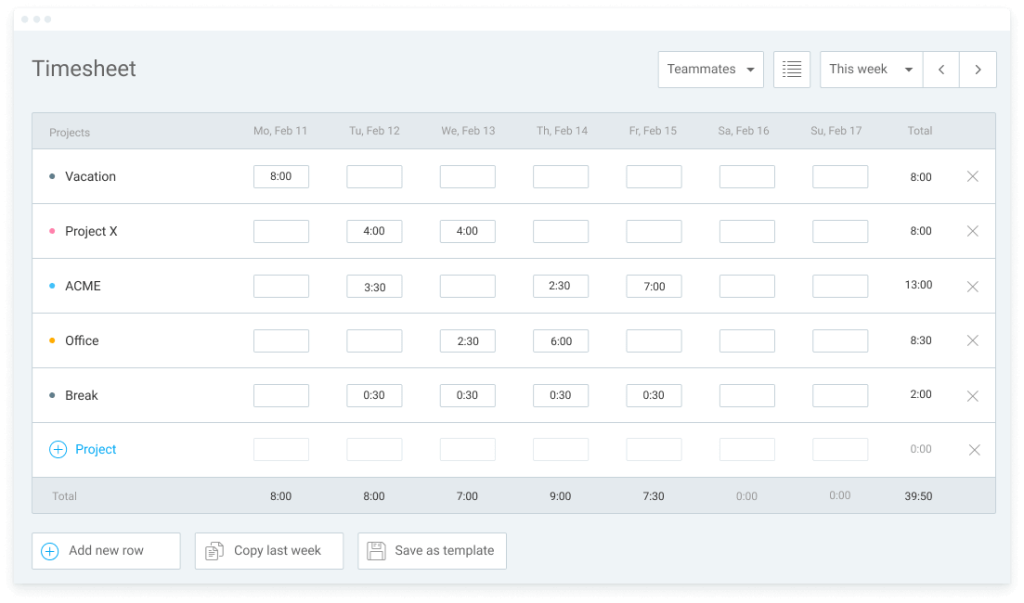
The timesheet summarizes the work done on each project. Your team can use timesheets to record daily or weekly work activities and submit those timesheets for manager review.
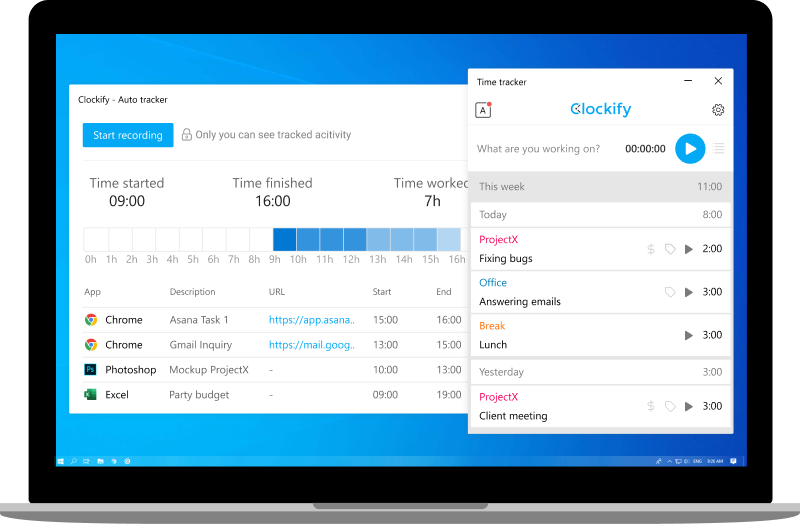
The Auto-tracker helps you keep track of how much time you spend on programs and web browsers while working on a desktop computer. Only you can see these records, and you can then choose which entries you want to transfer to Clockify web.
7. Record project expenses
Managing projects sometimes require additional expenses not initially included in the budget.
Clockify lets you record whatever expense you might have during a project – fixed fees (e.g. day rates, retainers, overtime pay, etc.) or unit-based expenses (e.g. mileage, material, meals, etc.)
With expenses, you can:
- create different expense categories,
- give them unit prices, or enter whole amounts,
- attach receipts,
- connect expenses to a project, and
- include them in an invoice.
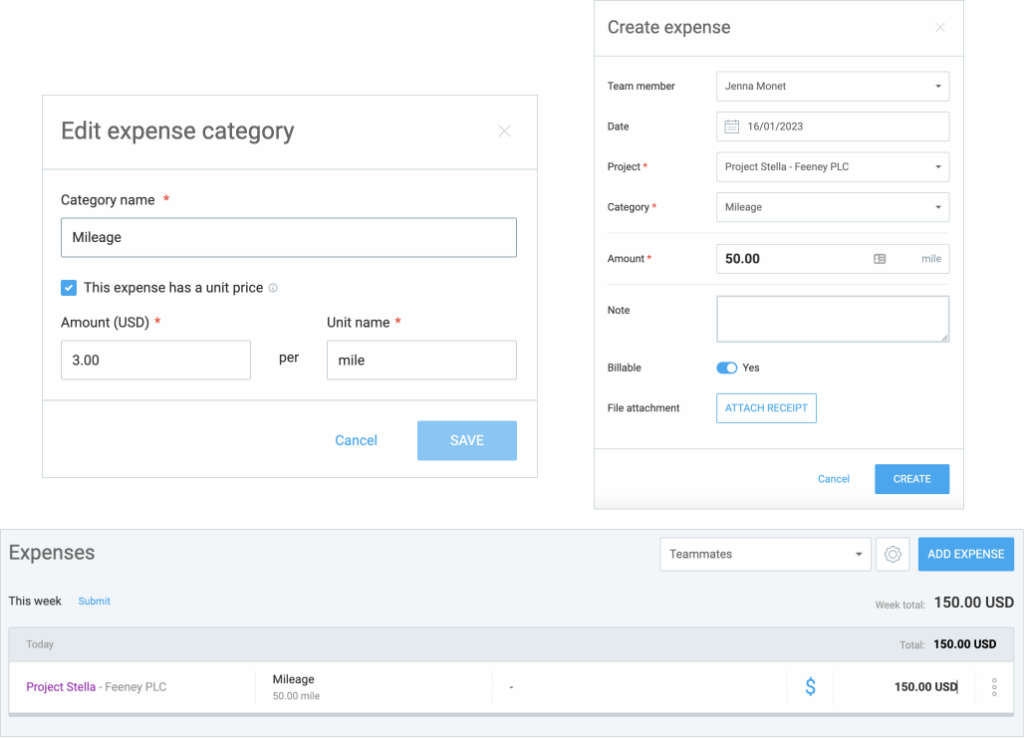
Expenses can be managed from the web or directly from a mobile app (Android, iOS).
8. Track progress
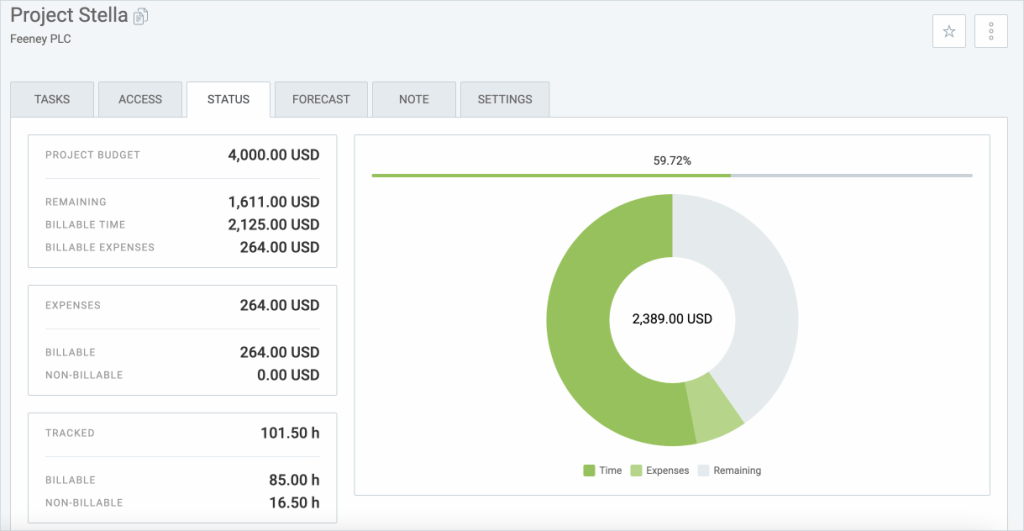
If you’ve entered time and budget estimates for your project, you will be able to track progress on it.
Based on your budget estimate, you will be able to see:
- the amount of tracked billable hours
- Recorded (billable and non-billable) expenses
- Remaining budget, and
- Total tracked (billable and non-billable) hours.
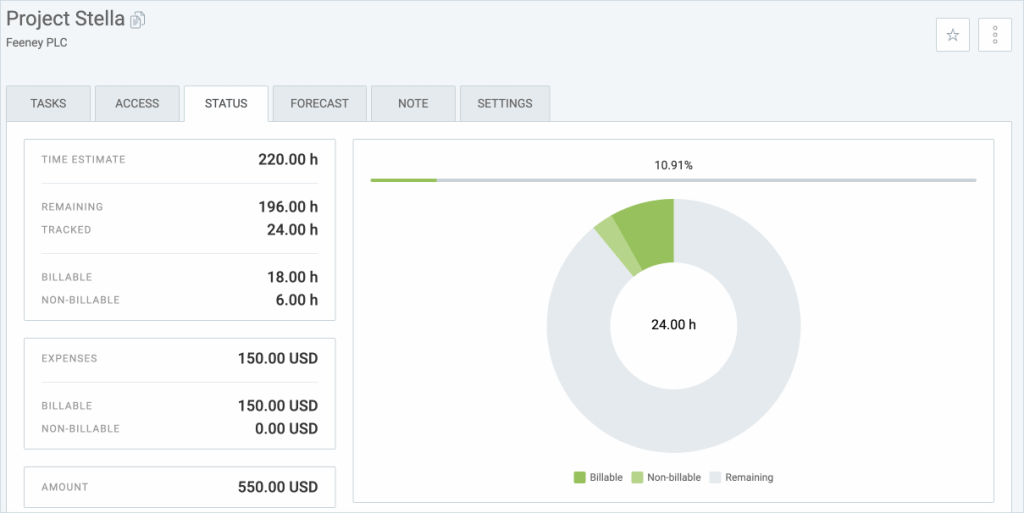
Based on your time estimate, you will be able to see:
- total tracked hours,
- remaining hours,
- tracked billable and non-billable, and
- recorded (billable or non-billable) expenses.
9. Forecast progress
Forecasting helps you visualize your project’s progress based on tracked and scheduled time.
If you, for example, schedule more hours than you estimated at the beginning, the forecasting feature will alert you that the project will go over the estimate by ‘x’ hours and the line would be displayed in red.
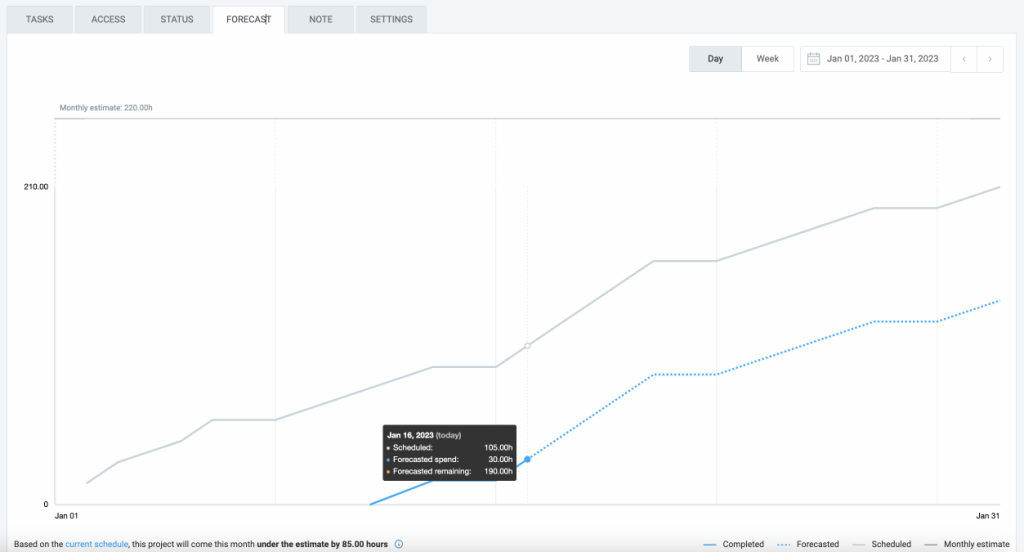
You can use forecasting to adjust estimates or to adjust team schedules and reassign tasks.
10. Chat with your team
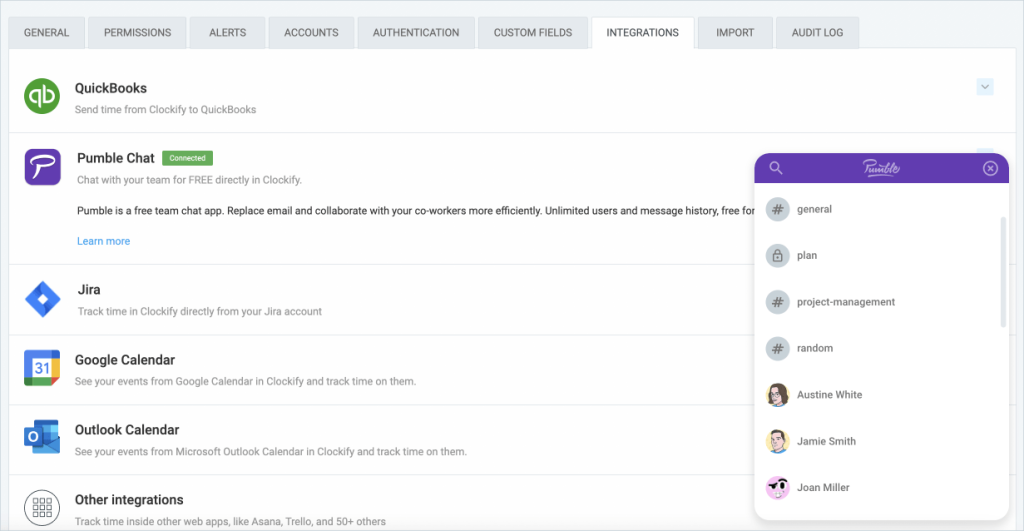
To ensure a project is completed successfully, you need to make sure your team members stay connected. So, it’s safe to say that communication is a complete necessity for project management.
With Clockify, you get access to a free team communication app to:
- Exchange messages
- Make voice and video calls
- Exchange files of any type
- Keep and access files at any time
11. Customize project reports
Regular reporting gives you a clear overview of the overall performance of the project, whether you want to inform clients of the project’s progress or scan through generated costs and profit.
Clockify offers summary, detailed, and weekly reports which can display any date range you need, and filter the data by:
- team/team members.
- clients,
- projects,
- task,
- tag,
- status (billability, approval, invoicing status), and
- description.
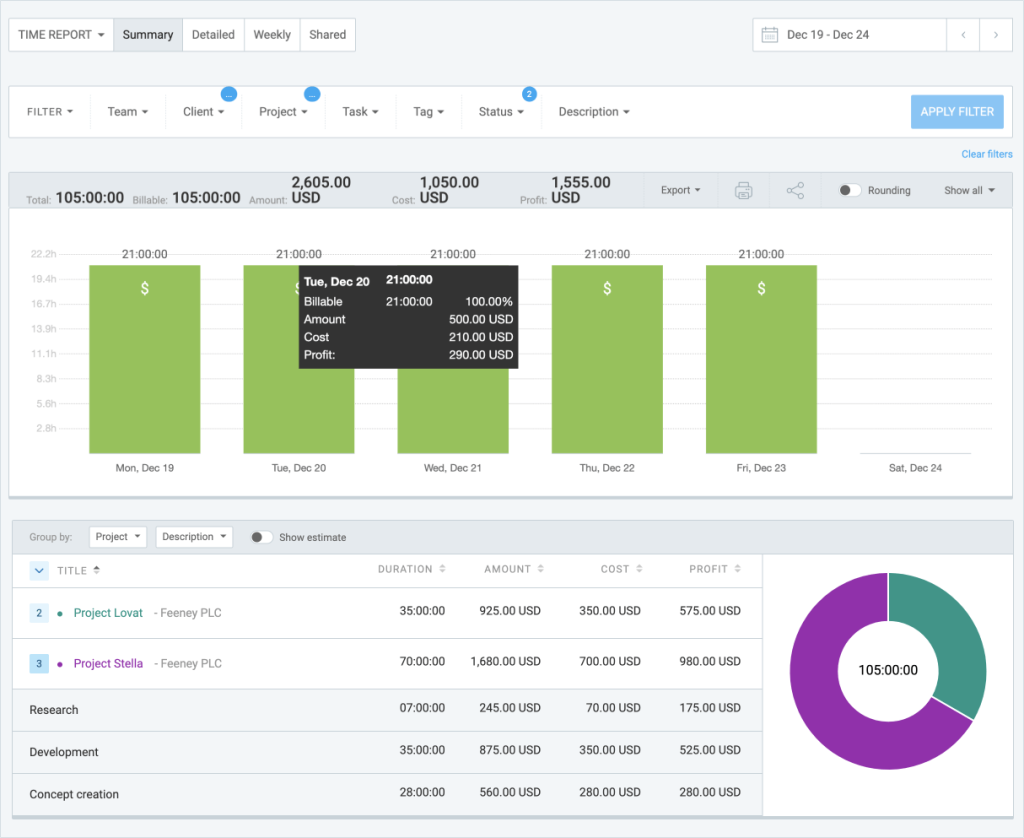
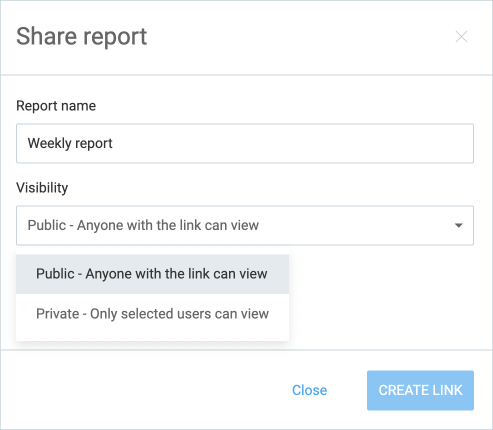
If you want to share reports with your clients, just click on a share button and set up a public link to a report where they can follow real-time updates on the project.
12. Bill projects
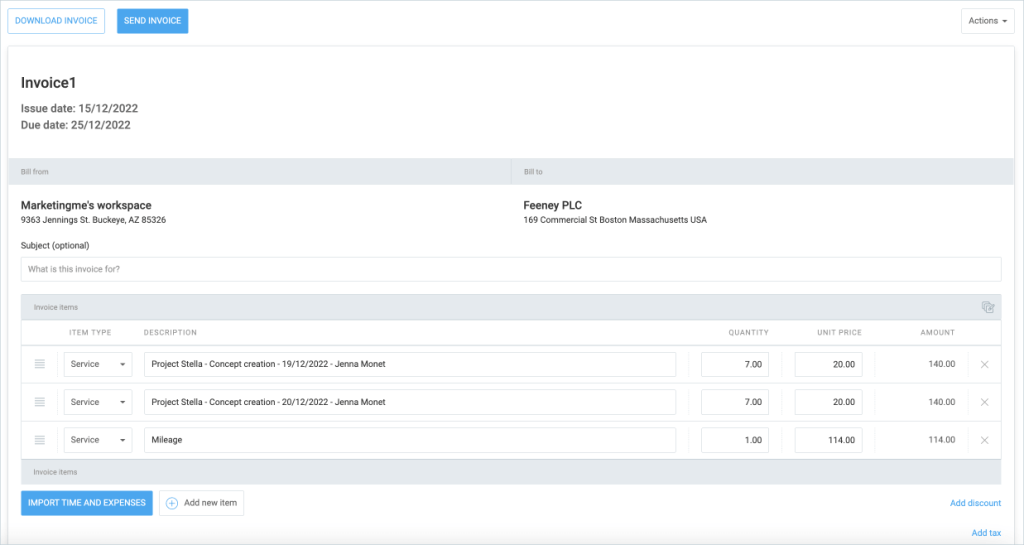
When all work on the project is completed, you need to invoice your services, and Clockify lets you do that with customizable invoices.
Just import your billable entries and expenses, and your invoice will be ready for clients.
Besides that, here you can manage all the other invoicing information, such as your company and client information, issue and due dates. You can even add taxes and discounts.
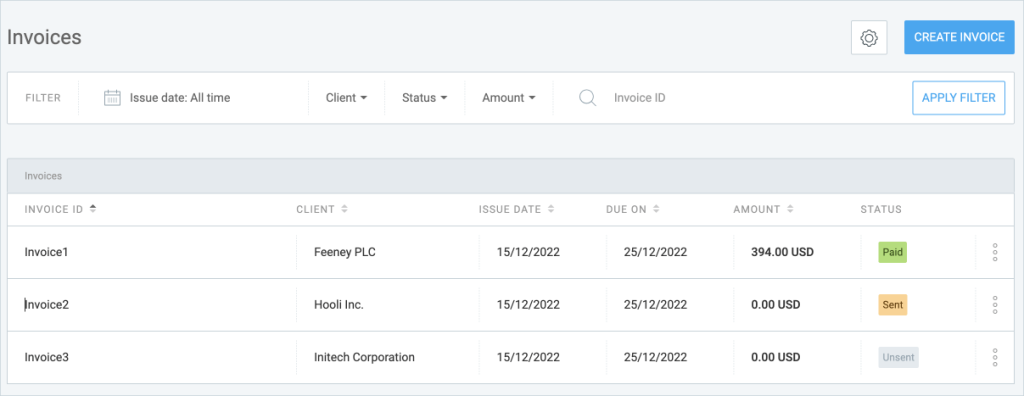
All your invoices will be in the invoice list so you can have an overview of their status (sent, paid, unsent, overdue).
FAQs
Here are a few common questions about managing projects in Clockify.
What is the complete workflow for managing a project in Clockify?
To manage and track a project from the ground up, just follow these steps:
- Define and create a project,
- Set estimates and reminders,
- Add tasks to the project,
- Add team members and split the workload,
- Track time on projects and tasks, and
- Generate reports once the project is finished.
How can I set time and budget estimates to ensure a project stays on track?
When you log into your account, click on the Projects tab in the left side menu. Once there, you’ll find options to set custom project time estimates and cost rates. Additionally, you can click on the subitem Tasks and set time estimates for tasks, as well.
What are the different ways to track time on a project, and what are their specific benefits?
Clockify lets its users track time spent on projects by using various methods, including:
- Use a simple on/off timer — ideal for users who tend to forget to input their work hours.
- Add hours via timesheet — ideal for users who input their time entries in bulk; recommended for people with time-consuming tasks.
- Use an auto tracker — the most accurate method of time tracking, ideal for business owners who require full transparency from their employees.
- Clock in and out using Clockify kiosk — ideal for on-site employees, as users often share a single clock-in and clock-out device.
How do Clockify’s reporting features help me monitor project progress and communicate with clients?
Clockify’s reports help you present all time tracking data to your team and analyze elements, such as wasted time, unproductive tasks, and admin work.
To present the findings to your clients, your best course of action is to use Clockify’s detailed reports that showcase all time entry details categorized via tasks and projects. You can export the reports in PDF, CSV, or Excel formats.
Manage projects with ease
Clockify facilitates project management for the whole team. You can effectively organize tasks across team, follow the progress and stay sure that you are within the budget and deadline.
With Clockify, you can choose from four different plans, each suitable for different projects and organizations of varying sizes.
We recommend the PRO plan as it has all the advanced features for successful project management.
See which plan might be the best option for your team.
How we reviewed this post: Our writers & editors monitor the posts and update them when new information becomes available, to keep them fresh and relevant.
