Approve time & expenses
Admins and managers can review and approve tracked time entries and expenses submitted by team members. Timesheet approval and expenses approval have separate tabs, but they are both located in the Approvals page.
Approving tracked time is available on Standard plan and higher and can be performed by workspace owners, admins, project managers or team managers.
Enable approvals #
You can choose to enable timesheet or expense approval in your workspace settings.
Enable expense approval #
To use expense approvals in your workspace:
- Click the
 three-dot icon next to your workspace name
 - Select Workspace settings > Finances
- Toggle the Enable expense approval switch to ON in the Expenses section
- Select the frequency of when approvals are made (Weekly, Semi-monthly, or Monthly)
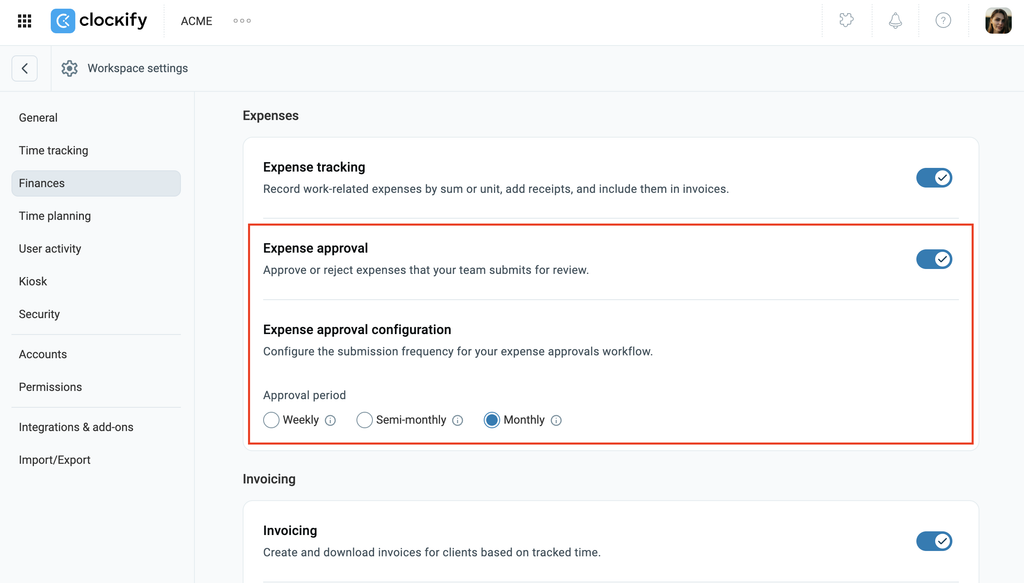
If the toggle for Expense approval isn’t active, you need to activate Expense tracking first.
Enable time approval #
To use time approvals in your workspace:
- Click the three-dot icon next to your workspace name
- Select Workspace settings > Time tracking
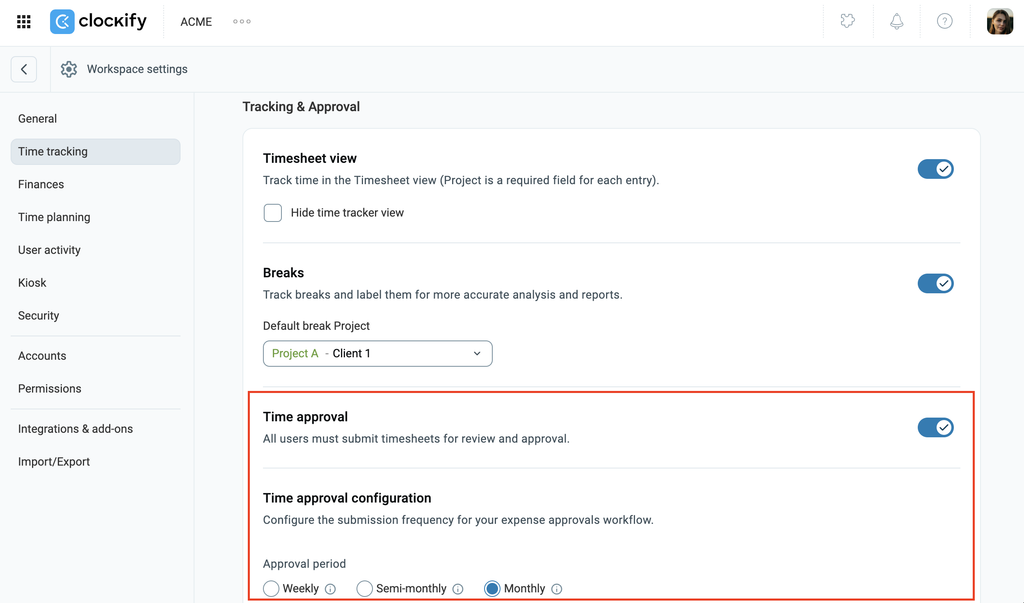
- Toggle the Enable time approval switch to ON in the Tracking & Approval section
- Select the frequency of when approvals are made (Weekly, Semi-monthly, or Monthly)
Permissions #
Depending on the permissions defined in the Workspace settings, submitted time and expenses can be managed from the Approvals page in the following way:
- Admin: approve, reject, edit
- Team manager (if enabled): approve, reject, edit
- Project manager (if enabled): approve, reject
To modify approval permissions:
1. Navigate to Workspace settings > Permissions page
2. Locate Who can approve submitted timesheets and Who can approve submitted expenses
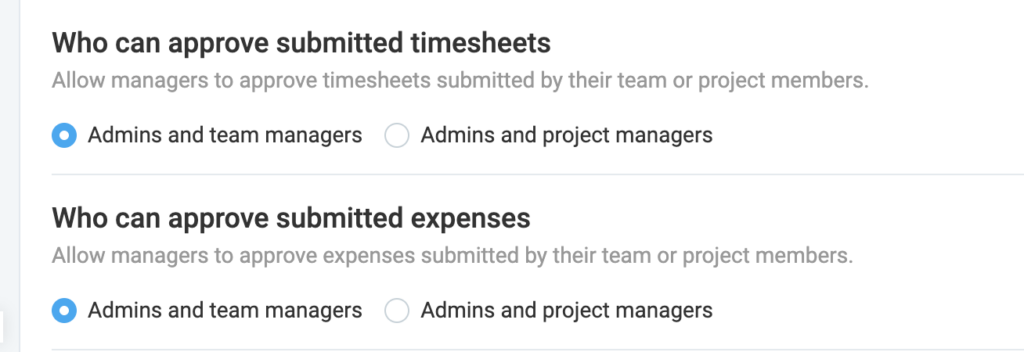
3. Select the option for both sections:
- Admins and team managers: Team members can approve timesheets and expenses submitted by their team members
- Admins & project managers: Project managers can approve timesheets and expenses submitted by members assigned to the projects they manage
If a user has admin and any other manager role, the admin role will override every other role. If a user has both project and team manager roles, all permissions to both roles will apply.
Approve/reject timesheets #
To approve timesheets:
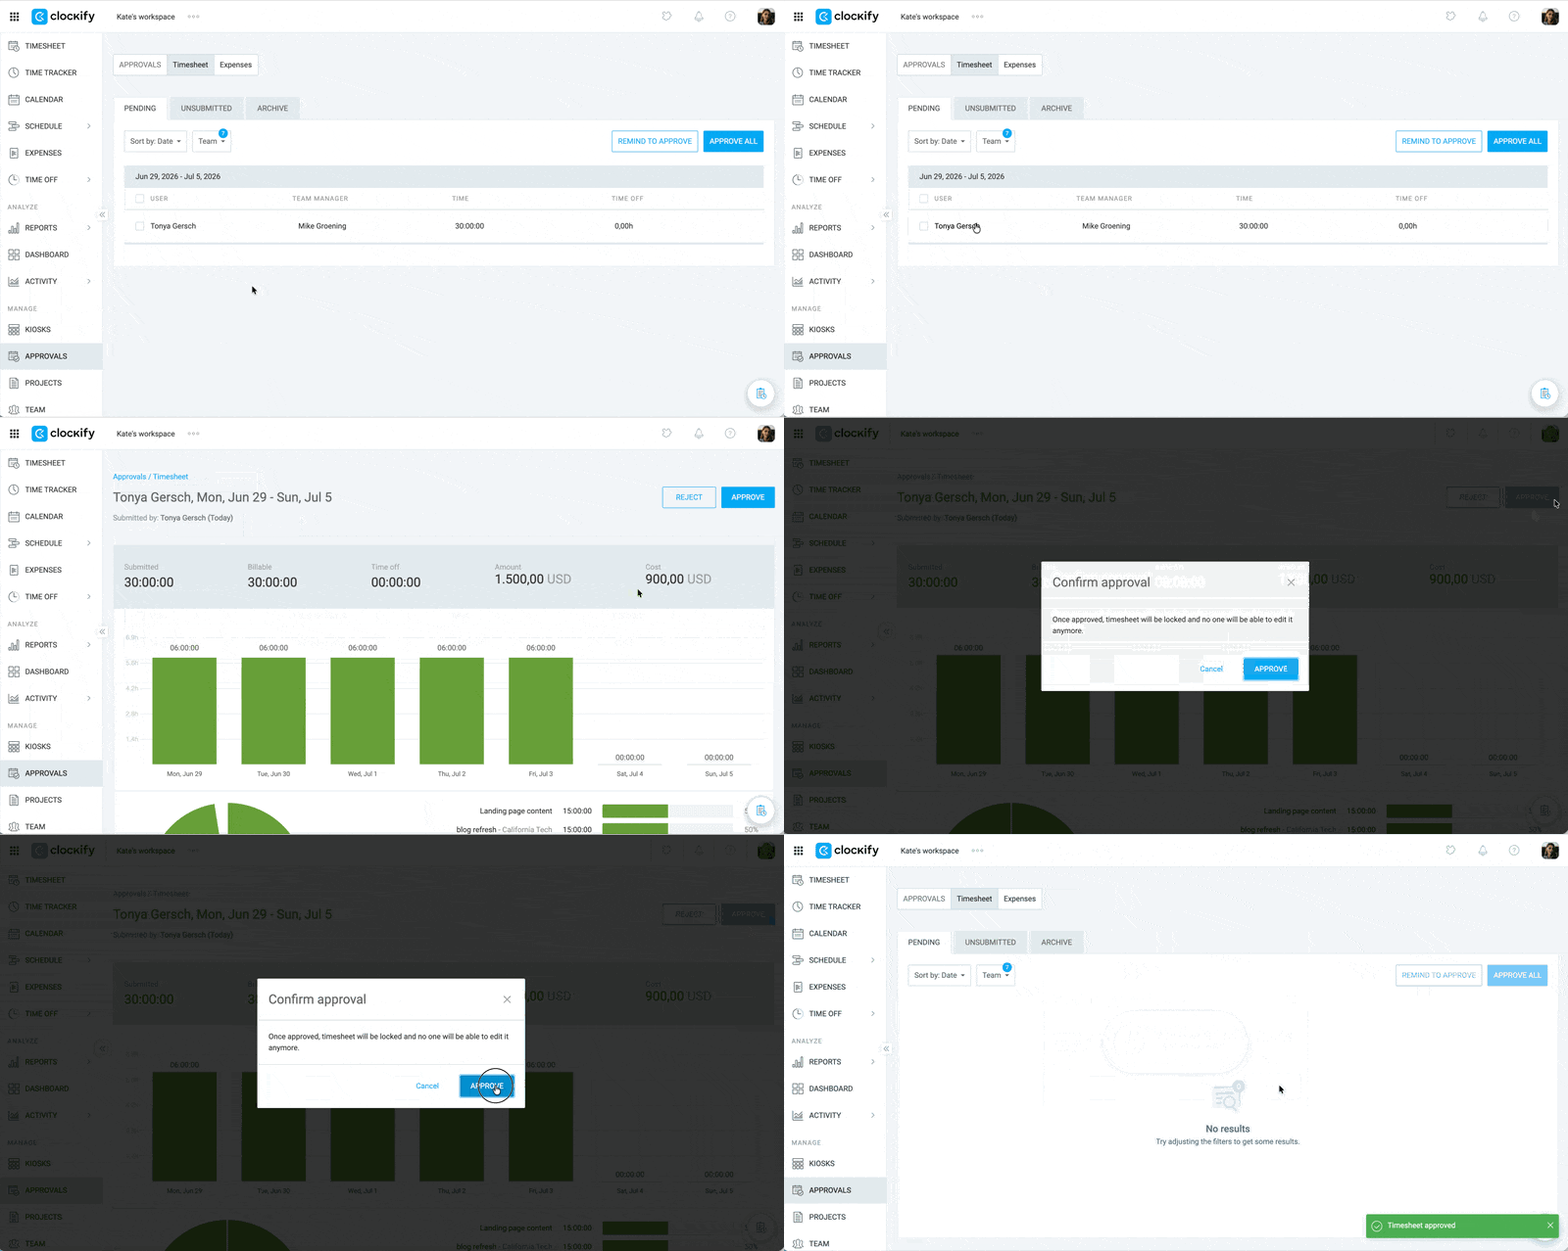
- Go to the Approvals page
- Make sure the topmost tab is set to Timesheet
- Go to the Pending tab
- Click Approve All to approve all timesheets or
- Click the team member’s name and click Approve or Reject on the next page
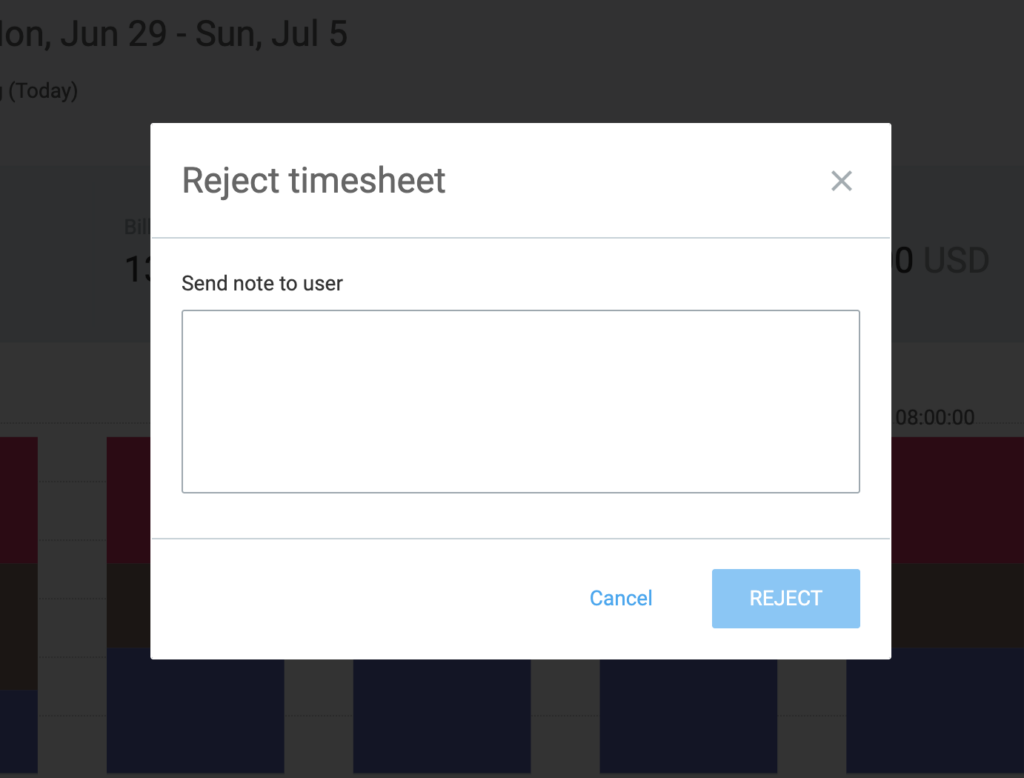
6. For a rejected timesheet, you need to write a note to send to the user
7. Click Reject when done
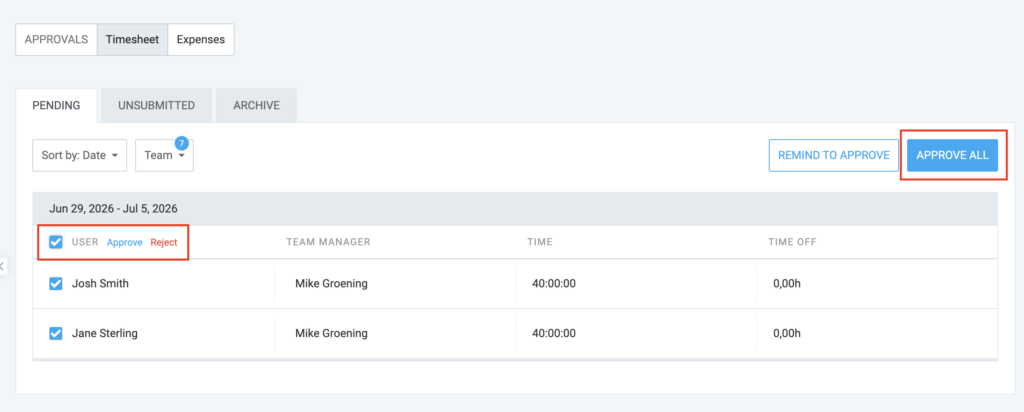
You can also bulk approve multiple users by clicking the box next to the user’s name and clicking Approve or Reject. To approve all users, click the Approve All button on the top-right corner.
Approve/reject expenses #
To approve expenses:
- Go to the Approvals page
- Click Expenses on the topmost tab
- Go to the Pending tab
- Click Approve All to approve all expenses or
- Click a team member’s name and click Approve or Reject on the next page
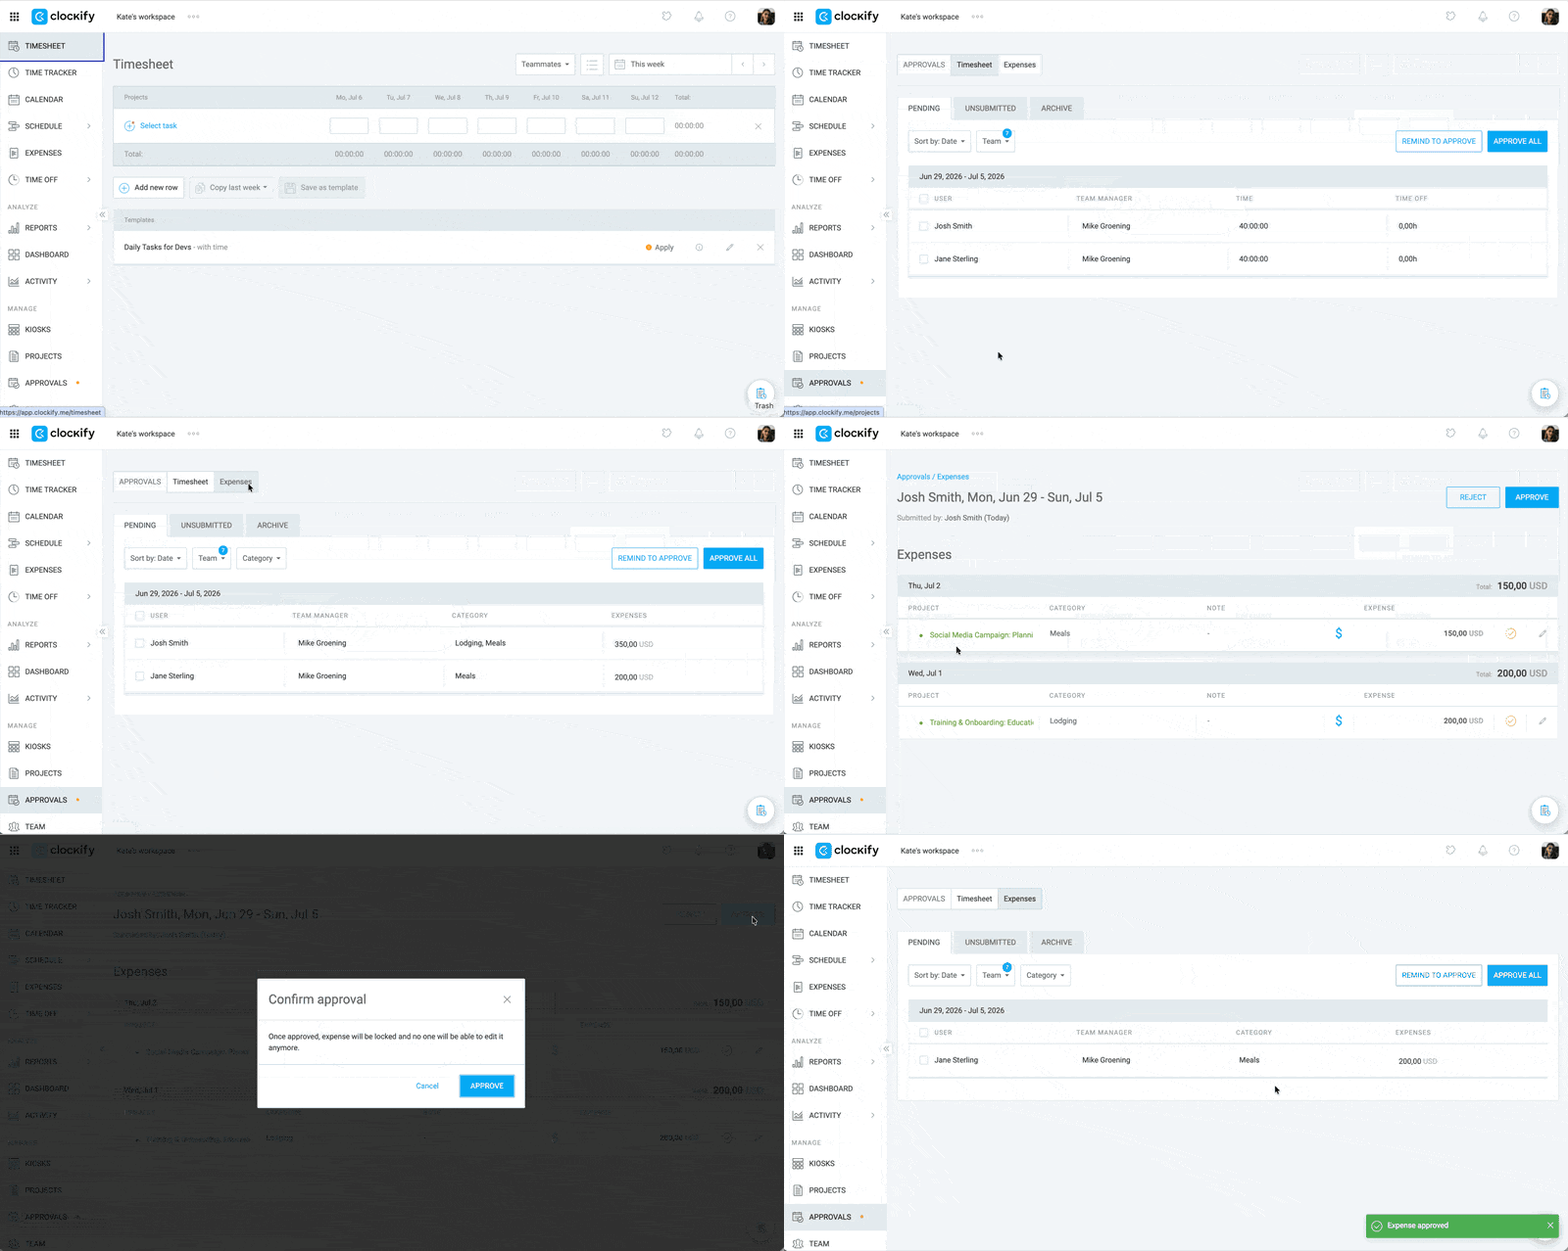
6. If rejecting, you need to write a short note for the user and then click Reject
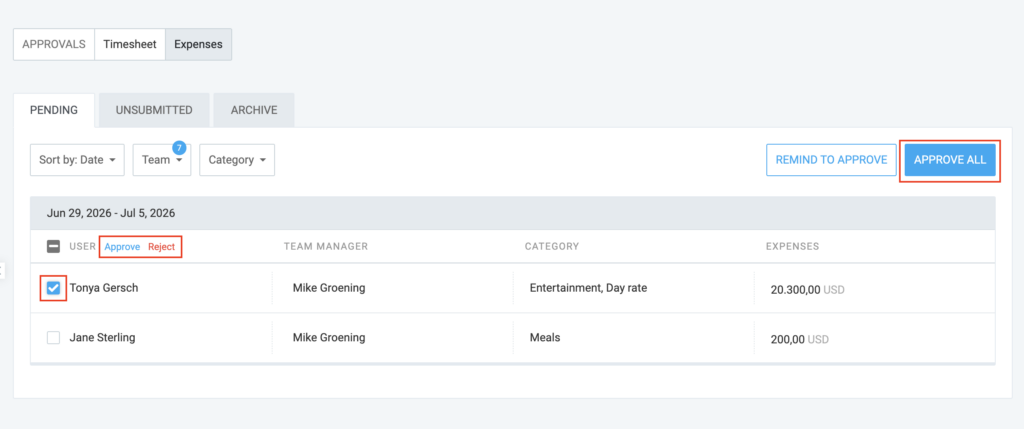
You can also use the bulk approve/reject feature by ticking the boxes next to the team members (or the topmost box to select all) and clicking Approve/Reject.
Approved time entries are permanently locked and admins can’t make any edits after approval.
If a member submitted a timesheet with entries that are wrongly submitted, you can:
- Reject the entire timesheet and edit and resubmit the entry (as Owner/Admin, or their Team manager)
- Go to the Detailed report and manually correct the mistake (only as Owner/Admin, or their Team manager)
Remind to approve #
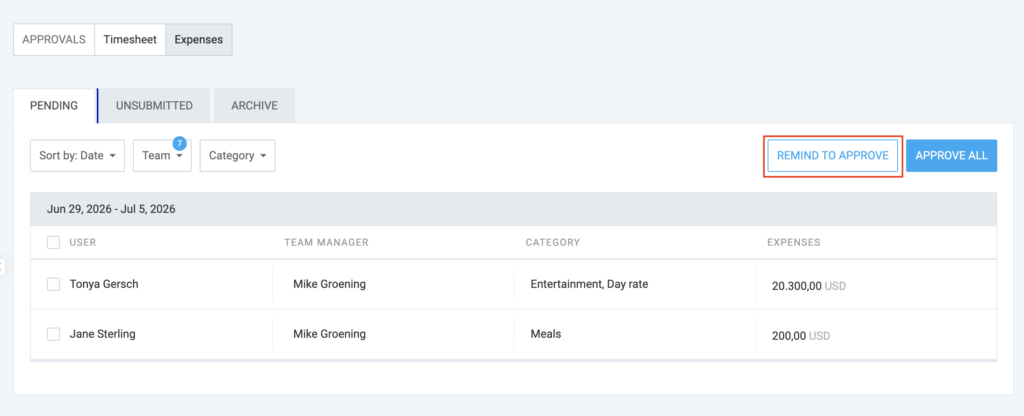
If there are Team or Project managers that are supervising teams or project assignees, you, as an Admin, can click Remind to approve to send an email reminder to each Team or Project manager to approve their team members’ timesheets.
To send managers reminder to approve:
- Go to the Approvals page
- Select Timesheet or Expenses on the topmost tab
- Go to the Pending tab
- Click Remind to approve
A reminder to approve submitted timesheets and expenses will be sent to managers’ email addresses.
To see a full timesheet, click on the request to see it in more detail.
Remind to submit #
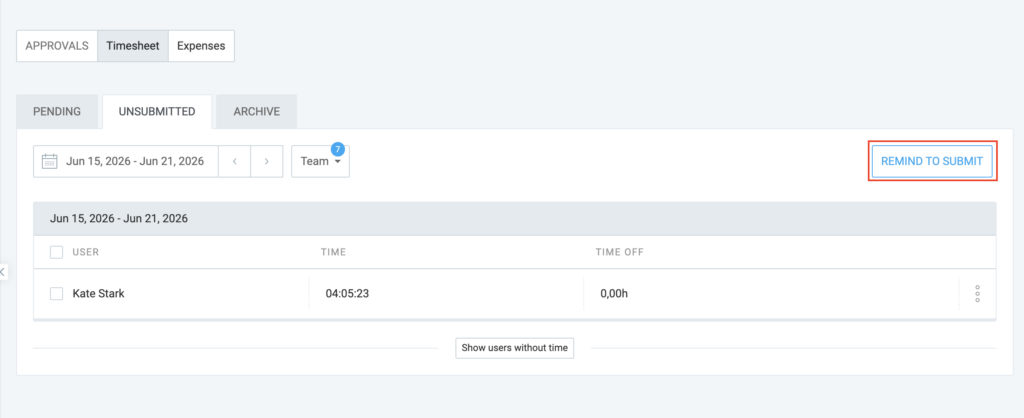
Admins and managers can check for unsubmitted timesheets and expenses and click Remind to submit.
To do this:
- Go to Approvals
- Select Timesheet or Expenses on the topmost tab
- Go to the Unsubmitted tab
- Click Remind to submit
Edit pending time request #
Admins can edit other user’s pending requests directly from the Pending tab in the Approvals page.
Unless time entries are locked, Team managers can edit their team’s pending requests.
To edit pending request:
- Go to Approvals page
- Select the Timesheet tab
- In Pending tab, choose submitted timesheet
- Click on edit pen icon next to time entry
- In Edit time entry screen, you can edit the following:
- Time and date
- Description
- Project
- Billability
- Duplicate/delete entry
- Click Save to complete the action
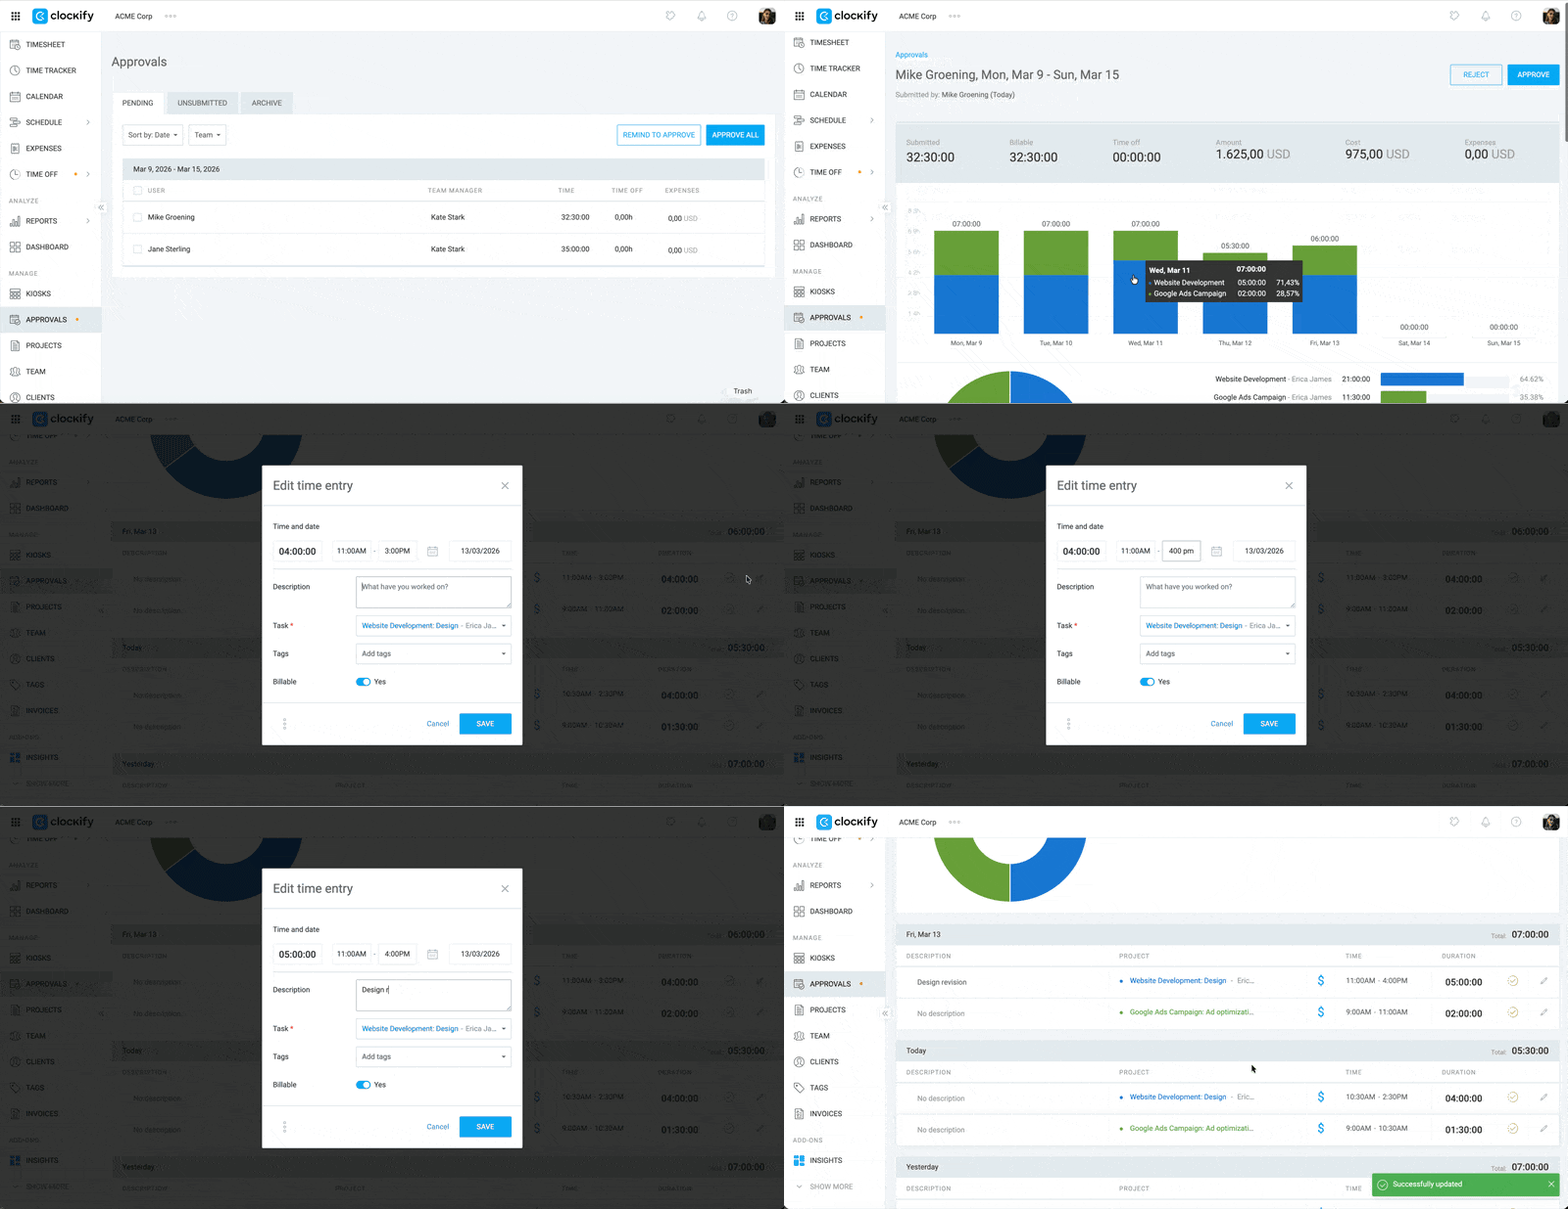
Once a person has Team or Project manager role, they can see the Approval page in the sidebar with members/project visible to them.
Edit pending expenses #
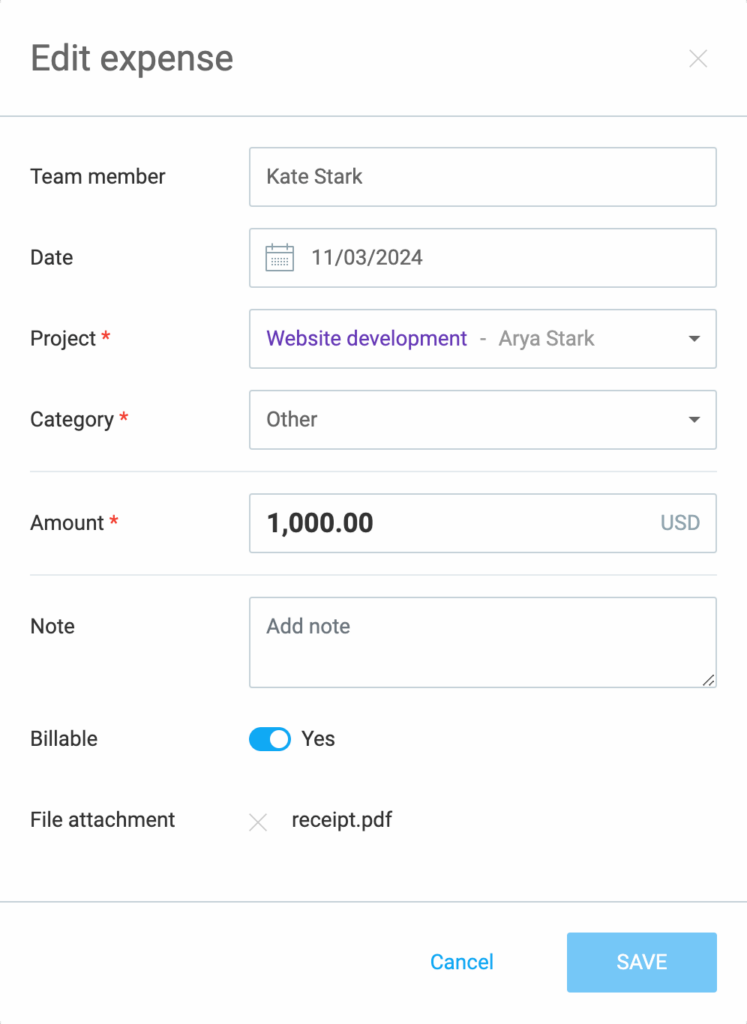
Admins can edit other user’s expenses directly from the Pending tab in Approvals > Expenses.
Team managers can edit their team’s pending requests unless time expenses are locked.
To edit pending expense:
- Go to Approvals page
- Select the Expenses tab
- Choose submitted expense in Pending tab
- Click on edit icon
- In Edit expense screen, edit the following:
- Date
- Project/Task
- Category
- Amount
- Billability
- Add/delete receipt
- Delete request
- Click Save to complete the action
If the start and end time include an overnight period, there will be a superscript number next to the end time, showing how many additional days the time entry covers.
Archive tab #
You can review all your approval history for both timesheets and expenses to see if all the required changes have been made.
- Go to Approvals
- Select Timesheet or Expenses tab
- Click Archive
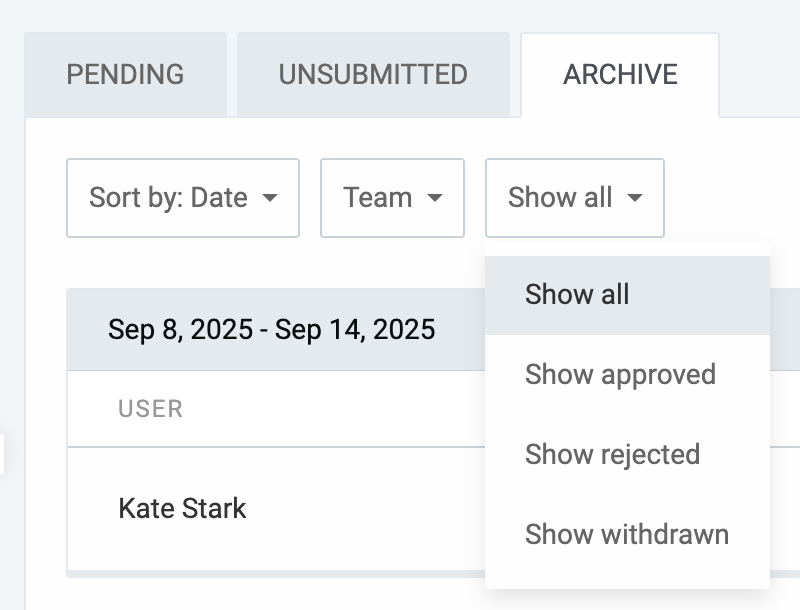
- The Timesheet archive shows the history of submitted, approved, rejected, and withdrawn timesheets.
- The Expenses archive shows the history of submitted, approved, rejected, and withdrawn expenses.
Use the filter timesheets and expenses according to their status (Approved, rejected, or withdrawn).
When you click on the timesheet marked rejected, you will see the detailed view that includes:
- User name and submission period
- Date & time of submission
- Timesheet details (time entries, expenses)
- Rejection comment explaining why timesheet wasn’t approved (if rejected)
Notifications #
If you’re admin and want to receive an email notification when a user submits their timesheet, you need to have a manager role for users you manage.
- User’s manager is notified if Timesheet is submitted
- User who submitted the timesheet is notified if Timesheet is approved
- User receives an email and note if Timesheet is rejected
- User and all the Admins receive an email if Approval is withdrawn
Learn more about Notifications in Clockify.