Free Invoice Templates for Agencies, Consultants & Freelancers
Download a free invoice template in your preferred format — Google Docs, Google Sheets, Word, Excel, and PDF. Use it as-is or customize it for your billing arrangement.
PDF • Excel • Word
What is an invoice? + download links
An invoice is a document that records a transaction between a service provider and a client. From your side (service provider), the invoiced amount is an accounts receivable — money you’re owed. From the client’s side, it’s an accounts payable — a bill they need to settle.
Every invoice should clearly state what was provided, how much it costs, and when payment is due.
Below, you’ll find free, ready-to-download invoice templates for every format and billing type, plus a clear breakdown of what a professional invoice must include and how to fill one out correctly.
Multipurpose Invoice Template Hourly Invoice Template Agency Invoice Template Consulting Invoice Template Small Business Invoice Template Credit Invoice Template Debit Invoice Template Mixed Invoice Template Commercial Invoice Template
What should an invoice include?
A professional invoice must include these fields:
- Invoice title — the word “Invoice” must appear on the document.
- Invoice number — a unique identifier for record keeping (e.g., INV-0042).
- Issue date — when the invoice was created.
- Due date — when payment is expected (e.g., Net 30, or a specific calendar date).
- Your business information — name, company name, address, email, phone, and business/tax number.
- Client information — name, company name, address, email, phone, and business/tax number for the person or company you’re billing.
- Itemized line items — a description of each service or product, quantity, rate, and line total.
- Subtotal — the total before taxes and discounts.
- Taxes — applicable tax rate and amount.
- Discounts — any negotiated discounts.
- Total amount due — the final number, clearly visible.
- Payment terms — accepted payment methods, late fee policy, etc.
- Notes — optional space for project reference, follow-up instructions, and so on.
Including all these fields ensures transparency, speeds up client approval, and reduces disputes.

🎓 11 Types of Invoices You Need for Your Business
Choose your ideal invoice template format
Here are 5 common invoice template formats:
Google Docs invoice templates: The most popular invoice format, it’s free, accessible from any device, and easy to share with clients. Use an invoice template in Google Docs for a clean, editable invoice you can update directly in your browser.
Google Sheets invoice templates: Works like Excel but lives in the cloud. It’s the right choice if you want automatic calculations as you fill in your line items.
Word invoice templates: Easy to edit and produce a polished result when printed or exported as a PDF. Invoice templates in Word are best used for businesses that want full control over formatting and layout.
Excel invoice templates: The strongest choice for complex billing — variable quantities, hourly rates, multiple tax lines, or currency conversions. Formulas handle all the calculations automatically.
PDF invoice templates: The standard format for sending finalized invoices. It locks the formatting across all devices and prevents clients from accidentally editing the document.
9 professional invoice templates — free download
Below are 9 professional invoice templates for different business types in all 5 of the above-mentioned formats. All of them can be used as a freelancer invoice template as well.
🎓 How Freelancers Spend Time — Statistics for 2025 (and Beyond)
#1: Multipurpose Invoice Template
The Multipurpose Invoice Template works as a Standard, Timesheet, Pro Forma, Interim, Recurring, or Past Due invoice — depending on how you fill it out.
Best for: Any professional service business looking for a single reliable template to handle most billing scenarios.
⬇️ Google Sheets • Excel • Google Docs • Word • PDF
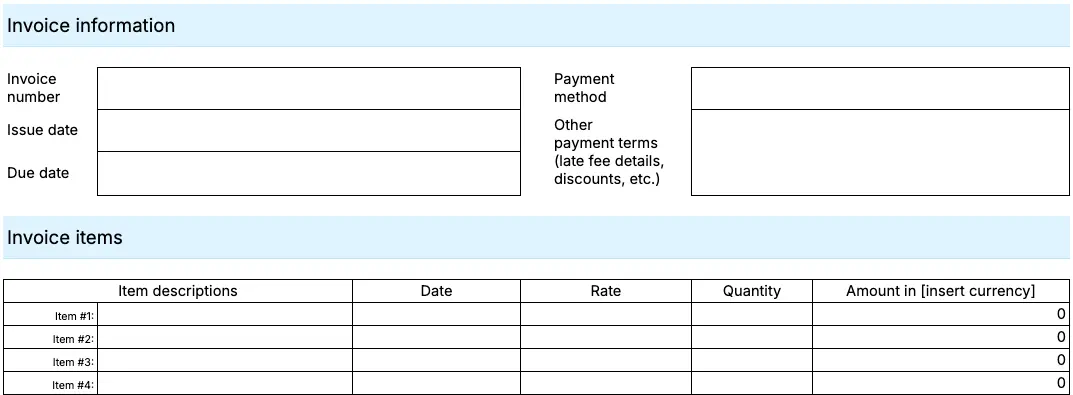
#2: Hourly Invoice Template
The Hourly Invoice Template covers billing by the hour. It shows hours worked, hourly rate, and a calculated total per line item. This invoice also supports multiple service lines at different rates — useful when billing for different team members or service types within the same project.
Best for: Agencies, consultants, lawyers, developers, designers, and any professional who bills clients for time.
⬇️ Google Sheets • Excel • Google Docs • Word • PDF
#3: Agency Invoice Template
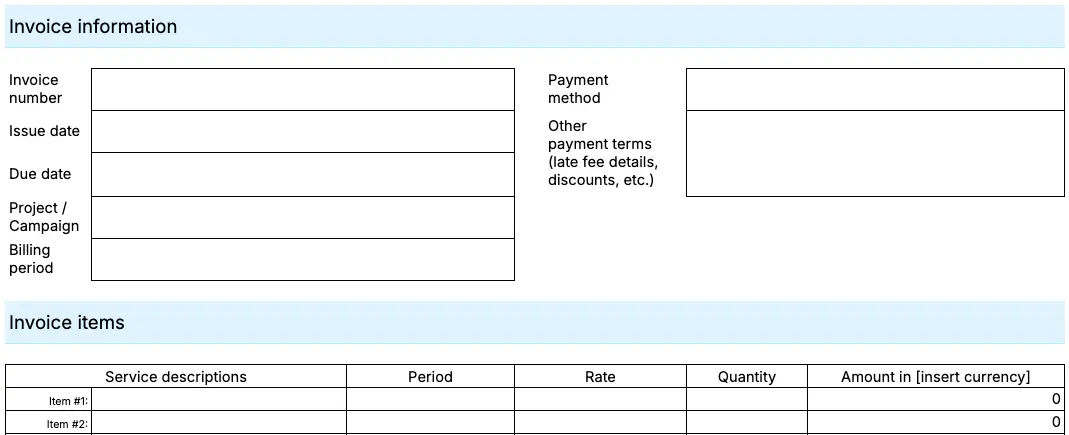
The Agency Invoice Template focuses on project-based and retainer billing for agencies. It supports multiple line items across services, billable hours by service type, and a recurring monthly retainer. The invoice also includes space for a clear project reference, so clients can match the invoice to their records.
Best for: Marketing agencies, creative studios, and PR firms billing clients on a project or monthly retainer basis.
⬇️ Google Sheets • Excel • Google Docs • Word • PDF
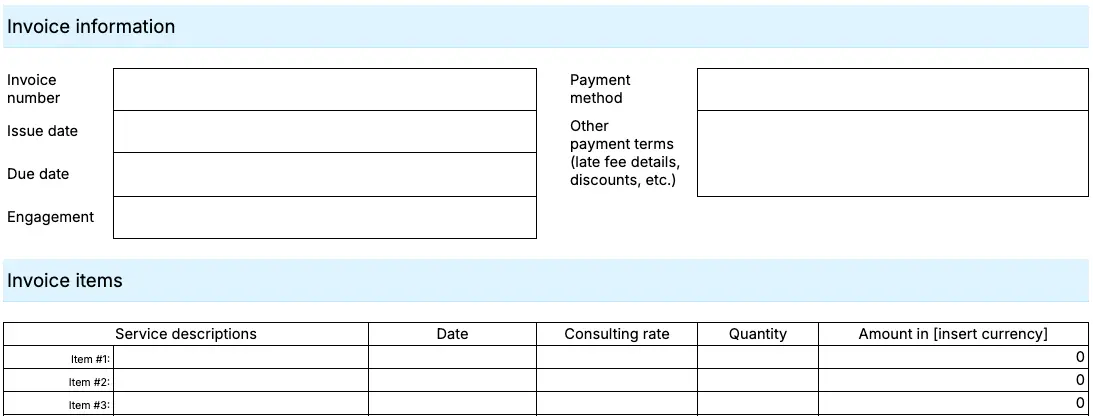
#4: Consulting Invoice Template
The Consulting Invoice Template covers hourly and fixed-fee billing for consultants, with dedicated line items for expense reimbursement alongside service fees. It supports both straightforward project billing and engagements that mix advisory hours with out-of-pocket expenses.
Best for: Independent consultants and consulting firms billing for strategy engagements, advisory retainers, or project work — with or without reimbursable expenses.
⬇️ Google Sheets • Excel • Google Docs • Word • PDF
#5: Small Business Invoice Template
The Small Business Invoice Template covers the standard required fields — line items, payment terms, taxes, and total. It’s a professional invoice template without any complexities, and easy to customize.
Best for: Small businesses and solo operators who need a clean invoice format.
⬇️ Google Sheets • Excel • Google Docs • Word • PDF
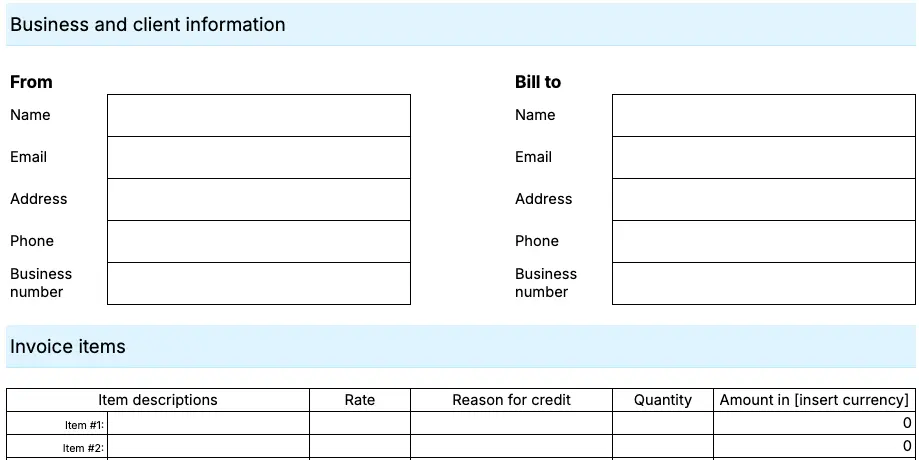
#6: Credit Invoice Template
The Credit Invoice Template focuses on a money return issued to a client — for refunds, belated discounts, or correcting a previous invoice error. It always shows a negative total (e.g., -$200 for a $200 refund).
Example: A company sells 10 office chairs to a client and issues an invoice for $1,000. After delivery, the client reports that 2 chairs are damaged and returns them. You then issue a credit invoice for a $200 refund.
Best for: Any business needing to issue a refund or apply a discount after the original invoice has been sent.
⬇️ Google Sheets • Excel • Google Docs • Word • PDF
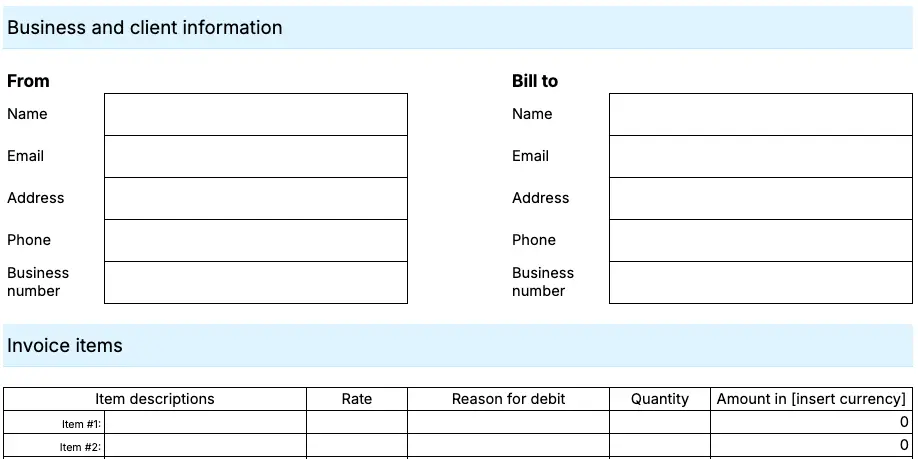
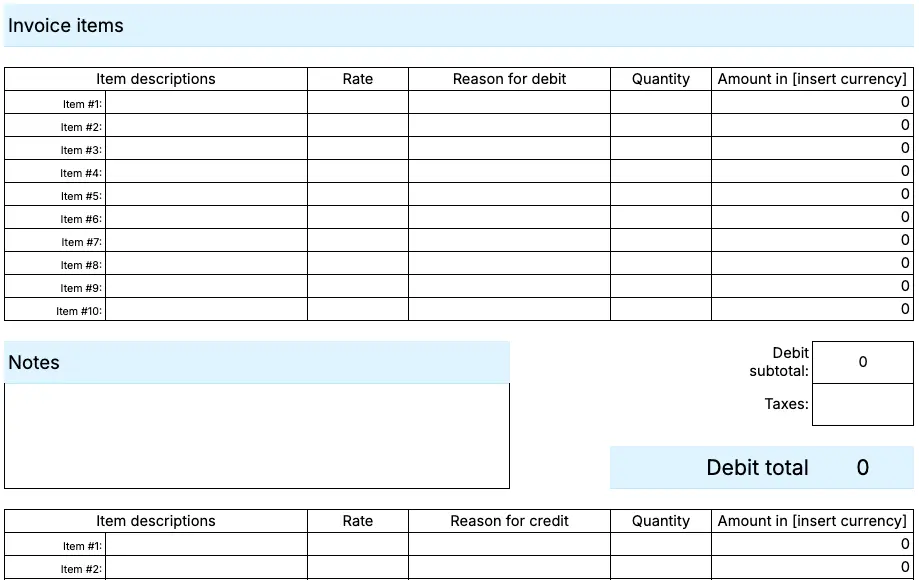
#7: Debit Invoice Template
The Debit Invoice Template manages an increase to a previously invoiced amount. For example, when a project ran over the original estimate, or when an early-payment discount was applied but the early payment never arrived. Debit invoices are always positive and add to the original amount.
Example: A client approved a fixed-fee project for $3,000. Midway through, they requested additional features outside the original scope worth $800. You then send a debit invoice for the extra $800, on top of the original $3,000 already invoiced.
Best for: Any situation where the scope or cost of work increased after the original invoice was sent.
⬇️ Google Sheets • Excel • Google Docs • Word • PDF
#8: Mixed Invoice Template
The Mixed Invoice Template combines credit and debit adjustments across multiple projects. This is useful when one project warrants a discount while another requires a cost increase.
Best for: Agencies and consultants managing multiple concurrent projects for the same client, where adjustments in both directions need to be settled in one document.
⬇️ Google Sheets • Excel • Google Docs • Word • PDF
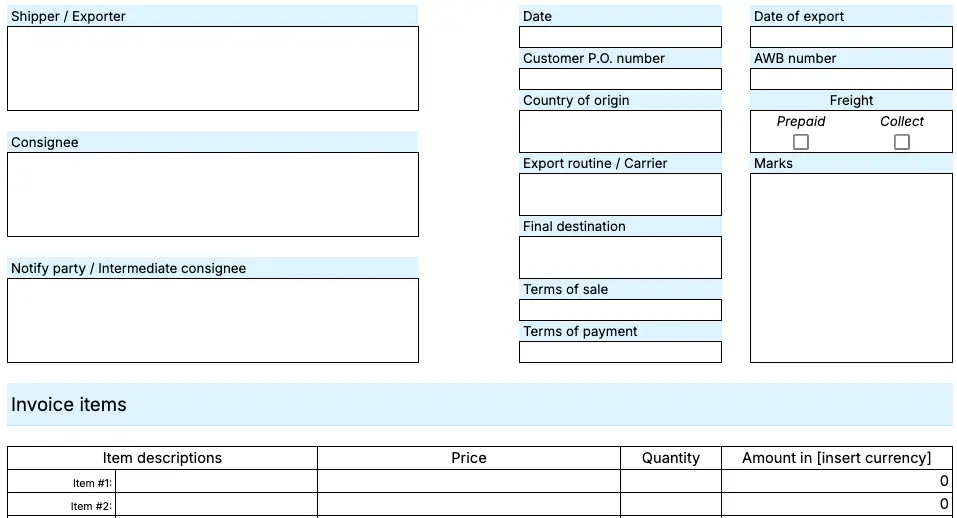
#9: Commercial Invoice Template
The Commercial Invoice Template covers customs-required data for international shipments, including unit count, weight or volume, total shipment value, and packaging format. It’s required for packages to clear customs in most countries.
Best for: Businesses shipping physical goods across borders.
⬇️ Google Sheets • Excel • Google Docs • Word • PDF
🎓 Project Billing: Guide to Accurate and Efficient Invoicing
How to fill out an invoice template
Whether you’re using a Word document, Google Docs template, or a spreadsheet, the process is the same.
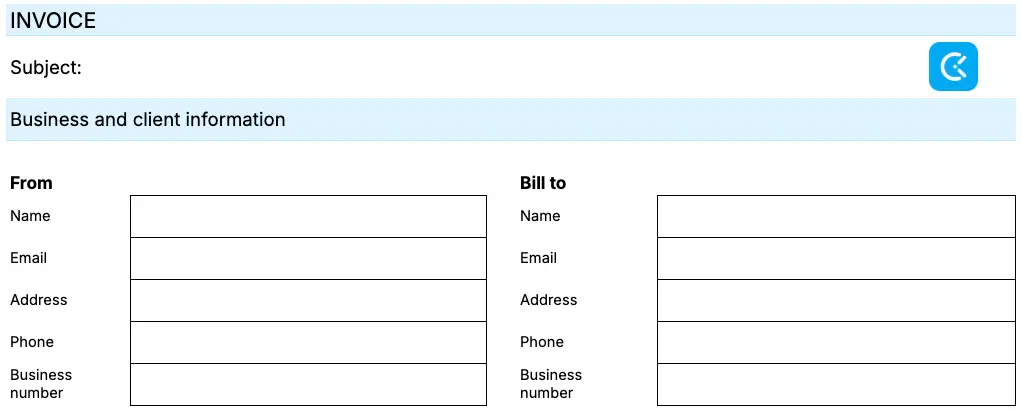
Step #1: Add your business information
Fill in your name, company name, address, phone number, email, and business or tax number. This goes at the top — it tells the client who the invoice is from.
Step #2: Add your client’s information
Fill in the same fields for the person or company you’re billing. Make sure the company name and billing address match what your client has on file — mismatches are a common reason payments get delayed.
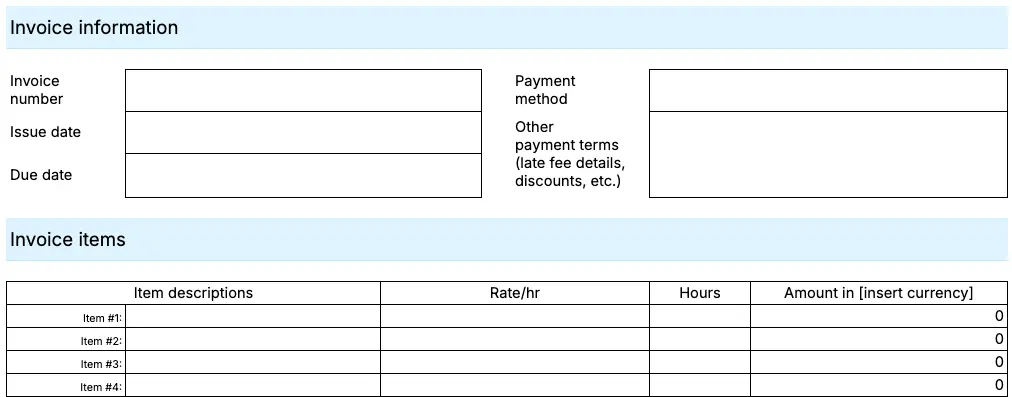
Step #3: Fill in the invoice details
Assign a unique invoice number, add the issue date, and set a due date. If you bill on Net 30 terms, the due date is 30 days after the issue date.
Step #4: List your line items
For each service or product, add a description, the quantity of items or the duration in hours, the price/rate, and the line total. Be specific: “Brand strategy; 12 hours @ $150/hr” is clearer than “consulting services” and far less likely to generate questions.
Step #5: Add taxes and discounts
Add applicable taxes as a percentage of the subtotal. If you’ve offered an early-payment discount, deduct it here.
Step #6: Show the total amount due
Make the total the most visible number on the invoice. Bold it, increase the font size, or add a background color. It should be the first number the client sees.
Step #7: Add payment instructions
List the payment methods you accept — bank transfer, PayPal, credit card, check — and state your late payment policy. If you charge a late fee, spell it out clearly.
Step #8: Add a note (optional)
A note section can serve many purposes — a brief thank-you, a project reference, or an invitation to reach out with questions. It’s optional, but it makes the invoice feel professional rather than just transactional.
🎓 Simplify Billing and Automate Client Invoicing With Clockify
How to create an invoice template from scratch
If none of the templates above fit your exact needs, here’s how to build one yourself.
Decide what type of invoice you need: Your billing arrangement determines the structure. An hourly invoice requires hours × rate calculations, while a fixed-fee invoice just needs a line item and a total. And a milestone invoice needs a clear description of what each payment covers.
Choose your program: Google Docs, Google Sheets, Word, and Excel all work for creating your invoice. Spreadsheet programs (Google Sheets, Excel) are better if you want automatic calculations. Word processors (Google Docs, Word) are easier to format into a polished, print-ready layout.
Build the header: Write “Invoice” at the top. Also, add a space for the subject line and your logo (if you have one).
Add business and client information: Your name, company, address, email, and business number should be on one side — with the same fields for your client on the other. Side by side, or one after the other, whatever works best for you.
Add invoice details and payment terms: This is where you need to create fields for the invoice number, issue date, due date, accepted payment methods, late fee policy, and any discount terms.
Build the line items table: The columns you’d need are typically: Description, Date, Quantity, Hours, Rate, and Amount. Add a row for each service or product. Below the table, add rows for Subtotal, Discount, Tax, and Total.
Add formulas (spreadsheets only): In a spreadsheet, use formulas so the math happens automatically:
- Line total =quantity cell × rate cell (e.g., =E5*F5)
- Subtotal =SUM(range) (e.g., =SUM(G5:G15))
- Total =(subtotal - discount) + tax (e.g., =(G16-G17)+G18)
In a word processor, you’ll calculate manually before filling in the totals.
Add a notes section: Leave space at the bottom for a thank-you, additional project notes, or payment instructions.
Save a master copy: Once the blank template is complete, save it as your master. Each time you invoice, duplicate the file, fill it in, and save it under the client and invoice number. Never edit the master file directly.
Invoice template vs. accounting software — when to upgrade
Invoice templates work well when you’re billing a small number of clients, your projects are straightforward, and you have time to fill things in manually.
They start to break when:
- You’re managing several active clients — tracking which invoices are paid vs. outstanding becomes a spreadsheet problem in itself.
- You bill by the hour, so translating time entries into invoice line items is a manual, error-prone process.
- You get clients pushing back on line items, and you have to dig through folders to find the original time records.
- You’re losing billable hours because you forget to log them before invoicing.
- Your accountant flags inconsistencies between invoices and your actual time records.
At that point, a tool that connects time tracking directly to invoicing is the solution to prevent revenue leakage.
Clockify by CAKE.com has a native Invoicing feature that lets you track billable hours against projects and convert them into client invoices. The invoice pulls from data you’ve already tracked — no manual entry, no calculation errors.
How to invoice clients with Clockify by CAKE.com
Clockify is a time tracking and invoicing software that connects tracked billable hours to client invoices. Here’s how the workflow looks:
- Set up your clients, projects, and rates. Add your billing address in Settings so it populates automatically on every invoice.
- Track your time as you work. You can use a timer, add time manually, or fill in a weekly timesheet. If the work you do for clients is repetitive, Clockify lets you duplicate time entries and even save your timesheets as templates.
- Review your earnings. In Reports, you can filter by project and time period to see your billable hours alongside calculated earnings.
- Create the invoice. When you create a new invoice in the Invoice section, select your client and set the currency, invoice ID, issue, and due dates. Simply import tracked billable time and add taxes, discounts, and notes if necessary.
- Track invoice status. Mark invoices as sent, unsent, paid, or void. All your invoice history stays in one place, searchable anytime.
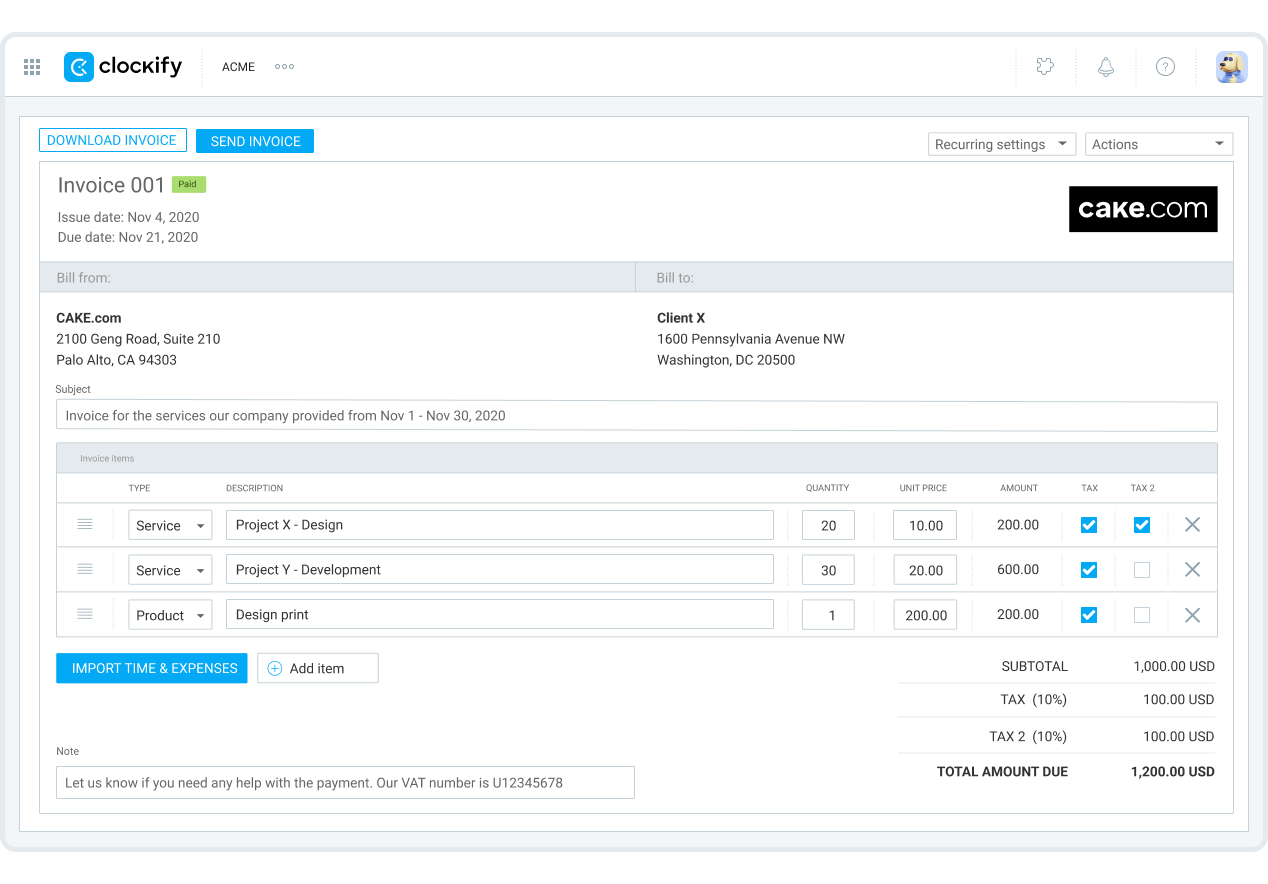
You can upload your company logo and update the invoicing email template. To further customize your invoices, visit our Marketplace add-ons. For example, Xero Integration lets you send your Clockify invoices to Xero and get payment information back to Clockify.
FAQs about invoices and invoice templates
If you have any further questions about invoices or invoice templates, refer to the following section.
What’s the difference between an invoice and a receipt?
An invoice is a request for payment, sent before the client pays. A receipt confirms that payment has been received.
What is the best format for an invoice?
The best invoice format will depend on your business needs and preferences. For example, the PDF format is good for sending finalized invoices. Google Docs or Word are good choices if you want to edit files between clients. And Excel or Google Sheets may be better for you if you need automatic calculations.
Should an invoice be PDF or Word?
An invoice can be both. For instance, you can create and edit your invoices in Word, and once it’s done, you can convert the finalized file to PDF and send it to the client.
How far in advance should I send an invoice?
Send an invoice as soon as the work is completed or the milestone is reached. For recurring retainers, send invoices on the same date each billing cycle.
What happens if a client doesn’t pay by the due date?
If a client doesn’t pay by the due date, send a Past Due invoice — a follow-up that references the original, restates the amount owed, and sets a new payment deadline. If your original invoice included a late fee policy, apply it here.
🎓 Late Invoice Statistics You Should Know
How do I create a simple invoice in Word?
To create a simple invoice in Word, open the program, go to File > New, and search “invoice” in the template gallery. Replace the placeholder text with your details, save a copy, and send. You can also download one of the free invoice templates in Word available on this page — they already include all required fields.
Is there an invoice template in Google Docs?
There currently aren’t any invoice templates in the Google Docs template gallery. However, the free Google Docs invoice templates available on this page are designed for professional service billing and include all required fields.
Does Google Sheets do invoices?
Yes, a Google Sheets invoice template with built-in formulas calculates subtotals and totals after the added adjustments. For more details and fields, you can opt for one of the spreadsheet-based templates on this page.
What’s the difference between a Pro Forma invoice and a Standard invoice?
A Pro Forma invoice is an estimate sent before work begins.
A Standard invoice is sent after the work is complete and represents the actual amount owed.
When should I use invoicing software instead of a template?
You should use invoicing software like Clockify by CAKE.com instead of a template when you are:
- Managing multiple active clients,
- Billing by the hour, or
- Spending lots of time reconciling invoice records.
The Invoicing feature is available on Clockify’s Standard plan, which you can try out for free for 7 days. Clockify is also available as part of CAKE.com’s Bundle deal, along with Plaky for project management, and Pumble for team communication.
