
Billing errors lead to client dissatisfaction and disputes, and ultimately loss of credibility.
Read this project billing guide to learn about types of project billing and how to bill clients accurately — step by step.
- Project billing is the process of setting prices, invoicing, and getting paid for your work.
- Multiple types of project billing exist; some of the most common are flat-fee, time-and-materials, and milestone-based billing.
- Proper timeline and cost estimation are key aspects of project billing.
- Good communication with a client is essential for getting paid for your work.
- Accounting software speeds up the billing and invoicing process.
What is project billing?
Project billing is the process of charging the client for a project. It includes everything from deciding on the billing method and rate to invoicing the client and requesting payment.
To bill a client accurately and secure profit, you should ensure the billing rate reflects the work put into the project.
Clockify by CAKE.com lets you track billable and non-billable hours, set billable rates, and log all other expenses.
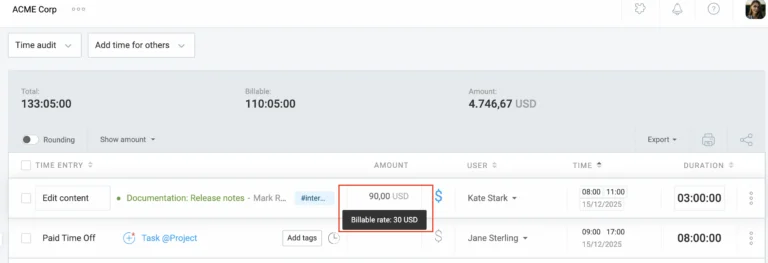
Track billable costs with Clockify
Different billing methods work for different projects — so let’s go through each project billing type and how to bill clients accurately.
Types of project billing
Without an adequate billing type, you’ll likely end up underpricing (or overpricing) your services.
Let’s take a look at some of the most common project billing methods so you can find the one that works for your project.
| Project billing type | Meaning | Pros | Cons |
|---|---|---|---|
| Flat fee | A fixed price is charged for the entire project. | – Clear expectations (client knows how much they’ll pay in advance) – Simplified budgeting | – Lack of flexibility, as the price is pre-determined (it doesn’t account for any changes as the project progresses) – Potential revenue loss in case of scope creep |
| Time and materials | The total amount the client pays includes the cost of materials used for the project and billable hours. | – Minimizes financial risks for service providers – Adds more flexibility — no strict budget or time constraints | – Requires precise time and expense logging – Causes potential client disputes if the cost of time and materials exceeds their initial expectations |
| Milestone-based billing | The service is paid for in increments after each project milestone is reached. | – Eliminates the risk of not getting paid at all for a completed project – Promotes accountability (of both team members and clients) | – The client and service provider may have disagreements due to not clearly defined milestones – The client must approve all milestones, which may cause a stalemate |
| Retainer billing | The price is fixed but recurring — the client usually pays the same amount weekly, monthly, or yearly for as long as the service is being provided. | – Secures steady revenue for the service provider – Simplifies billing and reduces administrative work | – Workload doesn’t always reflect the price – Prices are difficult to raise, as they are fixed and recurring |
| Cost-plus | The price includes the cost of materials and a pre-determined amount for profit. | – Brings flexibility for both the client and service provider, as they can adjust the project scope – Accounts for profit | – The client doesn’t know exactly how much they’ll have to pay until the end of the project – The service provider must meticulously track all expenses |
Method #1: Flat fee
A flat fee is a fixed amount you charge for your project. So, you always charge the same price for this service, regardless of how many hours you put into it. You can charge a flat fee at the beginning or at the end of the project.
The main advantage of this billing method is that both you and the client know what to expect. They know how much they’ll need to pay up front, and you know precisely how much you’ll earn.
However, charging a flat fee can lead to a financial loss if the project is prolonged or resource costs exceed expectations.
Method #2: Time and materials
When charging for time and materials in projects, you bill your client for a specific service based on the number of hours and resources you’ve put into it.
The time-and-materials billing method is riskier for the client in case of scope creep. They may end up paying more than expected if more work needs to be done in the end.
On the flip side, you could lose revenue if you don’t properly track time spent and materials used. So, in this case, logging every billable hour and expense is essential.
Method #3: Milestone-based billing
Milestone-based billing has the client pay in increments when predetermined project milestones are reached. In this case, the invoice is sent once a milestone is completed.
The founder of Full-Scale Advisors, Jason Whitlock, ensures his project milestones are never vague:

“For example, in a RevOps or GTM project, I don’t want a milestone to simply be ‘strategy complete’. That’s way too vague. A better milestone might be a completed current-state audit, a mapped sales process, a documented handoff workflow, a CRM field architecture, or an enablement playbook tied to specific success criteria.”
Another expert and CEO of Pearl Lemon, Deepak Shukla, explained that he usually doesn’t charge each milestone the same:

“I don’t split fees evenly. Higher-risk or more labour-intensive phases usually carry a larger percentage of the project value. For example, planning might be 20%, execution 50%, and final delivery 30%. The goal is to align payment with the actual work and risk involved at each stage.”
So, to bill a client using the milestone-based method, create specific milestones and price them based on the amount of work and risk they entail.
Our expert contributor, Jason Whitlock, finds that milestone-based billing promotes accountability. He notes that this is the greatest benefit of this billing type:
“The biggest advantage I see is that billing on milestones creates accountability for both sides. Clients get tangible checkpoints, and me, as the consultant, has to define progress in terms of the completed outcomes rather than pricing with flat project-based or hourly-based engagements.”
Deepak Shukla finds disputes over poorly defined milestones as the greatest weakness. Deepak says that “disputes can arise if it’s not obvious that a goal has been met.”
Method #4: Retainer billing
Retainer billing is a billing method frequently used in law firms. It involves charging clients a fixed, recurring price for a service. So, the client pays the same amount on a weekly, monthly, or yearly basis — as long as the service is being provided.
The advantage of this billing method is that it can give financial stability. However, since it involves charging a fixed price, you may end up doing more work than you get paid for.
Method #5: Cost-plus
Cost-plus is a billing type commonly used in construction. It involves setting a price that accounts for both expenses and profit.
The contractor and client first agree on what will count as a cost. Then, they determine how profit will be calculated. Some options for calculating profit include:
- Fixed amount
- Percentage of the costs
- Incentive after specific goals are reached
The pro of this method is that you won’t lose money, as profit is always taken into account (as long as you plan and calculate everything properly). However, the disadvantage is that you may underestimate how much profit you could achieve and miss the opportunity to maximize your revenue.
💡CLOCKIFY PRO TIP
If you want to learn how to easily keep track of project expenses, check out this guide:
5 stages of project billing
Project billing can be broken down into 5 main stages to keep in mind.
#1: Project planning
The first stage of project billing involves project and resource planning. Here’s a quick breakdown of the steps to creating a project plan:
- Define the project scope — include boundaries, aims, and requirements. To avoid surprises, you should clarify with the client what work will go into the project.
- Break the project down into tasks — this makes it easier to manage and lets you determine who will work on what.
- Estimate project duration — set accurate deadlines and estimate costs.
- Establish a budget — do this based on the estimated costs of resources, including staff, materials, and tools.
- Allocate resources — assign tasks to teams and distribute other resources, including financial and technological.
Track hours on tasks in Clockify
#2: Setting and negotiating the billing rate
The next stage is setting the billing rate: Your billable rate should be high enough to cover expenses and secure a profit.
Here’s one way to calculate a fair and sustainable rate.
First, calculate all costs — labor costs, materials, and other expenses. Labor cost is the total you pay your team for the project.
Once you know your total costs, determine your target delivery margin. The delivery margin is the profit remaining after you’ve covered all costs.
Let’s say you aim for a 60% delivery margin, and your delivery cost is $35 per hour. Here’s how you’d calculate your billing rate:
Delivery cost / (1 – Target delivery margin) = Hourly billing rate
$35 / (1 – 0.60) = $87.5 per hour
To ensure you set competitive prices while remaining profitable, learn about average hourly rates in your field. For example, the average hourly rate for a data scientist is $40.84, whereas the average hourly rate for a media buyer is $26.13.
💡 CLOCKIFY PRO TIP
Unsure how to determine and calculate your hourly rate? You can use our free hourly rate calculator:
#3: Project time and expense tracking
To bill a client accurately for a project, you need to log all billable time and expenses. As for the tracking method, find the one that works best for your business. The most common options include:
- Pen and paper — this method involves writing down time entries on paper.
- Honor method — this method involves employees reporting the time they estimate they worked on a project to their manager.
- Spreadsheets — this method involves manually entering work start and end times in a spreadsheet (typically Excel or Google Sheets).
- Software — this method involves using an app to track hours automatically (e.g., timer mode) or manually (e.g., timesheet mode).
Time-and-billing apps, such as Clockify, calculate the total amount of billable hours for you. Based on the billable rates you set, you can even see the total billable cost.
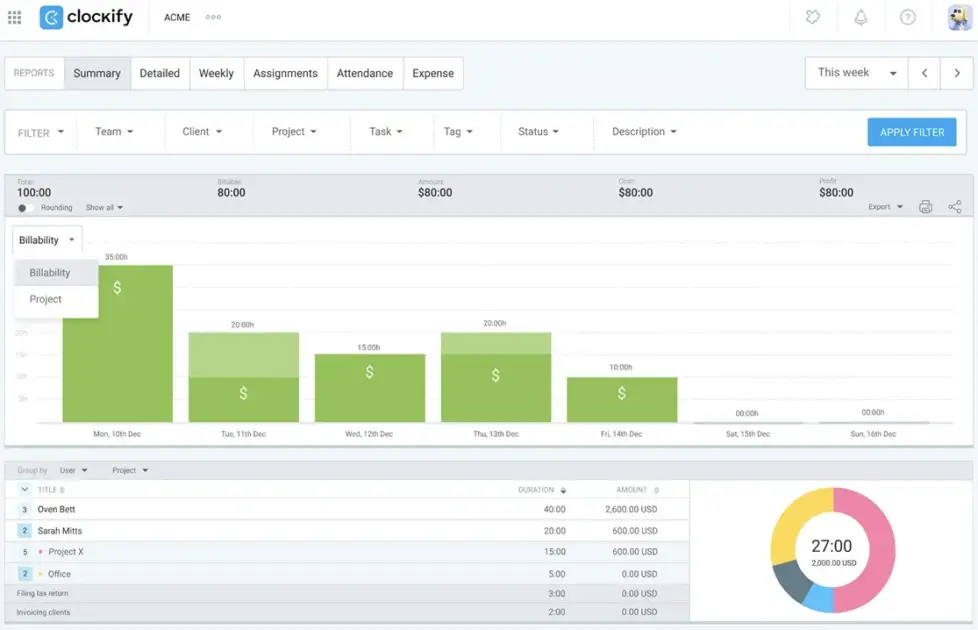
If you don’t want all team members to see all tracked hours and expenses, you can manage their access in Settings. This means you can hide tracked time and expenses from users, so they’d only see their own tracked data.
Tracking project time is a good idea even if you don’t bill by the hour. It allows you to estimate how much time future projects will take and set your rates accordingly.
💡 CLOCKIFY PRO TIP
Wondering why tracking time is important? Find out in this article:
#4: Project invoicing
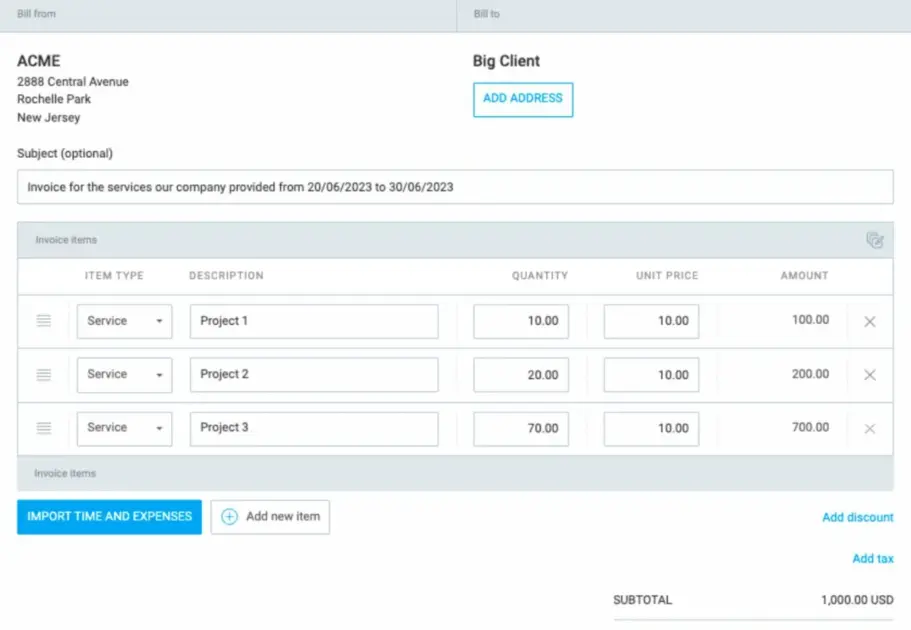
Once you have finished the project (or a project milestone), you can invoice your client. Your project invoice should contain:
- Client name and address
- Services provided
- Payment deadline
- Amount to be paid
- Any other details you find relevant
You can make your own invoice, use an invoice template, or find high-quality invoicing software that can do the work for you.
If you use time tracking and invoicing software like Clockify, you can import tracked billable time and expenses directly into the invoice.
💡 CLOCKIFY PRO TIP
If you need a more detailed, step-by-step guide on how to invoice clients, check out this article:
#5: Collecting payment
After you’ve sent out the invoice with details on how your client can pay you, you can expect your payment.
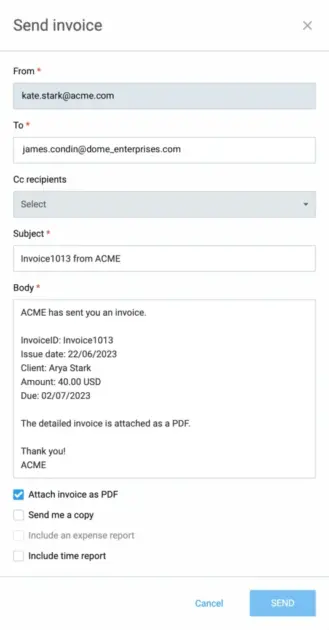
Using Clockify to generate your invoices also lets you send the invoice email through the app. Clockify has a range of email templates you can choose from — sparing you from drafting up the email text each time you need to send an invoice. You’ll also have the option to modify the email text before it’s sent.
If you realize all payment deadlines have been breached and you still haven’t been paid, you’ll need to push matters forward yourself.
Here are some invoice late-fee wording tips you can try when you want to politely ask the client for payment.
First, send a firm (but friendly) email asking for payment — be straightforward but friendly about payment details (the amount, the payment method, etc.).
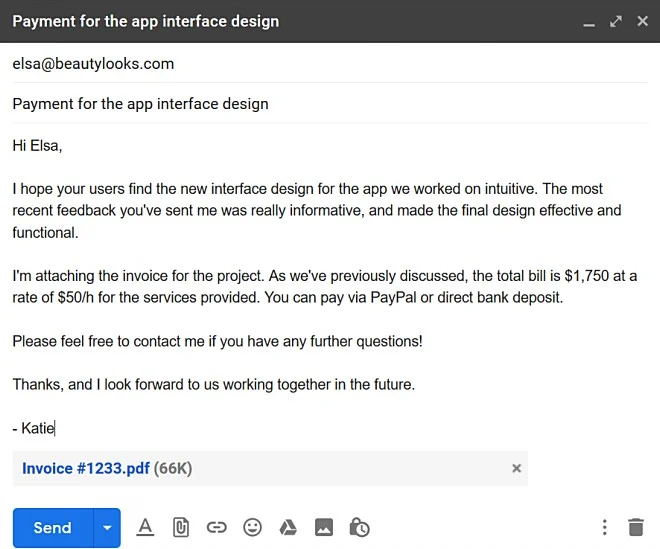
Secondly, send a follow-up email after 2 weeks if you receive no response to the first email — be firmer in this follow-up email, but retain a friendly undertone. You can also charge an extra fee if your client doesn’t pay you before a certain deadline.
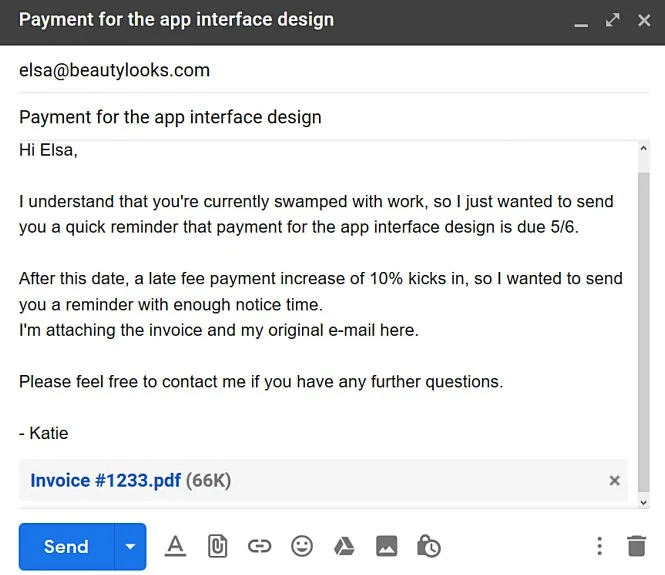
If you don’t receive a response — make a phone call. Remind the client of your payment agreement (including the due date and late-fee details) and make further payment arrangements.
What are the challenges of project billing?
Project billing is complex because it involves setting pricing and explaining your costs for each project separately.
Small businesses across industries — from IT companies to law firms — face various challenges when charging for their services. Here are the most common ones.
Challenge #1: The complexity of billing per project
Billing for your work involves much more than estimating the time you’ll spend on a project and charging for that time. That is why having a separate billing process for every project can be complicated and time-consuming.
Finance specialist Kevin Huffman believes the right system and a good billing tool help automate the billing process and avoid errors:

“Project billing processes could be greatly enhanced using an integrated project management and accounting system. This would allow time and expenses to be tracked ‘on the fly’, so everything is billed accurately in a transparent way.”
Challenge #2: Charging for operating costs
Operating costs that aren’t directly related to the specific project you’re working on also have to be accounted for. Administrative fees, rent and utilities, training, professional software, and subscriptions are part of your business operations.
If you don’t learn how to properly include them in your service rates, you’ll end up losing money. So, you need to set up a system to allocate operating expenses across your projects and include them in the cost of your services.
Considering the complexity of billing per project and accounting for operating costs, finance specialist Huffman suggests “performing regular internal audits of the billing processes.” This way, you’ll perfect a billing system that accurately predicts your project expenses and accounts for the operating costs.
Track time and costs with Clockify
Challenge #3: Scope creep
Sometimes, project tasks and goals change and expand beyond the original plan. This is known as scope creep.
As the project scope expands, the project costs will likely increase. As soon as you realize you need more resources to cover project costs, you should come up with a new project budget.
If scope creep happened due to the client’s additional requests, you also need to:
- Communicate the changes to the client on time — contact the client in a direct, prompt, and straightforward manner as soon as you realize you’ll need a bigger budget.
- Provide proof of the changes — clarify what items you need more money for, provide specific reasons and proof.
- Document all changes — create a new budget agreement that includes the new pricing.
If scope creep occurs due to poor planning on your part, you may end up losing revenue.
To minimize the consequences, you’ll need to revisit your plan. For example, use a project schedule compression technique to avoid missing the deadline, such as fast tracking or project crashing. Fast tracking involves identifying what tasks can be performed simultaneously, while project crashing includes adding more resources.
💡 CLOCKIFY PRO TIP
If you wonder what the best strategies are for avoiding cost overruns, check out this article:
Challenge #4: Accounting for unpredictable costs
Unpredictable costs during a project affect both you and your client.
If you’re charging on a time-and-materials basis, additional expenses or time spent on a project directly affect the final cost of services. In case the final cost exceeds the client’s budget, they may refuse to reimburse you for the additional expenses that occurred.
Inversely, when you’re charging a fixed fee, any additional expenses are on you.
On the upside, by maintaining clear communication and explaining the unpredictable circumstances to the client, you may be able to agree on a new budget that reflects the changes.
CEO of Venture Smarter, Jonathan Morgan, believes thorough project assessment mitigates the issue of unpredictable costs:

“Sometimes, unforeseen obstacles arise, causing delays and increased expenses. To tackle this, it’s essential to invest time in a comprehensive project assessment before providing a quote. Break down the project into tasks, evaluate potential risks, and incorporate buffers for unforeseen circumstances.”
5 tips for improved project billing
Looking to perfect the billing process and avoid potential misunderstandings? Check out these 5 tips for improved project billing.
Tip #1: Establish the terms upfront
Every aspect of billing and invoicing should be agreed upon with the client before you start a project. This ensures both parties have a clear understanding of what’s expected of them regarding deliverables and pricing.
Billing aspects you need to agree on before the project starts include:
- Pricing
- Type of billing
- Payment method
- Timelines
- Number of installments and their dates (if applicable)
- Possible penalties for late payments
Tip #2: Sign an agreement
Signing a contract with a client ensures you have records of everything you agreed on. This provides legal protection in case any issues arise.
Furthermore, a client is more likely to honor their obligations when a written agreement is in place, as it serves as evidence of their commitments.
Tip #3: Set realistic timelines and expectations
Learning how to properly estimate your projects is key to getting paid.
The inability to deliver on your promises makes you look unprofessional and could cause frustration for the client. This may result in their refusal to pay for your services.
Tip #4: Maintain clear communication
Clear communication goes a long way in ensuring you bill your client and get paid properly.
For starters, make sure the client understands every aspect of the project’s billing.
Then, if you encounter any issues, inform your client immediately. Don’t make any changes to the process and the pricing before getting the client’s approval.
Expert contributor Morgan highlights that proactive communication leads to transparent and fair billing:
“Regularly update clients on the project’s progress, discuss any proposed changes, and agree upon additional costs before implementing them. This proactive approach helps manage expectations and ensures billing remains transparent and fair.”

Tip #5: Consult a legal expert
A legal expert can help you draft a contract to sign with your clients. Moreover, they can assist in determining possible penalties for late payments and in disputing any issues that may arise.
In addition, they can help you file your taxes, which can be a complicated process for 1099 contractors. Lastly, if you’re working with international clients, you could benefit from legal advice on cross-border billing.
How to automate project billing with Clockify by CAKE.com
Clockify is a time tracking and invoicing app that simplifies client billing. Here’s how you can use Clockify for project-based billing.
First, track billable hours and expenses. You and your team can choose how you want to track time — automatically or manually.
If you want your time automatically tracked, simply select your project and start the Timer. To mark hours as billable, click the dollar sign in the Timer.

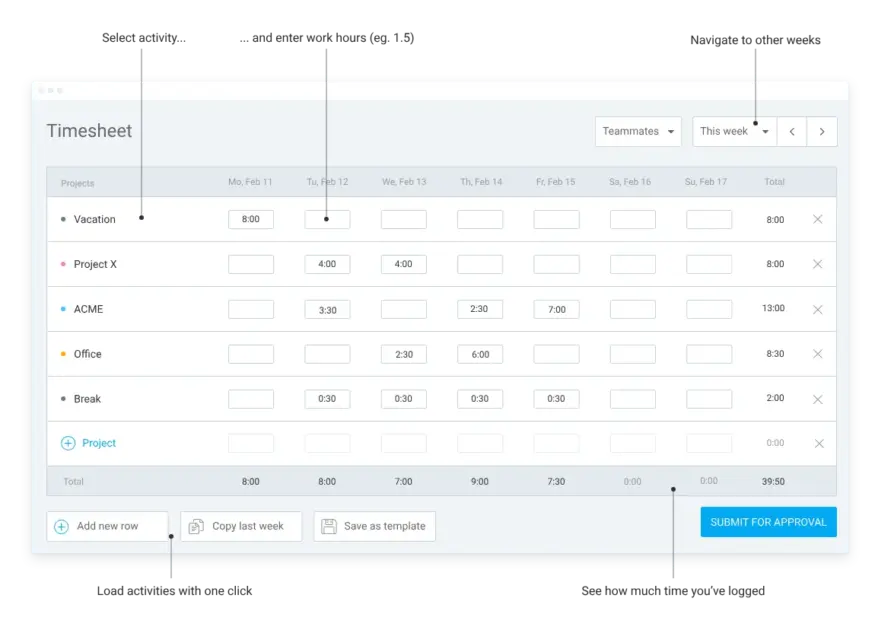
If you prefer to track hours manually, you can use timesheets and quickly add hours for the entire week.
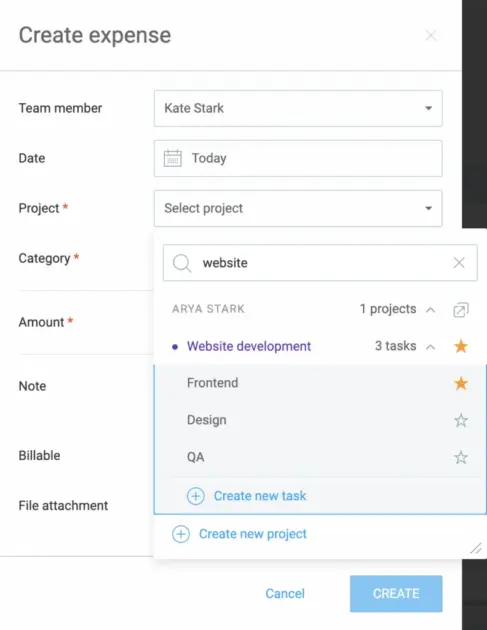
You can also easily categorize and log your expenses. Once you create expense categories, your team can add all expenses associated with your project. They can also attach a receipt to the expense.
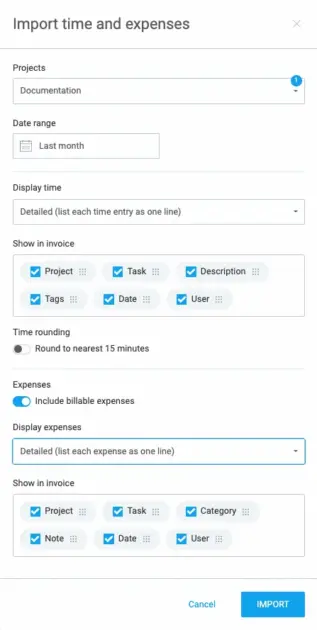
Then, import billable time and expenses into the invoice. When importing time and expenses, Clockify lets you choose which information to display on the invoice.
For billable hours, this includes project, task, description, tags, date, and user. Clockify will calculate the total amount to be paid for you.
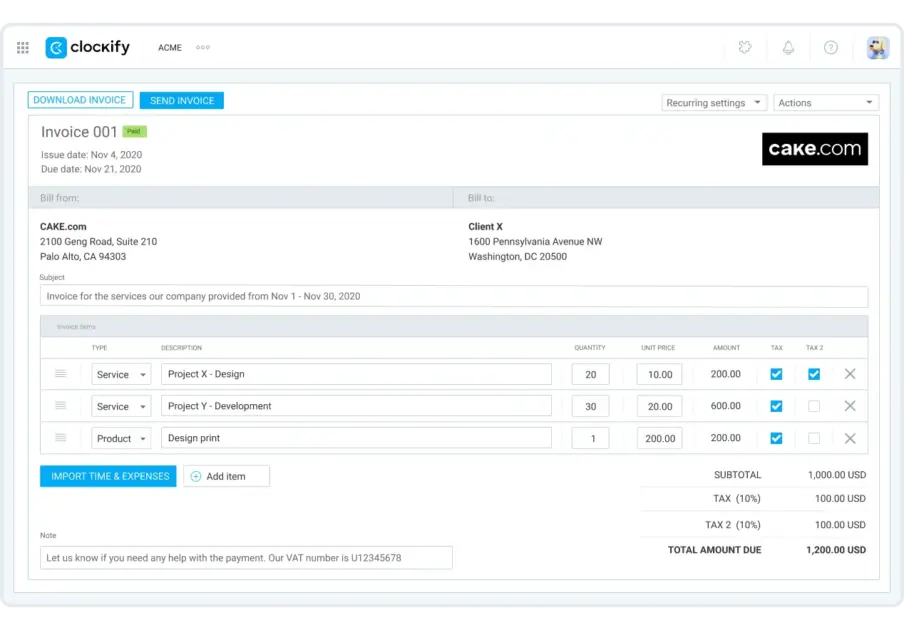
To further customize your invoice in Clockify, you can use the Better Invoices add-on.
After that, you can send the invoice to your client. Clockify lets you send the invoice you generated easily via email. To do this, click the Send invoice button.
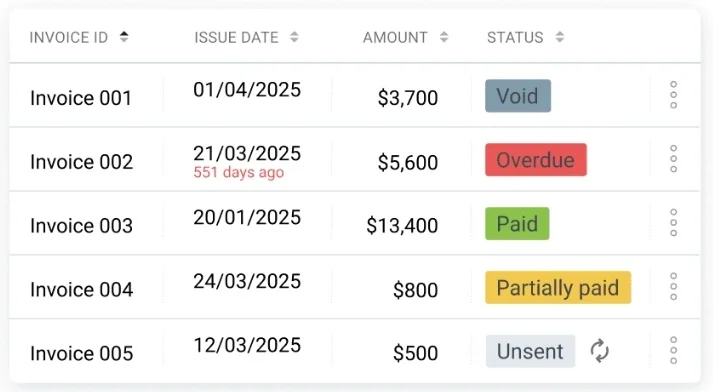
Finally, mark the invoice as paid. To keep up with client payments, you can use Clockify statuses. Clockify invoice statuses include:
- Unsent
- Paid
- Partially paid
- Void
- Overdue
You can even send invoices generated in Clockify to Xero. And once an invoice is paid, the status automatically changes in Clockify.

FAQs about project billing
Want to learn even more about different aspects of billing for a project? Here are answers to some frequently asked questions about project billing.
What is billing a project?
Billing a project (project billing) is the process of setting rates, invoicing, and getting paid for a project you worked on.
How do I bill a project?
To bill a project accurately, create a detailed project plan first. This includes everything from determining what aspects of the project are billable and establishing a project timeline to creating the budget and assigning tasks to team members. After the project (or project milestone) is done, you can invoice your client.
What’s the difference between billing and invoicing?
Billing involves all the steps from setting the billing rate to collecting the payment. Invoicing is one step in billing and involves creating and sending an invoice to the client. The invoice should include the services provided, the payment due date, the amount, and other details.
💡 CLOCKIFY PRO TIP
Wondering how to simplify and automate client billing? Refer to the article below:
What are the 3 types of billing?
The 3 common types of billing include flat fee, time and materials, and retainer. Charging a flat fee means setting a fixed amount to be paid for the project, regardless of how many hours your team ends up working on it.
Conversely, the time-and-materials billing method accounts for the number of hours worked on the project and the cost of materials used.
Retainer billing is more similar to the flat fee method, as it also involves a fixed amount. However, in this case, the same amount is billed on a recurring basis (e.g., weekly, monthly, or yearly).
Do project managers do billing?
Project managers may handle aspects of project billing, such as approving timesheets and billable expenses. Sending invoices is usually not a project manager’s responsibility, as this is typically handled by the accounting staff.
How to enable billing for a project?
To enable billing in a time-and-billing tool like Clockify, set billable rates and enable invoicing in Workspace settings. Then enter the client’s information and add the client to your project.
Once you track billable hours on the projects associated with your client, you’ll get all relevant billing data — hours worked on the billable projects and the amount your client needs to pay.
Start billing projects in Clockify
How we reviewed this post: Our writers & editors monitor the posts and update them when new information becomes available, to keep them fresh and relevant.