 Updated: October 15, 2025
 Getting started with Clockify by CAKE.com? We got you covered. This Clockify new user guide explains how Clockify account creation works and how to get started setting everything up.
Clockify by CAKE.com sign up
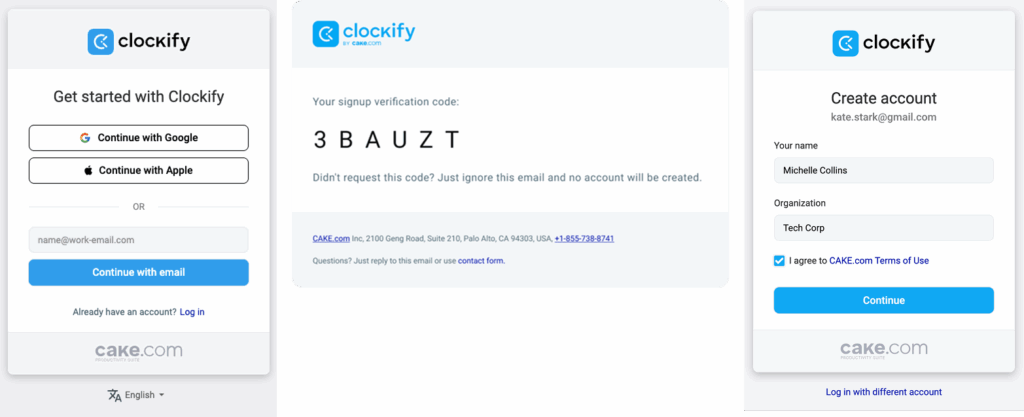
To register a new free account and get started with Clockify:
- Go to https://clockify.me/
- Click the “Sign up free” on the Clockify home screen (top right corner)
- Insert your email in the Sign-up modal, click Continue with email
- Enter the verification code you received in the email
- Type in your name and the organization name
If you need more details on how to organize your workspace in one or multiple workspaces, check out this guide.
Choosing a plan
If you opened a free account and now you want to switch to one of our paid plans, you can do that right from the initial home screen.
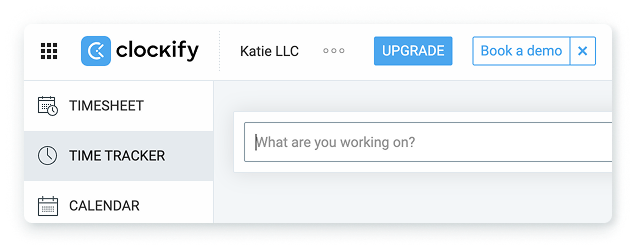
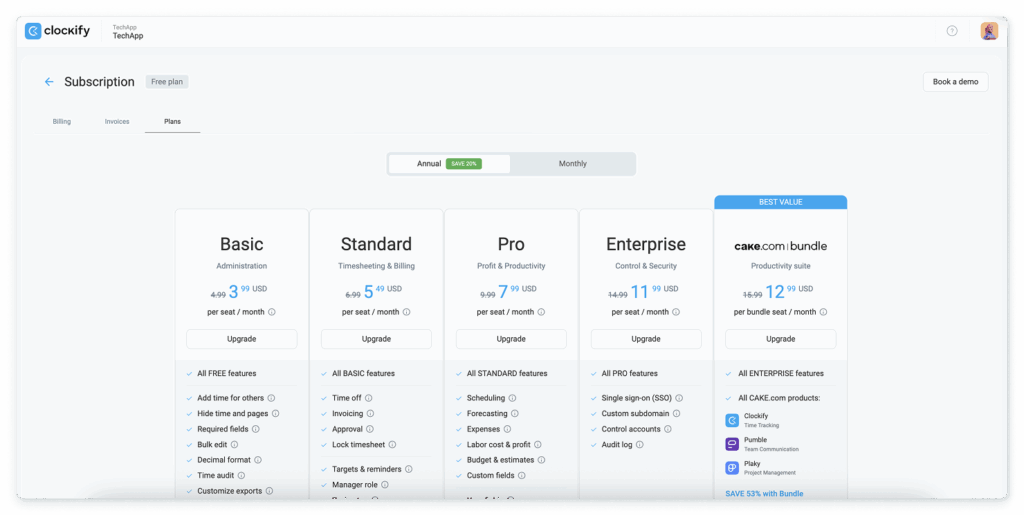
When you click on the Upgrade button, you will get an option to choose between the plans and the subscription option (annual or monthly).
The annual subscription provides a more cost-effective seat price over time compared to the monthly billing option.
After you click “Upgrade” on a subscription plan you opted for and confirm the action, you will type in all the information necessary to complete the action:
- Customer information: If you’re using Clockify as an individual or a Company/Organization, the country you operate in
- Invoice information: Company name, email, address, and other company details
- Payment information: Card number and details
Then, you will be able to add the number of seats (people) you want to have involved and finish the upgrade after agreeing to the CAKE.com Terms of Use.

How to set up your Clockify workspace?
When you create an account, one workspace will be automatically created for you.
Workspace settings are unique to each workspace, so if you’re not sure if you need only one or more, read our guide on How to organize a workspace in Clockify.
You can start setting up your account by exploring your personal Profile settings and customizing them however you wish.
Profile settings
Profile settings give you the ability to set your personal information and preferences, for example, time zone, language, date format, or week start day.
Your email, profile picture, and username are managed through the “My profile” option and will lead you to your CAKE.com Account page, while preferences are set through the “Preferences” option in Clockify.

All other Clockify users in your workspace will also have the option to set up their own personal preferences that will affect their workspace view.
When you make sure all the settings are set in the right way, you can start preparing to organize your business data and track time.
Workspace settings
The first thing you need to set up is the list of active features in your workspace. Some features, like Time Tracker, are automatically activated when you create an account. While other features, such as Timesheet, have to be enabled first to be visible.
You can browse the Workspace settings to explore the active/inactive features for yourself, or read the full list of features that have to be enabled in this guide.
The next thing to set up is how your time-tracking data will be organized throughout your workspace.
Categorizing time
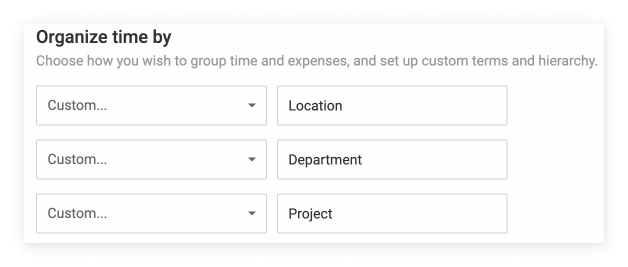
By default, time in Clockify is categorized through tasks, projects, and clients. But these labels can be renamed.
So, if you wish to track time on, e.g., Jobs, Locations, Departments instead of Tasks, Projects, Clients, you can rename the labels.
For further categorization, you can also use tags, which work regardless of the hierarchy.
You can create tags for any type of time entries you want to later filter out much more easily in the Reports.
For example, you can create an “Overtime” tag, and when you track your work, your overtime hours can be marked with an Overtime tag.

Other than that, in the Workspace settings, you can set all the general settings related to your workspace, such as the default billability status for projects, billable and cost rates for the whole workspace, currency format, data format, number format, and so on.
Permissions & roles
Before you invite all the team members and assign them adequate roles, make sure that all the permissions for specific roles are set as you want in the Permissions tab in the Workspace settings.
In short, there are four types of roles in Clockify:
- Owner – a person who created a workspace and who can add/remove Admins
- Admins – who can see and edit everything
- Managers – who can manage people and projects
- Regular users – who can track time and see reports
After you have all the permissions for the roles are set, you can proceed to invite team members.
Managing team members
Clockify by CAKE.com allows you to add full or limited users. A full user can access all active Clockify features, while a limited user can only use Clockify through a kiosk to clock in and out of work hours.

To add a full user, you would need their email address. For limited users, you only need to add a name.
While you’re adding team members, you can right away assign them adequate roles in Clockify to manage who can do what.
You can also organize team members in Groups, and when a new team member joins, you can give them access to certain projects just by assigning them to a group, instead of doing it manually.
On the Team page, you can customize and edit each member’s profile.
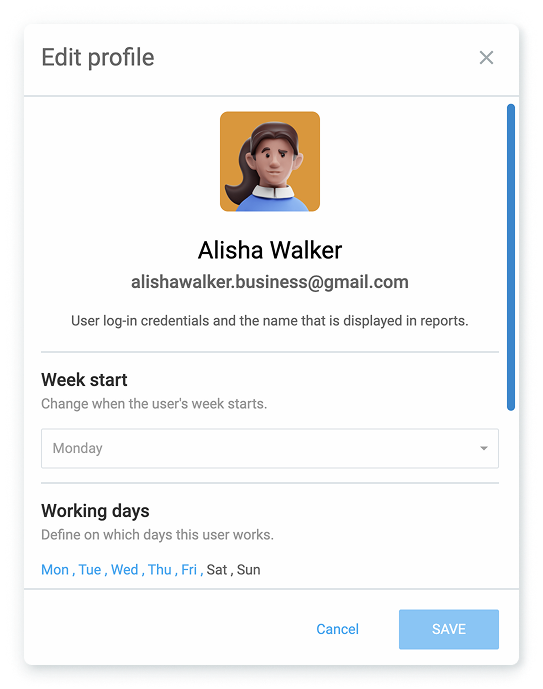
You can set different working days and daily work capacities (e.g., 4h for part-time employees) for each member.
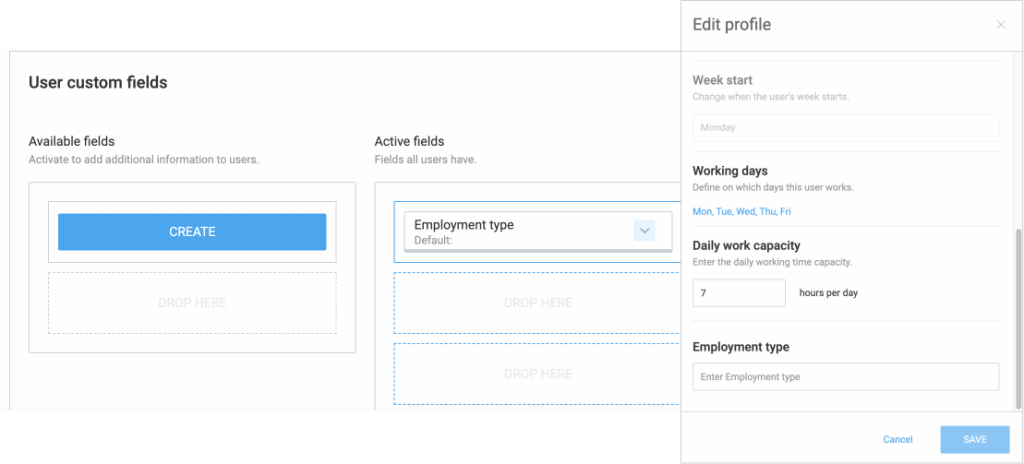
And if you need any further information on each employee, go to the Workspace settings and create custom user fields.
When you add your active custom user fields, you will see that information in their profile settings.
Managing clients
You can create as many clients (departments, or any other custom category you’ve set) to group the work done on projects.
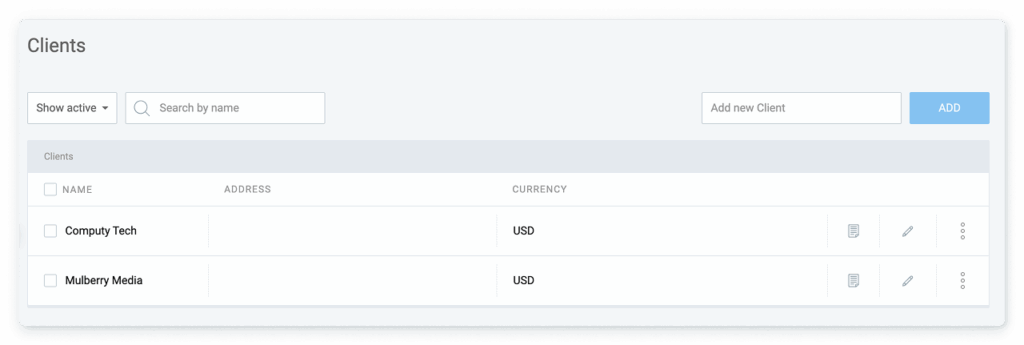
When you type in a new client name, you will get the option to add other information, such as email address, postal address, client currency, and custom notes.
Tying your tracked hours to projects and clients will help you filter out just the information you need in the reports.
Managing projects
Projects in Clockify will group your total tracked time, help you filter out the reports, and give you insight into the work tied to a project or a client.
When creating a project, you can assign it to a specific client, give it a color to easily distinguish it from other projects, and set it as public or private to determine who can track time on it.
Public projects will be accessible to all, while private projects will be visible to certain users only.
For example, you can create a special project to plan a surprise party for a colleague and mark it visible only to the people who participate in its planning.
To ensure you stay within budget and meet deadlines, and actually track the progress of a project, you need to add its time or budget estimates.
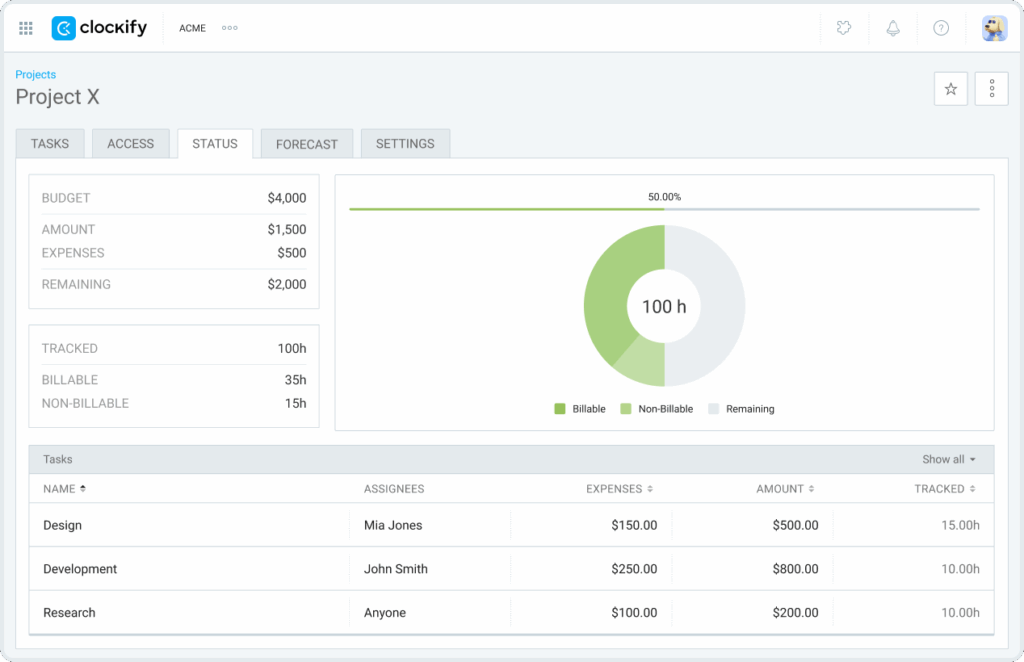
Budget estimate only works if you have “Billable hours” enabled in the Workspace settings.
You can set estimates for a project as a whole, or for each task individually. Either way, you will be able to track how much time or money you have left to finalize the project.
And if you use the forecasting feature, Clockify will also warn you about exceeding the deadline or the budget, so you can adjust your schedules or estimates accordingly.
To see and compare the profitability of projects, you have to set both billable and cost rates. Let’s see how that works.
Managing rates
Rates help you to see which projects are the most profitable ones by calculating revenues, labor costs, and the profit of each project or a specific task.
Revenues are calculated by first setting up billable rates, and labor costs are calculated by setting up cost rates.
Billable rates are applied only to billable time entries, while cost rates are applied to all time entries.
Depending on how specific you want to set your rates, they can be managed on different levels:
- Workspace rate, which you define in Workspace settings.
- Member rate, which you define on the Team page for each team member.
- Project rate, which you define for each project in Project settings.
- Task rate, which you define for each task on a project, but it first needs to be enabled in Workspace settings.
- Projects’ member rate, which you define in the project’s Access tab for each member on a project.
The overall rule is that the more specific rate overrides the less specific rate. In this hierarchy, the least specific rate is the Workspace rate, and the most specific rate is the Projects’ member rate.
For example, if you set the Task rate, but your team is struggling with its execution, you might involve a more experienced team member and set up the Project’s member rate – even though that person is working on the same task.
When you’ve set the rates and your team has started tracking time, you will be able to analyze profitability in Clockify’s Time Reports.

Calendar syncing
Clockify allows you to have all meetings and scheduled events in one Calendar by syncing your Outlook or Google Calendar with Clockify.
When synced in Clockify, you are able to directly start a timer on an event or create a time entry from it.
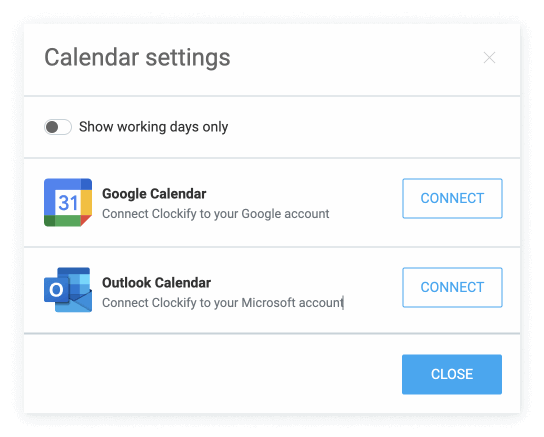
You can also use Calendar to create new time entries, visually keep track of your day and organize it in time blocks.
Time tracking
Tracker is automatically activated when you create a new account, but if you want to use Timesheet or a Kiosk, you first need to enable them in the Workspace settings.
In the same way you track your work hours, you can also track break time via Tracker and Kiosk. However, Breaks have to be enabled in the Workspace settings first.
And if you want to use the Auto tracker, you need to download the desktop app for your computer (Windows, Mac, or Linux).
The Tracker lets you start and stop the timer when you start and finish work on a specific activity, and mark it as billable or non-billable.
You can choose the project and a task you’re working on, and be as specific as you want when describing the activity.
You can use the timer mode with a button, or the manual mode to enter start and end times yourself.
The Timesheet allows you to enter the total hours spent on projects. If you know you will work on one project or a task the whole week, the quickest way to record your working hours will be through a Timesheet.
You can use the “Copy last week” option or Timesheet templates to log your weekly activities quickly.

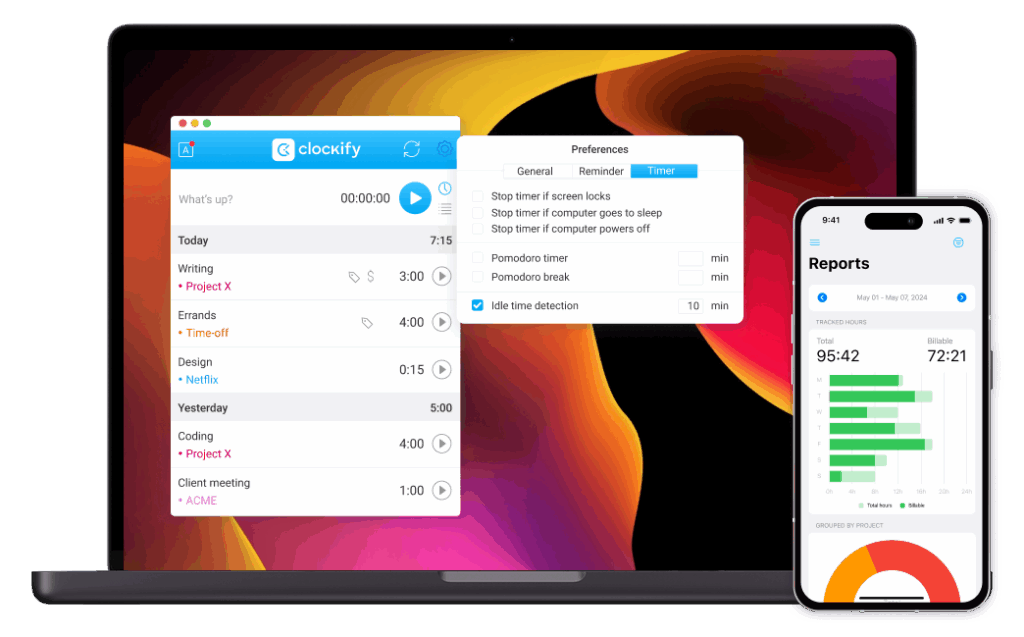
Another way to track your work hours is through the desktop app. Clockify’s desktop timer can be set to start automatically as soon as your computer is active, so you don’t have to remember to start it.
Clockify’s desktop comes with a handful of useful features and reminders. It also has a built-in Auto tracker, which automatically counts the time spent on each web page or app, so it is handy when switching between tools and tabs.
Auto tracker logs are visible only to you, and you can choose which logs will end up being imported as time entries to Clockify’s web.
Tracking time with a kiosk lets you easily clock in and out to track work and break hours.
Mobile apps also provide you with a timer and manual mode, and with a timesheet feature.
A Kiosk is great for simple time tracking in shift-based workplaces. Length of active time for kiosks can be customized, and employees can clock in with or without a PIN code.
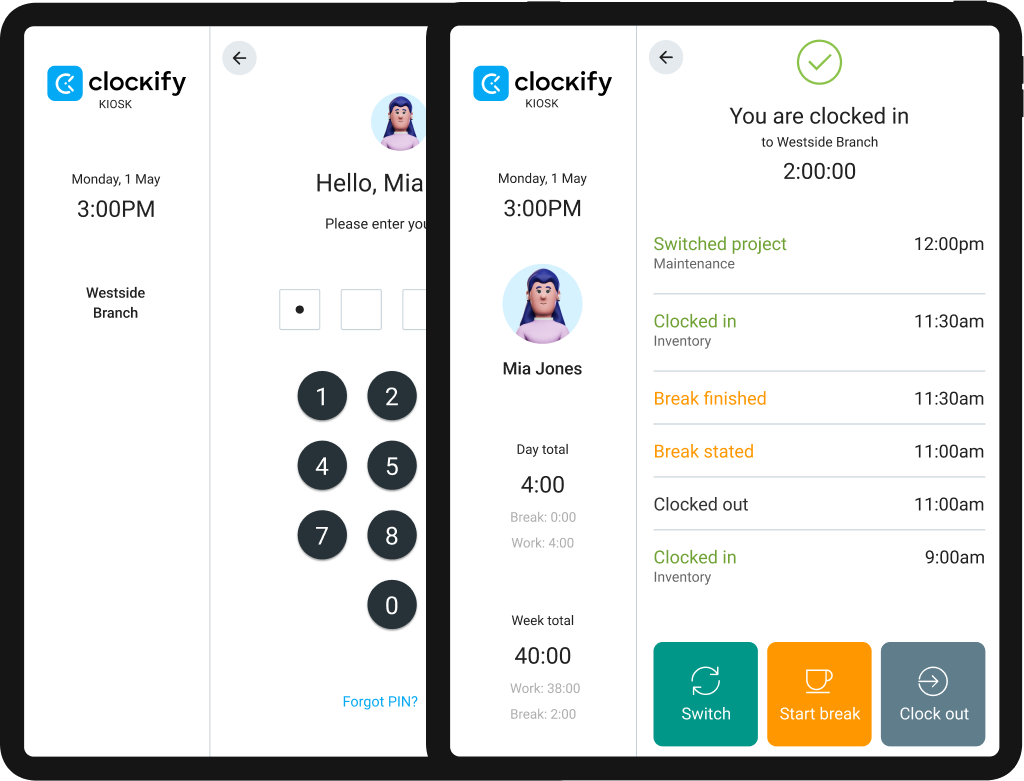
You can create multiple kiosks and select a default project for each. But when employees clock in, they can switch between projects, tasks, or jobs.

A kiosk can be launched on any internet-connected device, so it can easily be set up as a clock-in station on tablets, laptops, or mobile phones.
Account Setup FAQs
How to set up idle time tracking in Clockify by CAKE.com?
Idle time tracking is available by using either the browser extension or the Clockify desktop app. To enable it, go to Clockify Settings in the browser extension or Preferences in the desktop app.
Then, set the parameters: the number of minutes it takes for the idle timer to register inactivity, whether to enable or disable screenshots, and whether you want the auto tracker to log the apps and websites you use.
What is approval and lock time?
Tracking time entries with Clockify is available to all users within a single organization. However, managers and workplace admins can opt to review individual time entries once they’re submitted by the employees. Additionally, they can set a time period for reviews on a weekly, semi-weekly, or a monthly basis — all from within the approval feature.
On the other hand, the lock time functionality simply locks out users from adding new or editing existing time entries after a specific period.
What’s the best way to manage projects and teams within Clockify by CAKE.com?
To manage your projects, teams, and time better, establishing a project workflow is essential. Once you create a Clockify account, make sure to follow these steps:
- Define and create your projects,
- Set estimates and reminders,
- Add tasks to your projects,
- Add your team members,
- Track the time on your projects and tasks, and
- Generate reports once the project is finished.
Once you have your reports (available in PDF, CSV, or Excel format), you’ll be able to analyze your workflow and identify gaps to improve your overall efficiency.
Install Clockify by CAKE.com apps
If you prefer using the app instead of the web version, you can download and install it on your computer (Windows, Mac, Linux) or mobile device (iOS, Android).
If not, you can use Clockify solely through the web or browser extension (Chrome, Firefox, Edge).
Whichever method is more convenient to you, all data will be synced.
If you need help to understand Clockify features, or if you want to explore other features, such as scheduling, expense management, invoicing, approval, or managing time off, make sure to visit our website or explore our YouTube videos.
How we reviewed this post: Our writers & editors monitor the posts and update them when new information becomes available, to keep them fresh and relevant.