 Updated: September 18, 2025
 Clockify setup: How to start?
When you first start using Clockify by CAKE.com, you can join a workspace by invitation, or you can create your own.
When you sign up, we automatically create a Clockify workspace for you. This workspace is a part of your CAKE.com account, which acts as a central hub for all your tools – including Clockify, Pumble, and Plaky. Learn more about it here.
With the Admin role, you can create as many workspaces as you wish in one organization. For example, you can use different workspaces for different departments or clients.
We will cover the settings that are unique to each workspace so you can better understand how many you need.
Let’s begin by learning about workspace organization in Clockify.

Workspace customization
Here is the list of settings that are unique to a workspace, and that will reflect further down the process.
Examine to see if some are of great importance to your workflow. If so, having multiple workspaces might be a better option for your team.
Company logo
You can start customizing your workspace by adding your company’s logo. You can upload the logo image directly within the workspace settings.
This logo will then be displayed on invoices, shared reports, and exported PDF reports.
Active features
Some features need to be activated before they are available and visible to users. Such as:
- Timesheet
- Breaks
- Kiosk
- Invoicing
- Approval
- Project and task favorites
- Favorite entries
- Expenses
- Time off
- Task rates (plus Billable and non-billable tasks)
- Billable rates
- Cost rates
- Scheduling (plus Billable and cost amount in Scheduling)
- GPS tracking
- Screenshot capturing (plus High-resolution screenshots)
- Audit log
You can only activate these features if they are included in your subscription plan.
Contrary to activating available features, you can also hide some automatically visible features.
- Time Tracker can be hidden
For example, if you want your employees to enter hours only through the Timesheet.
- Manual tracking can be disabled if you disable manual tracking for the Tracker (“Force timer” option located in the Permissions tab) and disable the Timesheet feature
To conclude, if you don’t want all your employees and contractors to have access to the same features, you can separate them into two workspaces.
For example, you can disable manual tracking in one workspace for employees who are paid by the hour, and enable Timesheet for employees working in shifts in another.
Time organization
Time in Clockify is automatically organized through tasks, projects, and clients. These labels can be renamed to something more suitable for your work.
For example, you might not track time on the “Tasks” but on “Jobs, or avoid “Projects” and use “Locations”.
Such settings will impact the entire workspace, so if it makes sense for your business to have distinct tracking objects, having multiple workspaces is a better option for you.
Time duration formats
You can choose how to display recorded time on your workspace, whether you want to display:
- Full duration (hours, minutes, seconds as hh:mm:ss)
- Compact duration (hours and minutes as hh:mm)
- Decimal duration (only hours as h:hh)
Time rounding
Time rounding in Clockify can round entries up, down, or to the nearest value. Once set, it is unique for the whole workspace.
It can be quickly changed from the Reports, but if you have multiple different clients, each demanding different rounding options for reports you share with them, it might be better to keep clients in separate workspaces.
Data and currency format
You can set up default types of data and currency formats.
If you have clients from the USA and Europe, your data formats displayed in reports might need to be different, for example:
- 3,000 for USA clients
- 3.000 for German clients
- 3 000 for Swedish clients
- 3’000 for Swiss clients
Currency format can be customized to be shown as, for example:
- USD 100
- 100 USD
- USD100
- 100USD
Depending on whether you have clients demanding specific conditions, organize them into one or more workspaces.
Project’s default billable status
If you have many projects, either billable or non-billable, you can set their default billability status in workspace settings.
So, if you don’t want to change that for each project separately, it might be easier for you to have two different workspaces – one for billable projects and the other for non-billable ones.
Alternatively, you can create a project template with a billable or non-billable status, and create each subsequent project based on it. This way, all new projects will inherit its billability status.
Required fields
Required fields let you choose the fields that must be filled in for a time entry to be saved.
You can mark as required the default time entry fields – project, task, tag, or description – or any (visible) custom time entry field you’ve set.
These settings will apply to all time entries within the workspace.
Custom fields
Custom fields can be created for time entries or for users, so you can add more information to tracked time or user profiles.
Both time entry custom fields and user custom fields can be:
- Text – input field where you can type anything you wish
- Number – input field that accepts only numerical values
- Link – input field that accepts a URL to websites or files
- Switch – a simple yes/no switch
- Select – an input field that lets users select a single option from a pre-determined list
- Select multiple – an input field that lets users select any number of values from a pre-determined list
You can mark custom time entry fields as required, and it will apply to the whole workspace.
So if you want to apply different required custom fields to different teams and projects, having more than one workspace is a solution.
Alerts
Alerts are a way to be notified when a project or task reaches a certain percentage of the (time or budget) estimate.
You can customize the percentage that will trigger the alert, and customize who will receive the alert:
- For Project alerts: alerts can be sent to Project members, Project manager, or Admin
- For Task alerts: alerts can be sent to Task assignees, Project manager, or Admin
The rules you set for getting alerts will be unique to that workspace.
For example, if you set up that a project manager should get the alert if a project reaches 50% of the estimate, that will apply to all projects.
And if you want to change that percentage for non-billable projects, for example, using multiple workspaces is a better solution for your team.
Approval period
Approval period can be customized as:
- Weekly
- Semi-monthly
- Monthly
If you apply different timesheet approval periods for different team divisions, you might need more than one workspace to adjust approval periods.
Time locking
Time in Clockify can be locked after a specific date or after a set period of time to prevent employees from editing time entries. Time locking doesn’t affect Admins, so they can still add or edit time.
Time locking can be set to weekly, semi-monthly, or monthly, and it applies to everyone in the workspace. If you need different approval periods for different teams, you might want to consider multiple workspaces.
Workspace organization
Once your workspace is created, you can proceed to invite users, organize them, assign roles and permissions, and enable active features.
Inviting users
To start, add your employees or team members as full or limited users, depending on what is needed from them.
Full users can track time in all available ways and access all active features to which they are permitted, while limited users can only use the kiosk to track their time.
To add full members, you will need their email addresses so they can join your Workspace, while for limited users, you need only to enter their names.
Assigning roles
To delegate some of the responsibilities in a workspace, you should start by assigning roles.
Then you might want to revise the Workspace settings and see which features are enabled, and grant permissions for different user roles.
Besides the Owner of the workspace (there can only be one), there can be multiple Admins, Project managers, Team managers, or Regular users in one Workspace.
Overall:
- Owners can see and edit everything, plus establish SSO, or delete the Workspace
- Admins can see and edit everything
- Project managers can see and edit things related to their projects
- Team managers can see and edit things related to their team members
- Regular users have limited permissions and can see and use the features they have access to
Roles are one way to establish who can do what, but you can be even more specific by setting up specific role permissions.
For example, if only Admins can create projects, clients, tasks, and tags, or if Project managers or Team managers can approve submitted timesheets and expenses.
For more details on roles, read the help article on roles and permissions.
Groups
Now, when all roles are assigned, you can proceed to create Groups.
Groups are a way to organize people into teams or departments, and they make managing people on projects easier.
You can assign people to Groups right when you create them in the Group tab, or if a new user joins, assign them to a Group when finishing up their profile.
You can also assign a Team manager to a Group or give project access to a specific Group to avoid adding people one by one.
If you organize people into Groups, it will be easier to assign them the right time off policies. One person can be a part of multiple groups.
So, for example, if you have a Maternity Leave or Paternity leave policy, you can quickly assign people to that policy without adding people manually.
Creating clients, projects, and tasks
Creating clients in Clockify by CAKE.com is simple. You should only add their names, and then details of their email addresses, location address, client currency, and other details if something specific needs to be noted. Adding these details will facilitate invoice management in Clockify.
Creating projects is similar. First, give it a name, a specific color, mark it as public or private, and give the project a client if it has one.
Projects can be saved as templates so you can create a new project from a template to quickly populate the list of tasks, access, and project settings, which can always be overridden for a new project.
Tasks can be created simply by typing in their names, and then you will be able to assign them to specific people so only they will be able to track time on them, or leave them visible to everyone.
Clockify workspace FAQs
How can I manage user roles and permissions to organize my team effectively?
To make your team more efficient and run smoothly, you’ll need to set up proper user roles with clearly defined permissions. As the owner of a Clockify workspace, you’ll be able to assign multiple roles and permissions, such as:
- Admins,
- Project managers,
- Team managers, and
- Regular users.
Each role has a different set of permissions, ranging from full functionality (edits, SSOs) to team-related permissions.
Organize your time with Clockify
What are some key features that apply to an entire workspace?
Only workspace owners can assign workspace-wide permissions in Clockify by CAKE.com, such as the required fields, custom fields, and project alerts.
How can I use groups to simplify managing team members on projects?
Aside from simply being organized in a more efficient way, Clockify groups can help you manage team members in various ways. For example, you can give task or project access to a specific group (team) of people and keep matters confidential. On the other hand, maybe some teams within your organization have different contractual obligations/perks. If that’s the case with, say PTO, you can assign different PTO policies to each group and avoid manual inputs for each employee.
Manage Clockify workspaces: To have one or multiple workspaces?
With multiple workspaces, you can:
- Ensure that users won’t be able to change settings on other workspaces
- Have different active features for different teams on workspaces
- Avoid assigning roles and creating groups, as only users from that team will be in the workspace (depending on the team size and complexity of the project)
With multiple workspaces, you can’t:
- Have all the tracked time, overall profit, and costs for the whole company in one place
With one workspace, you can:
- See all tracked time for all projects and clients on the Reports page, where you use filtering to display the data you need
- Appoint team managers and project managers so they can look over projects and teams
- Restrict who can track time on certain projects by setting them as private, so only people who are part of the project (assigned as individuals or as a group) can track time on them. (with the exception of Admins and Owner)
With one workspace, you can’t:
- Apply different workspace settings and different permissions for the same roles
If you’re managing multidisciplinary work across multiple teams, using separate workspaces can help you organize projects, teams, and resources more effectively.
So, if you choose to have more than one workspace, here’s how to create an additional one.
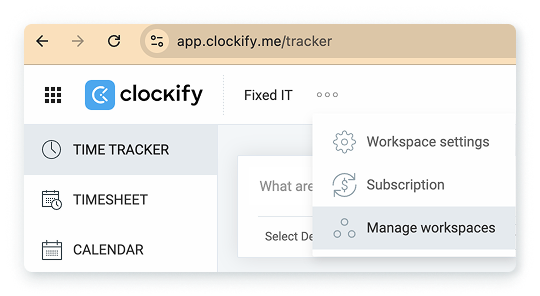
Select the option to Manage workspaces from your Clockify.
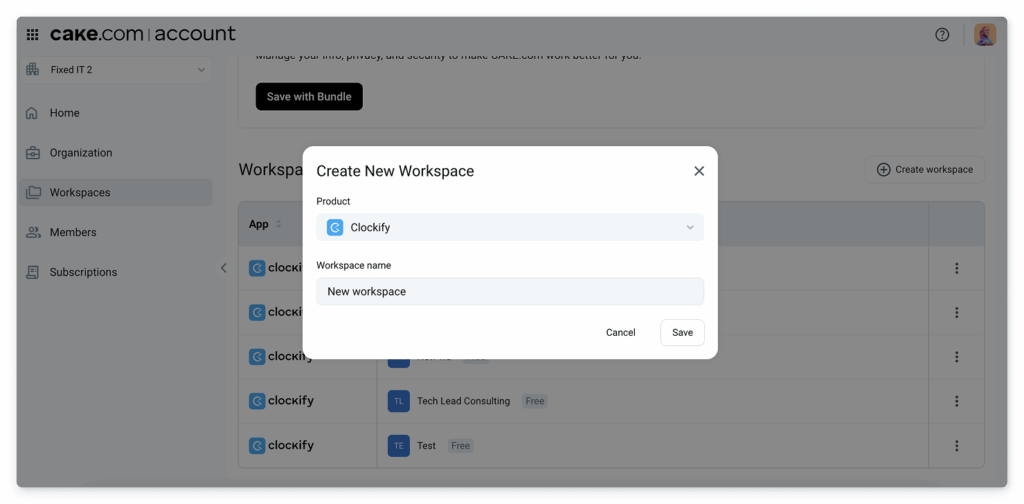
You will be redirected to your CAKE.com account and the Workspaces page. Now you will see a “Create workspace” button where you can create a new one. Select Clockify as the product, and type in a workspace name.
Now you will have a list of workspaces you can switch from.
To decide what’s best for your organization, think about the initial logical segmentation of your teams and processes, and consider:
- what day-to-day processes look like for each team
- what outputs do they need to produce
- how close each team cooperates with the other teams, and
- if those outputs can be produced from one or multiple workspaces
Following this chain of thought will give you the answer to the question of what the optimal solution is for successful project completion in your case.
For more details on getting started with Clockify features, visit the Setting up your new Clockify account guide.
To learn more about organizing your current work processes, visit Clockify’s YouTube channel.
How we reviewed this post: Our writers & editors monitor the posts and update them when new information becomes available, to keep them fresh and relevant.