Invite & manage users
To add members to your team or organization, they first need to be invited to your workspace.
Only owners and admins can invite new users to a workspace, deactivate users, revoke their invite and manage their details (set their billable rate, set as inactive, and assign to groups).
Invite users #
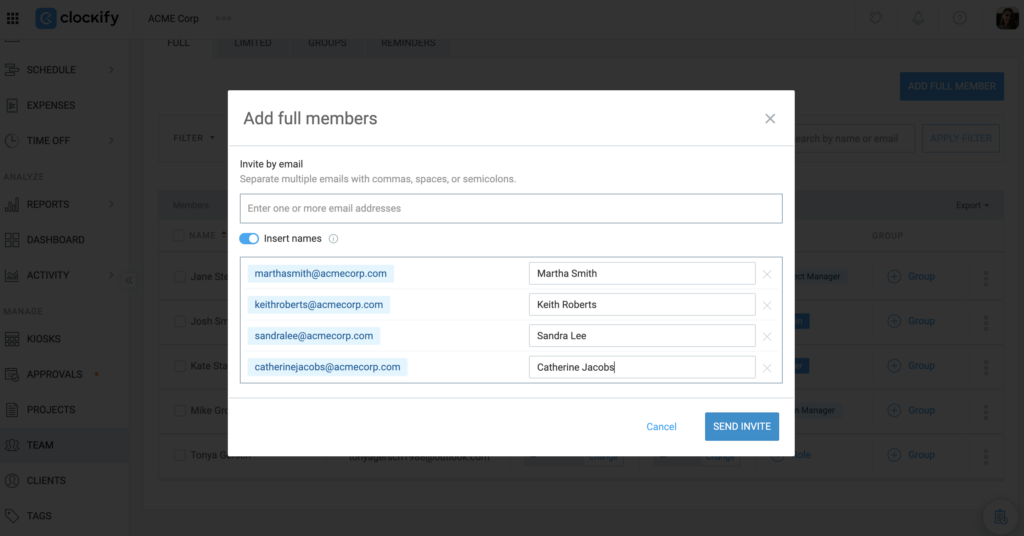
To invite users to your workspace:
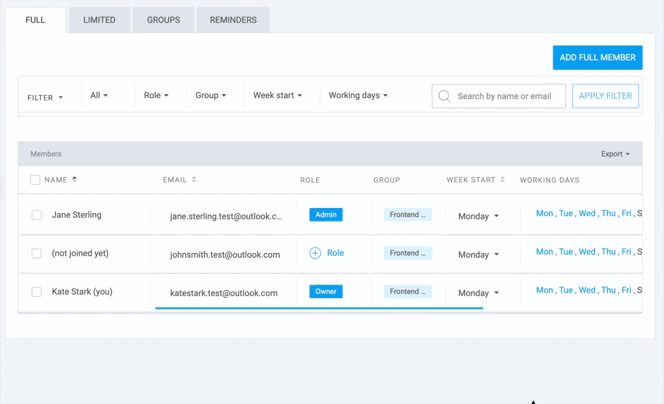
- Go to the Team page
- Click Add new member/Add full member (if kiosk is activated) in the upper right corner
- Enter the email/s of the person/s you want to invite
- Toggle Insert names to ON if you want to assign a full name to each user you are adding
- Enter the full name for each user (if Insert names is enabled) in the Enter full name field next to the email address
Invalid emails will be highlighted in red. To proceed with the invite, click Remove all invalid emails (located in the bottom-right corner of the list), then click Send invite.
If you’d like to invite multiple users at once, enter the emails in the designated fields one below the other, or copy and paste the list of emails (e.g. mark@domain.com, jane@domain.com).
You can invite up to 5 users on a Free plan. Keep in mind that paid plans are charged per user seat. Learn more about how to manage user seats and paid plans here.
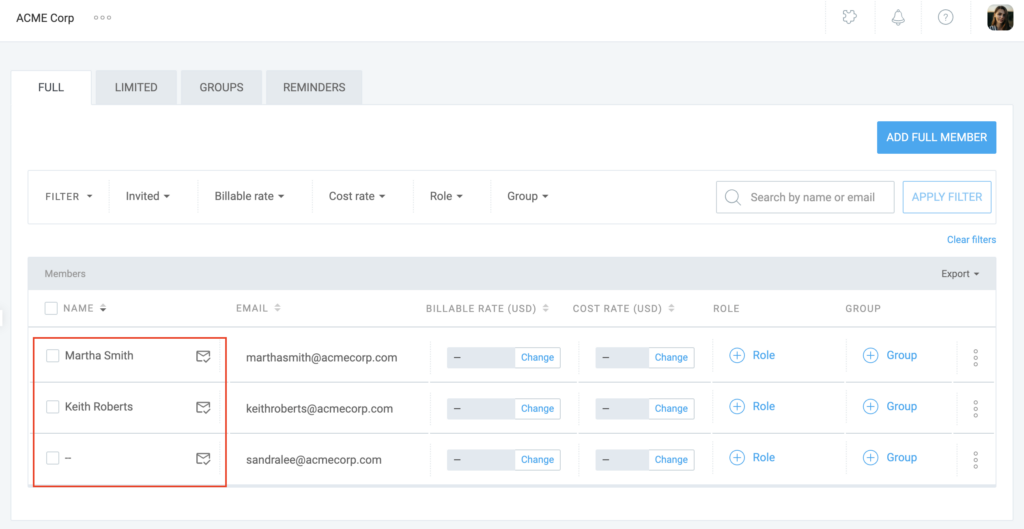
After the invites are successfully sent, your Team page will show invited users with the envelope icon next to their names in the Name column. Users without names will show a dash (-) in this column.
Names should have 50 characters or less. Links and special formatting are not allowed.
How Insert name affects sign up #
If a manager or admin invited you to join their team, your sign-up experience depends on how they sent the invite:
- If they included your name in the invite: The name field will automatically show the name they typed for you.
- If they didn’t include your name, but you signed up with Google, Apple, or Microsoft: Clockify will automatically fill in the name linked to your Google or Apple account.
- If they didn’t include your name, and you sign up with an email and password: The name field will be empty, and you will need to type your name yourself.
If your name is misspelled or you prefer to go by a nickname, you can delete the pre-filled text and replace it with your preferred name to continue your sign-up.
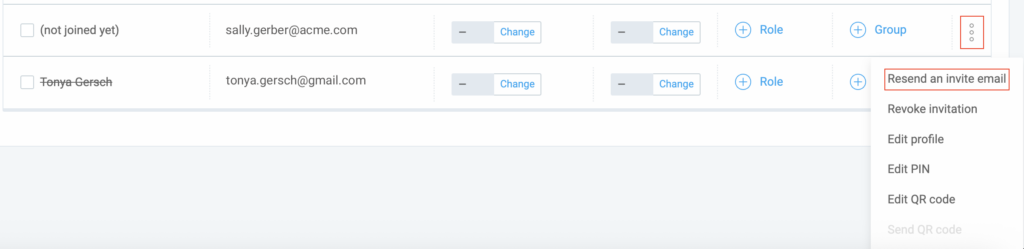
Invite users manually #
If you’ve added a member, but they haven’t received an email, you can send them the invitation manually:
- Click on three dots next to member and choose Resend an invite email
Members can sign up on their own and they’ll automatically be part of your workspace (if they have a pending invite).
If a member already has a Clockify account, they have to log in and accept the invite via the bell notification in the upper right corner.
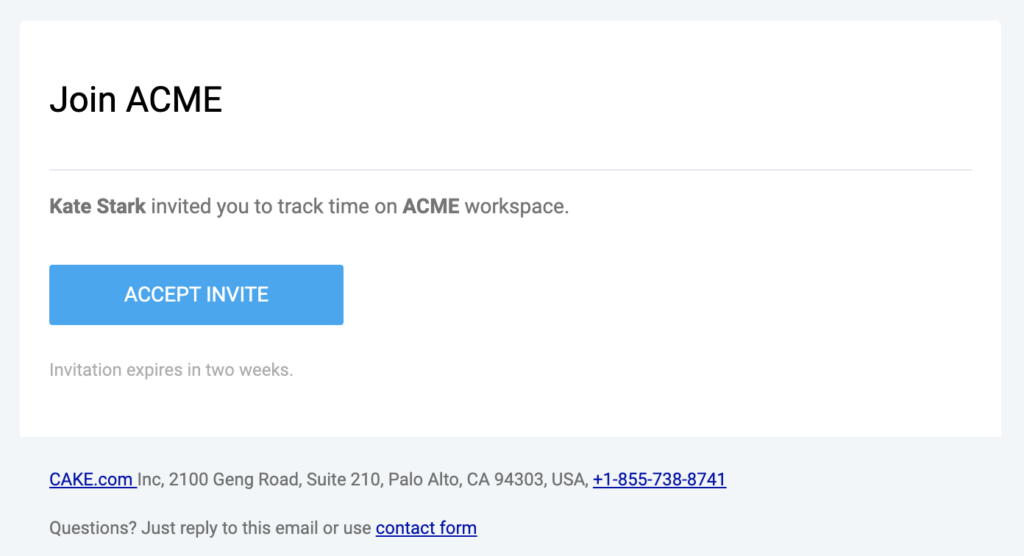
Accept invite #
- The person you invited will receive an invitation email with the activation link they need to click
- After clicking the link, they need to verify their email
- The invited person can then log in and start tracking time for you
If someone is invited to your workspace and doesn’t have a Clockify account, they can sign up and automatically join your workspace (if they have a pending invite). As a result, their CAKE.com Account will also be created.
If the user is already invited, they won’t be able to create an account with the same email address on the Signup page.
If a person already has a Clockify account, they will receive an email and a notification in Clockify. In that case, they have to open the bell notification from the top right corner and click Accept. Then, they’ll be able to switch to your workspace and start tracking time for your company.

Revoke user’s invite #
If user hasn’t accepted the invite yet and you’d like to remove them from your Clockify workspace, you can do that without leaving the app.
To revoke user’s invite:
- Go to the Team page
- Click on three three-dots menu
- Choose Revoke invite option

Once you confirm the action, the invite is revoked and the previously invited user is no longer visible in the Team page.
If the user tries to accept the invite after it has been revoked, they will be redirected to the landing page with the info that the invite has expired
You can also revoke user invite from the Members page in your CAKE.com Account.
Filter users #
The Team page allows you to have a better overview of your team members and their tracking data. Quickly find specific users and apply filters to narrow down your team list and customize the table columns to display the most relevant information for your needs.
To filter out users in your workspace:
- On the Team page, look for the filter bar at the top of the member table
- Click to open the filter options and select the criteria you want to use (e.g. role, group, week start, even by custom fields)
- Choose the specific values for each filter you’ve selected
- Click Apply Filter to update the table with your filtered results

Clear filters to reset your view.
Regular users, Team managers, or Project managers can filter users in both the Full and Limited tabs based on the information you have permission to view in the table. Admins and Owners have broader filtering permissions to filter users in both the Full and Limited tabs by all their information, including user custom fields.
You can update any user’s filtering criteria directly from the page. Simply click on the info you wish to change, enter the new one and Clockify will automatically save the update.
Customize your table view #
As an Owner or Admin, you can personalize your Team table:
- Add/Remove filters: Adjust which filters appear in your filter bar
- Select/Deselect Columns: Choose which columns are visible in the table
- Sort Columns: Sort data by most columns that contain single values (e.g. Billable rate, Cost rate, Role, Week start, Daily working capacity)
If Billable or Cost rates are turned off in your workspace and then enabled, they’ll automatically be selected in the filter picker for easy access.
Edit user profile #
Apart from editing user profile with the Control accounts, you can also do it on the Team page.
You can modify information on your team members’ profiles including week start, working days and daily work capacity.
Workspace owners and admins can’t change user’s email, profile picture and username.
To edit user profile:
- Go to Team page
- Click three dots next to the person whose profile you’d like to edit
- Make changes:
- User’s week start
- Define working days
- User’s daily work capacity
- Assigned team manager
- All active custom fields
If you have permission to edit user data in the Edit profile window, you can also edit that same data directly in the table, if the corresponding column is visible in your view.
To edit user data in the table:
- Navigate to the column that displays the user’s data you’d like to edit (e.g. user’s working days)
- Click on the data
- Modify the data in the pop-up window
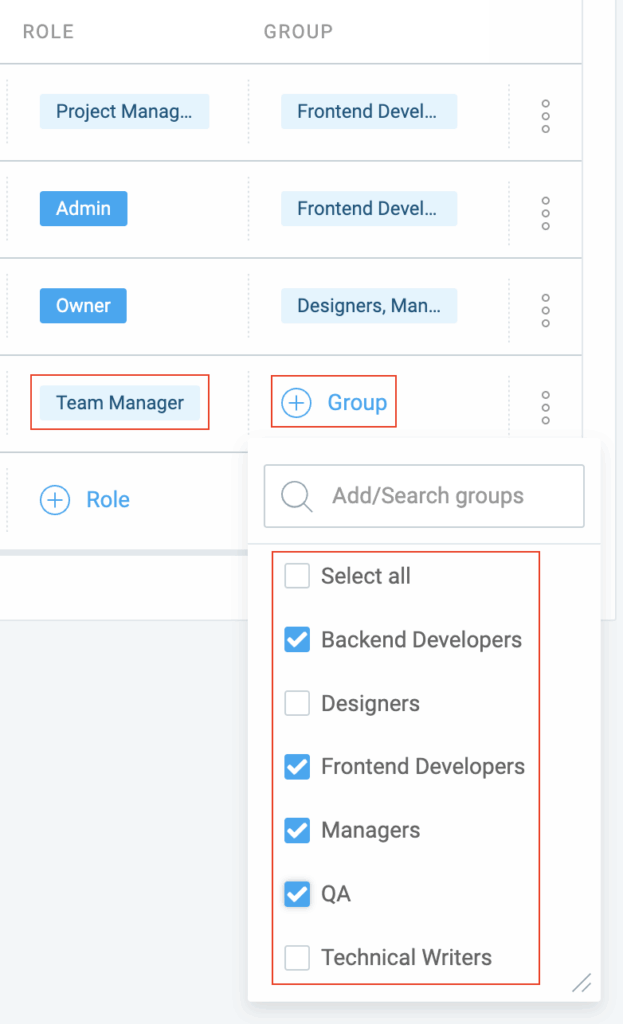
Make someone admin #
To make someone an admin:
- Go to Team page
- Click on +Role next to the person you wish to make admin
- Tick the Admin checkbox
- Save changes
To remove them as admin, untick the checkbox Admin.
Only the Workspace owner can remove an admin role from someone, transfer ownership to another user, and delete the workspace.
Make someone owner #
To make someone an owner, current owner needs to:
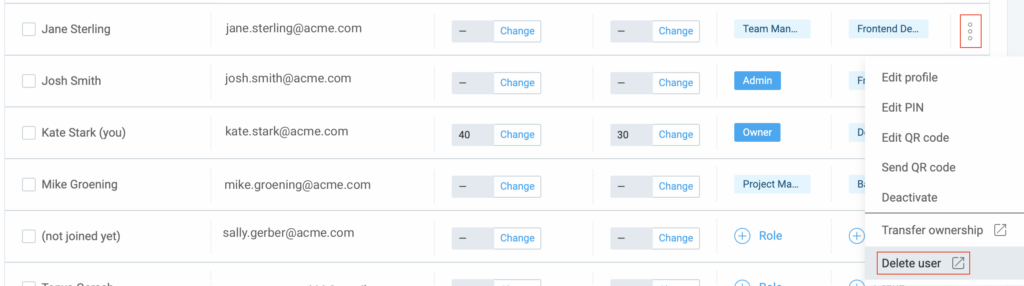
- Click on the three dots next to the user’s name
- Click Transfer ownership
You’ll be redirected to the Members page in your CAKE.com Account where you can complete this action.
Make someone Team manager #
Improve your team management by assigning Team managers directly to individual users or entire groups.
Assign to users #
As an Admin, assign a Team Manager to any user. This allows the Team Manager to oversee that user’s time and attendance.
Assign to groups #
As an Admin/Owner, assign or remove Team managers from groups in the Group tab.
The assigned team manager field is available on the Team page for Standard plan users and higher. If your subscription downgrades to a Basic or Free plan, this field will no longer be visible.
Deactivate and delete user #
Keep in mind that deactivating and deleting users are two different actions.
When you deactivate a user, you temporarily end their login, access to the application and all their billing actions. However, all their data is saved, including their activity and history.
If a user is deleted, their account and all their associated data is removed from the workspace.
Learn more about account deactivation and deletion in this CAKE.com article.
Deactivate user #
Only Workspace admins and owners can deactivate a user.
When you deactivate a user, they won’t be able to see and track time on the workspace and won’t appear on the Team page anymore.
To deactivate a user:
- Go to Team page
- Click three dots next to the person you want to deactivate/delete
- Select Deactivate
Once the user is no longer active, you will be able to delete them.
You can also deactivate user from your CAKE.com account.
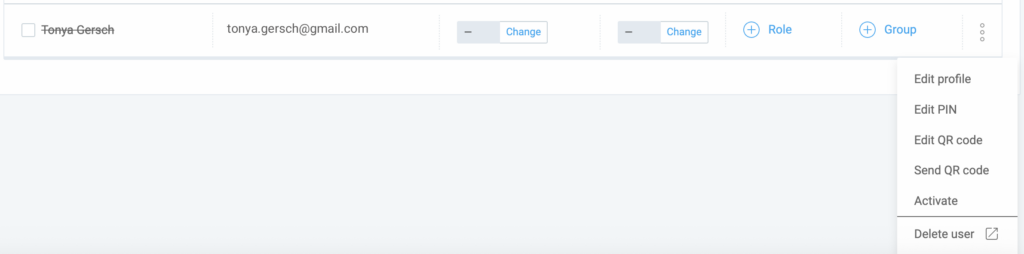
Delete user #
Only Organization owners can delete a user.
Deleted user is permanently removed from the workspace and Clockify app, along with all their data.
To delete a user:
- Go to Team page
- Find member you want to delete
- Open three-dots menu and click Delete user
You’ll be redirected to the user’s profile on the Members page of your CAKE.com organization account. You can complete the action there.
or
- Navigate to the app switcher at the top left corner of the screen
- Choose your CAKE.com Account
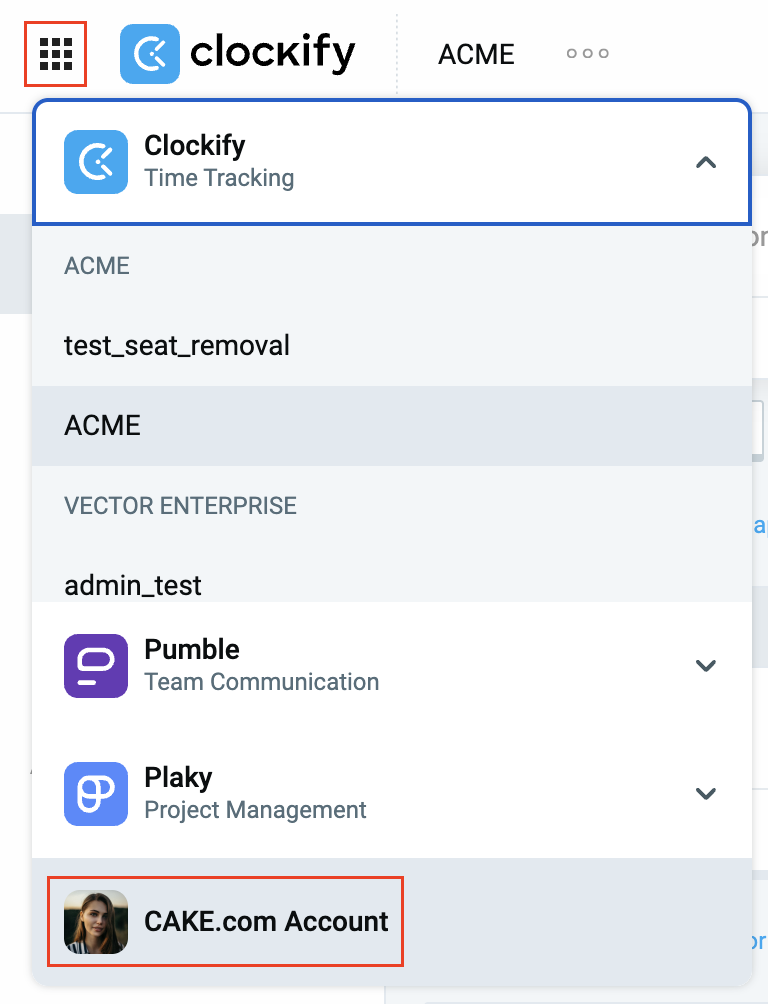
You’ll be redirected to your CAKE.com Account where you can make the changes.
For more information on how to delete a user, check out this article in the CAKE.com Help center.
Important to note #
If user is deactivated from the only workspace they were using, they’ll be logged out and redirected to the login page to make another workspace. In case they are using more than one workspace, they’ll be able to log in to the other workspace they’re a member of.
Users can only be deleted once they are deactivated. Also, when a user is deactivated, their current timer is stopped (if they have one running).
The time entries of deleted/inactive users will remain but you won’t be able to filter reports by them. You can see their time in the summary report when you group it by user.
Additionally, the time off data of deleted users is permanently lost, even if they are reinstated.
Reactivate user #
To reactivate a user:
- Go to Team page
- Select Show all or Show inactive users in the drop down menu
- Select Activate
Once the user is activated, they can log in and track time as usual (although they won’t receive an email or a notification that they’ve been activated).
All inactive user names are struck out.
You can also activate user from your CAKE.com account.