Submit time & expenses for approval
Users can submit their weekly, monthly and semi-monthly timesheets and expenses for approval. As an Admin/Team manager, you need to review these submissions to verify billable hours and project expenses before approving them for client invoicing.
Time approval is a paid feature, which you can enable by upgrading your workspace to Standard, Pro, or Enterprise plan. Expense approval is also a paid feature available on the Pro and Enterprise plans.
For more information on the approval process, check out Approve time & expenses.
Submit time for approval #
Regular users #
Regular users can submit their time via Time tracker or Timesheet.
To submit time in Time Tracker:
- Open the Time tracker page
- Choose pending entry you’d like to submit for approval
- Click Submit for approval
- Click Submit to complete the action
To submit time in Timesheet:
- Open the Timesheet page
- Choose time period you’d like to submit for approval
- Click Submit for approval at the bottom right corner of the page

- Click Submit in the pop-up window to confirm the action
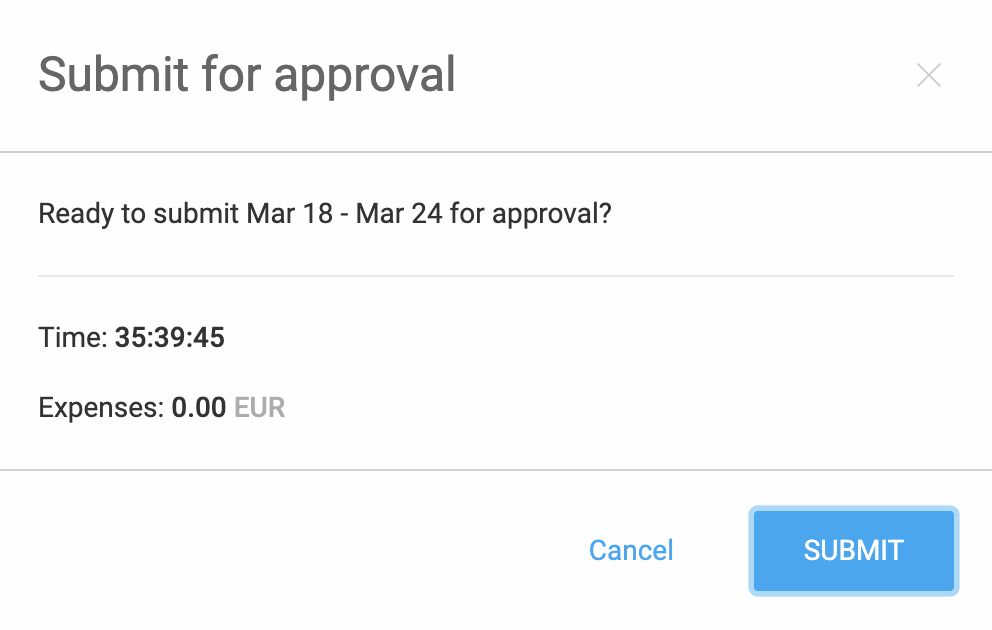
- Click Submit to complete the action
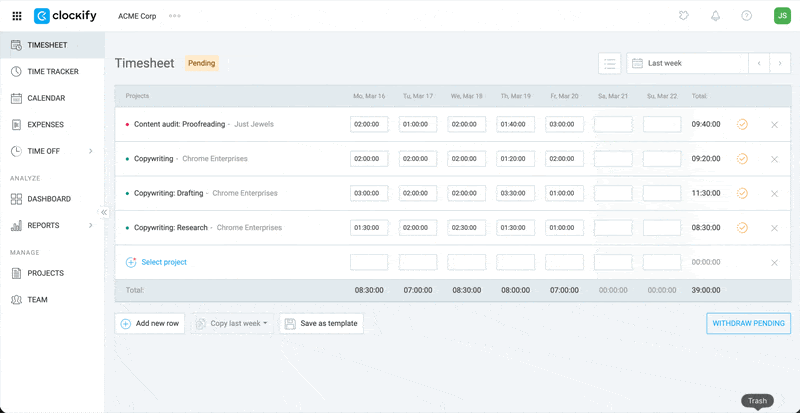
Edit pending requests #
If a timesheet or expense request is already submitted and is still Pending, you can modify existing entries or add new ones for that same date range without needing to submit a new request.
Add time entry to pending request (Timesheet) #
If you add new time entries or expenses to a period that has already been submitted for approval, you can choose whether to include these new items in the existing pending request or keep them separate.
- Go to the Timesheet page
- Click Select Project to add a new task
- Enter the duration on the day column
- Click Submit Changes
The existing request will be automatically updated to include the new entry.
If you choose not to add changes to the pending approval, your Timesheet page will show the new entries, but the manager will only see the original submission in the Approvals section.
Add time entry to pending request (Time Tracker) #
To add new time entry to a pending request in the Time Tracker page:
- Go to Time Tracker
- Shift to manual mode by typing m or clicking the note icon (above the timer)

3. Add the task description, project, date, start time and end time
4. Click Add
5. Scroll down to the time range of the new entry
6. Click Submit changes
7. Click Submit to confirm the action
The new time entry should have a light orange checkmark just like the other pending items.
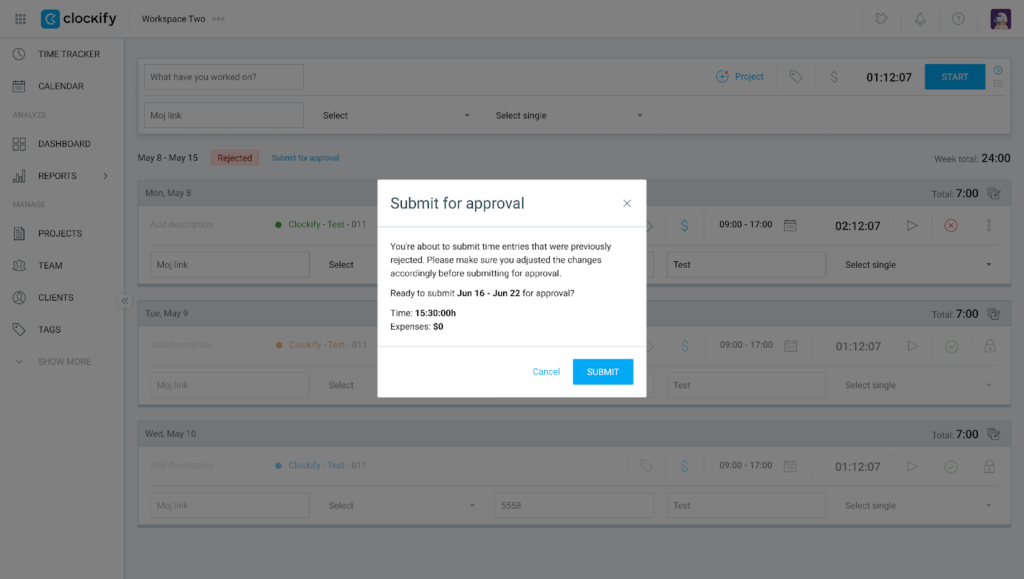
Edit rejected entries #
You can edit rejected entries in Timesheet or Time Tracker and submit the changes or save them for later.
- Go to Timesheet or Time Tracker
- Edit the rejected entry
- Click Submit for approval
- Click Submit on the pop-up window
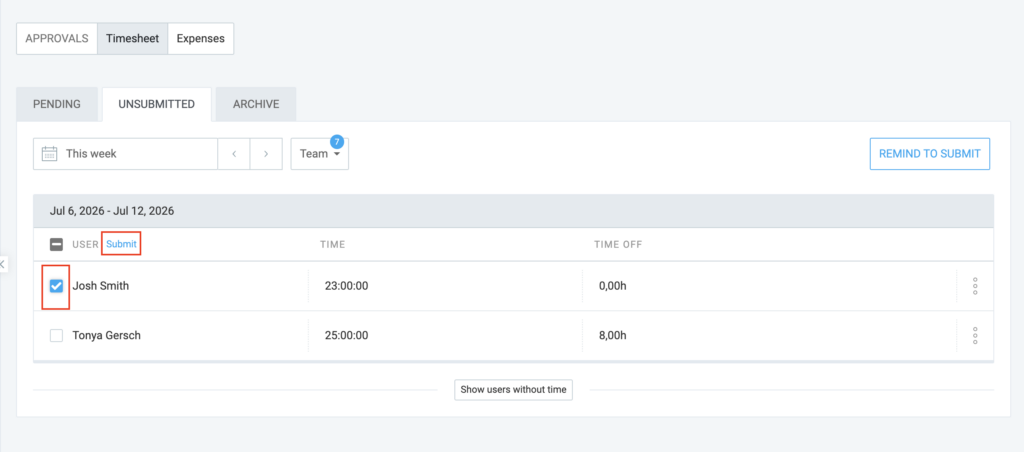
Submit time for others #
If you’re an admin or team manager, you can also submit time for your team members in the Approvals page.
Do that in the following way:
- Go to Approvals page
- Make sure you’re on the Timesheet tab
- Choose Unsubmitted tab
- Click on
 three dots next to the uer’s name and click Submit
 - Click Submit on the pop-up window to confirm the action
Timesheets remain editable while pending, with changes updating automatically during the approval process. Once approved, they are permanently locked; even administrators cannot make changes without leaving a permanent written record.
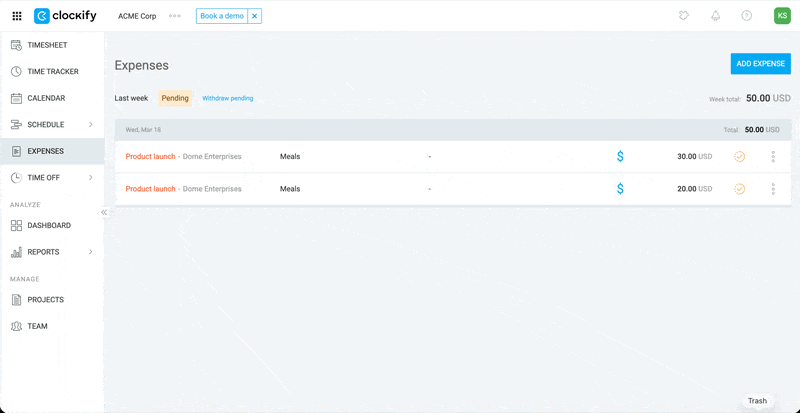
Submit expenses #
Expenses can be submitted for approval and subsequently approved only by an admin or team manager.
Added expenses appear in the Expenses page.
To submit expenses for approval:
- Click the Submit button above the Expense label you have created
- Submit for approval confirmation screen appears with the specified timeframe and the expenses
- Click SUBMIT
Submitted expense that has not been approved yet has a Pending approval tag.
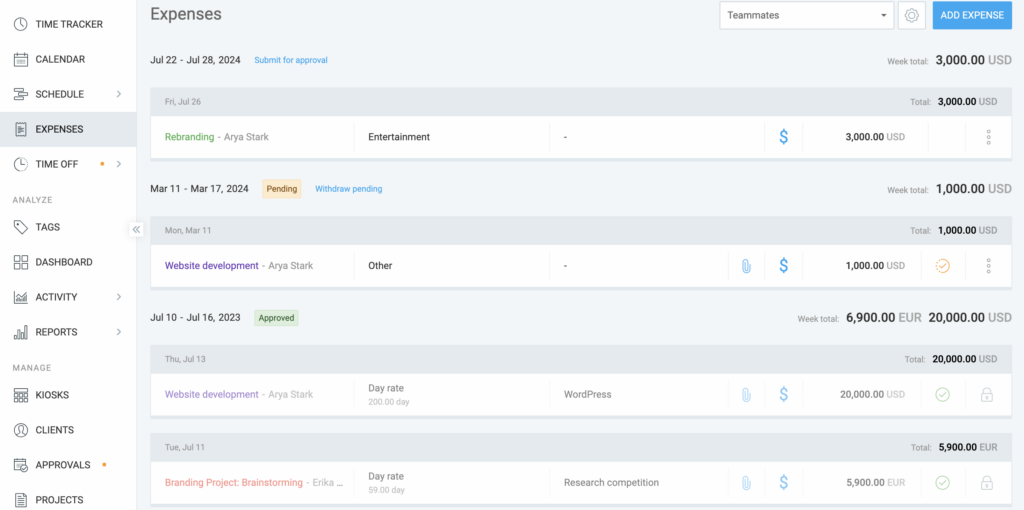
If you hover over the Pending approval tag, you’ll see the name of the user who submitted the Expenses. By clicking on Withdraw pending, you can withdraw the approval. If you do that, an Admin or Manager won’t be able to approve time and expenses unless you send it again.
Admins can edit pending expense approvals. Team managers can perform this action for their team members.
Expenses can also be submitted for approval from the Timesheet and Time tracker as seen in the instructions above.
Add expense to pending request #
You can add a new expense to a pending expense request.
- Go to Expenses
- Click Add Expense
- Enter the details of your expense
- Click Create
- Click the Submit changes link at the top the table
- Click Submit on the confirmation window
Your new expense should now be added to the other expenses previously submitted for approval.
Bulk submit for others #
Submit multiple unsubmitted timesheets from other users at once and improve the approval process.
This action can be performed by workspace admins and team managers.
To bulk submit timesheets for others:
- Go to the Approval page and choose the Unsubmitted tab
- Check the boxes next to the timesheets you’d like to submit
- Check the box at the top of the column to select all timesheets in that submission period
4. Click Submit to confirm the action in the popup window
Withdraw approval request #
In case a mistake, or correction is needed, you can withdraw the submission.
Only pending requests can be withdrawn.
To withdraw your approval request:
- Go to Time Tracker
- Click Withdraw pending
- Click Withdraw to complete the process
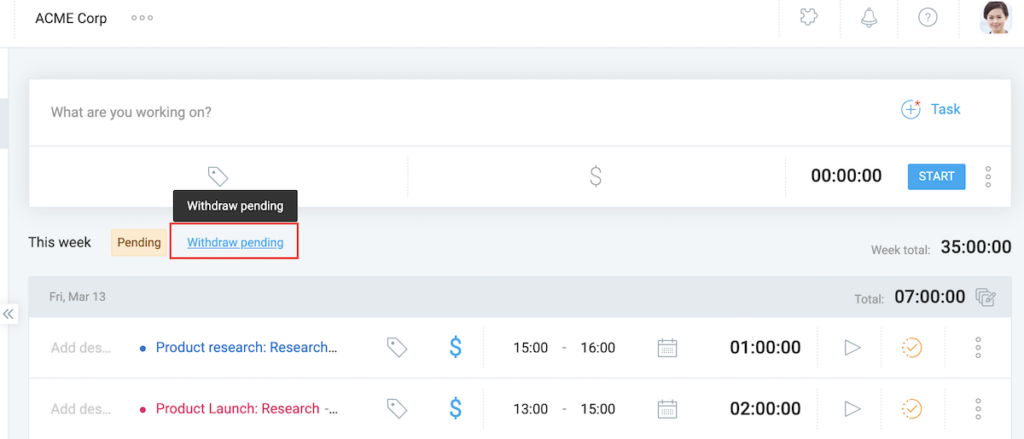
After you withdraw your pending time period, the approval request will disappear, and you can submit a new time period when you’re ready.
Locked dates
- CAN submit timesheets
- CAN’T edit time since entries become permanently locked once approved
Owner/Admin
- Submit timesheet for any user
Team manager
- Submit timesheet for their team members
Submit time on mobile app #
You can also submit time on the mobile phone via Clockify’s mobile app.
Notifications #
Here are the timesheet notification types you can receive in Clockify:
- Timesheet approved: Alerts team members when a manager accepts their submission.
- Timesheet rejected: Notifies users of a rejection and includes the manager’s explanatory note.
- Approval withdrawn: Informs team members if a previously approved timesheet status is revoked.
- Timesheet submitted: Alerts assigned managers and admins that a team member submitted a timesheet for review.