iOS app
Install Clockify on your iPhone or iPad and track time while on the go.
Download Clockify for iOS on the App Store →
For step-by-step guidance on using Clockify on your iOS device, watch the video and follow the instructions below.
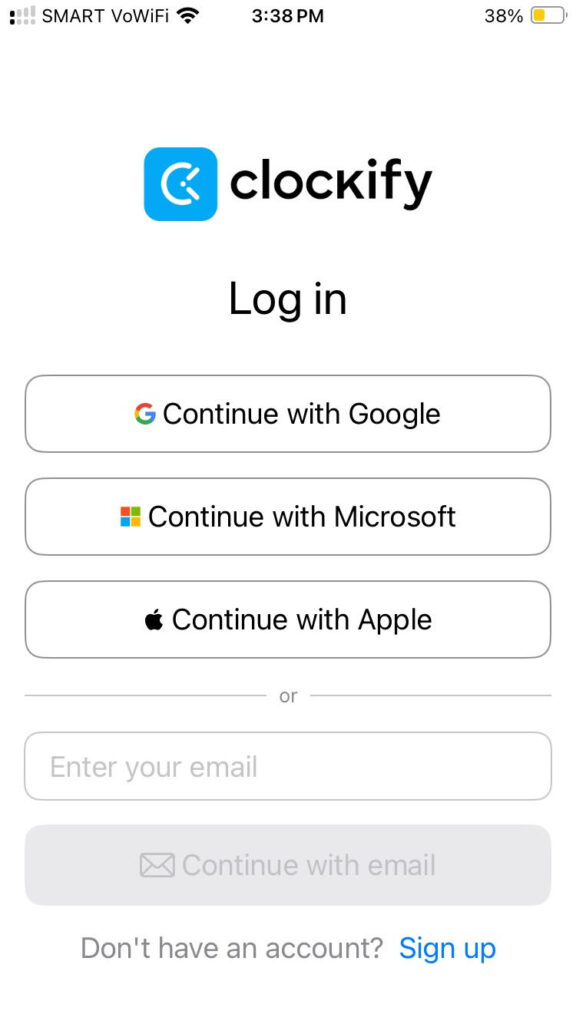
Log in #
To use Clockify app, you first have to log in to your Clockify account:
- Enter your Clockify account email
- Tap Continue with Email
- Or choose Continue with Google if you’ve associated your Clockify account with your Google account
- Or choose Continue with Apple and enter your AppleID
- Or choose Continue with Microsoft and enter your user name and password
Choose region if you’d like to host data on one of the regional servers.
You’ll receive an email with a verification code and link to verify your email address.
To proceed:
- Enter verification code in the verification screen
- Or tap the link and automatically log in
After successful verification, you’ll be redirected to the Time Tracker screen and can start tracking time.
If you don’t have a Clockify account yet, you can create one by tapping the Sign up button.
Custom domain and subdomain login #
If you are on a custom domain or a subdomain, you can also use the Clockify iOS app.
To log in:
- Launch the app and enter your Clockify account email
- Choose the workspace associated with your subdomain/custom domain
- You’ll be automatically redirected to the subdomain/custom domain in question
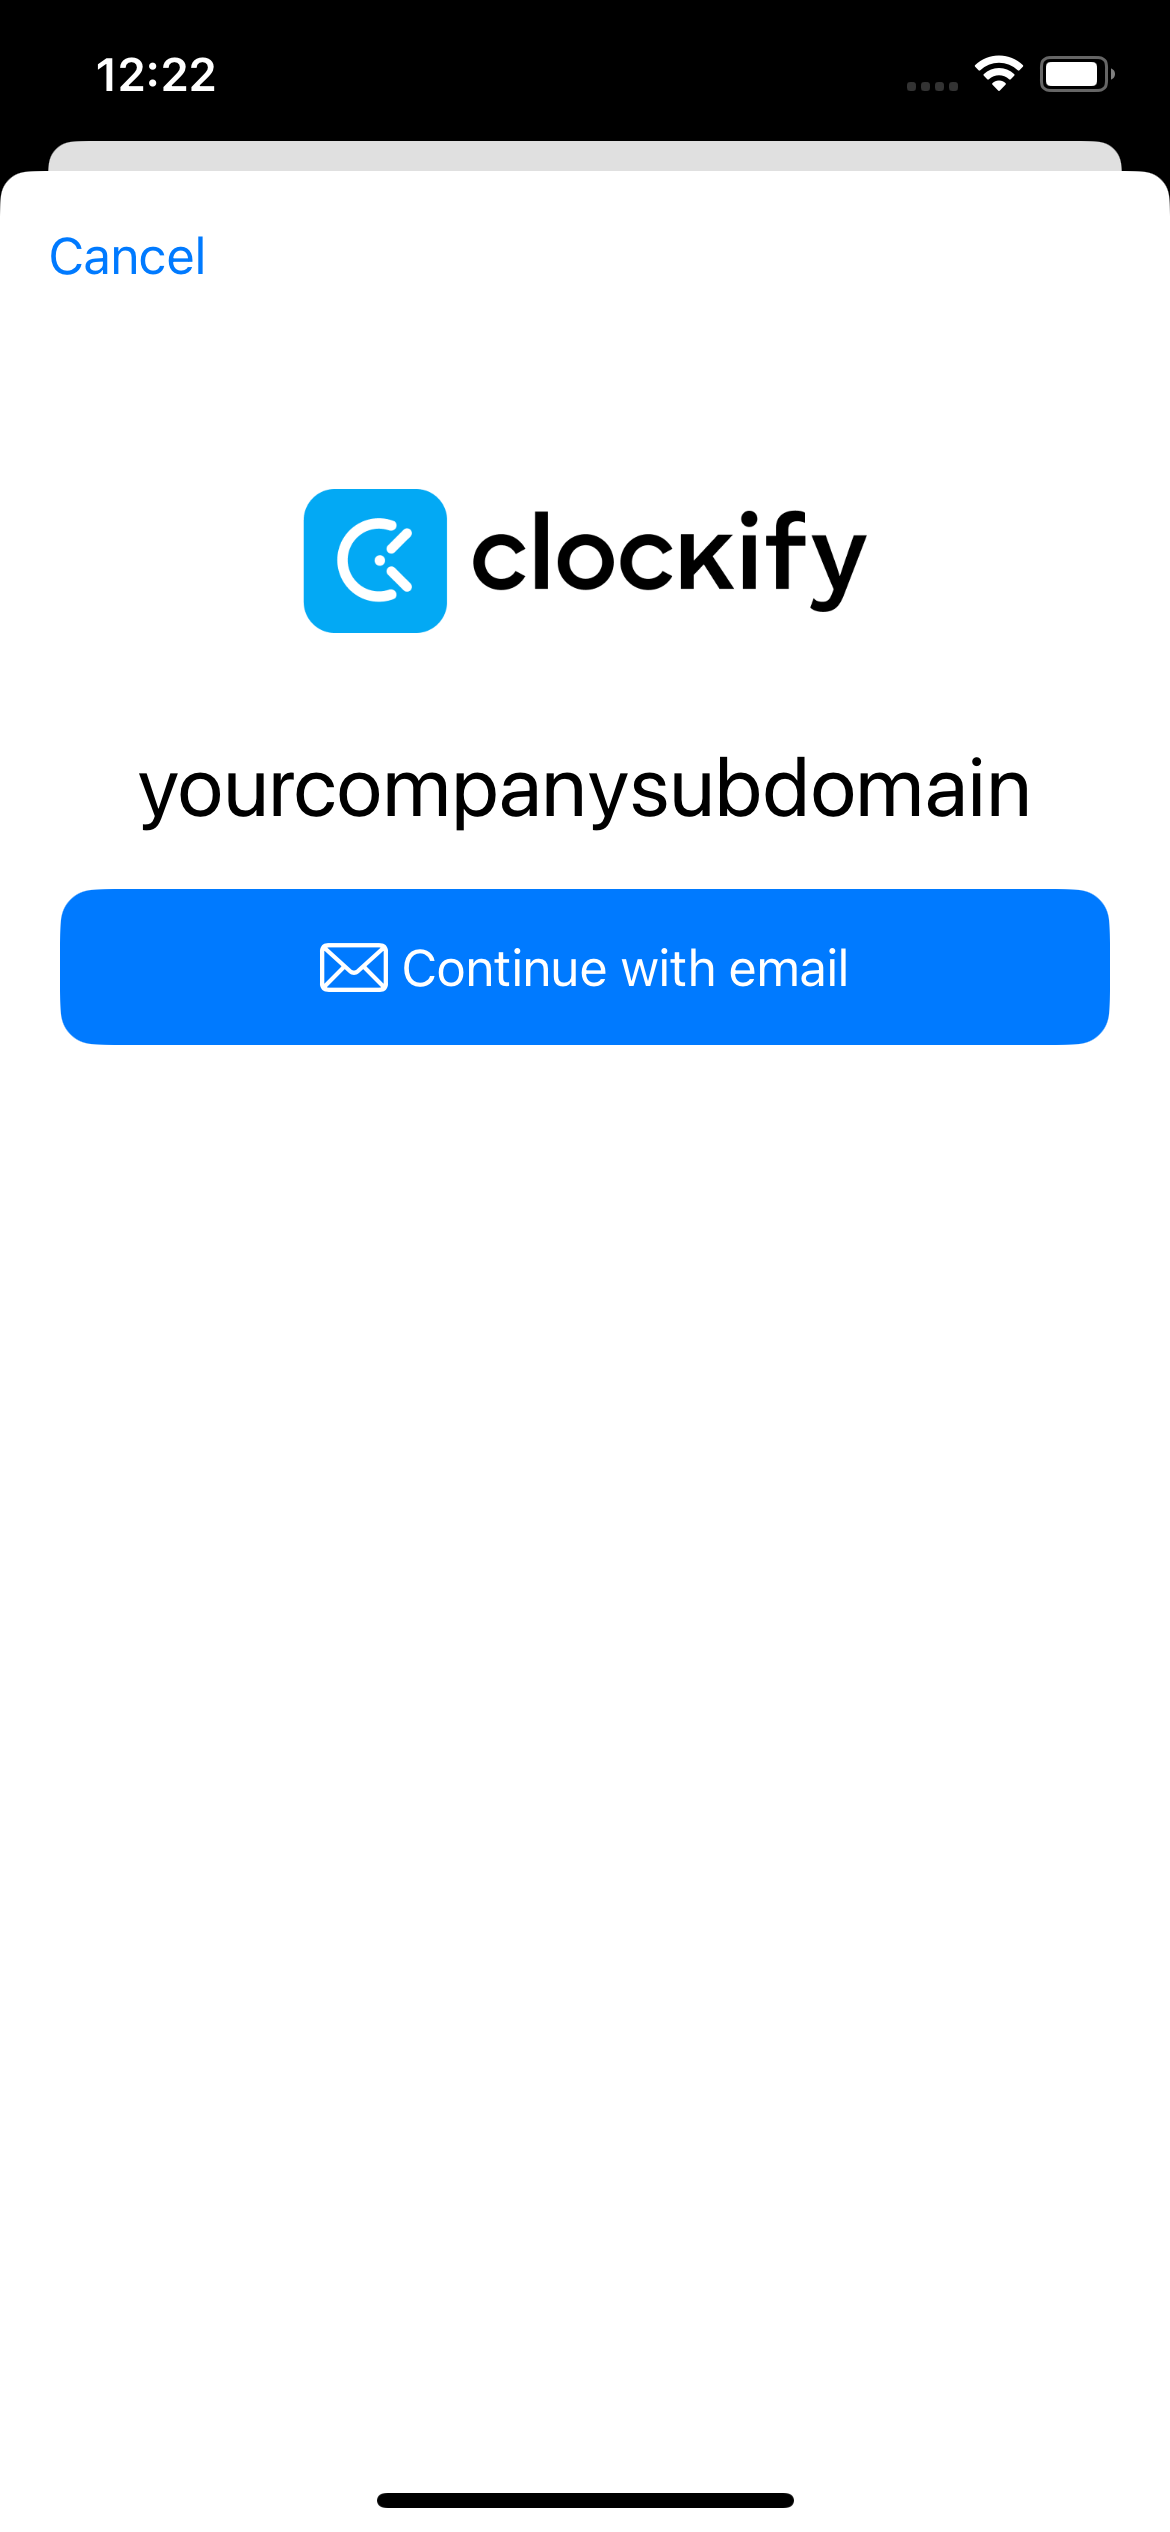
- Tap Continue with email
- You’ll receive an email with a verification code
- Follow the instructions to verify your email by entering the code
After the successful verification, you’ll be redirected to your Clockify account and the Time Tracker screen.
Log in with Apple login #
If upon logging in you choose the Continue with Apple option:
- You’ll be prompted to enter your AppleID
- After your ID is verified, you’ll be able to Create your account
- You’ll go through the login process via Google or Apple login
- After the process is successfully completed, a Sign up screen will appear
- Check CAKE.com Terms and Conditions
- Create your account
You’ll be redirected to the Time Tracker screen and you can start tracking time right away.
If you’re logging in via Google or Apple log in, there won’t be the verification account step.
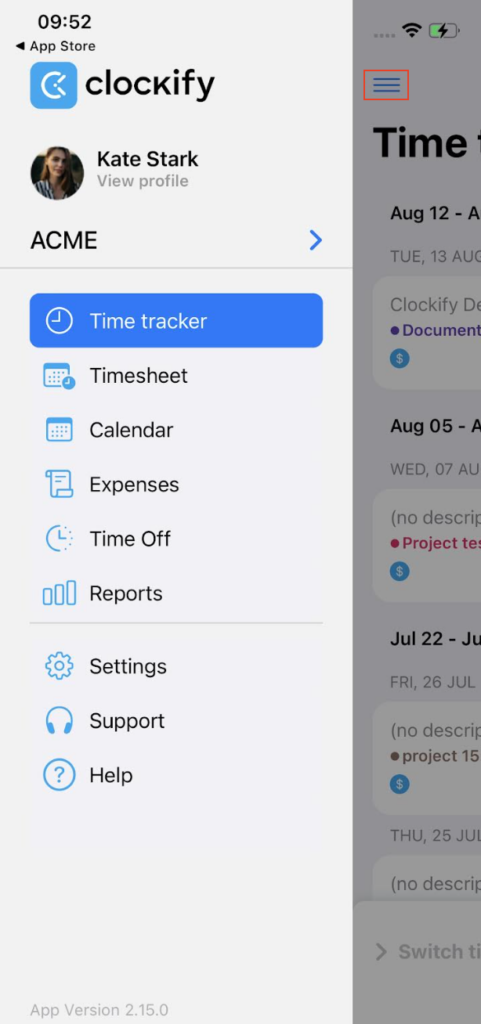
Once you’re logged in, you’ll land on the Time Tracker screen, where you’ll see your most recent entries. Navigate through the app’s menu by tapping on the hamburger icon at the top left part of the Time Tracker screen.
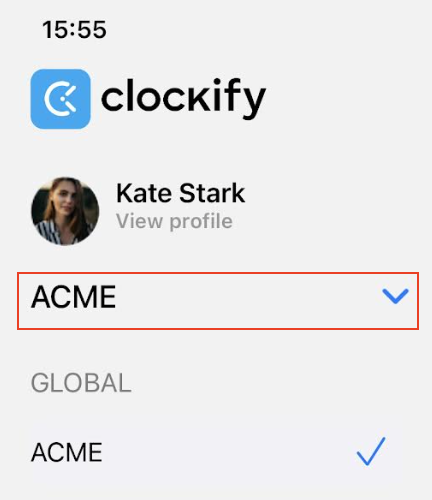
If you are a member of multiple workspaces, you’ll be able to see the list of all your workspaces and their hosting regions (if hosted on different regional servers). Tap on your current workspace to expand the menu and switch between the workspaces.
Manual login is disabled for iOS v2.14.5 and above. Users with these versions or higher will no longer have the manual login option, while users with older versions can still log in manually.
What’s new #
When you launch the screen for the first time, after each new update, a What’s new screen appears detailing all the changes.
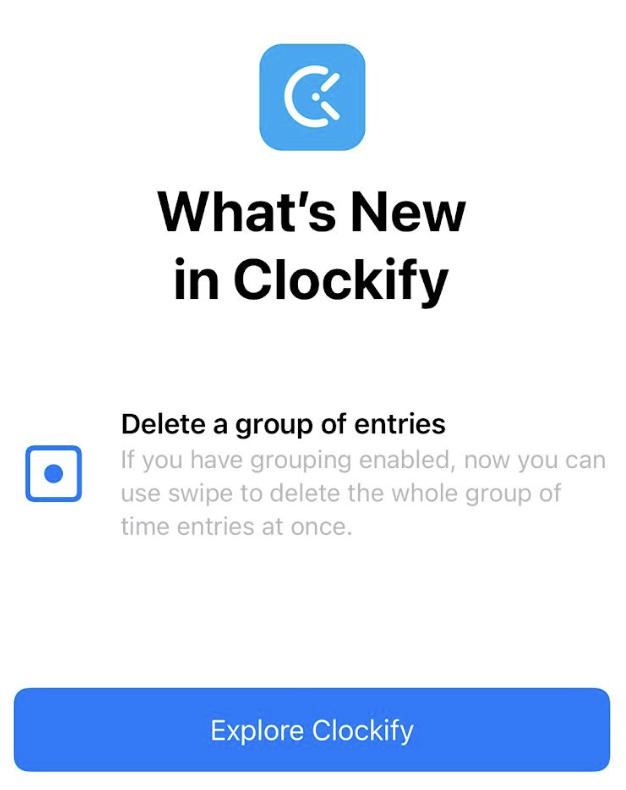
After you reviewed all new features, tap on Explore Clockify to jump to the app.
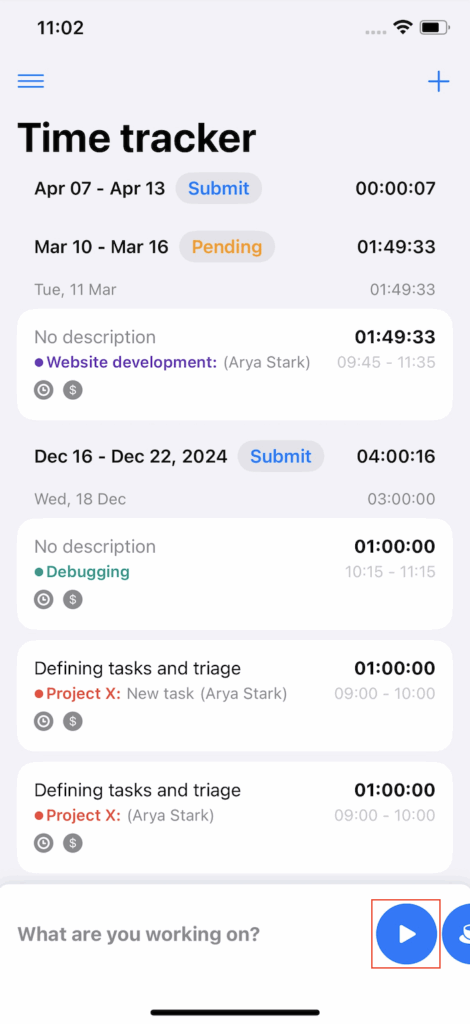
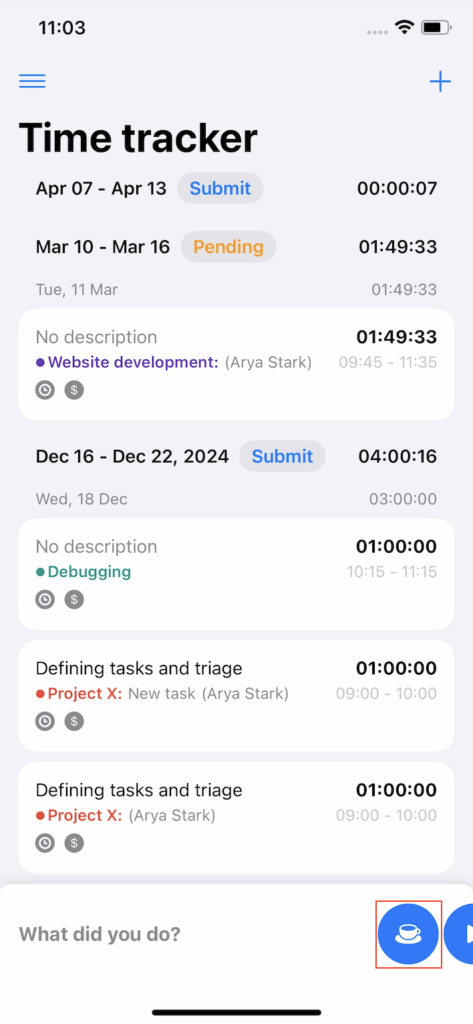
Time Tracker #
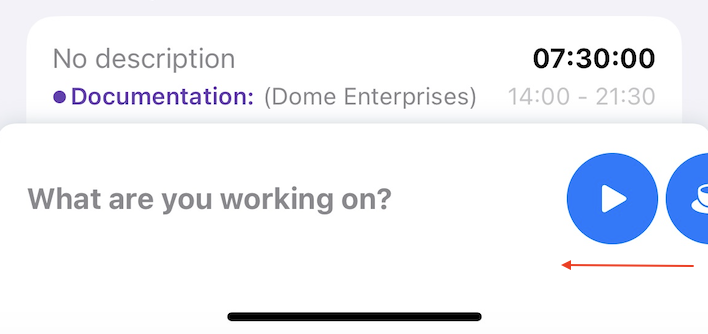
Time Tracker screen lists your 50 most recent time entries. Here you can:
- Switch between tracking time and break mode: swipe left
- Create a new time entry: tap on the blue play (timer)
- Manually add time: tap + button at the top right corner
- Continue tracking time for a recent task: swipe right on a time entry
- Delete a time entry: swipe left on a time entry
- See the timer ticking at the bottom, if it’s running
- Edit time entries: tap a time entry or the running timer to edit
- See past time entries: swipe up from the middle of the screen
When you are manually creating a time entry, default start and end times are automatically provided, so you don’t have to enter them each time. However, you can easily adjust these times by entering your preferred start and end times.
Clockify does an automatic sync every time you perform an action. If you are offline, Clockify will sync as soon as you’re online. If you don’t perform any action, you’ll have to do a manual sync by swiping down from the middle of the screen.
Clockify groups similar time entries under one expandable entry. If you wish to see entries in chronological order, go to the Preferences > General tab in the web app and turn off Group similar entries.

Creating a time entry #
- Choose time entry mode
- Tap plus/play icon in the lower right corner when you start working
- Add details (description, start/end time, project, task, billability, tags)
- If in timer mode, stop the timer when you stop working
Continue the timer for an existing time entry by swiping right on the time entry and tapping Continue. Then, a new time entry with the same description, project, client, and tags will be created, and the timer will start ticking for it.
Calendar #
You can see all your time entries in a Calendar view (available in the sidebar menu).
- Tap on a time entry to edit it, or to continue a timer for it
- Add a new entry by tapping + sign at the corner
- Or press & hold a desired time slot until New time entry form appears
- To move time entry, press & hold a time slot and drag & drop it to desired time
- Navigate to other days by tapping on a date
- See when you have time off
Syncing Clockify and your local calendar #
Connect your phone’s calendar to track and see events in Clockify.
- Go to Settings
- Tap on Calendar integration
- Toggle the switch to connect with your calendar
- Tap OK in the confirmation screen that appears to allow Clockify to access your calendar
You’ll get a list of all accounts and calendars connected to your phone. Choose which events you’d like to see in your calendar (e.g. scheduled assignment/project/task, holidays, contacts), or enable them all.
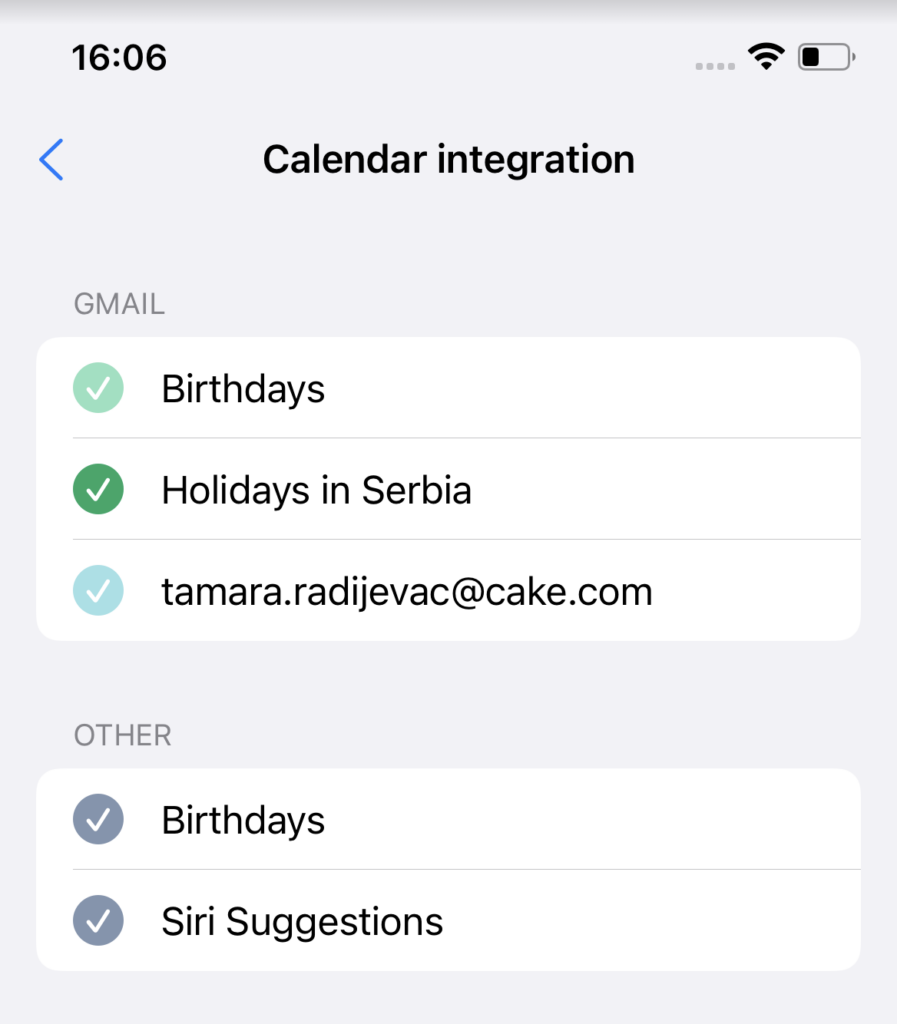
Now, when you go to the Calendar screen you’ll be able to see events from your calendar.
Track time with calendar events #
When you tap on one of the events on the Calendar screen, you’ll get the action sheet with the option to:
- start timer
- copy as time entry (not available if Force timer is turned on)
- cancel action
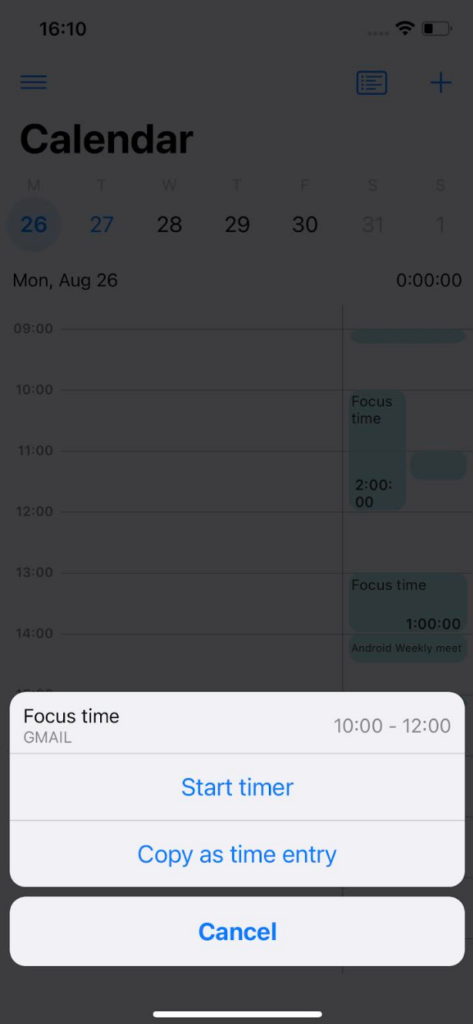
If you choose Start timer option, you’ll start the timer for the event you chose. You can discard the running timer on the Time Tracker screen.
With Copy as time entry, you’ll copy the event as a time entry that can be added to a task or a project.
If there is a newly created event in your calendar, go to the Calendar screen and wait for the events to sync. After the sync is done, you’ll be able to see them in Clockify.
Pomodoro timer #
Pomodoro timer helps you structure your work by breaking it into timed work and break sessions, allowing you to stay focused and avoid burnout.
How it works #
A Pomodoro session consists of a focus session (work time) and a break session (break).
You can start a timer for a focus session to begin your work.
To start the Pomodoro timer:
- Go to the Time tracker page
- Tap on Pomodoro to switch to Pomodoro tab
- From here, tap on Start session to start the session immediately
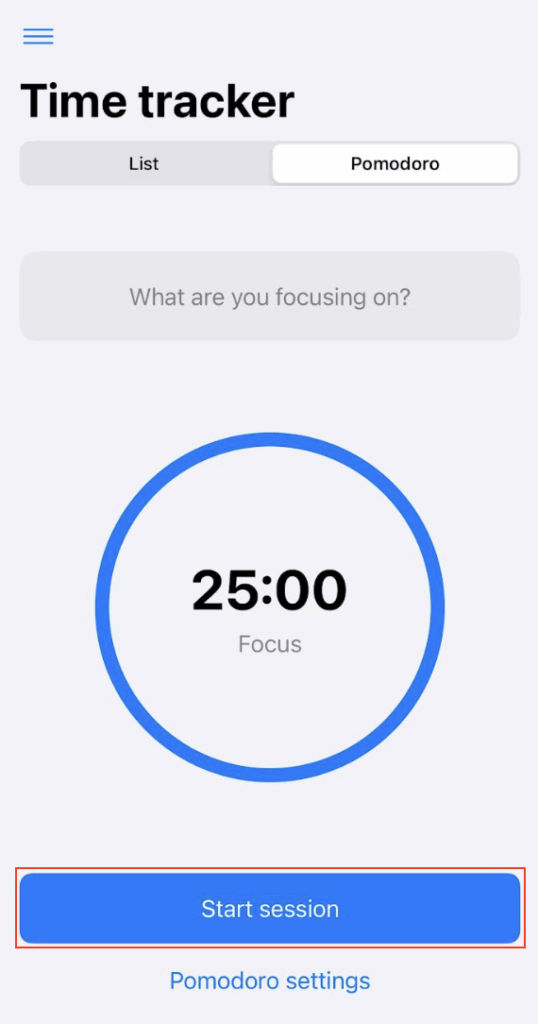
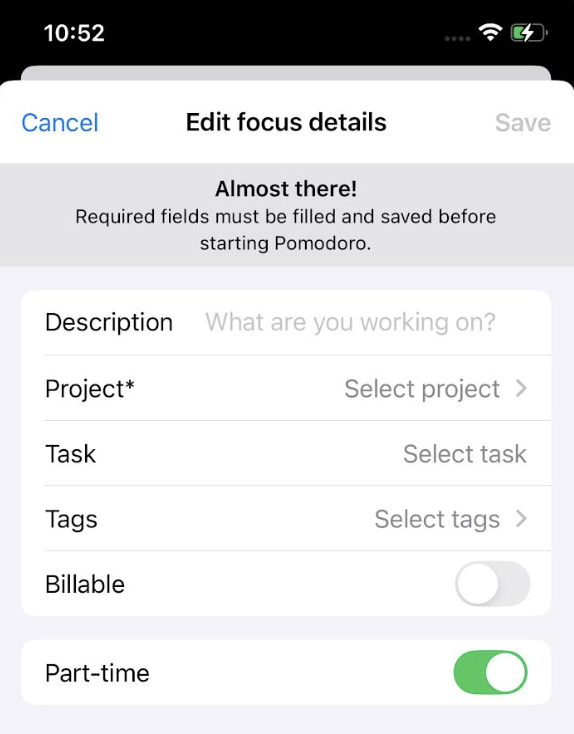
You’ll be prompted to edit focus details including adding project and some optional details (description, task, tag, billability, part-time).
Once the focus session ends, a new timer for a break session can start automatically, or you can start one manually.
When the break ends, the timer will stop, and you can continue your work or start a new task.
Minimum value for focus and break sessions is one minute.
Customize your sessions #
You can set up the Pomodoro timer settings to match your preferences.
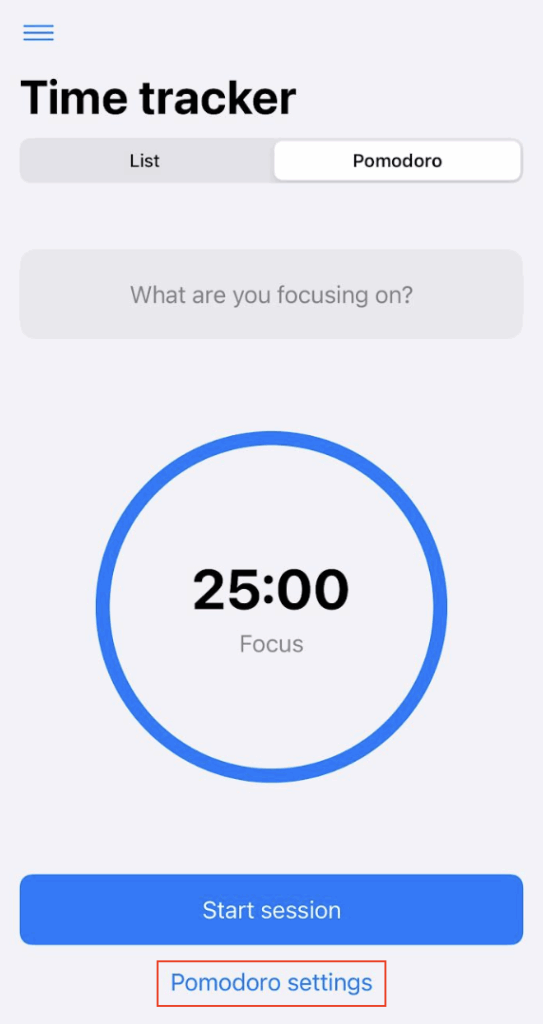
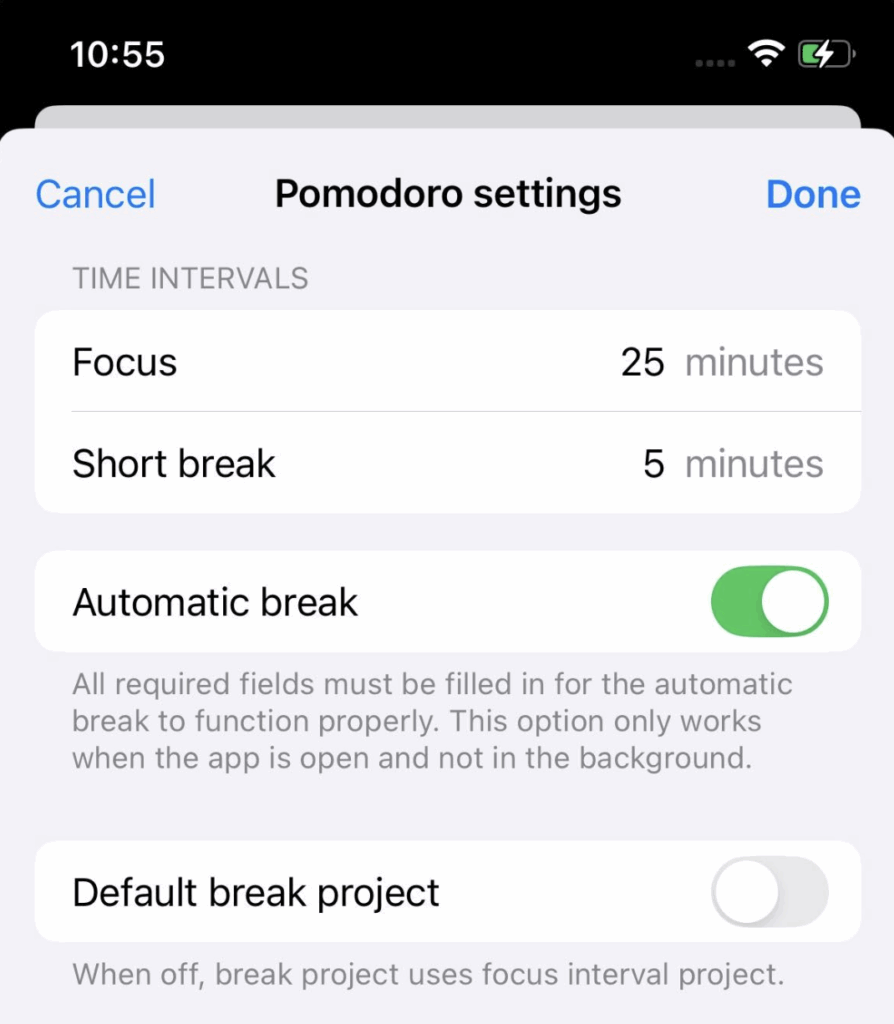
- Set intervals for your focus and break sessions
- Turn on Automatic breaks to start a break timer as soon as your work session ends
- Choose a default project for your Pomodoro breaks
Notifications #
You’ll receive push notifications when it’s time to start or end a session, so you don’t have to constantly watch the app. You can even start a break directly from the notification by tapping Start break.
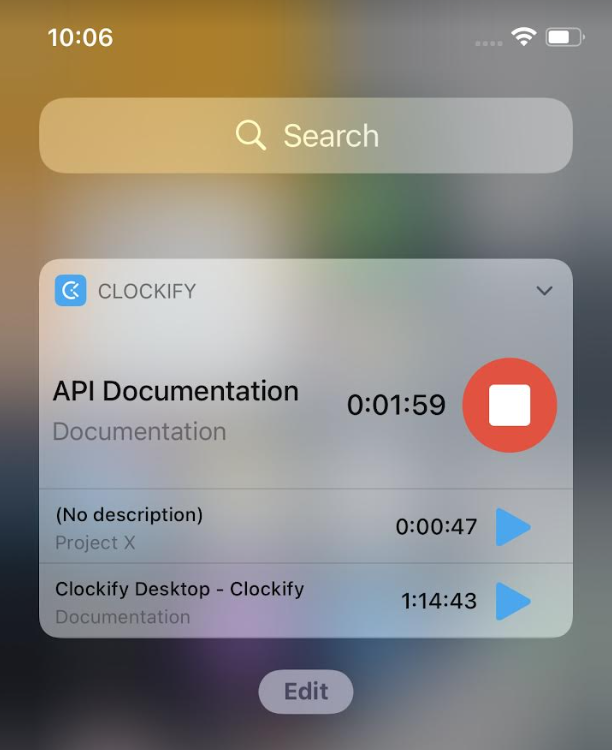
Timer widget #
The support for legacy widgets has been discontinued in iOS 18 and later versions.
You can quickly start and stop the timer from your phone without having to open the app. Widget makes switching time between tasks easier so you can track time with one tap. Just tap on the project to start adding time to it, and switch projects simply by tapping another project.
You can also start/stop or continue the latest timer with haptic touch (3d touch) when you long-press the app icon.
How to add a widget to your homescreen:
- Go to widgets screen on your iOS (left screen from homescreen)
- Go to the bottom of the screen and tap Edit
- Scroll down to Customize and activate Clockify widget
- Tap on play button to start a new timer
- Tap an arrow to see previous activities, so you can quickly continue a previous timer
Timesheet mode #
You can log how much time you’ve spent on projects for each day in the week in the Timesheet (Timesheet has to be enabled in workspace settings first).
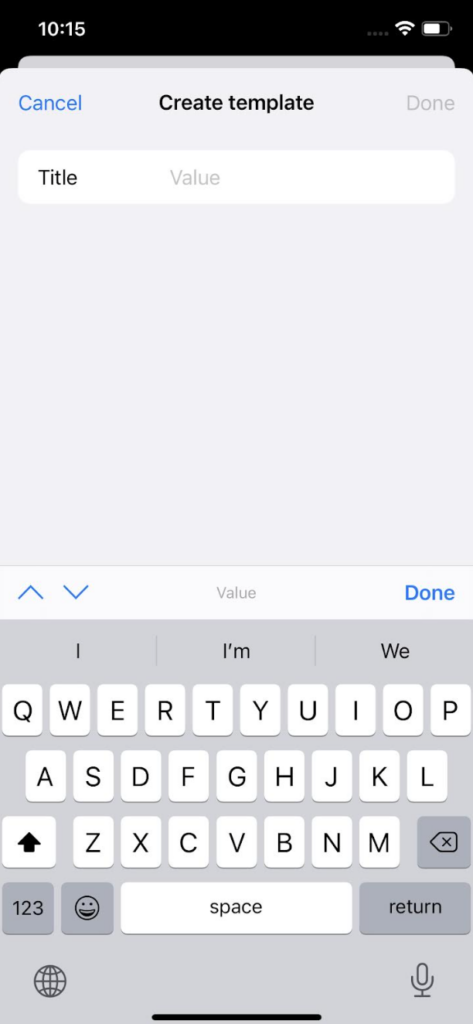
Create template in the following way:
- Add project/task
- Tap on the field next to the added project for the day you want to log time
- Enter time
- When a new week starts, you can reuse project/task combination from last week or apply a template
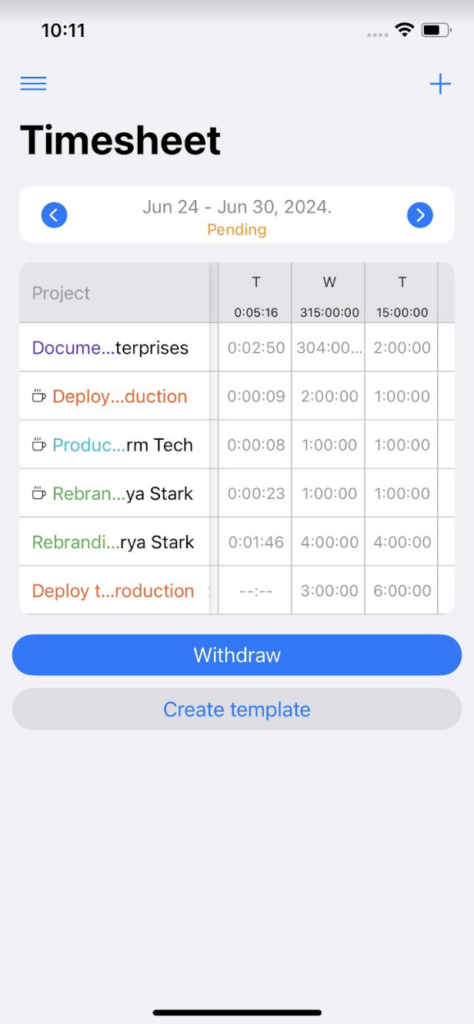
Depending on the approval period set up in the Workspace settings, timesheet templates can be created for weekly, semi-monthly and monthly time period.
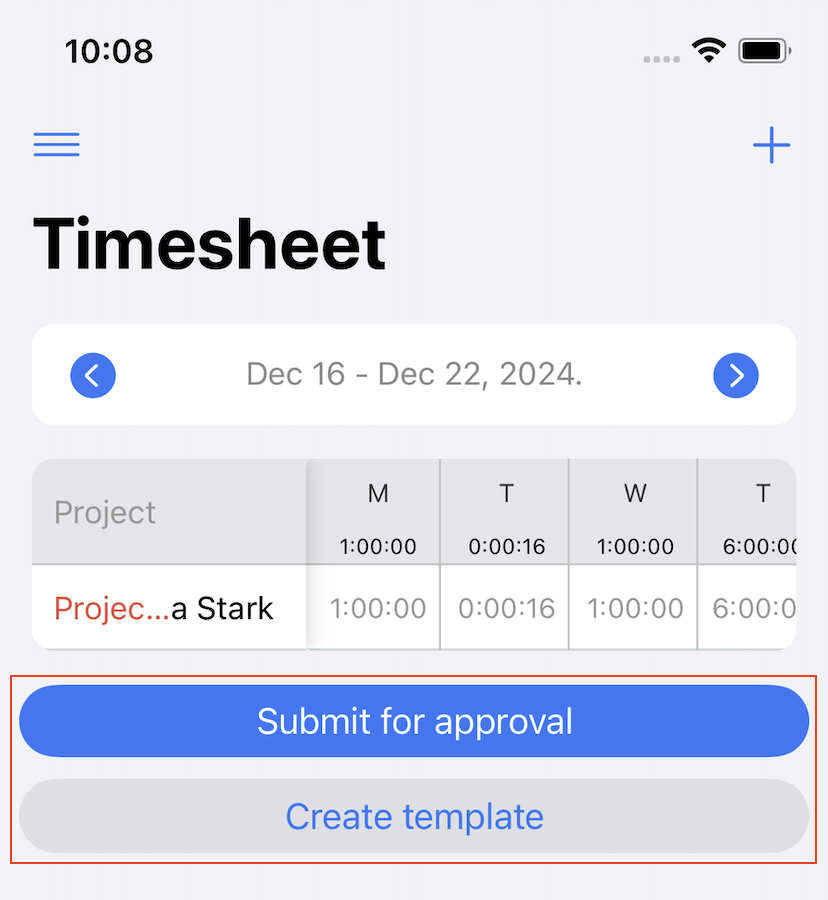
Timesheet template #
If you’re working on a complex project that spans a long time and often need to enter the same time entries in your Timesheet, you can set up a template to save time and reuse it whenever you need.
To set timesheet as template:
- Open the Timesheet screen in the app
- Below the list of tracked entries, you’ll have the following options:
- Submit for approval
- Create/Apply template
or - Copy last week
If you choose Apply template, a list of available templates will appear. Templates are extracted from your previous entries.
If you apply a template that includes projects or tasks that are deleted, archived, or no longer accessible to you, those items will not be added to your current Timesheet.
Copy last week #
To copy last week’s tasks and projects into the current week, tap the Copy last week button located below the timesheet prompt, where your current week’s entries are typically displayed.
This option will appear if you don’t have any entries for the current week. If you’ve already added entries, the option will not be visible.
If you’re offline, you can still save a template. Once you’re back online, you’ll be able to apply the saved template.
Edit entry #
To edit a time entry, simply tap on it from the Time Tracker screen. If the timer is running, you can edit details of that time entry by tapping on the timer.
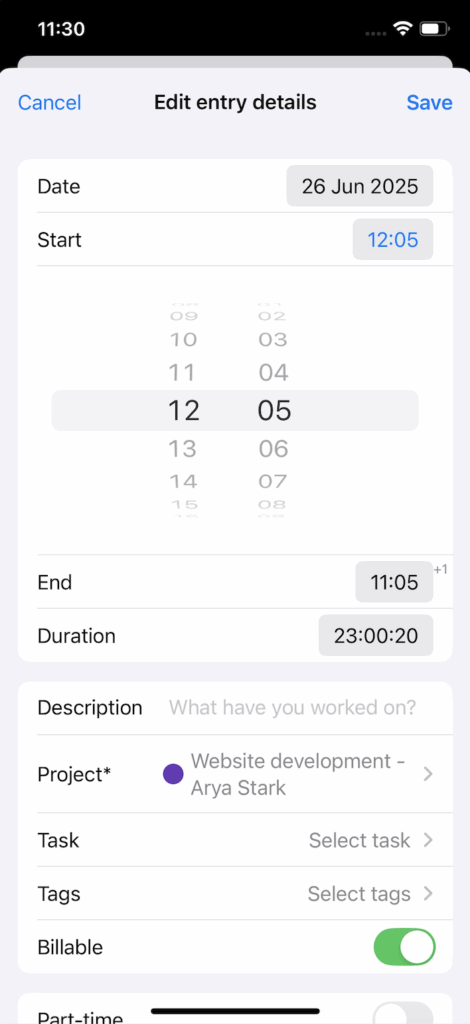
On Edit entry details screen you can:
- Edit start and end time, as well as the date
- Select task and project (plus create project, tasks, and clients from within the app)
- Edit time description
- Mark time entry as billable
- Add/remove tags (plus create them)
Regular (non-admin) team members aren’t able to create clients, projects, and tags if they are not granted these permissions. To give them such permissions, you will need to log in via Web browser and set Who can create projects and clients, Who can create tasks and Who can create tags to Anyone in the Workspace settings.
Anytime you edit something, Clockify will automatically save the changes and sync data.
Split entry #
When tracking time via Clockify on a mobile, you can split and divide an entry into smaller segments on the Time tracker and Calendar pages and track time with more accuracy and flexibility.
This feature is available to all users on a paid plan and free trial.
How it works #
- Find the entry you want to split on the Time tracker or Calendar page
- Choose the option to split the entry
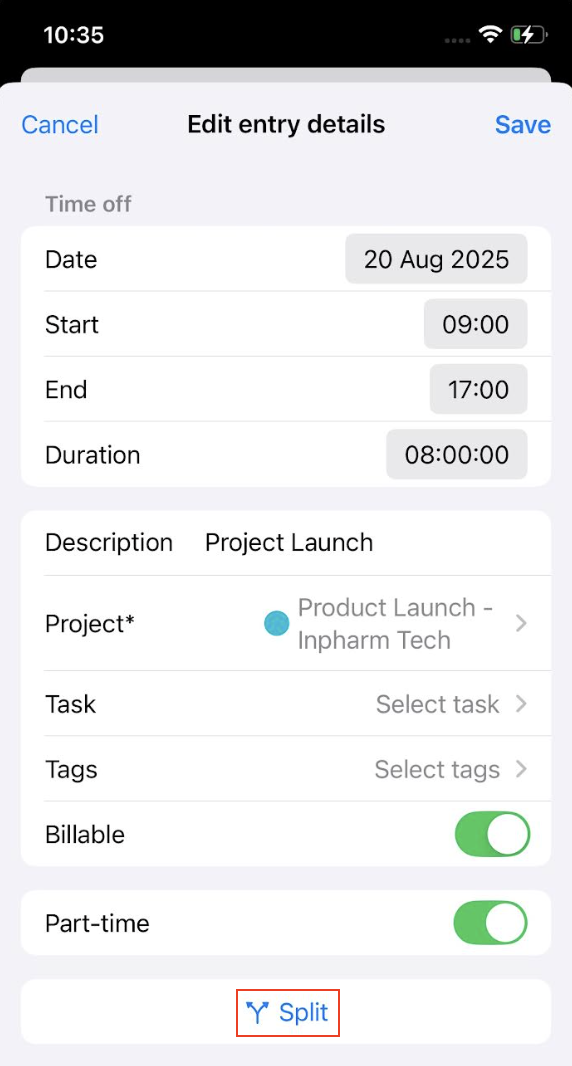
- Choose the time where you want to split the entry
When you split a running entry, the first entry stops at the point you choose, and a new one starts from that exact moment, continuing to run.
If you use a timeline slider, the duration of both entries will dynamically adjust as you drag it.
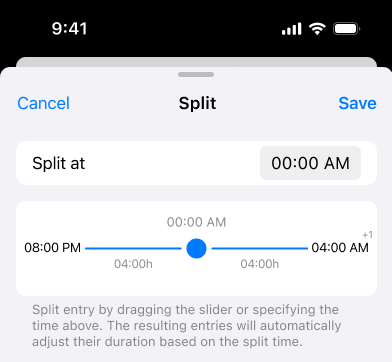
Time entries that are less than 2 minutes long cannot be split.
Delete entry #
To delete an entry, go back to Time Tracker screen, swipe left on the time entry, and tap Delete.
You can also delete grouped entries in the same way.
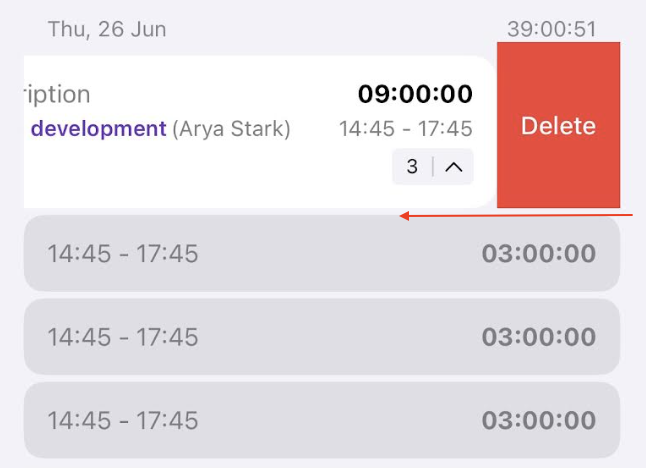
If you want to see similar entries grouped together, go to the Preferences > General tab in the web app and turn on Group similar entries.
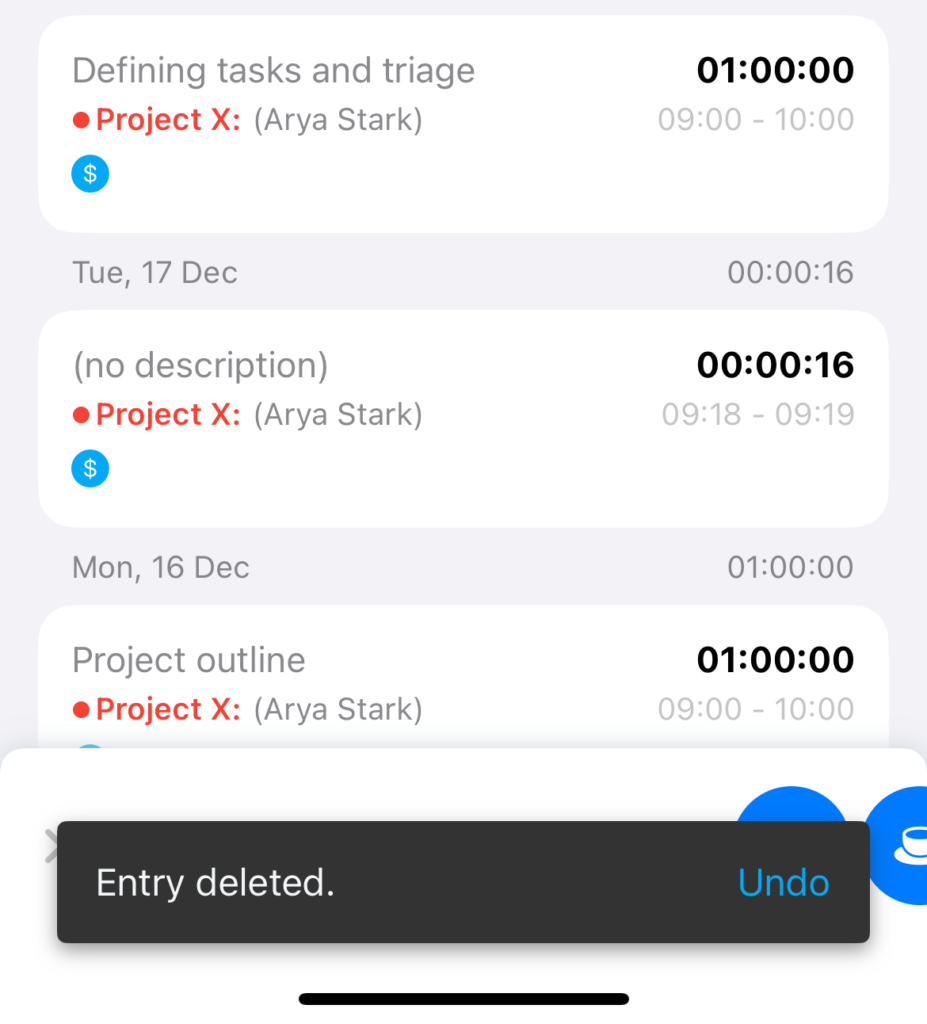
Undo ‘delete’ action #
If you’re on a Time tracker, Timesheet, Calendar or Expenses, you can bring back the entries you deleted. With the undo ‘delete’ action, you can quickly reverse actions like deleting entries, or expenses and discarding a running timer.
This feature is available to all users, regardless of their plan or role. You can use it whether you’re on a trial or a paid plan.
Undo deleted entries #
- Time tracker
- Swipe left on an entry
- Tap Delete
- Message “Entry deleted” will pop up with Undo option
- Timesheet
- Tap X at the end of time entry row, or set time to 0 to delete it
- Pop-up message will show “Entry deleted”
- Tap Undo to bring back the entry
- Calendar
- Tap entry
- Tap Delete
- Pop-up message will show “Entry deleted”
- Tap Undo to bring restore the entry

Undo deleted expenses #
- Expenses
- Delete an expense
- Message saying “Expense deleted” pops up
- Tap Undo to restore it
Message about the delete action stays visible for 5 seconds. If you move to another screen, it will stay there until you dismiss it or it disappears after 5 seconds.
You can still use Undo when you’re offline, but only for entries that were created offline. If you try to undo something created while online, the Undo message will disappear when you go offline.
Track breaks #
If you’d like to see how much time you’re spending on breaks and optimize it a bit, you can track your breaks in the Time Tracker on your iOS device.
Break timer is available to all users regardless of your user role. You only need to have breaks enabled in the Workspace settings on the web app.
To start a break:
- Tap on the arrow and switch to the Timer mode in the Time Tracker screen
- Navigate to the play button at the bottom right corner and swipe left
- Break button (cup icon) appears, you’re now in the Break mode
- Start the break by tapping the button
Each break entry contains the same type of information as any time entry, including start and end time, duration, project name, whether it’s billable or not and optionally some custom fields.

You can always edit and delete break entries unless that period is locked and the time entries are approved.
Important to note:
- If tracking breaks is disabled or the workspace is downgraded, tracked break entries stay in the Time Tracker
- If force timer is turned on, you can’t switch the mode and can only start the timer by tapping play
- If Break mode is turned on, when you duplicate or continue the break entry, a new break entry is created
- If Break mode is turned off, when you duplicate or continue the break entry, a regular break entry is created
- Break timer is available in the offline mode
- Duration format set in the Workspace settings, on the web app, will be applied
Track holidays and time off #
Clockify allows you to track and manage time off and holiday entries for your workspace members.
They are distinctly displayed on all the tracking pages:
- Time Tracker
- Timesheet
- Calendar
- Expenses
- Time off
- Reports
Time off and holiday entries can be created by Owners and Admins.
To use the Time off screen of iOS, the feature first needs to be enabled in the Workspace settings, on the web app.
Time off screen #
On the Time off screen, you can manage paid time off (PTO) and holiday leave.
It is organized into three tabs:
- Requests: Contains all submitted requests and their statuses (pending, approved or rejected)
- Timeline: With a 30-day overview of all scheduled time off and holidays
- Balance: Used to check your current PTO status (accrued, used and available) broken down by policy

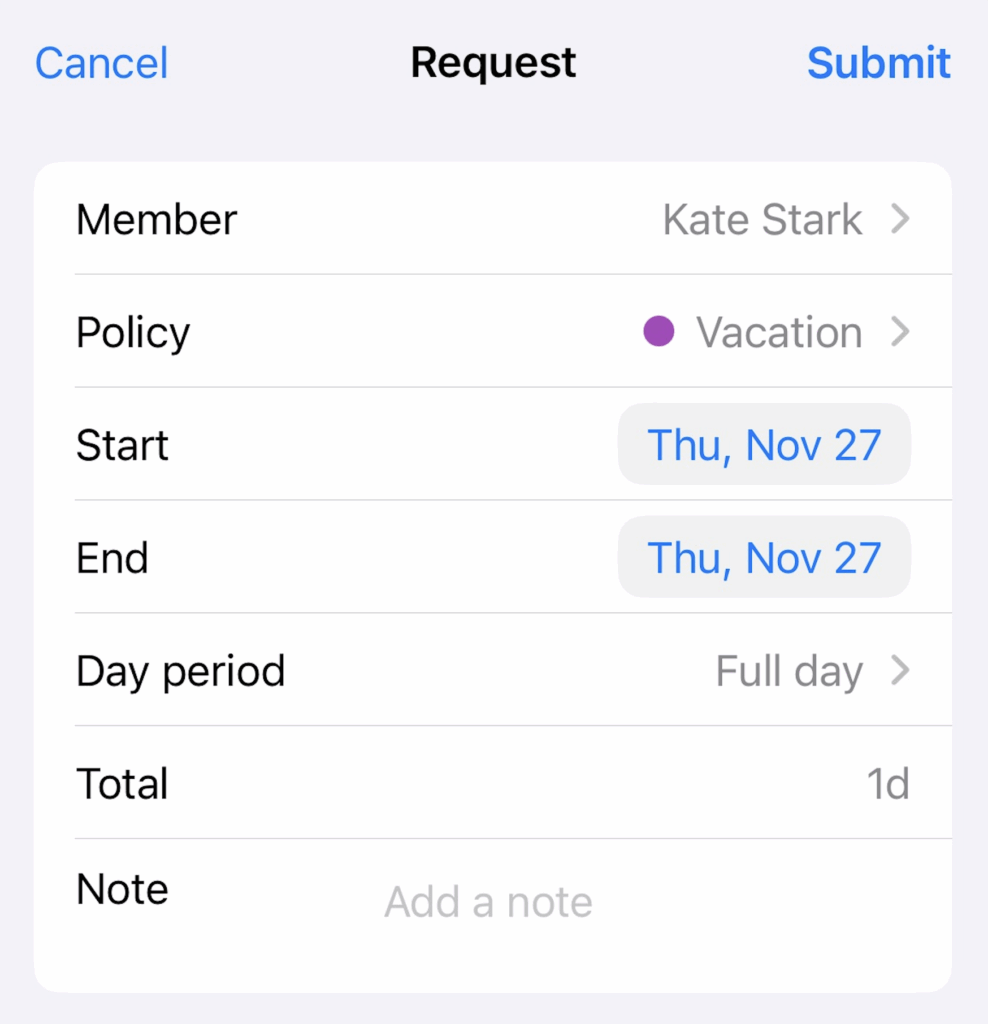
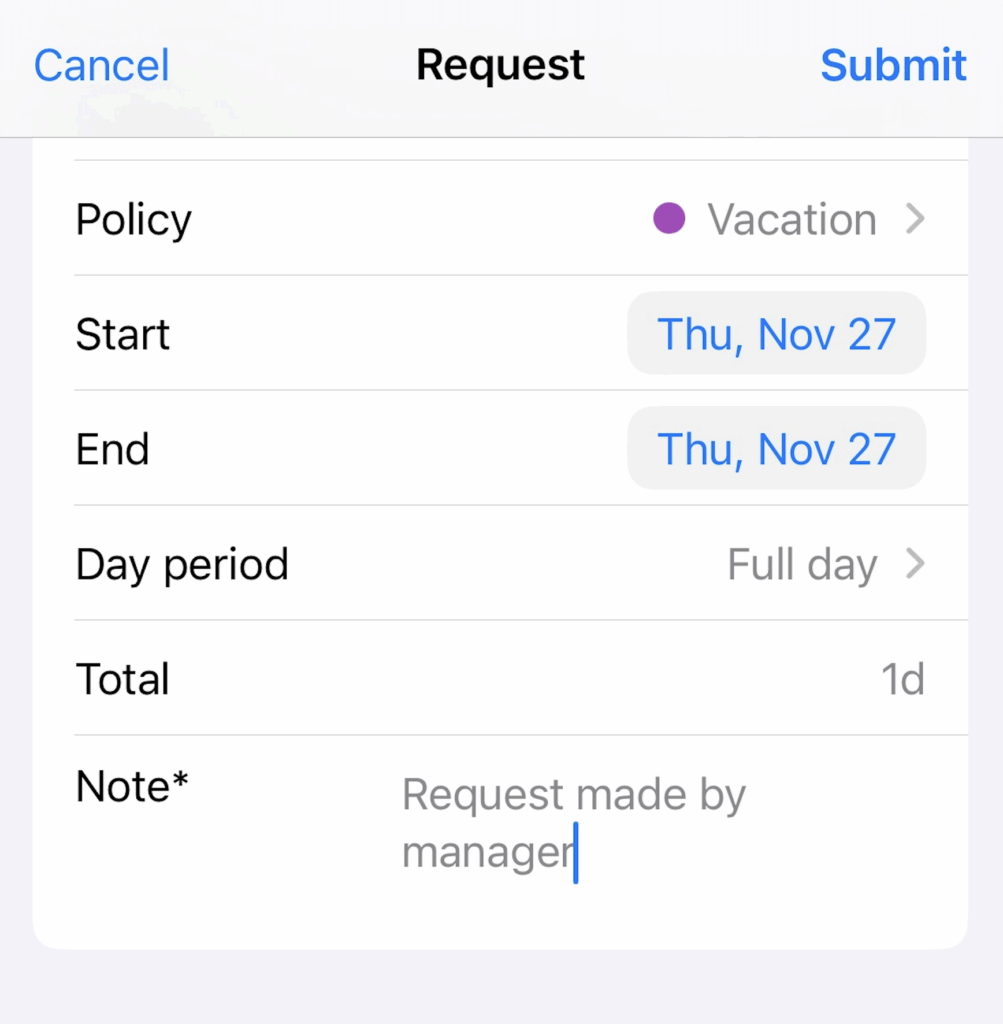
Submit a time off request #
To submit a time off request:
- Open the Time off screen from the sidebar
- Tap the + button to create new request
- Choose time policy (e.g. vacation), date range and specific time period
- Optionally add a note
- Tap Submit
Once approved, you’ll receive an email notification, and the request will be updated to Approved.
Manage & approve request #
Permission to manage the request are based on your role:
- Owners & Admins: View and manage all requests
- Team Managers: Manage requests for their team members
- Specific Members: Manage requests connected to the specific time off policy
To manage a request, tap to open it, review the details and choose to Approve, Reject, or Withdraw it.
You can only edit pending requests. To do that, tap on the request in question and make the necessary changes.
Submit time off for others #
If an employee forgets to submit a request, you as an Owner/Admin can do that for them:
- Open the Time off screen and tap +
- Choose the member, policy and date range
- Tap Submit
Filter request
Filter requests by status or team member by following these steps:
- Go to the Requests tab
- Click the filter icon and select options such as time period, request status, specific member, or team
Your filtering preferences will be saved for future visits.
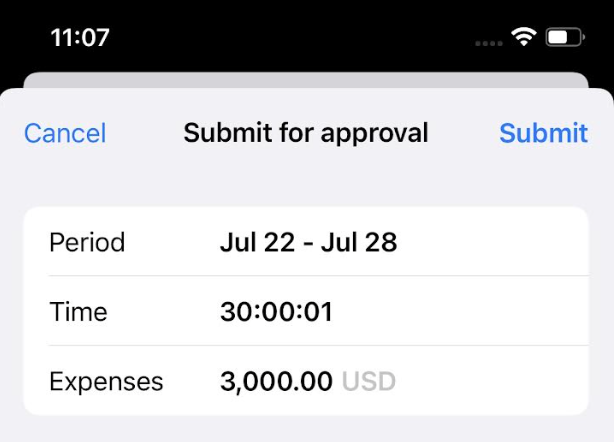
Submit time and expense for approval #
If your workspace has time & expense approval enabled, you’ll be able to submit weekly timesheets for approval.
- Open Time Tracker or Timesheet
- Navigate to the week you wish to submit
- Tap Submit
- Review and confirm by tapping Submit
All submitted weeks will have PENDING label next to them. To withdraw the submission, tap on the pending label and then tap Withdraw.
All approved weeks will have APPROVED label next to them, and the entries will have the approved checkmark. You can’t edit approved time. But, you can add new time entries (if the week isn’t locked) and submit it for another approval.
In case there are multiple currencies assigned to multiple clients, when you submit expenses for approval, all used currencies will be listed in the Submit for approval screen.
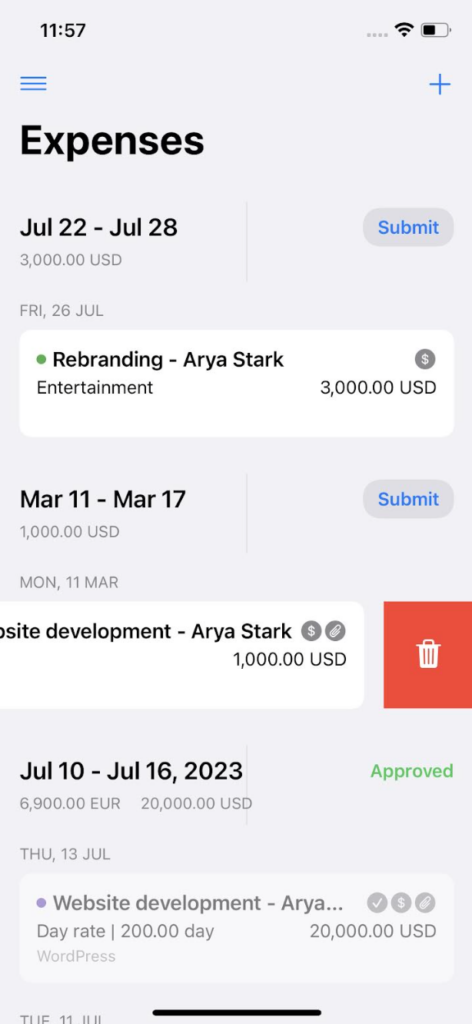
Record expenses #
- Open Expenses from the sidebar (if you don’t see it, make sure you have Expenses enabled in workspace settings)
- Tap + to add a new expense
- Select project
- Select category
- Enter amount
- Choose date
- (Optional) add a note and/or a receipt
Attach receipt #
You can attach a receipt to a project’s expense.
When creating an expense:
- Tap Add receipt at the top left
- Take a photo, choose photo from library, or upload PDF file
Maximum size of uploaded file is 5 MB.
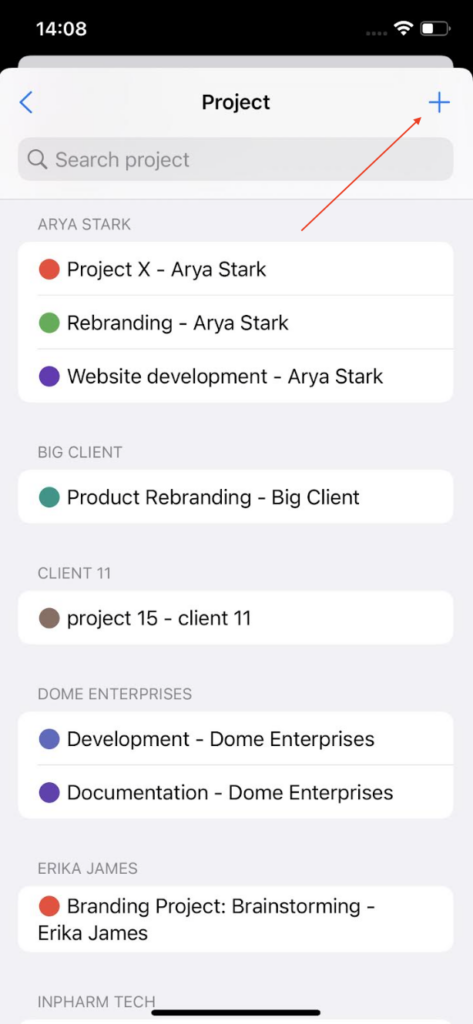
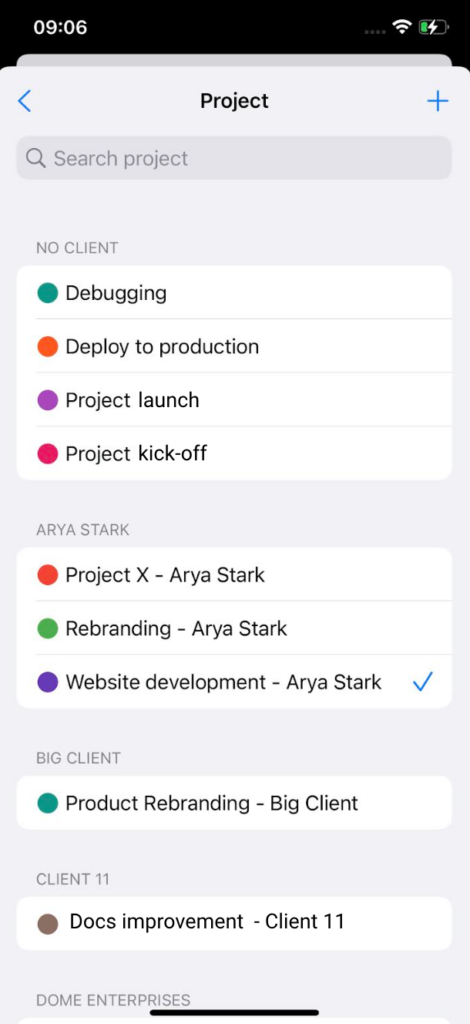
Add project #
- Tap on an entry
- Tap on the Project field
- Tap on the plus (+) at the top right corner

Add client #
Clients can be created from the Projects screen only.
To create a new client:
- Tap on +/play icon on Time tracker screen to add time entry
or
Tap on an existing time entry - Choose Project
- Tap on the + icon at the top right corner to create new project
- Tap on Client to open Clients screen
- Tap on the + icon at the top right corner to create new client
- Enter client name
- Tap on Create client to complete the action

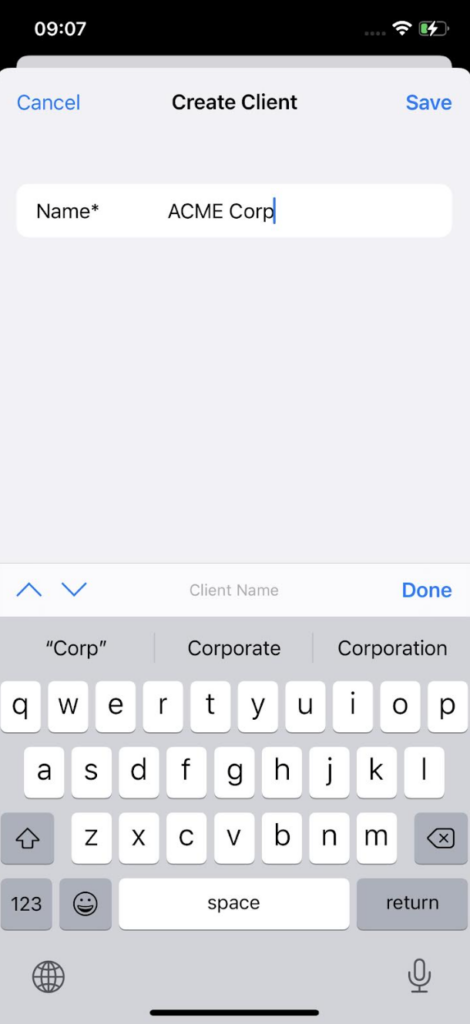
By default, owners and admins can create clients. However, this set of permissions can be modified. Check out Create projects & clients on web app help article for more information on who can create clients.
Reports #
Reports screen shows you how much time you’ve tracked each day and project breakdown. It’s equivalent to Dashboard in the web app.
You can choose whether you want to see:
- Weekly, monthly, yearly or custom range data
- Your time or time from the whole team
- Time spent working on certain project/task, or for certain client
You can swipe left on the report to see data for the previous week/month/year, or right to see data for the next week/month/year.
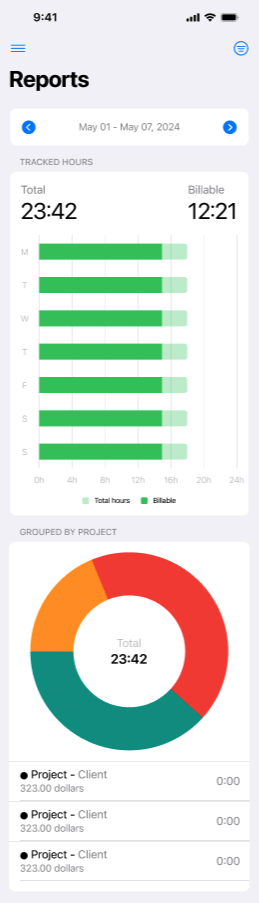
Regular team members won’t be able to see the data for the Team if you’ve disabled it in your workspace settings.
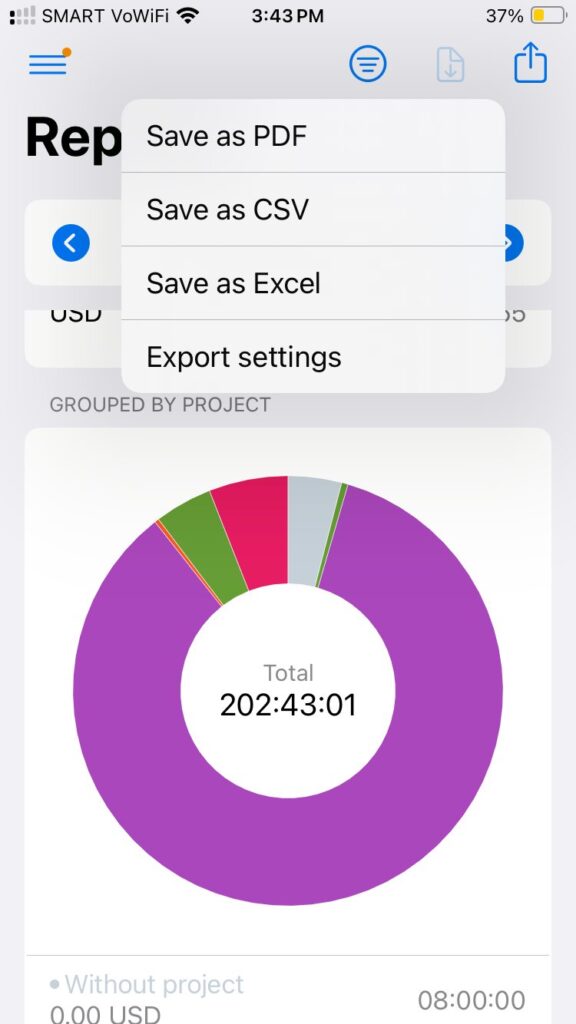
Export report #
Free plan users can only export reports within a one-month period and download it in PDF format.
Reports can be exported and saved as PDF, CSV, or Excel file format.
To export a report:
- Go to the Reports page
- Tap the export button on the top right-hand side
- Select the format you want to download (PDF, CSV, Excel)
- Select the app you want to use to save the file
Share report #
Share report is a paid feature available on any paid plan.
Generate a link to share reports.
To share a report:
- Go to the Reports page
- Tap the share button on the top-right corner
- Enter a name for the report
- Set optional settings like visibility and lock dates
- Tap Share
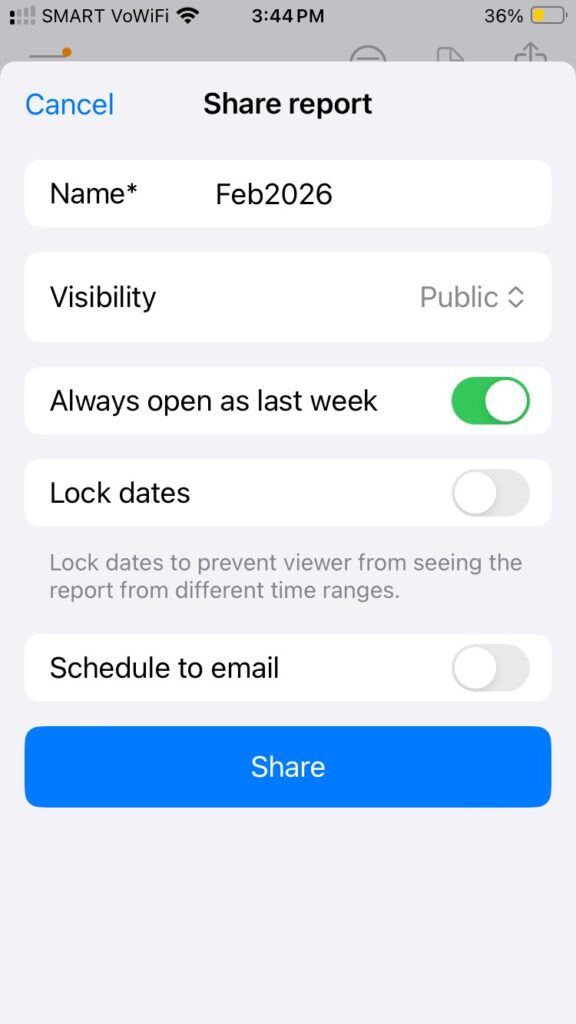
Visibility options
You can set the following visibility for your shared reports:
- Public: Anyone with the link can view (even if they don’t have a Clockify account)
- Private: Only visible to members of your workspace that belong to the assigned group
Time range options
These options allow you to set specific dates for reports you share:
- Always open as last week: The report will be displayed for the last or current day, week, or month depending on the date range you set for the report
- Lock dates: When enabled, the user is only able to view the report for a specific date range
Scheduled reports
Scheduled reports is a paid feature available on the Pro and Enterprise plans.
The Schedule to email feature lets Admins and Workspace owners schedule reports to be sent to selected recipients daily, weekly, or monthly.
Receive reminders and notifications #
Clockify iOS app allows you to configure push notifications to stay on top of your time tracking without constantly monitoring the app. You can also take action directly from the notifications.
Timer reminders #
Timer reminders help you remember to start or stop your timer again. You can customize reminders to fit your work schedule.
- Go to the main menu and open Settings
- In the Reminders section, toggle the switch on
- Choose the days and set specific times you want to be reminded to start/stop your timer
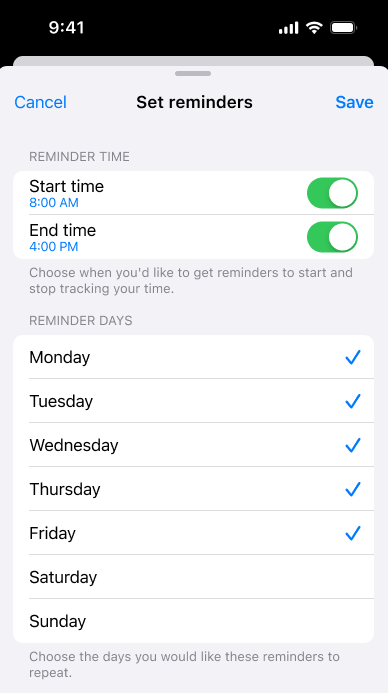
As a result, you will receive push notifications at the scheduled times, even if the app is closed. The notifications are actionable, so you can start/stop the timer with one tap.
You can disable the reminders at any time by toggling the switch off.
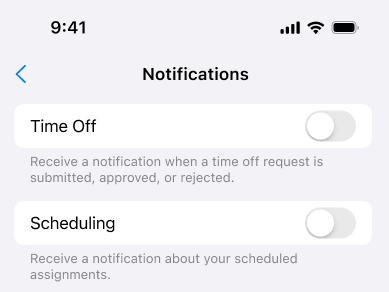
General notifications #
You can manage all your app notifications in one place to avoid being overwhelmed by unnecessary alerts.
- Open the main menu and tap on Settings
- Choose Notifications
- Here you can enable/disable specific types of alerts by toggling the switch:
- Time off: Receive alerts for time off requests and updates
- Scheduling: Stay informed about changes to your schedule
In-app badges #
In app badges help you stay informed of key updates at a glance.
- App icon badges: A badge will indicate if there are unread notifications of items that require your attention. Once the items are reviewed or actioned, the badge disappears.
- Time off alerts: An indicator appears at the top left corner of the screen when there is a pending time off request that requires users attention. This way, managers and admins can stay on top of the approvals.
Important to note:
- Reminders and notifications are disabled in offline mode
- If you are a member of multiple workspaces, you can set reminders for each and will receive them for all of your selected workspaces
Profile settings #
When you tap on your account name in the side menu, you’ll see your profile page where you can manage your account and personal settings.
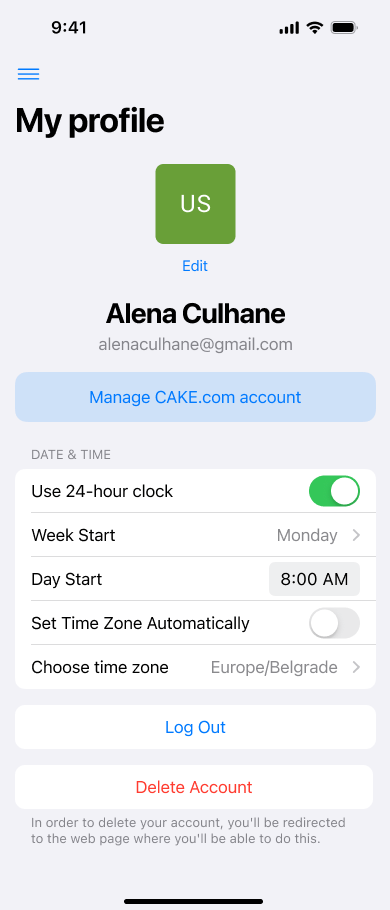
Profile & account #
- Change your profile picture
- Manage CAKE.com account redirects user to broader CAKE.com account settings
- Log out of your account
- Delete account
Delete account option redirects you to the CAKE.com account management page, where you can complete this action.
For more information on how to delete your account, check out this article.
Date & time settings #
In the Date & time section of the page, you can customize your preferences:
- 24-hour clock (enable/disable)
- Set your Week Start (e.g. Monday or Tuesday)
- Set your Day Start
- Automatically set your time zone or choose to set it manually
Settings (General) #
When you tap on the Settings menu in the sidebar you’ll see a general settings screen, where you can:
- Enable the option to add mobile tag to each time entry that’s created on your phone
- Two-factor authentication (2FA)
- App theme
- Default project
- Force offline mode
- Calendar integration
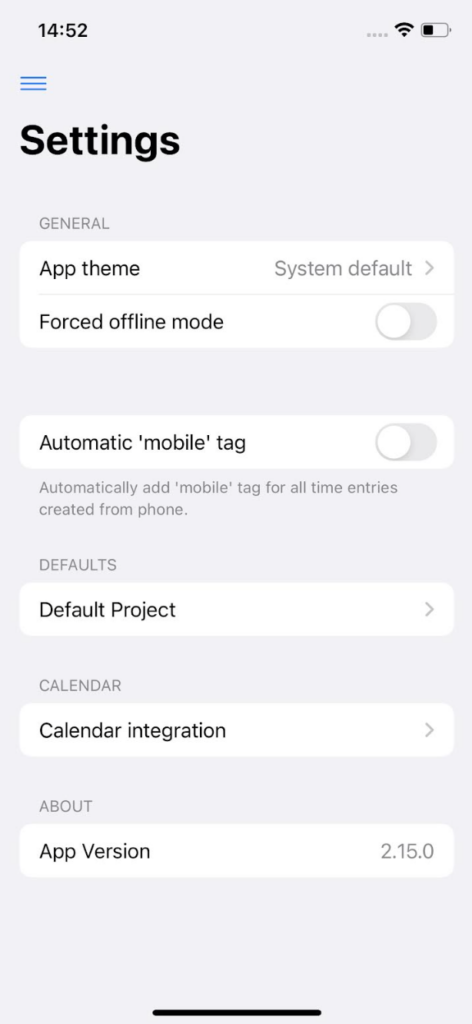
App theme #
You can set an app theme that corresponds to the system. By default, when you install the app, app theme is set to System default. If you’d like to change the default theme, you can do that in the Settings screen and choosing one of the following options:
- System default
- Light
- Dark
The theme will be applied immediately.
Default project #
If you continuously work on the same project, you can set a default project. Then, all you have to do is type what you’re working on and start the timer, and the project will be selected automatically.
You can set:
- A fixed project, which will be always used when you start a timer for an entry without a project (until you change the default project)
- Or select Last used project, and the timer will pick up the most recently used available project from your list of time entries
Offline mode #
You can track time in Clockify on your iPhone even offline. You can create time entries manually or start/stop the timer, and newly created time entries will be saved locally on your phone. When you get back online, the app will automatically sync all time entries.
When you’re offline, you will only be able to see information loaded while you were online (time entries, projects, tasks, tags, etc.). So projects, tasks, and tags are available for selection if they were loaded before you went offline.
It’s not possible to create new projects, tasks, tags, and clients while offline.
If you notice that the app is very slow, it probably means you have an unstable internet connection. In that case, enable Force offline mode in Settings to improve performance. This will make the app behave as if it’s offline without you having to turn off your internet connection. After your turn off Force offline mode, the app will automatically sync all time entries.
If you are using the app in the offline mode, please make sure you’ve synced your time entries with the cloud prior to logging out. If you fail to do that, all the data that is not synced at the moment of logging out, will be lost.