Billing tracked time
If you’re charging clients by the hour, you need to track all the time you spend working to ensure accurate billing. This includes non-billable tasks, such as emailing or sorting out invoices. Knowing the total time required for everything is important for getting a clear picture of how your business is doing financially.
Clockify can help you organize and view billable and non-billable work by setting up different rates in Workspace settings.
Billable rate is a paid feature available on any paid plan.
Set your rates in Workspace settings #
- Click the three-dot icon next to your workspace name
- Select Workspace settings
- Click Change under Workspace billable rate
- Enter the amount you want
- Select when the billable rate is applied:
- From today or a specific date onwards
- All past and future time entries
6. Click Save
Add projects to a client #
To create a specific project and link it to a client:
- Go to Projects
- Click Create New Project in the top-right corner
- Enter the project name
- Select a client from the dropdown menu
- Set to Public or Private
- Click Save

Public projects are visible to everyone in the workspace, while private projects are visible to project members, workspace admins, and project managers.
Set project rates #
To set unique rates for specific projects that are different from your standard hourly fee:
- Go to Projects
- Click on the project you want to set a different rate for
- Click on the Settings tab
- Set the amount under the Project billable rate by clicking Change
- Enter the billable rate/amount
- Click Save
Track billable vs. non-billable time #
To get a true picture of project profitability, you should track all work even the work you don’t charge for.
Track billable work #
1. Start the Timer: Enter your activity description and select the project you’re working on.
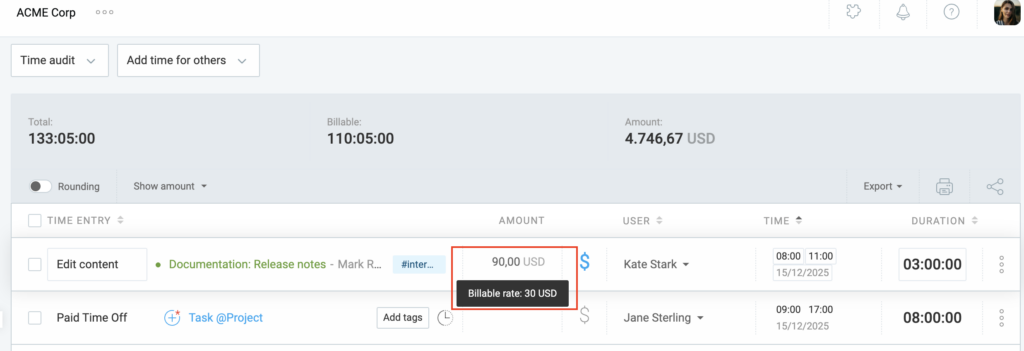
2. Time entries are marked Billable by default, but check that the $ sign is blue to indicate the task is billable.

3. Resume Work: Use the Play icon on existing entries to restart the timer for recurring tasks throughout the day.

In the Detailed report, you can check the total amount charged for a time entry in the Amount column. Clicking on the $ sign next to it will switch the billability to Billable or Non-billable.
Track non-billable work #
Meetings, administrative tasks, or invoice preparation should still be logged.
- Toggle the “$” off: Ensure the billable icon is gray.
- Use Tags: Add a “Meeting” or “Admin” tag to easily filter these out later in your reports.
Generate a client report #
- Go to the Report > Summary
- Select the time period you’re billing for
- Click the Client filter and select the client you’re billing
- Click the Status filter and select Billable
- Scroll down to the table and group by Project > Task for a granular breakdown of time entries
If you spent too long on a billable task and want to reduce the time, go to the Detailed Report, find those entries, and switch them to non-billable.
Share report #
To share a link to a report:
1. Go to Reports
2. Apply filters to generate the report
3. Click the Share button on the top-right corner of the table
4. Enter a name for your report
5. Set the report to public or private
6. Enable the following features:
- Always open as “This month”: Ensures the link is dynamic; whenever it’s opened, it automatically updates to show data for the current month.
- Lock dates: Makes the link static; it restricts viewers to the specific date range you selected and prevents them from changing it.
- Schedule to email: Automates delivery; sends the report as a PDF, Excel, or CSV to your inbox (or others) daily, weekly, or monthly.
7. Click Create link
8. Click Copy to copy the link
9. Click Close
Sharing a report in Clockify lets you grant others access to real-time data without them having to navigate the full dashboard.
Public vs. private shared reports #
The Visibility setting determines who can open the generated link:
- Public: Anyone who has the link can view the report. They do not need a Clockify account to see the data. This is ideal for sharing progress updates with external clients.
- Private: Only people with a Clockify account, members of your workspace, and members of the specific user group you select can open the link.
If you lose the link or need to manage it later, you don’t need to recreate the report:
- Go to Reports
- Click on the Shared tab (located at the top of the Reports page)

Here, you will see a list of all reports you have created or that have been shared with you. You can copy the link to your clipboard, click the name to open it, or click the three dots to edit sharing settings (like changing the name or visibility) or delete the link entirely.
Some things to remember about shared reports:
- Shared reports are live. When someone opens the link, it shows the most up-to-date data based on the filters you set, rather than a static snapshot.
- A shared report always reflects the creator’s permissions. If the person who created the link loses access to certain data (like billable rates), that data will also disappear from the shared report.
Create invoice #
Once your hours are verified, generate a professional invoice.
- Create a new invoice and use the Import feature to pull in all uninvoiced billable hours for that client.
- Manually remove any entries you wish to exclude or adjust the date range to match your billing cycle.
- Mark invoices as Sent or Paid within Clockify to keep your accounts receivable organized.
Check out Create & manage invoices for more information and guidance in using this feature.
Important to note: #
- Avoid typing the same description twice. Use the play icon on your Dashboard to resume previous tasks instantly.
- If you bought materials or paid for software for a project, log these in the Expenses tab so they can be added to the final invoice alongside your time.