 Published: April 28, 2026
 If you’re running a nonprofit organization, you’re likely focused on fulfilling your mission while remaining compliant, sustainable, and trustworthy.
This guide will help you set up Clockify to achieve this in the most efficient way for your organization.
- To track your funds in Clockify, simply create each Client for each funder.
- With Clockify Expenses, you can track payments such as mileage, event fees, and meals.
- For each project you have in Clockify, you can add time and budget estimates. Then, as you track time, you’ll see how much time and funds you’ve spent.
- Clockify has a free trial that lasts for 7 days, during which you can test out Pro plan features.
#1: Set up Clockify for nonprofit time tracking
Setting up hourly time tracking for your staff is the easiest way to keep clean records and signal transparency to your grantors.
Reliable data builds confidence — it shows your team and funders that you’re transparent and trustworthy. Here’s how to set everything up, regardless of your tech savviness and experience.
First, sign up for Clockify and create your free workspace. Afterward, you’ll need to:
- Invite your team, and
- Set up your workspace as you prefer.
That’s it — your initial setup is complete! Now, let’s get into the details.

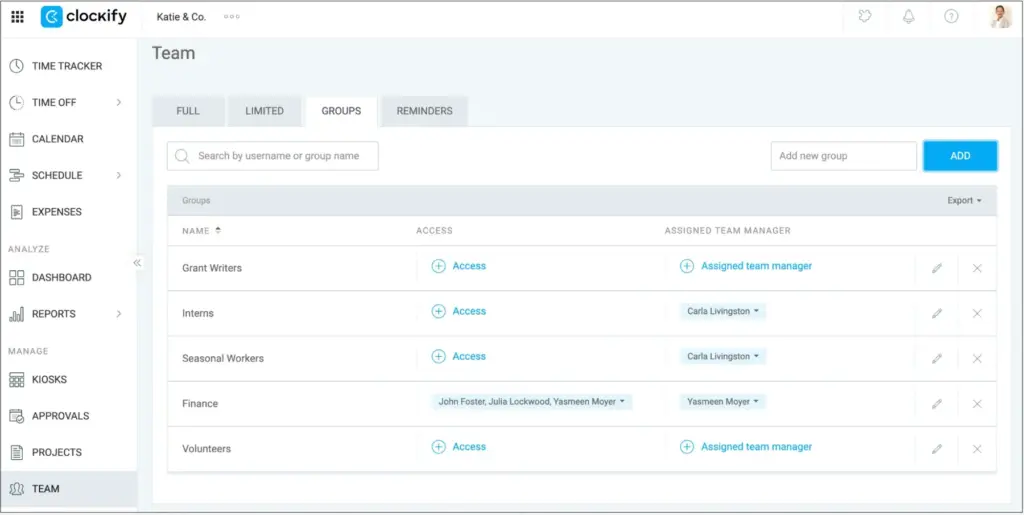
#2: Organize your nonprofit staff
Nonprofit organizations deal with vastly different types of personnel — from full-time employees to seasonal staff, interns, and volunteers.
Clockify by CAKE.com simplifies team management by letting you define hourly rates, daily work capacity, and workdays for each team member. Organizing this info makes your team feel recognized and valued.

You can also assign users to Groups to efficiently organize your nonprofit records. Groups can represent your actual teams or contract types.
#3: Choose the best way to track time
Clockify offers multiple time entry methods. Selecting the best one for your team helps them feel confident and in control of their work process.
To track time in Clockify, you can enable and use:
- Time tracker — for manual time entry,
- Timesheet — for a weekly timetable view,
- Calendar — for a weekly calendar view,
- Timer — for tracking each work second.
You can choose which method will be available to your team members in your Workspace settings. To learn more about these features, check out this video:
#4: Approve people’s time entries
After users track their time, Approvals allow Team managers to authorize time entries for their team on a weekly, semi-monthly, or monthly basis.
In the Approvals menu, clicking a user’s submitted entry will display more details. Among other data, you’ll see the cost of your employee’s hours, total time they tracked, and the billable time tracked for the submitted period.
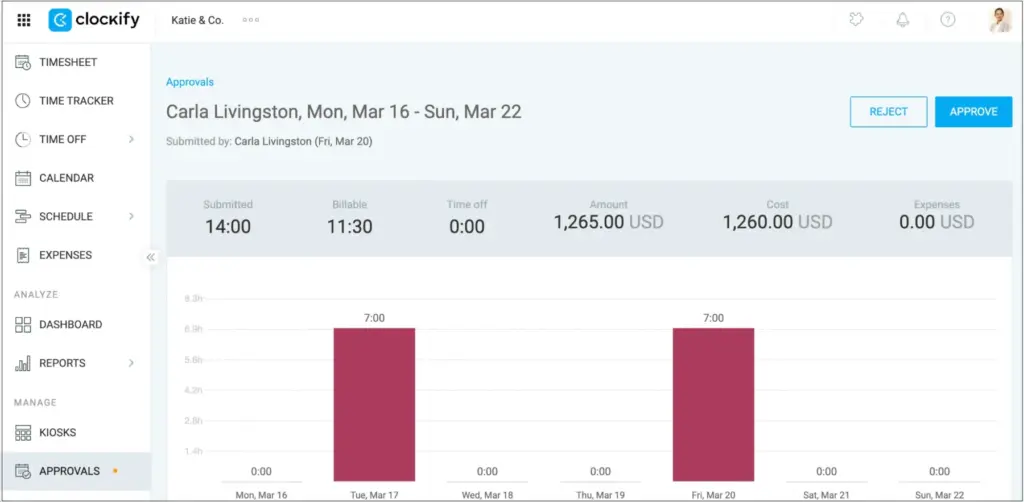
Approvals help you reduce manual time entry errors and simplify timesheet sign-off.
#5: Use rates to calculate wages
If you’ve recently hired paid staff members alongside volunteers, it’s important to manage them both accordingly. Clockify’s Rates let you do just that while keeping it simple.
For a nonprofit, hourly billable rates are most useful for calculating employees’ wages. In Clockify, these rates are set in the Team menu and are automatically applied to each hour your team member tracks.
While your volunteers will likely have their rates set to $0, you can also assign custom rates to showcase volunteer value to your funders. With this approach, you can back claims such as “Our community donated $3,000 worth of labor last month.”
You can also set rates that override hourly rates on a Project or Task level. To learn how, check out this video:
#6: Track funds and grants
Clockify by CAKE.com easily adapts to handle nonprofit-specific needs, like grant and fund tracking. The easiest way to achieve this in Clockify is with Clients and Projects.
For nonprofits, clients represent your funders. After you create a new client, you can assign new projects to them — to track what you spend their donations on.
Projects contain tasks, which can be set as billable or non-billable. This allows you to assign the same project to both volunteers and paid staff while keeping the records linked to a single fund source.
Example: Volunteers track a dedicated non-billable task, while your paid staff tracks their billable tasks.
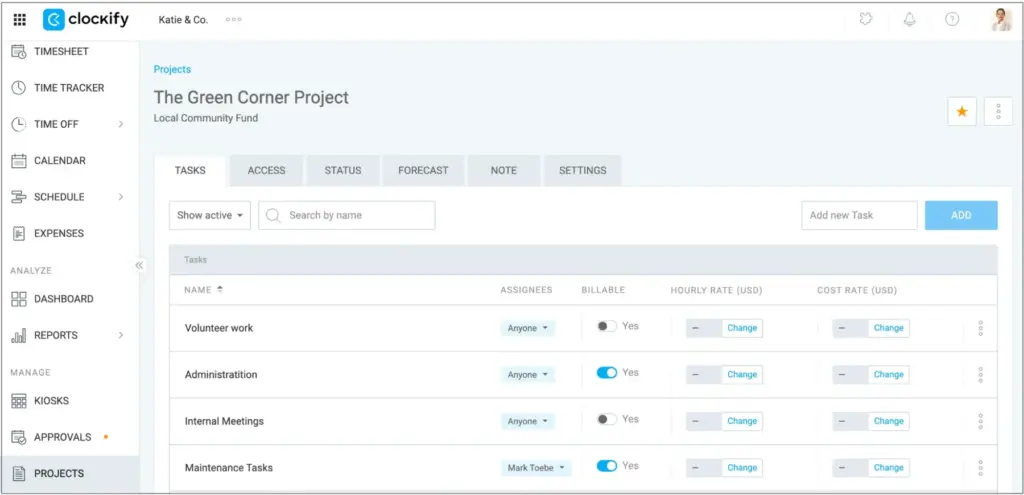
You can also mark projects and tasks as favorites. This will make them appear first in the Project finder when you search for them.
🎓 CLOCKIFY PRO TIP
Another way to track tasks and projects is with Plaky task management tool. Plaky is a part of the CAKE.com Bundle, which includes 3 productivity tools — Clockify time tracker, Pumble team chat app, and Plaky — at a heavily discounted price of $12.99. Sign up today:
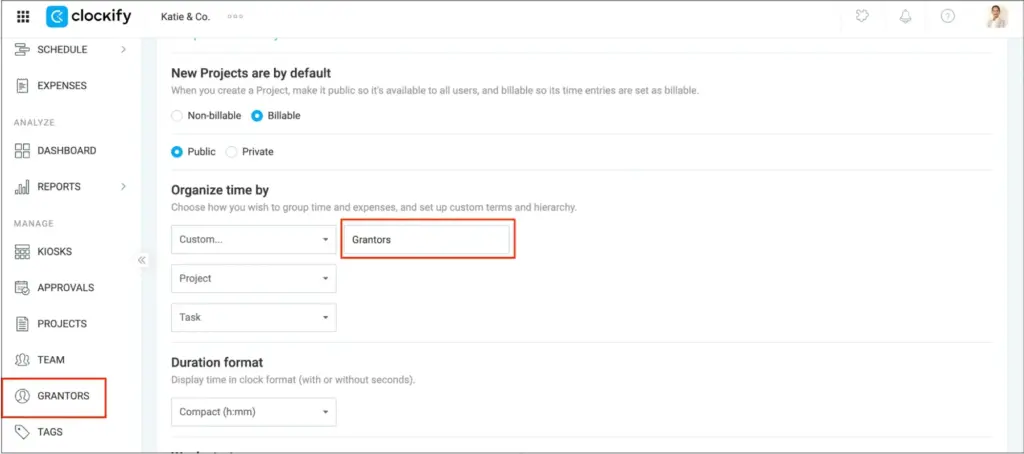
Customize Clockify’s labels
To make the terminology even more intuitive for your nonprofit, you can rename Clockify’s categories. Let’s change the Clients category, for example.
Go to Workspace settings, find the “Organize time by” section, and rename the Clients field into something more intuitive, like “Grantors.” Hit enter, and these changes will apply to your entire workspace.
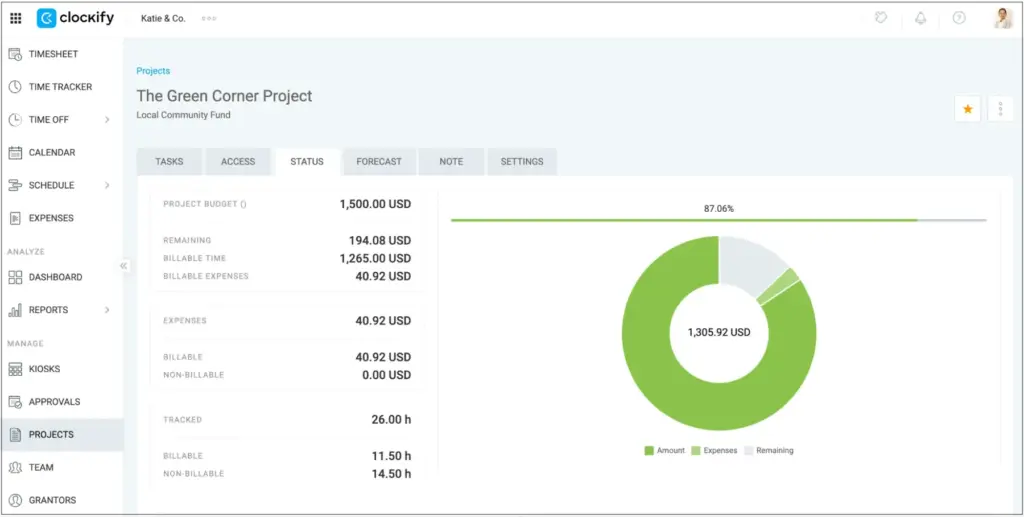
Track time or budget
Clockify’s Projects also let you assign time and budget estimates. That’s useful for tracking the available money and reporting to your funders if the budget runs out mid-project. Time and budget estimates also help you adapt your strategy if you see you’re running short on time.
To find it, you need to:
- Find your Projects in the Projects tab,
- Go to the Settings on the right,
- Scroll down to the Project estimate section, and
- Select Project budget.
Here, you can manually enter the amount of a grant.
As your team tracks work hours, your project’s status bar will update to indicate how much of the project’s funds have been spent on wages and additional expenses.
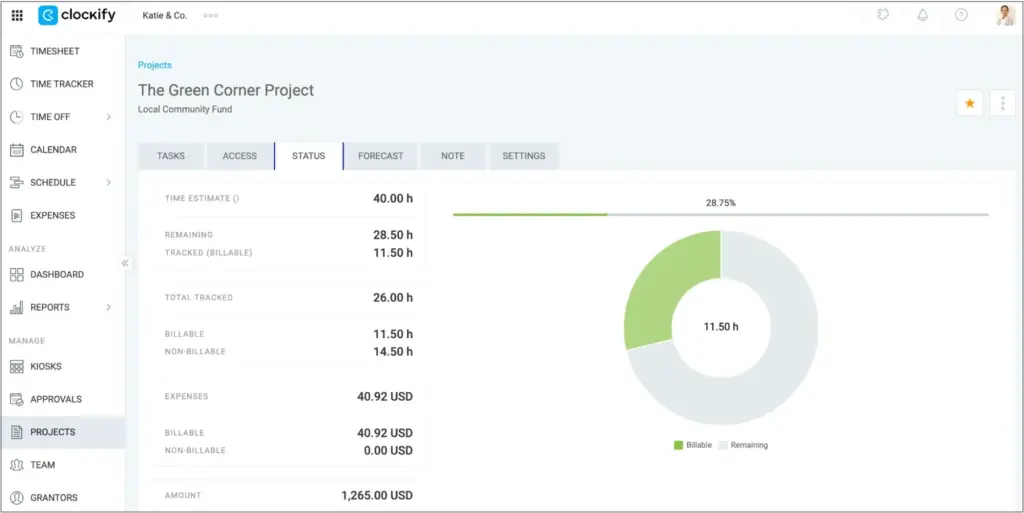
If you choose Time estimates in your Project’s settings, the displayed percentage shows the total tracked time vs. your manually estimated time.
🎓 CLOCKIFY PRO TIP
Want to plan work, manage time, and estimate projects better? Find expert advice on:
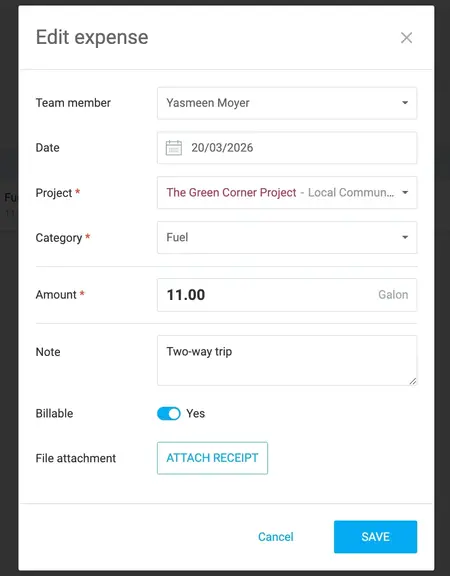
#7: Track expenses
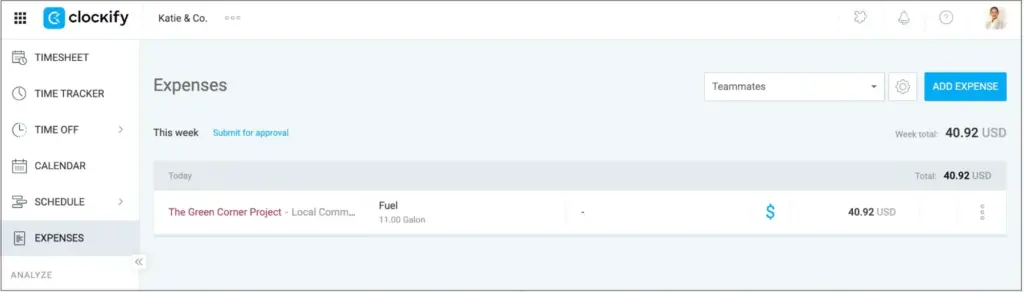
Use Clockify’s Expenses to track specific payments, such as mileage, lodging, meals, event fees, and more. You can also attach receipts and notes — and mark these expenses as billable or non-billable.
Expenses are always assigned to projects, which means they’re also connected to your fund source (clients), right alongside your team’s tracked hours. All of this information is also available in Clockify’s reports, making expense management and reimbursement much easier.
#8: Run reports to analyze nonprofit performance
Clockify offers multiple types of reports to help you:
- Analyze time spent on specific projects or tasks,
- Compare billable vs nonbillable hours, and
- Understand project costs by analyzing expenses.
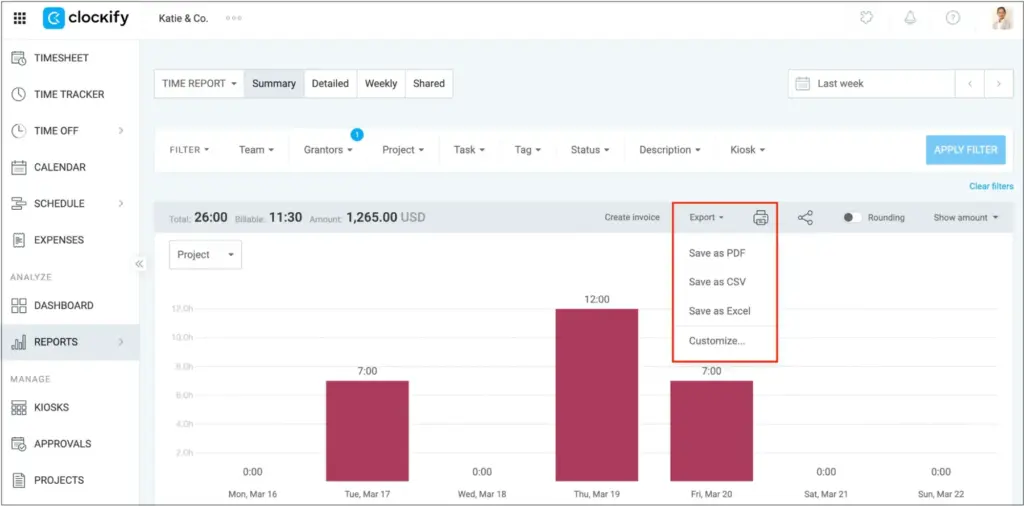
You can also share these reports for financial or administrative needs, or export them as PDF, CSV, or Excel. Let’s take a look at some use case examples.
See volunteer hours
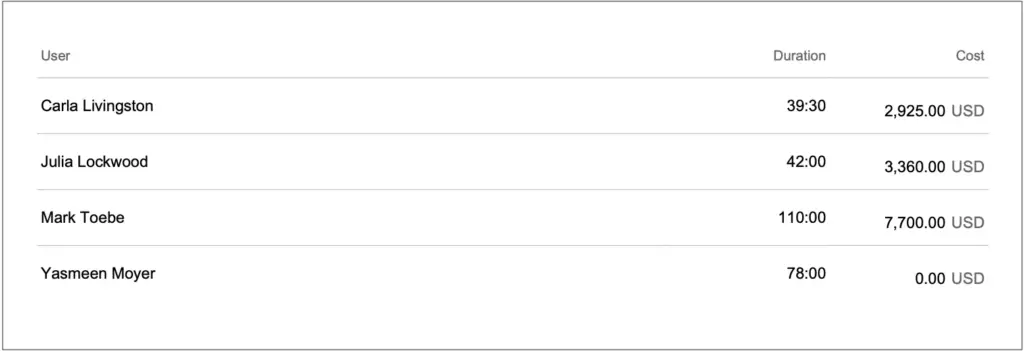
If you head to Reports > Summary report, you can apply various filters to the tracked time. Select the Time range (e.g., “Last week”). After this, select all tasks that represent volunteer hours.
Filtering volunteer hours with Clockify’s Reports
After you click on Apply filter, the Summary report will show the total volunteer hours for that time period. This is useful for demonstrating a nonprofit’s impact.
Simplify grant reporting
Instead of manually writing reports for funders in spreadsheets, you can generate them with a single click after applying relevant filters.
This way, you can easily submit financial and performance progress reports to funding agencies to ensure compliance and transparency.
Prepare payroll
You can also use Clockify’s Reports to prepare payroll with ease. Just select the time range, users, and any other additional info, and hit Export. The clean timesheet data is ready for your payroll software.
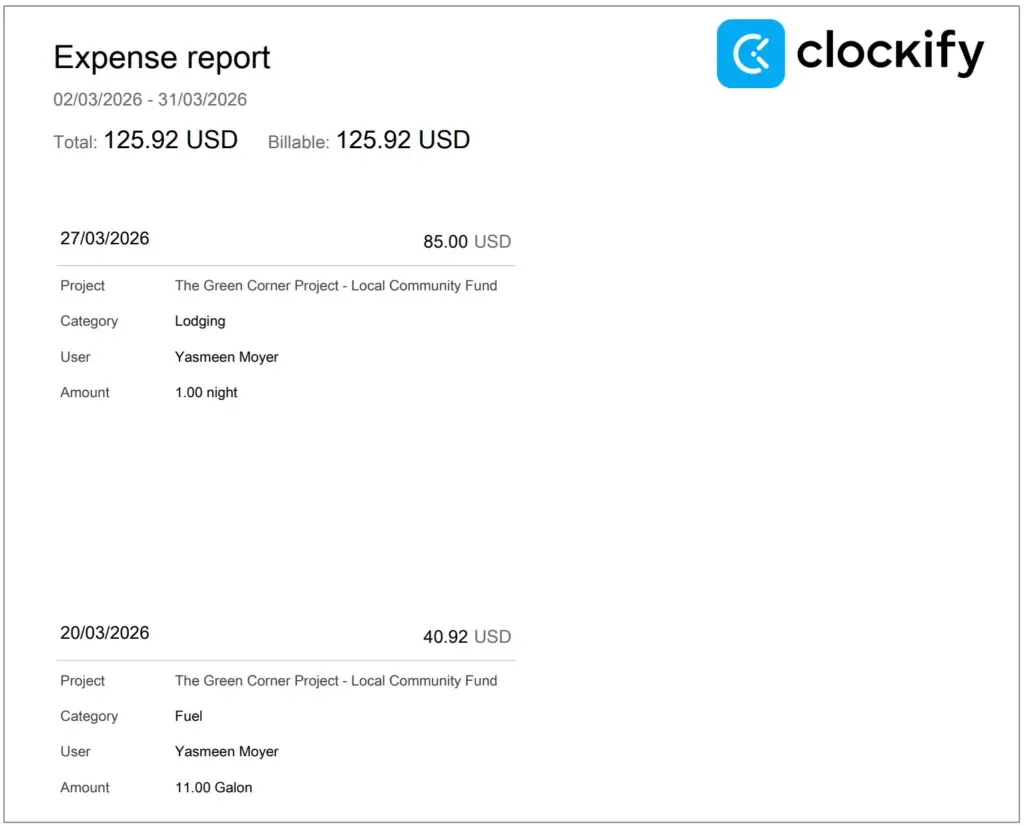
Create expense reports
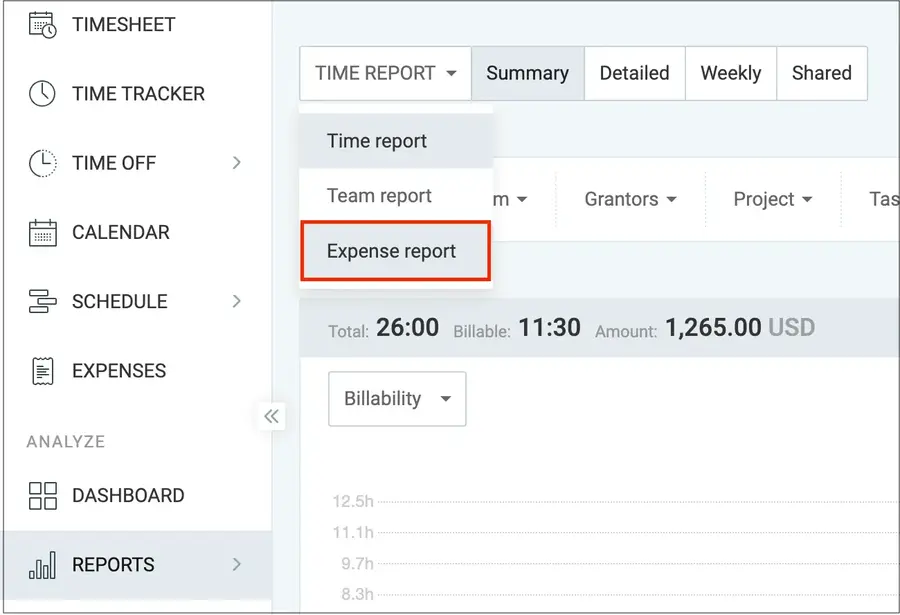
After you’ve logged some expenses, you can create Expense reports. Head to Reports, then choose Expense report.
Select the client (we renamed them to “Grantors”) and select your time range. Click on the export button on the right, and choose PDF, Excel, or CSV.
Try Clockify’s Expense reports
Example of nonprofit workflow with Clockify
Here’s a quick summary of how to organize your nonprofit easily with Clockify:
- Set up your grantor as a new client,
- Create projects for the client,
- Create a project budget,
- Create and assign tasks to projects,
- Assign projects and tasks to teammates,
- Let your team track time,
- Use project estimates to adapt your strategy, and
- Analyze reports to track funds and prepare payroll.
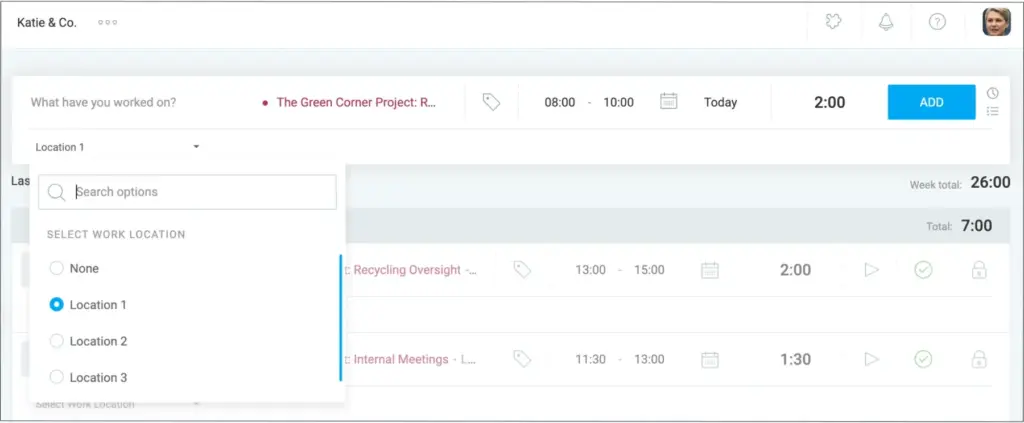
Optionally, you can also set up Custom fields for tasks and projects. This allows you to add extra data, such as work location, directly to time entries. You can set them as required fields or make them optional.
This approach ensures simple fund allocation, transparency towards donors, and easy payroll preparation — all in one place.

Clockify for nonprofits FAQs
Finally, let’s take a look at some of the most common questions nonprofits have about Clockify.
How does Clockify work?
Clockify allows organizations to track the time each user spends on billable or non-billable tasks. Workspace admins set up who can enter and who can approve tracked time. This data is used to calculate wages and expenses, and export different types of reports.
How do you track time spent across multiple programs?
The easiest way to track time across your apps is with Clockify’s Auto tracker. It automatically measures time spent in programs or browser tabs on your desktop device.
Is there a free version of Clockify?
Clockify by CAKE.com offers a free version that gives you:
- Unlimited projects and tracking for 5 users,
- 1-month reporting and PDF exports, and
- 24/7 fully human support.
Each new Clockify user starts with a free 7-day trial, with Pro plan features.
How to set up payroll for a nonprofit?
To set up payroll for a nonprofit organization, the essential steps are:
- Get on-board forms and bank details for employees,
- Understand your payroll tax obligations,
- Choose a reliable time and expense tracking solution, and
- Pick a reliable payroll solution.
