Best Time Tracking Apps for 2026: Reviewed & Compared
Time tracking software allows you to visualize where your and your team’s time goes and use the data for invoicing, payroll, and productivity increase. Here’s a quick breakdown of the best time tracking apps for 2026.
Clockify • Toggl Track • Harvest • Hubstaff • Time Doctor • Everhour • My Hours
KEY TAKEAWAYS
- When choosing a time tracking app for you and your team, think about the size of your team, your planned budget, and the basic features you’d expect from this app.
- A time tracking app should also have a variety of features and should be easy to use.
- A time tracking tool should offer integrations with other apps.
- Clockify, Toggl Track, and Everhour are work-hour trackers. On the other hand, Time Doctor is suitable for monitoring productivity.
How I chose which time tracking apps to review
With so many time tracking apps on the market, I needed to establish some ground rules for selecting the ones that would make it to the final list.
Here are the key criteria I considered when making my selection:
- Usability — a time tracker app should be simple to use, allowing users to track time effortlessly and streamline their workflow.
- Core and additional features — aside from core timekeeping functionalities such as a timer and a manual-entry option, a great time tracker should also offer extra features like scheduling or advanced analytics.
- Affordability — to accommodate different budgets, a time tracker should offer a free plan and affordable paid plans, or at least a free trial that allows users to test the app before committing.
- Multiplatform availability — a time tracking tool should allow users to track time across various devices, enabling consistent timekeeping.
Before selecting an app that falls short of your expectations, consider the following first:
- How do you usually work? Are you a freelancer? Do you run a company?
- How big is your team?
- What is your planned budget for a time tracking app?
- What are the basic features your time tracking app needs to have?
🎓 How to Choose the Best Time Tracking Software
Overview of the best time tracking software for 2026
I’ve done a thorough analysis of the current market and singled out the top 7 time tracking apps based on my outlined criteria.
Here’s my best time tracking apps comparison:
| Clockify | Toggl Track | Harvest | Hubstaff | Time Doctor | Everhour | My Hours |
|---|---|---|---|---|---|---|
| Price (per month) | ||||||
|
|
|
|
|
|
|
| Ease of use | ||||||
|
Extremely easy |
Fairly easy |
A bit difficult |
A bit difficult |
A bit difficult |
Fairly easy |
Very easy |
| Availability | ||||||
|
Android, iOS, Chrome, Edge, and Firefox browser extensions, Mac, Windows, Linux |
Android, iOS, Chrome, Firefox, and Edge browser extensions, Mac, Windows |
Android, iOS, Mac, Windows |
Android, iOS, Chrome browser extension, Mac, Windows, Linux, Chromebook app |
Android, iOS, Chrome and Firefox browser extensions, Mac, Windows, Ubuntu |
iOS, Chrome, Safari, and Firefox browser extensions, Mac |
Android, iOS, Chrome, Firefox, and Edge browser extensions, Mac, Windows |
| Perfect for | ||||||
|
Project managers, business owners, HR admins, and teams of all sizes |
Operations managers, HR managers, freelancers, and small businesses |
Freelancers and small-to-medium-sized businesses |
Large companies |
Freelancers and larger teams |
Project managers, HR managers, and small-to-medium business owners |
Small teams and freelancers |
| Support | ||||||
|
Chat, email, and phone |
Chat and email |
|
Chat and email |
Chat and email |
Chat and email |
Chat and email |
| Features | ||||||
| Timer | ||||||

|
|
|
|
|
|
|
| Add time manually | ||||||
|
|
|
|
|
|
|
|
| Timesheet | ||||||
|
|
|
|
|
|
|
|
| Reminders | ||||||
|
|
|
|
|
|
|
|
| Reporting | ||||||
|
|
|
|
|
|
|
|
| Project management | ||||||
|
(estimates, project status, expenses)
|
(estimates, project status, expenses)
|
(estimates, project status, expenses)
|
(estimates, project status, expenses)
|
(project status)
|
(estimates, project status, expenses)
|
(estimates, project status, expenses)
|
| Team management | ||||||
|
(scheduling, time off, permissions, hourly rates, approval)
|
(permissions, hourly rates, approval)
|
(permissions, hourly rates, approval)
|
(scheduling, time off, permissions, hourly rates, approval)
|
(scheduling, time off, permissions, hourly rates, approval)
|
(scheduling, time off, permissions, hourly rates, approval)
|
(permissions, hourly rates, approval)
|
| Employee monitoring | ||||||
|
(GPS tracking, screenshots)
|

|
|
(GPS tracking, screenshots, activity tracking)
|
(screenshots, activity tracking)
|
(screenshots)
|
|
| Invoicing | ||||||
|
|
|
|
|
|
|
|
Whether you need a time tracker for personal or business needs, the following app reviews will help you find the perfect fit.
Let’s get started.
#1: Clockify by CAKE.com — best for simple and effective team time tracking
Clockify is a simple yet powerful time tracker that offers free time tracking for unlimited projects, tasks, and clients.
How does Clockify work?
Clockify offers several timekeeping options, including:
- Timer — to track time spent on tasks by starting/stopping the timer when you begin/finish working.
- Manual mode — to enter time manually if you forget to start the timer.
- Timesheets — to add work hours manually at the end of the day.
To use Clockify’s timer, go to Clockify’s web version and choose the Time tracker option from the sidebar. Then, enter what you’re working on, select the project, and start time tracking by clicking the Start button. Once you finish working, simply stop the timer.

Since I prefer filling my timesheets manually at the end of the day, I use Clockify’s timesheets to log my hours. I simply choose the Timesheet option from the sidebar, select the project, and add my work hours in the appropriate time slot.

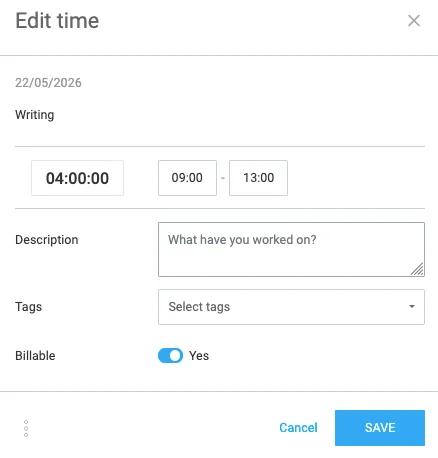
I can also edit my time entries by marking my time as billable or adding tags to my entries for better organization. To edit my time entry, I hover over it and click the 3 dots. Then, I adjust the time, add a description or tags, change the time entry’s billable status, and click Save. Very easy and intuitive.
With Clockify, you can ditch error-prone spreadsheets once and for all. The app makes employee time tracking simple and precise, regardless of team size.

Why is Clockify best for simple and effective time tracking?
Besides allowing me to track billable and non-billable hours, I like that Clockify helps me better understand my team’s productivity.
Once my team members complete their tasks, I can generate detailed time reports in Clockify based on their tracked time. Then, I get to analyze the data to identify areas for improvement.
With Clockify’s summary report, I can see who worked on what, when, and for how long, allowing me to assess my team’s efficiency. To generate a summary report with Clockify, I need to:
- Go to Clockify’s web version,
- Hover over the Reports section in the sidebar, and
- Select Summary from the dropdown menu.
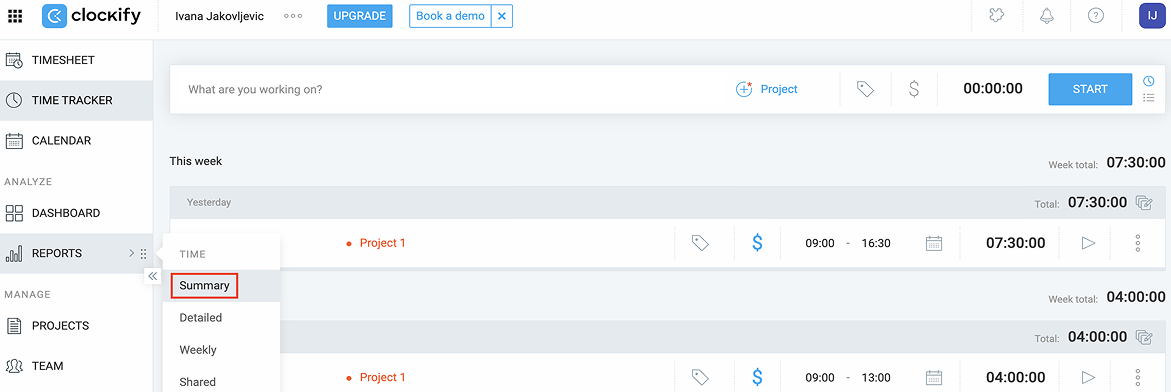
Then, I can choose the desired time range (e.g., this week) and use filters to narrow down the data included in my report. I can filter the report by:
- Team,
- Client,
- Project,
- Task,
- Tag,
- Status, and
- Description.
Additionally, I can further break down the data by groups (e.g., project) and subgroups (e.g., user) for more detailed analysis.
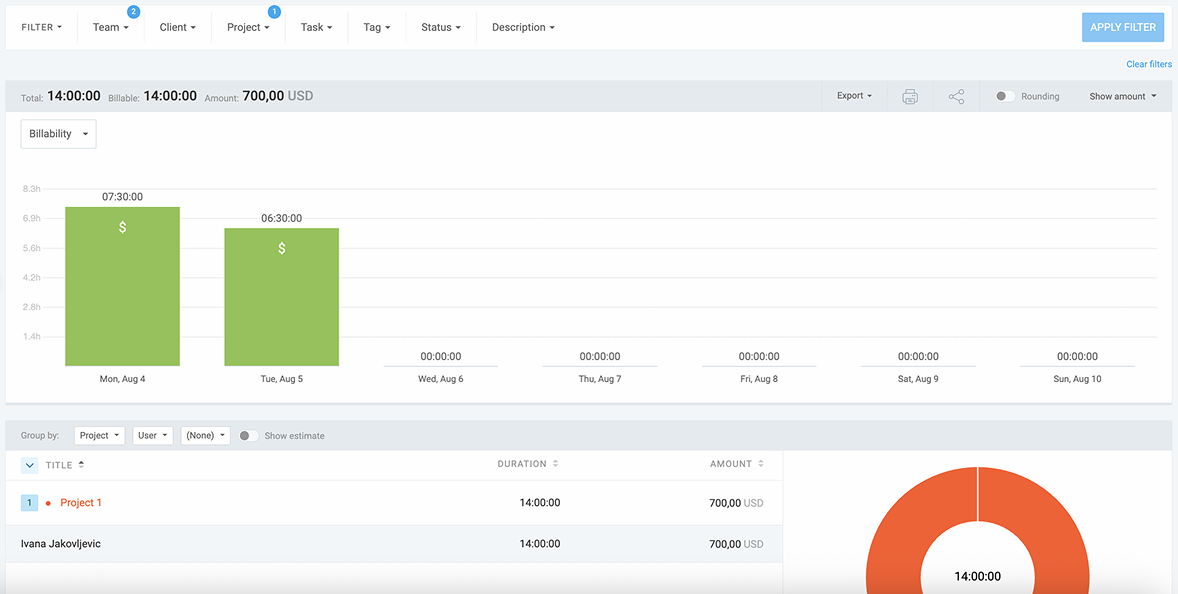
In the report, I can also see the total billable hours for the project and the total earnings based on tracked billable time. This information allows me to bill my clients accurately and avoid undercharging.
Moreover, you can export the reports in PDF, CSV, or Excel format and customize them to your needs.
Thanks to Clockify’s powerful reporting capabilities, managers can improve resource utilization and team productivity with ease.
What additional features does Clockify have?
With an online tracking system like Clockify, I can track my employees’ overtime and compensate them fairly. This also allows me to comply with state labor laws.
The app also lets me:
- Track and approve paid time off,
- Schedule tasks and track my team’s capacity,
- Set and track project budget and estimates,
- Track expenses,
- Create and customize invoices,
- Track GPS location, and
- Submit and approve employee timesheets for easier payroll processing.
This lengthy list of built-in features only scratches the surface of the full range of options that Clockify comes with. The tool also integrates with 100+ web apps, including Jira, Zapier, Asana, Trello, QuickBooks, Google Calendar, and others.
And if you want even more features, you can visit the CAKE.com Marketplace to get or create add-ons.
How easy is it to use Clockify?
Using Clockify by CAKE.com is extremely easy. The tool’s interface is intuitive and polished, making Clockify enjoyable to use.
Additionally, the timekeeping system is straightforward, allowing users to record time with minimum effort. With a simple timer, I can track time with just 1 click, allowing me to focus on my work.
In sum, you probably won’t need any instructions to use Clockify. The app is beginner-friendly and works exactly as you’d expect.
Clockify pros
Here are some of the biggest advantages of using Clockify:
- It sends you reminder emails when a team member misses their target or logs more than their target number of hours, enabling accurate timekeeping, and
- Its customer support is available 24/7 (via phone, chat, and email) and free for all users, regardless of their plan.
Clockify cons
To see Clockify’s drawbacks, take a look at the list below:
- Certain options, like adding time for others and bulk editing, are only available in paid plans, and
- Its free trial lasts for 7 days only, although I think that’s enough to explore all features.
What’s new in Clockify?
As of April 2026, Clockify’s Assignment report includes the Expected profit and Realized profit columns. So, now you can compare your initial profit estimates with the actual profit.
| Free trial | Yes, 7-day free trial |
| Free plan | Yes |
| Cheapest paid plan | $3.99/seat/month if billed annually |
| Availability | Android, iOS, Web (Chrome, Edge, and Firefox browser extensions), Mac, Windows, Linux |
Best suited for: Project managers, business owners, HR administrators, and teams of all sizes, especially in industries like construction, hospitality, services, manufacturing, healthcare, IT, accounting, marketing, and others.
#2: Toggl Track — best for setting and tracking goals
As one of the best apps for time tracking, Toggl Track allows users to easily keep tabs on their work hours, gain insights for better time management, and optimize productivity.
How does Toggl Track work?
To start tracking time with Toggl Track, I select the Timer option, enter my task’s name, and click the play button. To finish recording time, I click the stop button.

Once I stop the timer, my time entry is automatically saved in the app — no additional steps needed.
Besides checking my time logs via the list or timesheet view in Toggl Track, I can also see my time entries in a calendar format, which I found useful. This option allows me to see what I did the whole week at a glance, helping me identify any gaps or overlaps in my logged time.
To access the calendar view in Toggl Track, click on the Calendar tab on the Timer page.

While helpful for visualizing time entries, Toggl Track’s calendar view lacks certain functions, like the option to delete all entries for a given day in one action. This option would enable a quick clean-up of accidental or incorrect time entries, saving you time.
To add a time entry in Toggl Track’s calendar view, I need to click anywhere on the calendar, and a pop-up will appear where I can add time entry details.
After I enter what I’m working on, select the project, and specify start and end times, I just click the Add button, and my entry appears on the calendar.
Toggl Track offers a flexible array of time recording options, making it adaptable for various workflows.
Why is Toggl Track best for setting and tracking goals?
Toggl Track allows me to set time-based targets and track my progress towards achieving them. This helps me avoid distractions from less important tasks and focus on my priorities (e.g., a specific project).
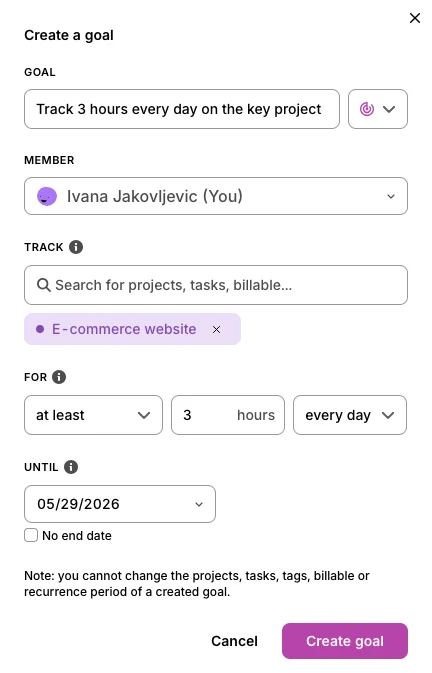
To set a goal in Toggl Track, I need to:
- Access the Goals feature in the sidebar,
- Click the + New goal button,
- Name my goal (e.g., Track 3 hours every day on the key project),
- Select the appropriate project (in this case, E-commerce website),
- Set the target hours (in this case, at least 3 hours every day),
- Specify the end date (in this case, 05/29/2026), and
- Click the Create goal button.
This feature comes in handy for those who need goals or KPIs to keep their work in check, especially project managers.
Once I start working on my goal, I can monitor my progress by entering the Goals page. There, I can see exactly how much time I’ve tracked for a day compared to my target hours (in my case, that’s 1.75/3 hours), as shown below:
With Toggl Track, you also get to assign goals to your team members to foster accountability and encourage them to stay on track and deliver results. This way, you’ll optimize your team’s efforts and boost their productivity.
🎓 25 Ways to Increase Productivity and Do More in Less Time
What additional features does Toggl Track have?
Apart from the real-time timer and reminders to track your time, Toggl Track offers some additional useful features. When using Toggl Track, I can:
- Submit and approve employee timesheets,
- Set billable rates,
- Track the progress of my projects,
- Look into the profitability of my projects,
- Set up project templates for faster project creation, and more.
Toggl Track also integrates with many project management tools, including Asana, Jira, and ClickUp, as well as calendar apps such as Google Calendar. However, compared to some other time trackers, Toggl Track lacks native payroll integrations needed for smooth payroll processing.
How easy is it to use Toggl Track?
Toggl Track is fairly easy to use. It has a clean, easy-to-navigate interface, enabling a seamless user experience.
The app also requires minimal setup, allowing users to start tracking time quickly.
Toggl Track pros
Some of the main pros of Toggl Track:
- It supports offline time tracking, and
- It offers the option to share a team time tracking report internally within your workspace or externally via a public link.
Toggl Track cons
Here are the key disadvantages of using Toggl Track:
- It doesn’t offer shift scheduling options or location tracking, and
- Its cheapest paid plan can be a bit expensive for some users.
What’s new in Toggl Track?
During the first quarter of 2025, Toggl Track released several updates, including user-specific access to billable rates and labor costs. This update allows you to have greater control over who can see relevant billable information, ensuring data security.
| Free trial | Yes, 30-day free trial for the premium plan |
| Free plan | Yes |
| Cheapest paid plan | $9/user/month if billed annually |
| Availability | Android, iOS, Web (Chrome, Firefox, and Edge browser extensions), Mac, Windows |
Best suited for: Operations managers, freelancers, and small businesses in industries like IT, consulting, finance, or legal.
#3: Harvest — best for basic expense tracking
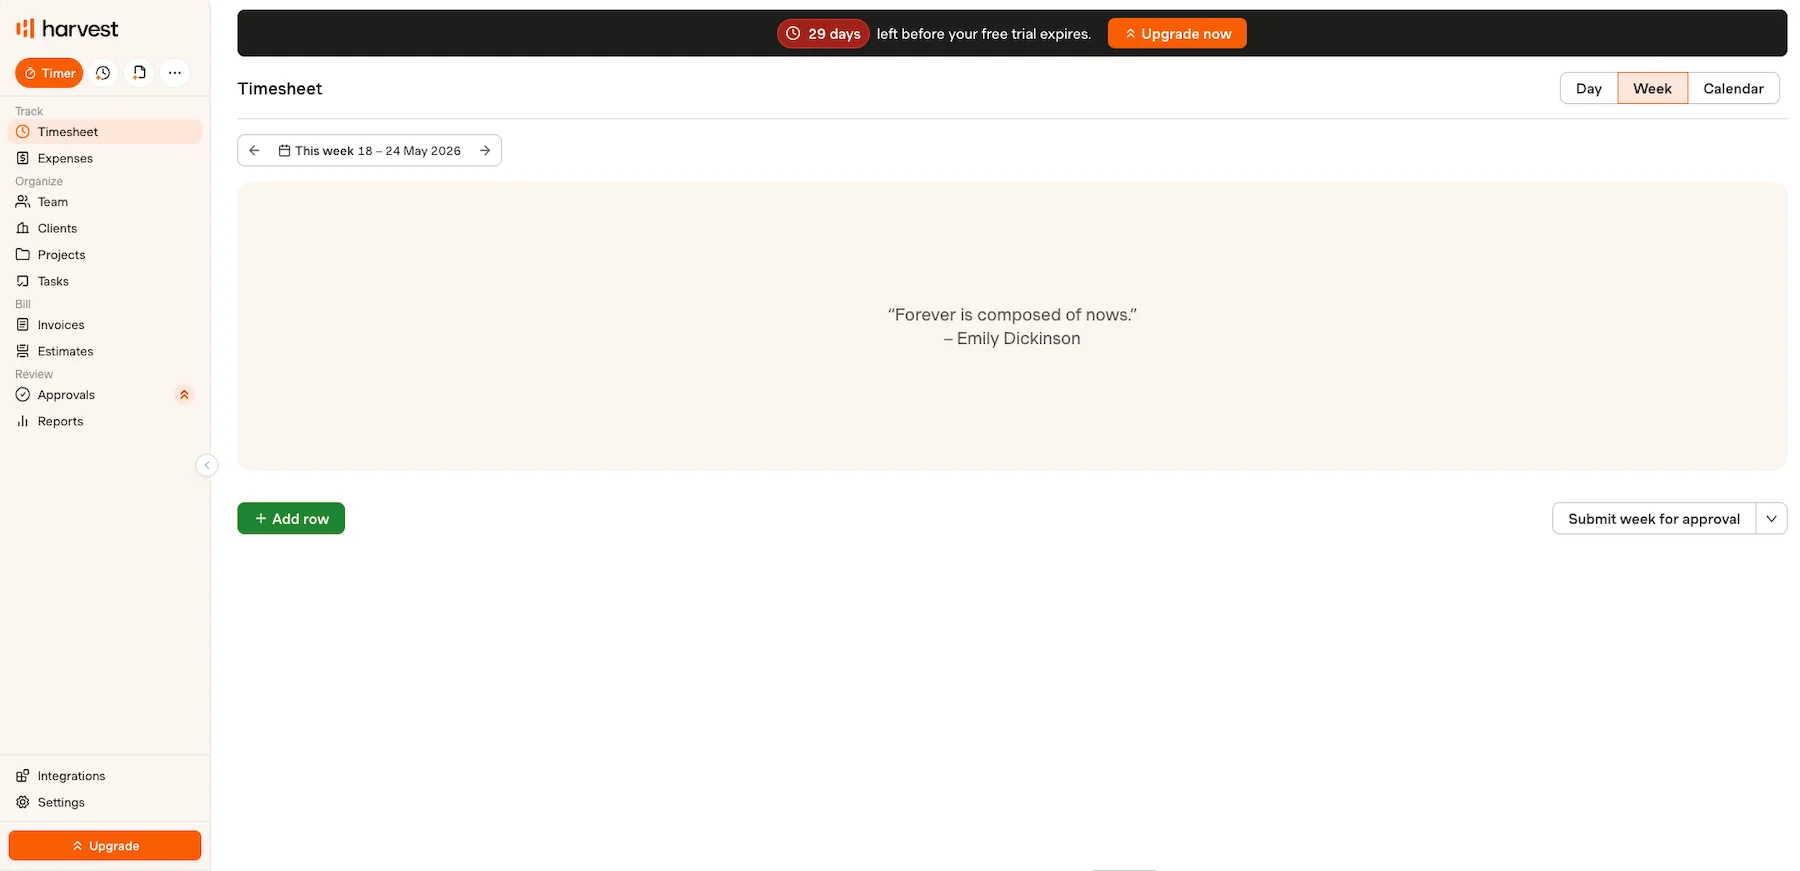
Harvest is an excellent time tracking app for personal use — but it’s also suitable for teams aiming to stay on budget and simplify the invoicing process.
How does Harvest work?
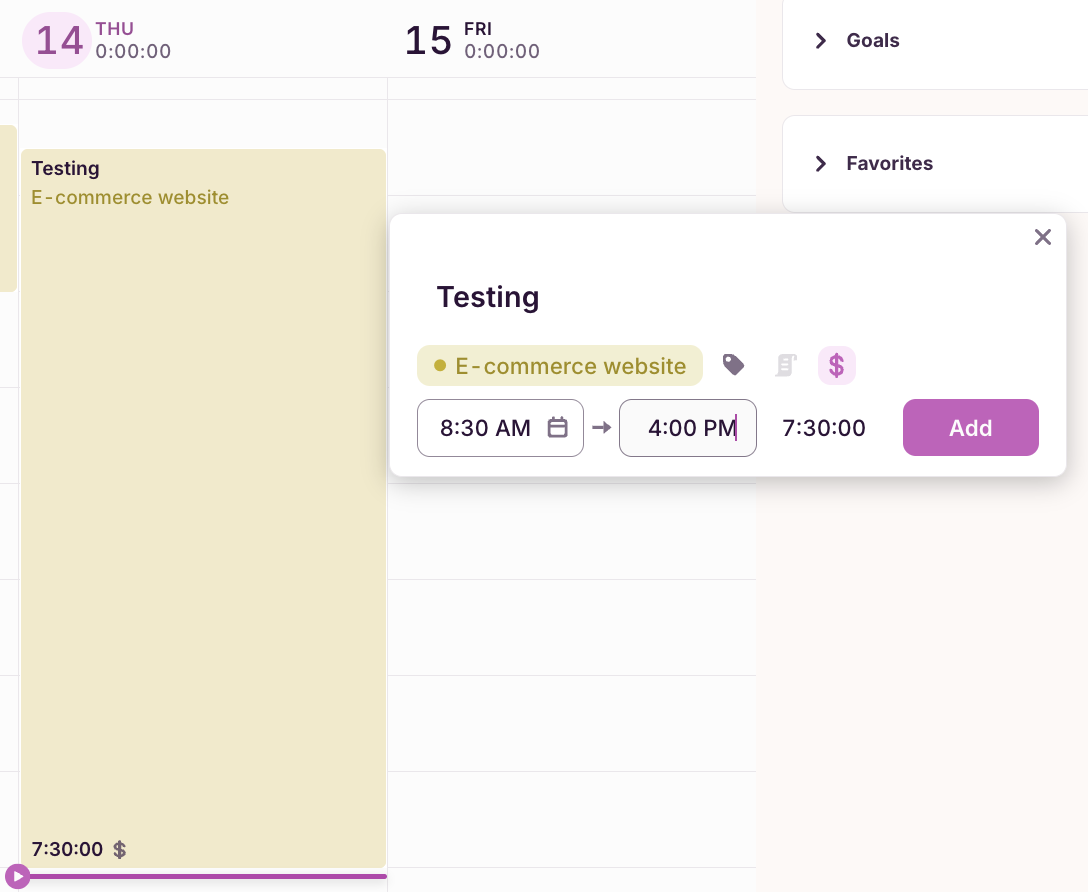
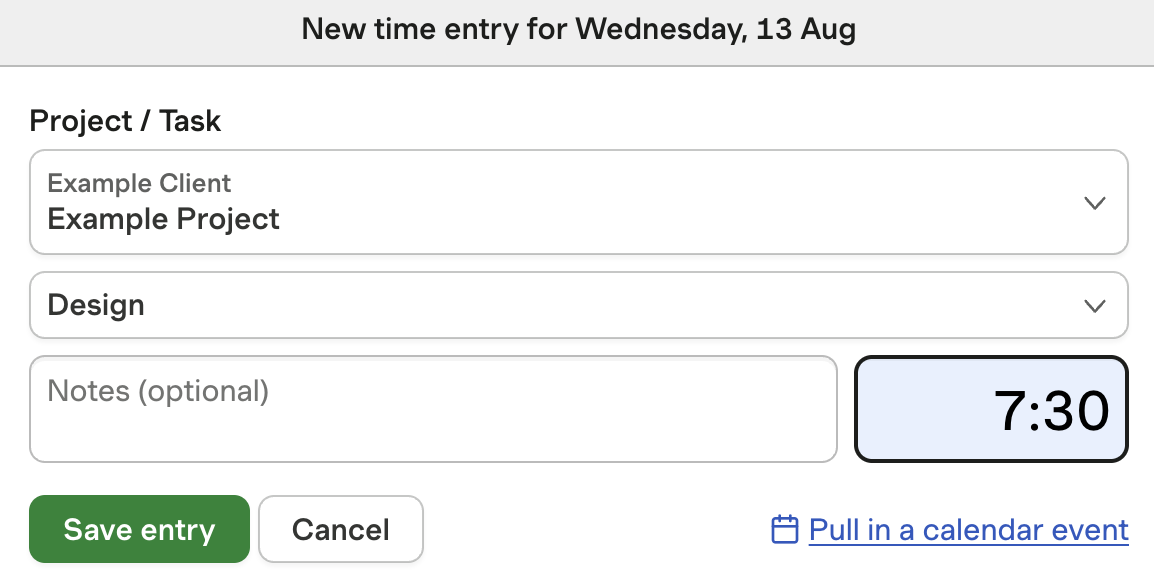
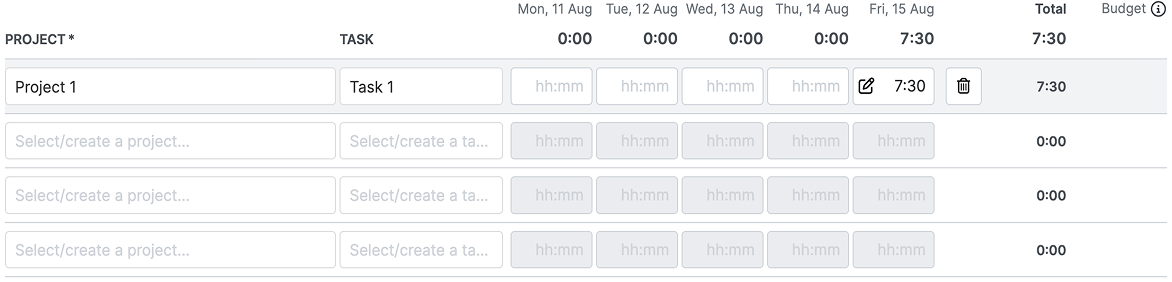
With Harvest, I can track time by manually entering the time spent on my task once I’ve completed it. To do this, I need to:
- Navigate to the Timesheet section (accessible under the Time menu),
- Click the green Track time button,
- Select the project and task,
- Enter my work hours (e.g., 7:30), and
- Select the Save entry option.
Adding a note is optional.
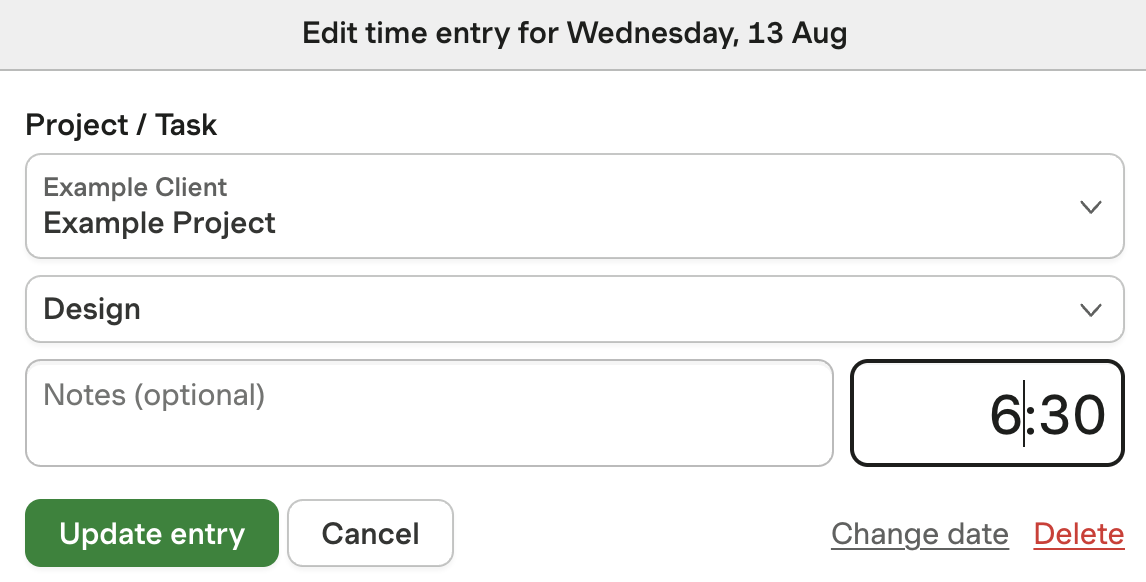
I can also delete or edit my time entry in Harvest. To edit my time entry, I click on the Edit option on the Timesheet page, modify the time, date, project, or task associated with that entry, and click the Update entry button.
The only thing I found lacking is the ability to change the billable status of a time entry directly within the log. For instance, to mark your task as billable or non-billable in Harvest, you need to take several actions (go to Projects, select a project, click the Edit project option, and then adjust the billability status of a specific task), which is time-consuming.
If we ignore minor practicality issues, Harvest has proven to be a solid timekeeping solution, offering simple time recording options.
Why is Harvest best for basic expense tracking?
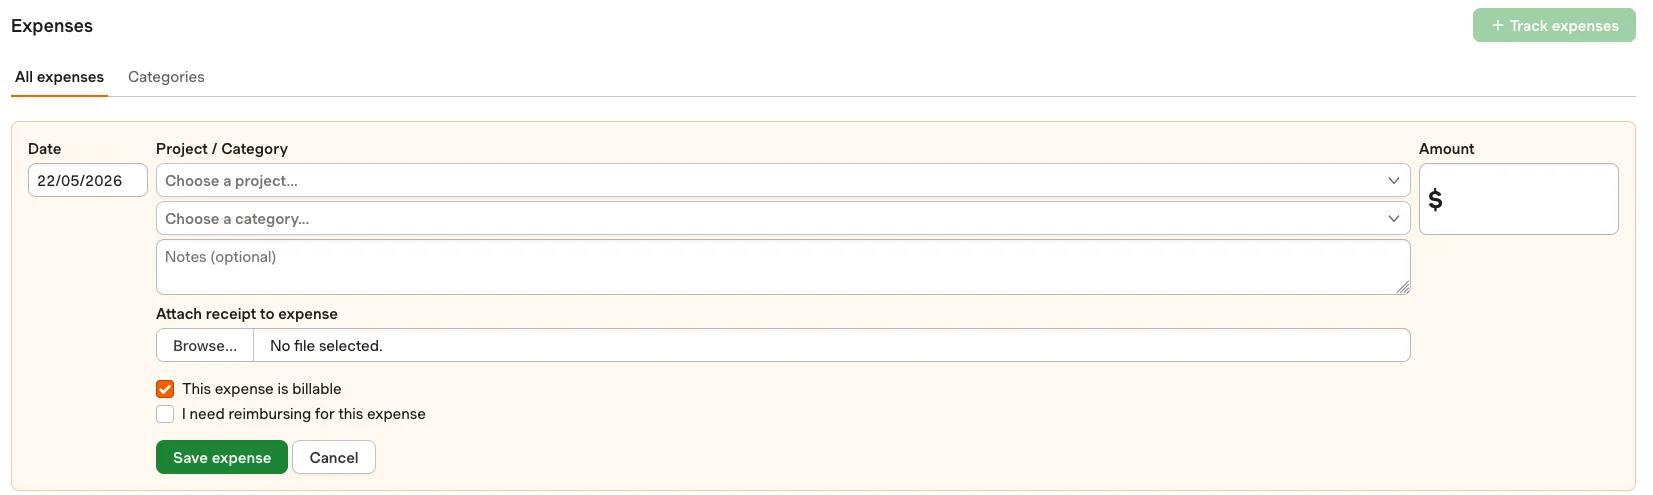
With Harvest’s expense tracking feature, I can:
- Track project-related expenses,
- Mark them as billable or non-billable, and
- Choose different expense categories (such as transportation, mileage, lodging, and others).
To create an expense in Harvest, I navigate to the Expenses section and click on the + Track expenses button. Then, I need to:
- Choose a project,
- Select a category,
- Enter the date and the amount,
- Mark the expense as billable if I want to bill my client for it, and
- Click the Save expense button.
Attaching a receipt to the expense is optional.
I can also edit my expenses, submit them for approval, or delete them. Note that in Harvest, once you submit your expenses for the week, you’re submitting both time and expenses for that week (you can’t submit just the expenses or the time entries for a specific week).
I like that I can attach receipts to my expenses in Harvest. This option allows me to keep all the cost-related information organized and provide transparency to my clients, fostering trust.
🎓 Smart Ways for Monthly Expense Tracking
What additional features does Harvest have?
Harvest offers useful timesheet reminders I can set for my team to ensure the timely submission of timesheets. The app provides several types of reminders, including:
- Recurring timesheet reminders I can send to the entire team, and
- One-time timesheet reminders I can send to specific team members.
As a manager, you can also set recurring timesheet reminders for yourself to stay accountable.
Apart from all that, Harvest also allows me to:
- Get visual reports of my performance and project progress,
- Edit and approve timesheets,
- Create and send invoices, and
- Look into my profitability analysis.
Although Harvest integrates with many accounting and project management tools, it lacks direct payroll integrations. This may be a limitation for businesses that want to streamline payroll processes and save time and money.
How easy is it to use Harvest?
I found the app’s interface a bit difficult to navigate at first.
Specifically, it took me some time to locate the option to start a timer in Harvest, since it wasn’t as clearly visible as I expected it to be. I had to access the Timesheet section, click the Track time button, and only then could I see the Start timer option.
Aside from this minor inconvenience, I didn’t encounter any problems while using Harvest, and I got used to the app quickly.
Harvest pros
To see some of the key advantages of using Harvest, check out the following list:
- It allows you to take a picture of a receipt and attach it to an expense through the mobile app, allowing you to manage expenses efficiently, and
- It offers the option to attach a time report or additional project information to an invoice before sending it to a client.
Harvest cons
Here are the biggest downsides of using Harvest:
- Unlimited projects are only available on paid plans, compared to Clockify, where you can create as many projects as you want in the free plan, and
- It doesn’t provide absence or offline tracking capabilities.
What’s new in Harvest?
In April 2026, Harvest refined its invoicing features. The biggest change is that you can now send your invoice via email through Harvest to multiple recipients without exiting the invoicing page.
| Free trial | Yes, 30-day free trial |
| Free plan | Yes |
| Cheapest paid plan | $9/seat/month if billed annually |
| Availability | Android, iOS, Mac, Windows |
Best suited for: Freelancers and small-to-medium-sized businesses in sectors like architecture, construction, accounting, consulting, and others.
#4: Hubstaff — best for tracking locations
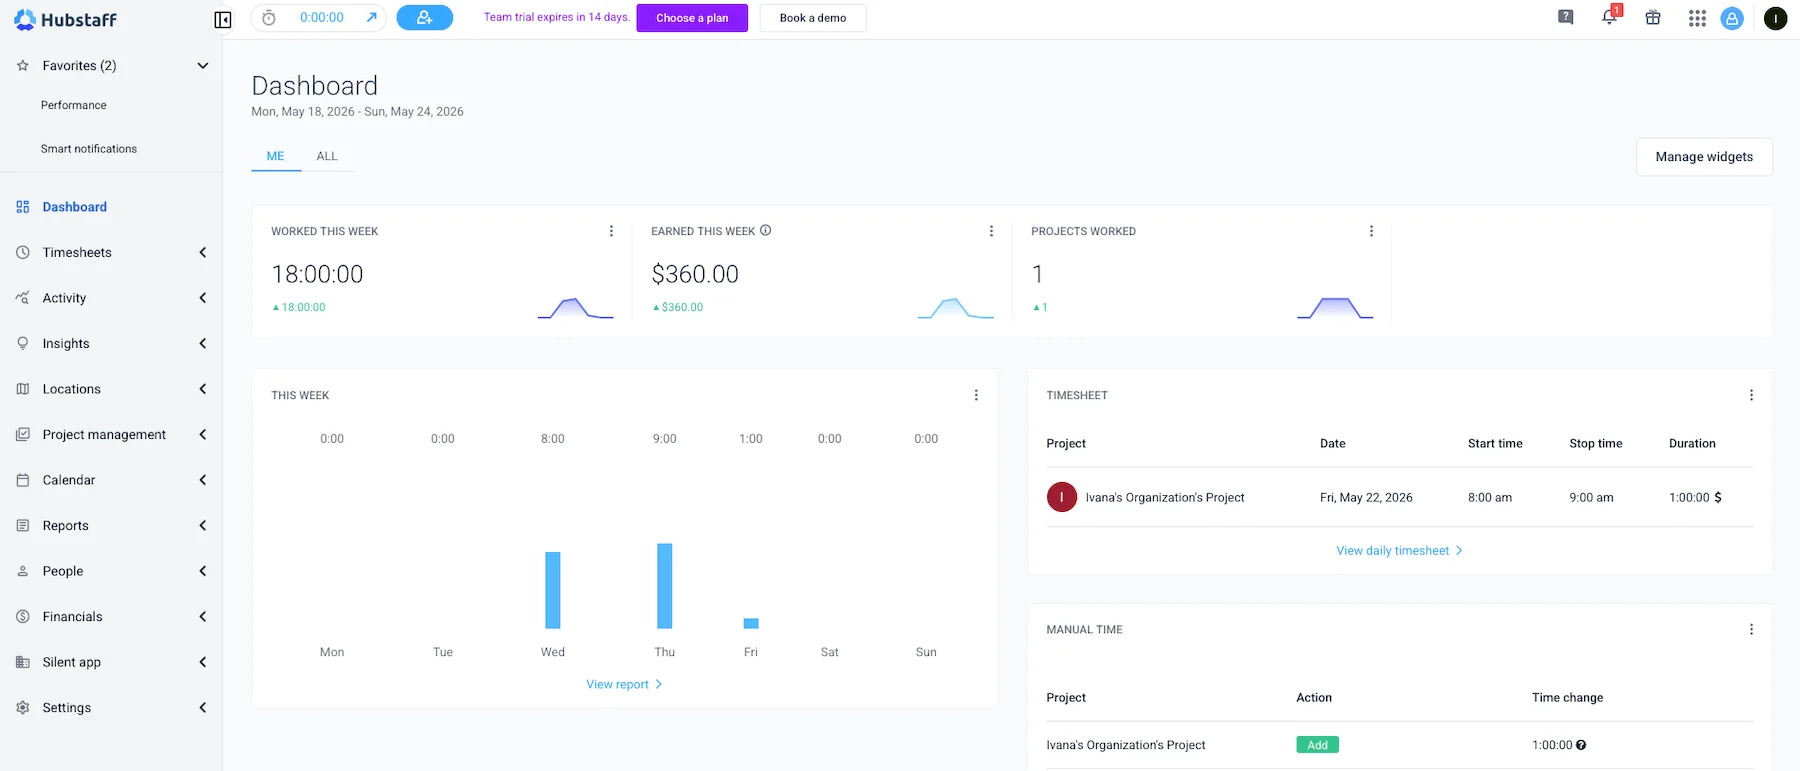
Being one of the best time tracking apps for work, Hubstaff is go-to software for busy managers looking for a way to keep track of their employees’ productivity levels.
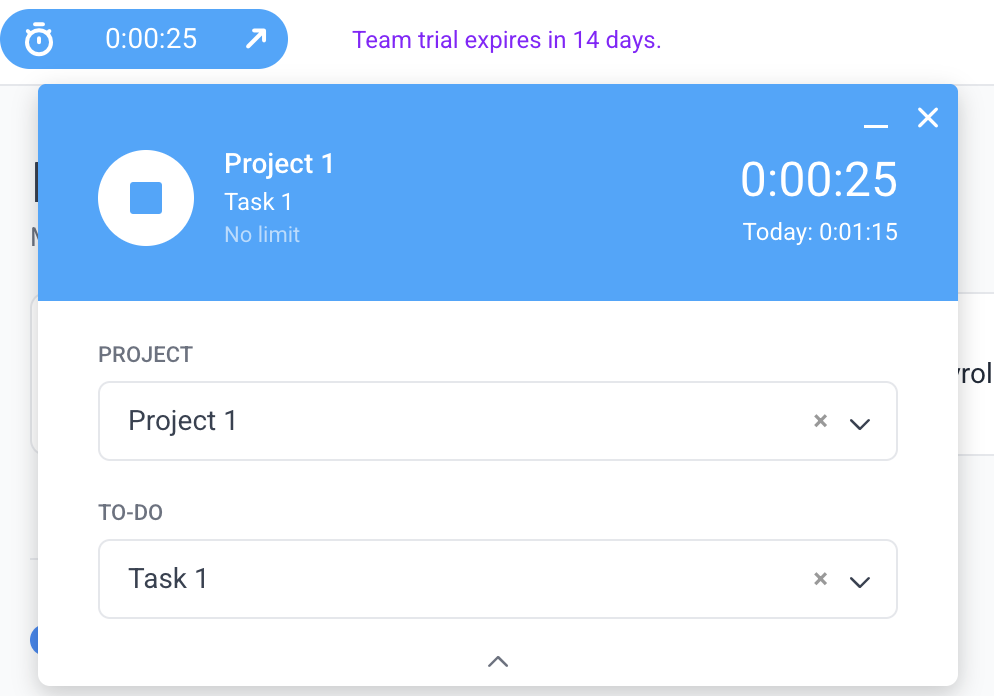
How does Hubstaff work?
To record time via Hubstaff’s timer, I need to choose a project I’m working on and click the play button to turn the timer on. Once I finish working, I stop the timer by clicking the stop button, and my time entry is automatically saved in the app.
After my team members and I finish tracking time spent on tasks, I can open the daily view in Hubstaff and see all the relevant details concerning each time entry, including:
- Project and task name,
- Activity,
- Idle time,
- Duration, and
- Start and end times.
I can also see if time was tracked manually and the reason why it was recorded that way (e.g., Forgot to start/stop timer).
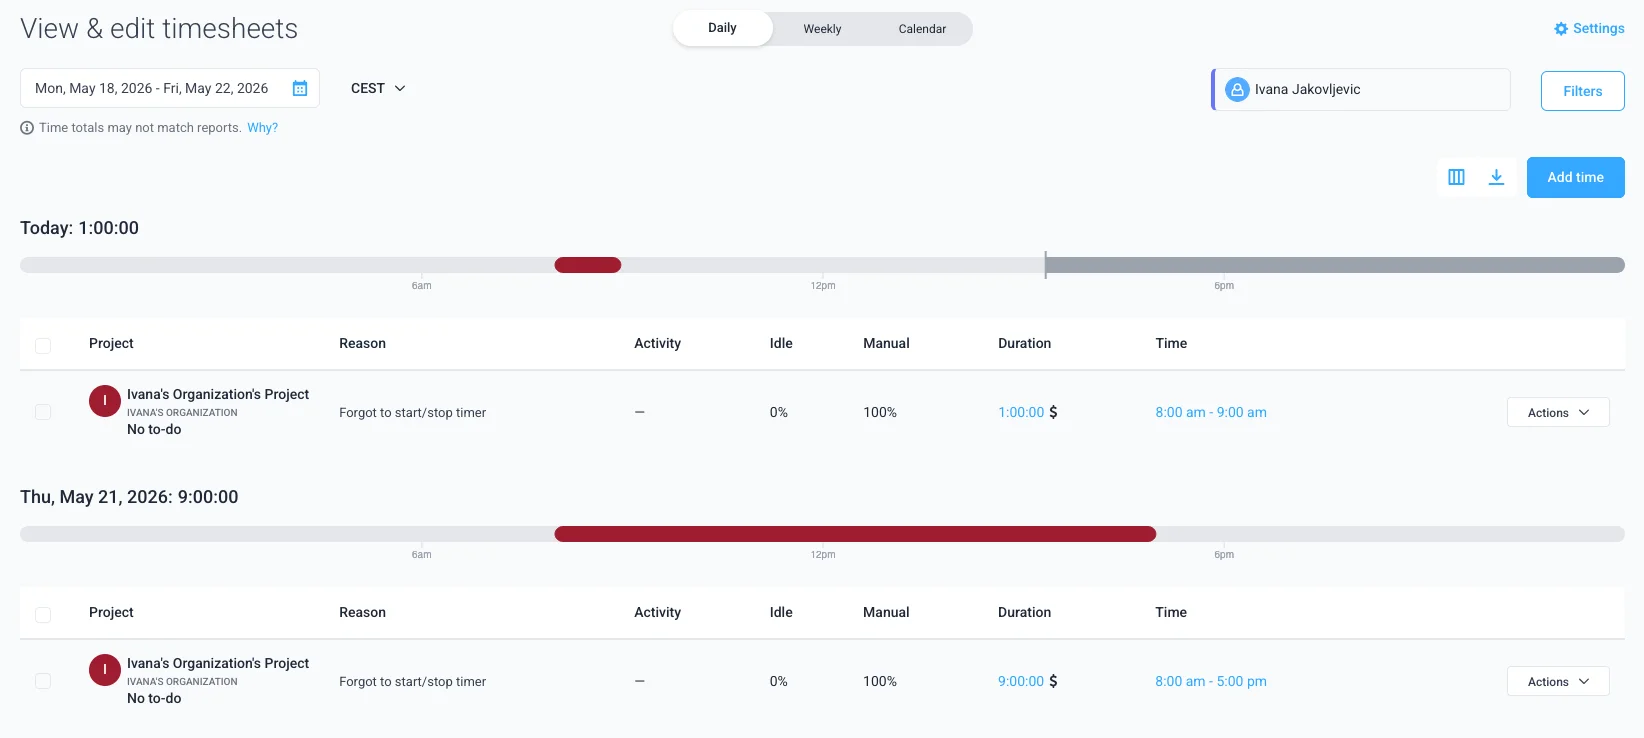
When I want to edit or add time in Hubstaff, the app requires me to provide a reason for a manual change before saving the entry, which feels unnecessary.
All in all, Hubstaff offers practical timekeeping functionalities, making the process of tracking time efficient.
Why is Hubstaff best for tracking locations?
Hubstaff lets me monitor employee locations and increase time tracking accuracy with GPS time tracking.
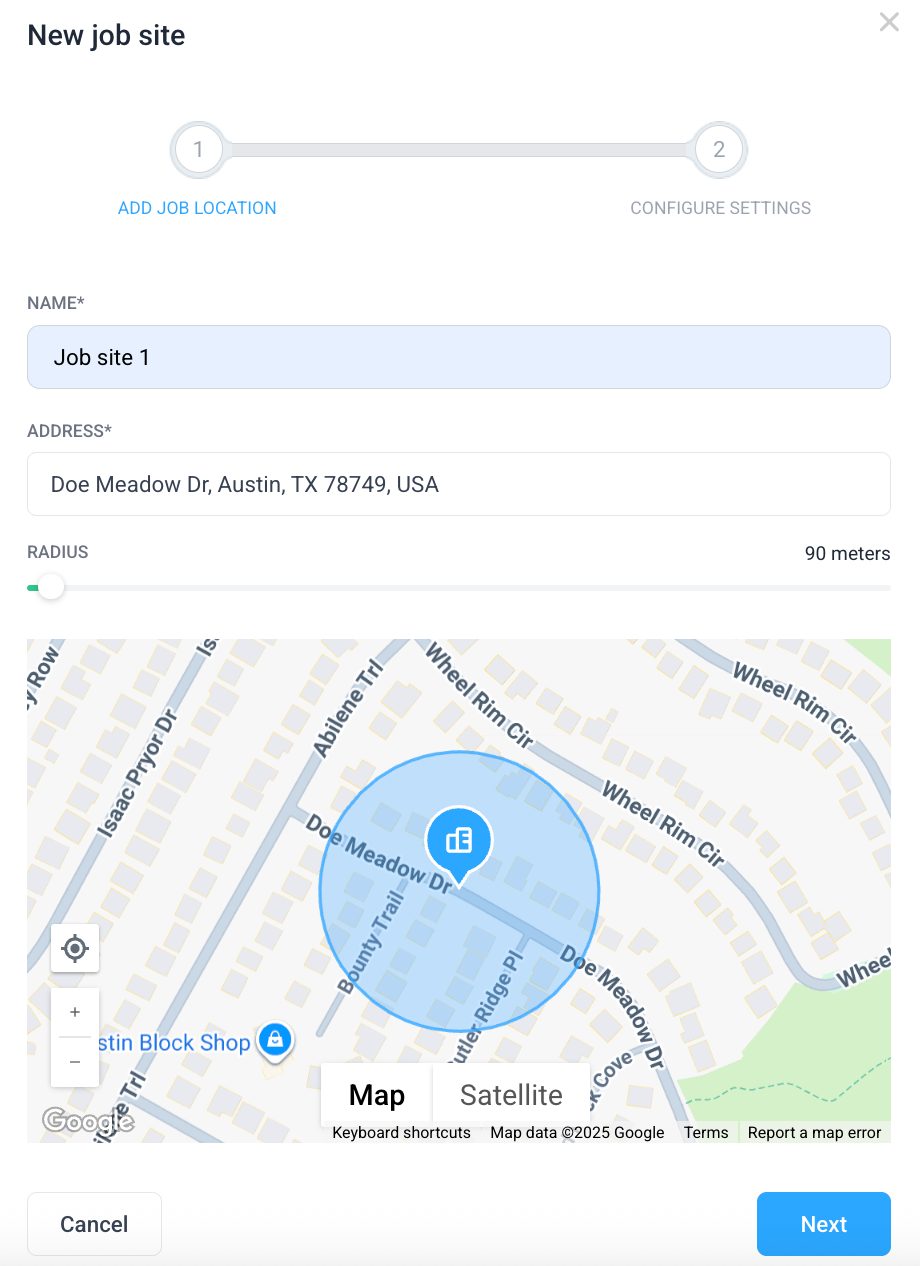
To track my team members’ locations with Hubstaff, I have to add job sites in the app. To create a job site in Hubstaff, I need to:
- Navigate to the Locations menu in the sidebar,
- Select the Job sites option, and
- Click the Add job site button.
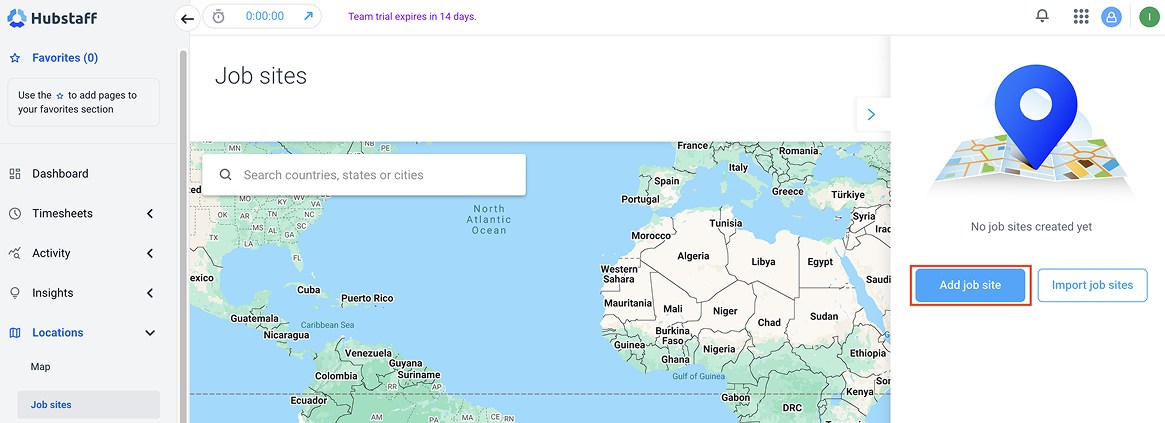
Then, I need to enter a job site’s name, address, and define the desired radius (time tracking is triggered when team members enter or leave the designated area). To continue with configuration and save a job site, I click the Next button.
After clicking Next, I select team members and adjust automatic timer actions to start/stop the timer when they enter/leave the site for precise tracking. Finally, I click the Save button to save my job site.
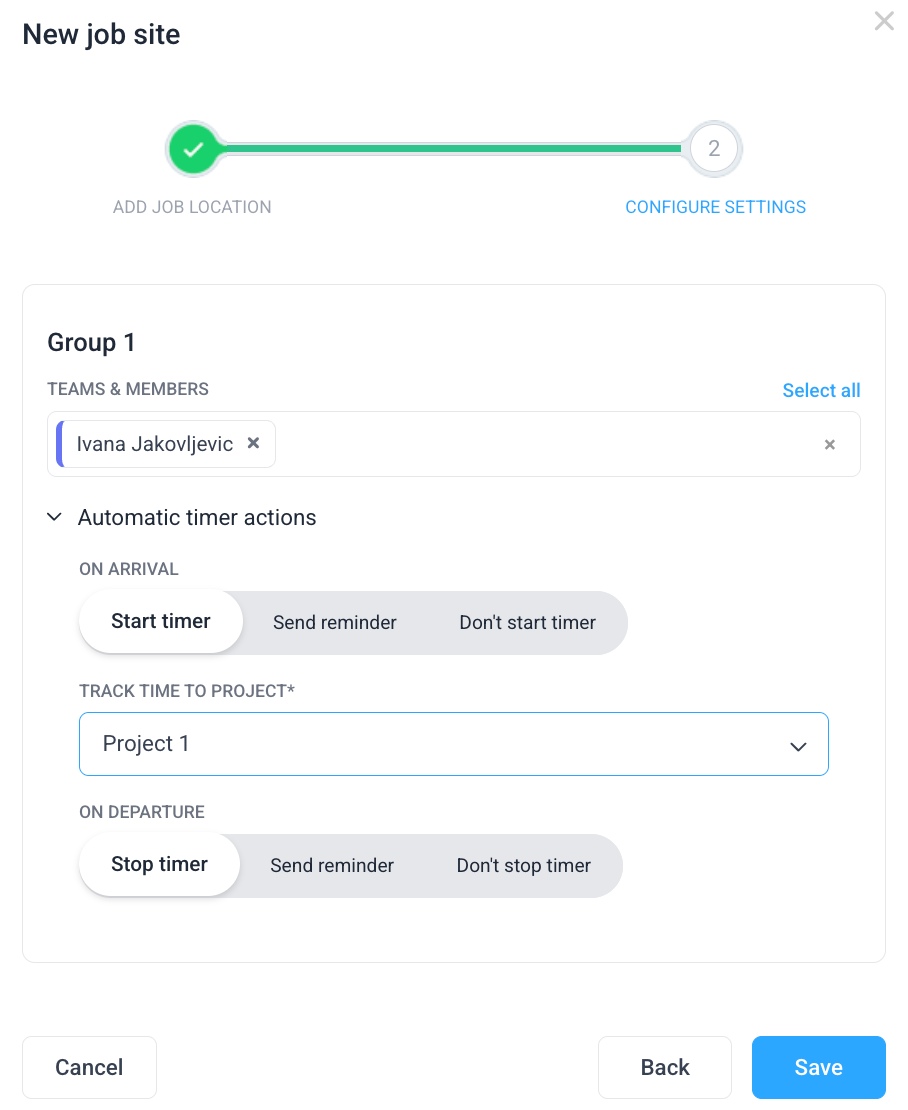
It looks like a long string of actions, but to my taste it’s actually relatively easy to get a handle on.
Once I create job sites and my team members start recording time via the mobile app, I can see where my employees are when tracking time by using the Map functionality. The Map option is located under the Locations menu.
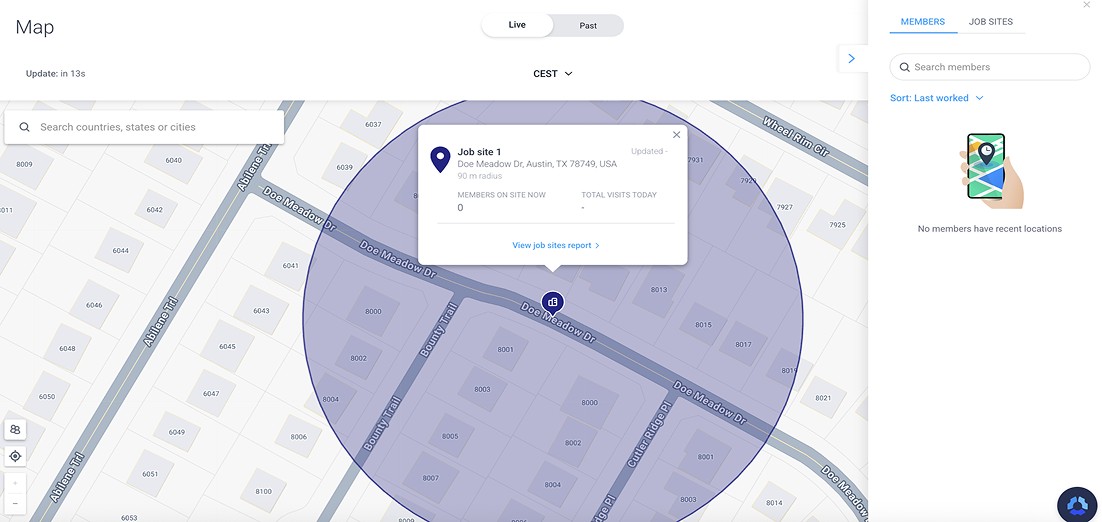
Tracking employee locations with Hubstaff offers several benefits, including improved accountability, more effective resource planning, and enhanced safety for field teams.
What additional features does Hubstaff have?
Along with tracking locations and creating in-depth time reports, Hubstaff lets me:
- Review and approve timesheets,
- Look into all the apps used while the timer was on,
- Review and approve time off,
- Take a look at screenshots to see how time is spent,
- Send automatic payments based on the time tracked, and
- Create invoices.
Hubstaff also comes with 30+ integrations, but streamlining your workflow with them has a hefty price tag attached.
If you’re interested in integrating Hubstaff with even just one of the offered apps, you’ll be able to do it only after upgrading to the Grow plan ($7.50/seat/month if billed annually).
In case you’re in for the unlimited number of integrations, you’ll have to upgrade further to an even pricier option.
How easy is it to use Hubstaff?
Hubstaff comes off as less intuitive and clear-cut compared to some of its competitors. For instance, it took me a while to get a gist of the dashboard, due to the overwhelming number of functionalities available.
Moreover, setting up Hubstaff requires a certain amount of time — which means a longer learning curve.
Hubstaff pros
Hubstaff’s main benefits:
- It offers scheduling and overtime tracking options, and
- It allows you to create work break policies for easier employee break tracking.
Hubstaff cons
These are some bad sides of Hubstaff:
- Its screenshot and activity tracking features can be perceived as intrusive and raise privacy concerns among employees, and
- It isn’t available as a Firefox or Edge browser extension.
What’s new in Hubstaff?
In the first quarter of 2026, Hubstaff redesigned the Time and Activity report. Apart from a refreshed UI, the report now features custom filters and additional fields.
| Free trial | Yes, 14-day free trial |
| Free plan | Yes (for a single user) |
| Cheapest paid plan | $4.99/seat/month if billed annually |
| Availability | Android, iOS, Web (Chrome browser extension), Mac, Windows, Linux, Chromebook app |
Best suited for: Large companies in sectors like software development, construction, manufacturing, and healthcare.
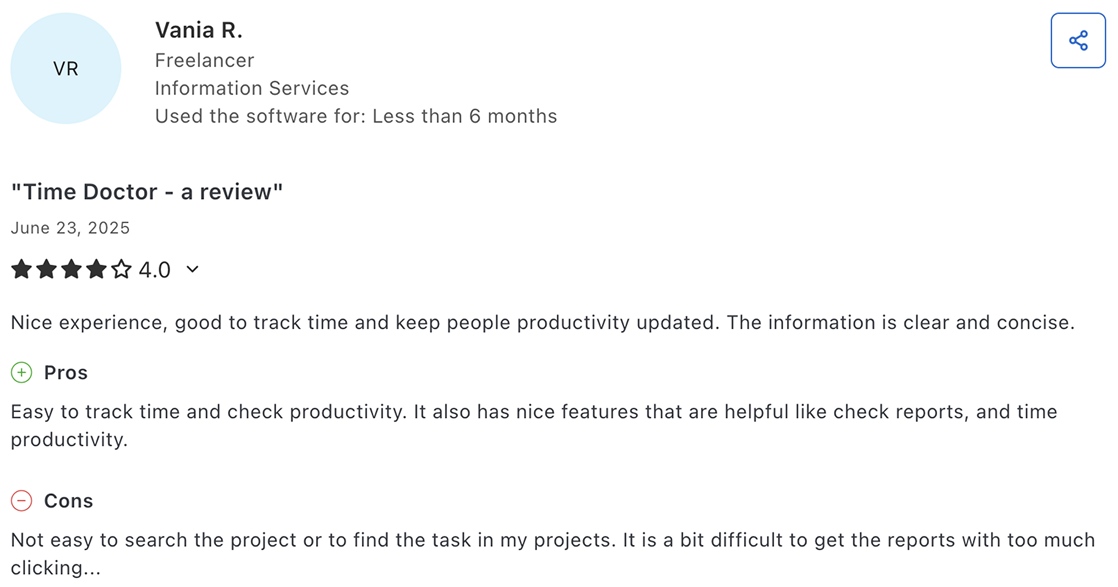
#5: Time Doctor — best for tracking and analyzing performance
As one of the best time tracking apps for productivity, Time Doctor gained its reputation for enabling its users to monitor their workflow in great detail.
How does Time Doctor work?
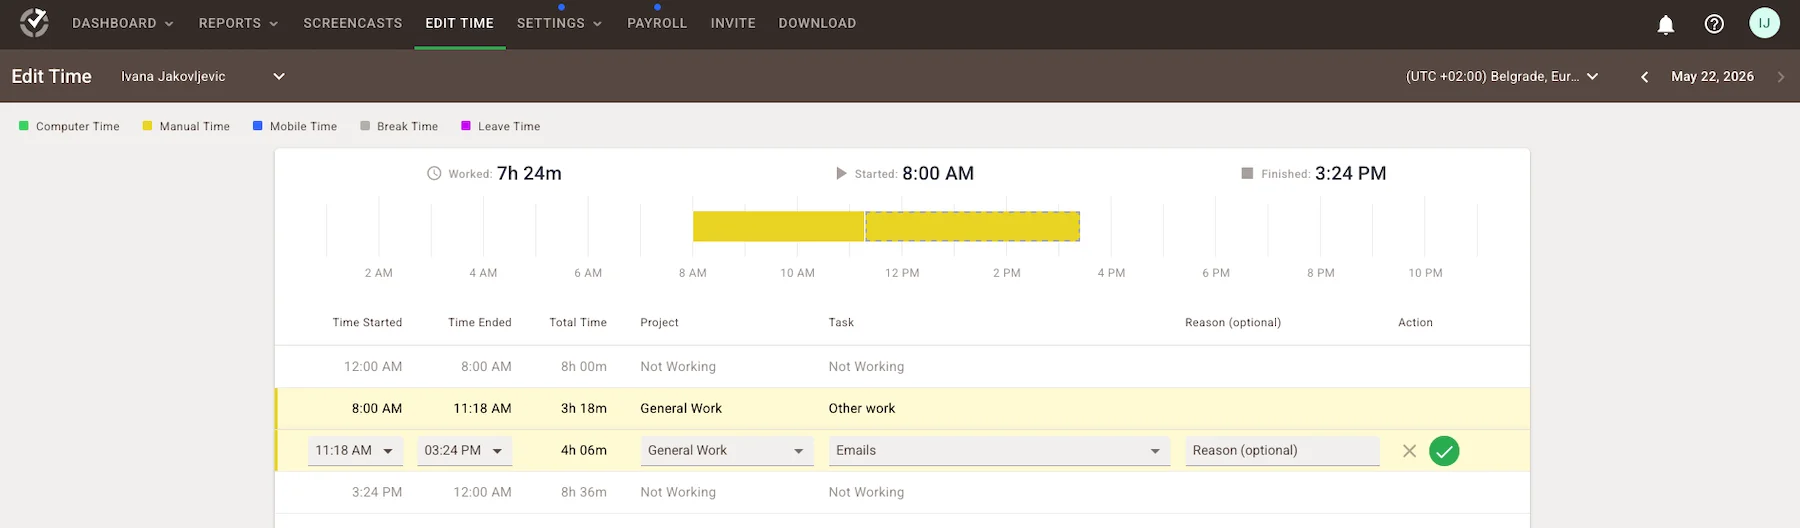
Time Doctor lets me record time spent on my task by adding time manually after I finish working. To do so, I need to:
- Navigate to the Edit time section in the app,
- Click the Edit option (the pen icon within the time entry field),
- Select start and end times,
- Choose a project and task, and
- Click the green check mark button to save a time entry.
Apart from that, adding a reason is optional.
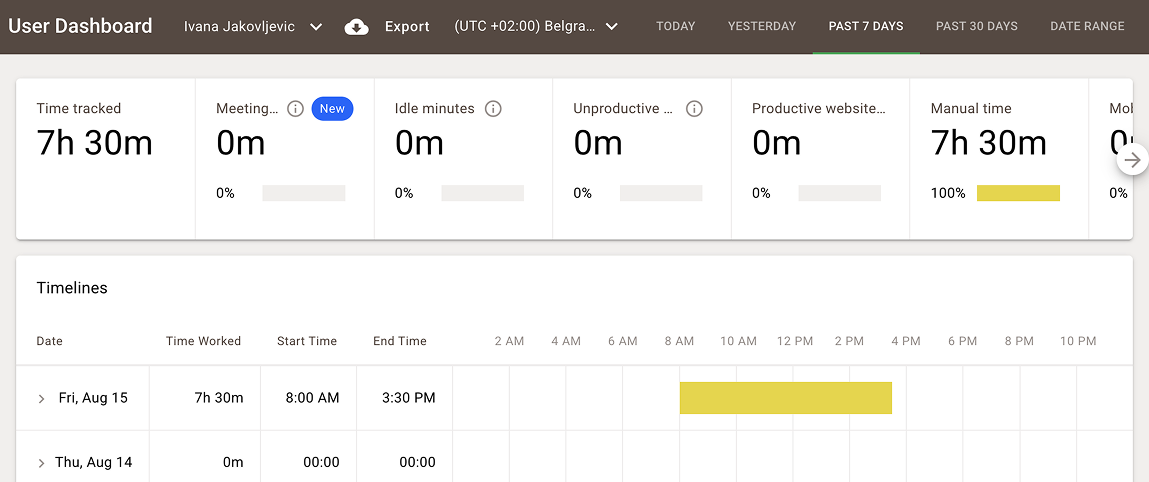
In Time Doctor, I can open my dashboard and see my tracked time for:
- Today,
- Yesterday,
- Past 7 days, or
- Past 30 days.
This is what it looks like when I choose to view my time logs for the past 7 days:
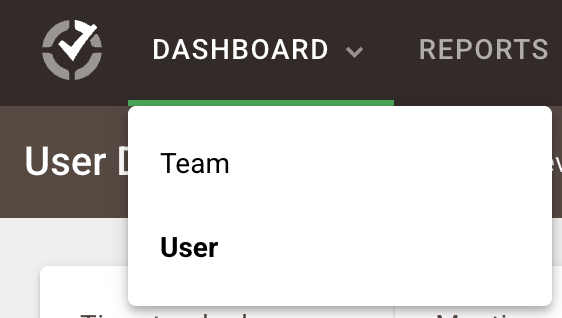
Note that Time Doctor offers 2 types of dashboards — a user and team dashboard. A user dashboard helps individual employees track their work, while a team dashboard lets managers monitor their team’s performance. As a manager, you can easily switch between these 2 dashboards by clicking on the Dashboard menu.
Time Doctor provides live visibility into how time is spent and simplifies employee timekeeping. This allows for improved efficiency and more effective resource allocation.
Why is Time Doctor best for tracking and analyzing performance?
Time Doctor allows me to monitor my team members’ activity and productivity and gain insights into their work patterns.
With Time Doctor’s team dashboard, I can check:
- Who’s currently active and who hasn’t tracked time yet,
- Who tracked the most and fewest hours,
- Who spends the most time on unproductive websites, and more.
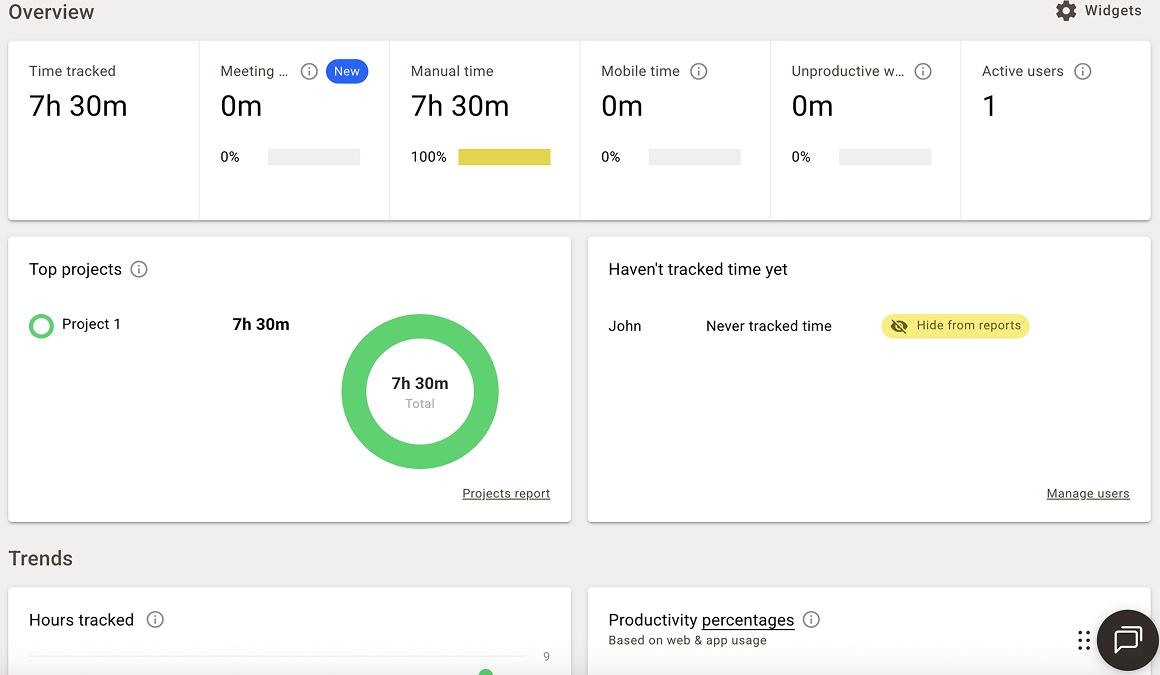
These insights help me assess how my team members perform and spot potential distractions and unproductive behavior.
By analyzing my team’s performance with Time Doctor, I can identify high-performing employees and reward them for their efforts. This way, I get to improve employee morale and retention.
What additional features does Time Doctor have?
Besides letting me manually add and edit my time, Time Doctor allows me to:
- Get summary reports of my and my team’s productivity levels,
- Approve and automate timesheets,
- Streamline payments,
- Look into chat and web histories,
- Go over screenshots of my team members’ activity,
- Receive distraction alerts, and
- Track my time offline.
Time Doctor also integrates with 50+ apps, including Asana, ClickUp, Notion, and others. However, these integrations are only available in Standard and Premium plans, which I found disheartening.
How easy is it to use Time Doctor?
Compared to some other time tracking apps, I found Time Doctor a bit complicated to navigate at first. Specifically, it took me some time to find the option to add time manually (I had to access the Edit time page).
Also, setting up the app is complex due to the large number of settings and options, such as detailed activity tracking and user management settings.
Time Doctor pros
The main benefits of using Time Doctor:
- It provides extensive reporting capabilities, and
- It helps managers identify potential overwork and burnout risks.
🎓 Career Burnout and Its Effect on Health
Time Doctor cons
The biggest disadvantages of using Time Doctor:
- It doesn’t offer phone support, and
- Some employees may find it intrusive due to its monitoring features, such as screenshots and mouse activity tracking.
What’s new in Time Doctor?
As of April 2025, users can set specific limits for breaks in Time Doctor. This option helps you manage break durations and ensure compliance with your company’s policy.
| Free trial | Yes, 14-day free trial |
| Free plan | No |
| Cheapest paid plan | $6.67/user/month if billed annually |
| Availability | Android, iOS, Web (Chrome and Firefox browser extensions), Mac, Windows, Ubuntu |
Best suited for: Freelancers and larger teams in industries such as technology, healthcare, or outsourcing.
#6: Everhour — best for task planning
Everhour helps teams accurately track time, manage tasks and projects, and improve efficiency. This makes it one of the best time tracking apps for employees who are juggling multiple deadlines and work initiatives.
How does Everhour work?
Everhour provides several time tracking options, including:
- Timer — to track time spent on your task as you work on it, and
- Manual mode — to add time manually, if you prefer to log time after completing your tasks.
To track time via manual mode in Everhour, I navigate to the Time section in the sidebar and click the plus sign button right beside the Start Timer button.

Then, I choose the task and project I’m working on, add my hours, and click the Report Time button to save my time entry.

What’s interesting about Everhour is that it also lets you track time without adding a task or project. In other words, I can quickly start a timer (e.g., if I have an urgent bug to work on) and allocate time to the right task later, which I found convenient.
Everhour provides useful time tracking functionalities, including an auto-stop timer option and handy reminders, allowing for precise timekeeping.
Why is Everhour best for task planning?
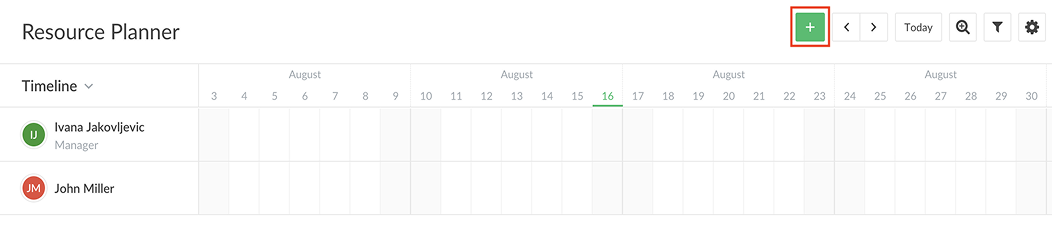
Everhour lets me create and plan assignments for my team members more easily than ever. To schedule tasks in Everhour, I go to the Resource Planner section in the sidebar and click the green plus sign button.
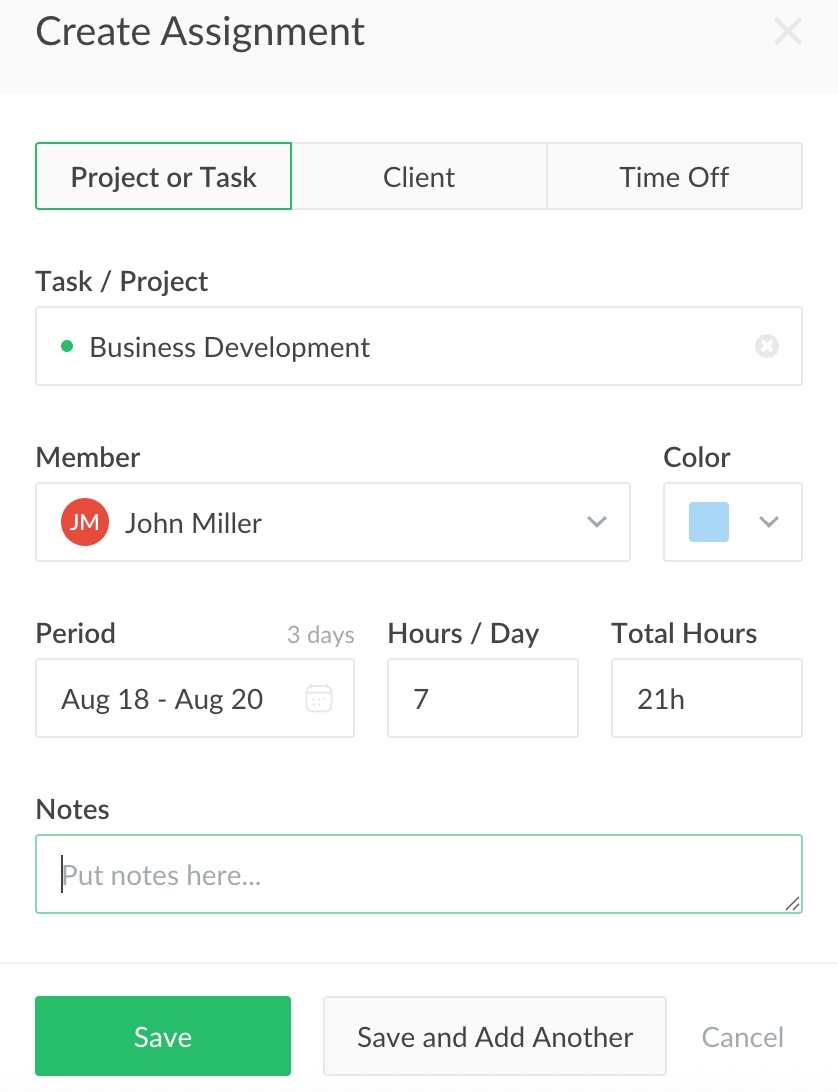
After that, I do the following:
- Choose the assignment type (Project or Task, Client, or Time off),
- Specify a task and a member,
- Select a period,
- Enter the estimated number of hours for the assignment per day, and
- Click the Save button to finish assignment creation.
Apart from that, adding a note is optional.
After I finish planning work for my team and me, I can see all the assignments on a timeline. To quickly view the details of each assignment, I just hover over a specific task, as shown below:
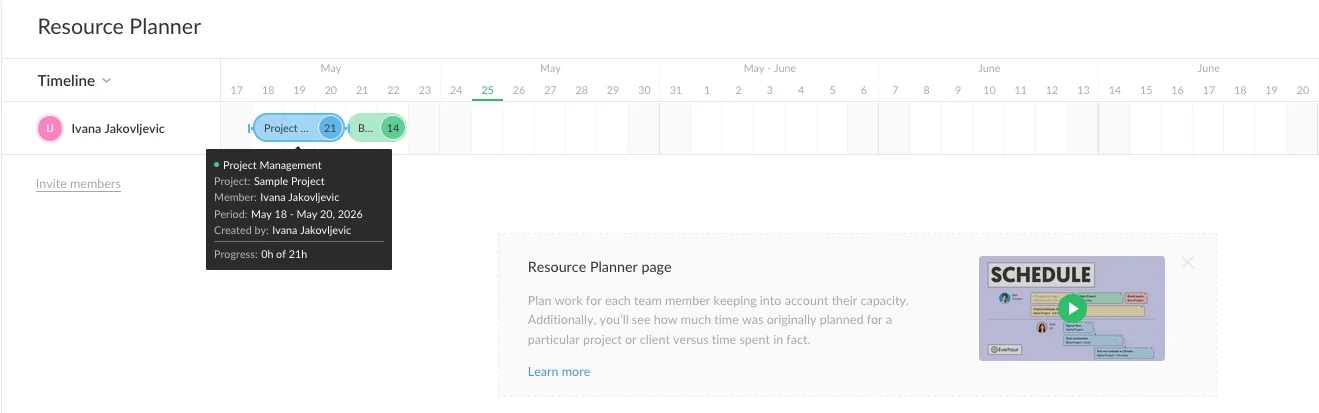
This way, I can also see how much time my team members have tracked for their tasks and check their progress (e.g., 3h of 21h).
I like that Everhour gives me the option to assign different colors to assignments. This allows me to easily distinguish tasks on a timeline and identify specific assignments at a glance.
What additional features does Everhour have?
Being a comprehensive tool with both basic and advanced time tracking features, Everhour is a good choice if you want to:
- Mark billable hours,
- Get reminders to track time,
- Break projects down into smaller tasks,
- Look into your team’s attendance,
- Approve timesheets, and
- Set up and track your project’s budget.
The app also integrates seamlessly with Asana, ClickUp, Trello, Jira, and other popular tools. The only issue is that you’ll have to upgrade to a paid plan to use these integrations.
How easy is it to use Everhour?
In my experience, using Everhour is quite simple. The app’s interface is user-friendly, and the time tracking features are intuitive, making for a streamlined time recording process.
Everhour pros
Everhour provides the following benefits:
- It allows you to track employee time off, and
- It offers the option of creating client invoices based on billable time and expenses.
Everhour cons
These are the key downsides of using Everhour:
- Its free plan supports 5 users only, and
- It requires you to purchase a minimum of 5 seats for the Team plan (and a minimum of 50 for the Custom plan).
What’s new in Everhour?
As of February 2026, users can delete their Everhour account directly in the app. Previously, they had to contact the support to request account deletion.
| Free trial | Yes, 14-day free trial |
| Free plan | Yes |
| Cheapest paid plan | $8.50/seat/month if billed annually |
| Availability | iOS, Android, Web (Chrome, Safari, and Firefox browser extensions), Mac |
Best suited for: Project managers and HR managers in sectors like IT, marketing, and consulting.
#7: My Hours — best for creating task templates
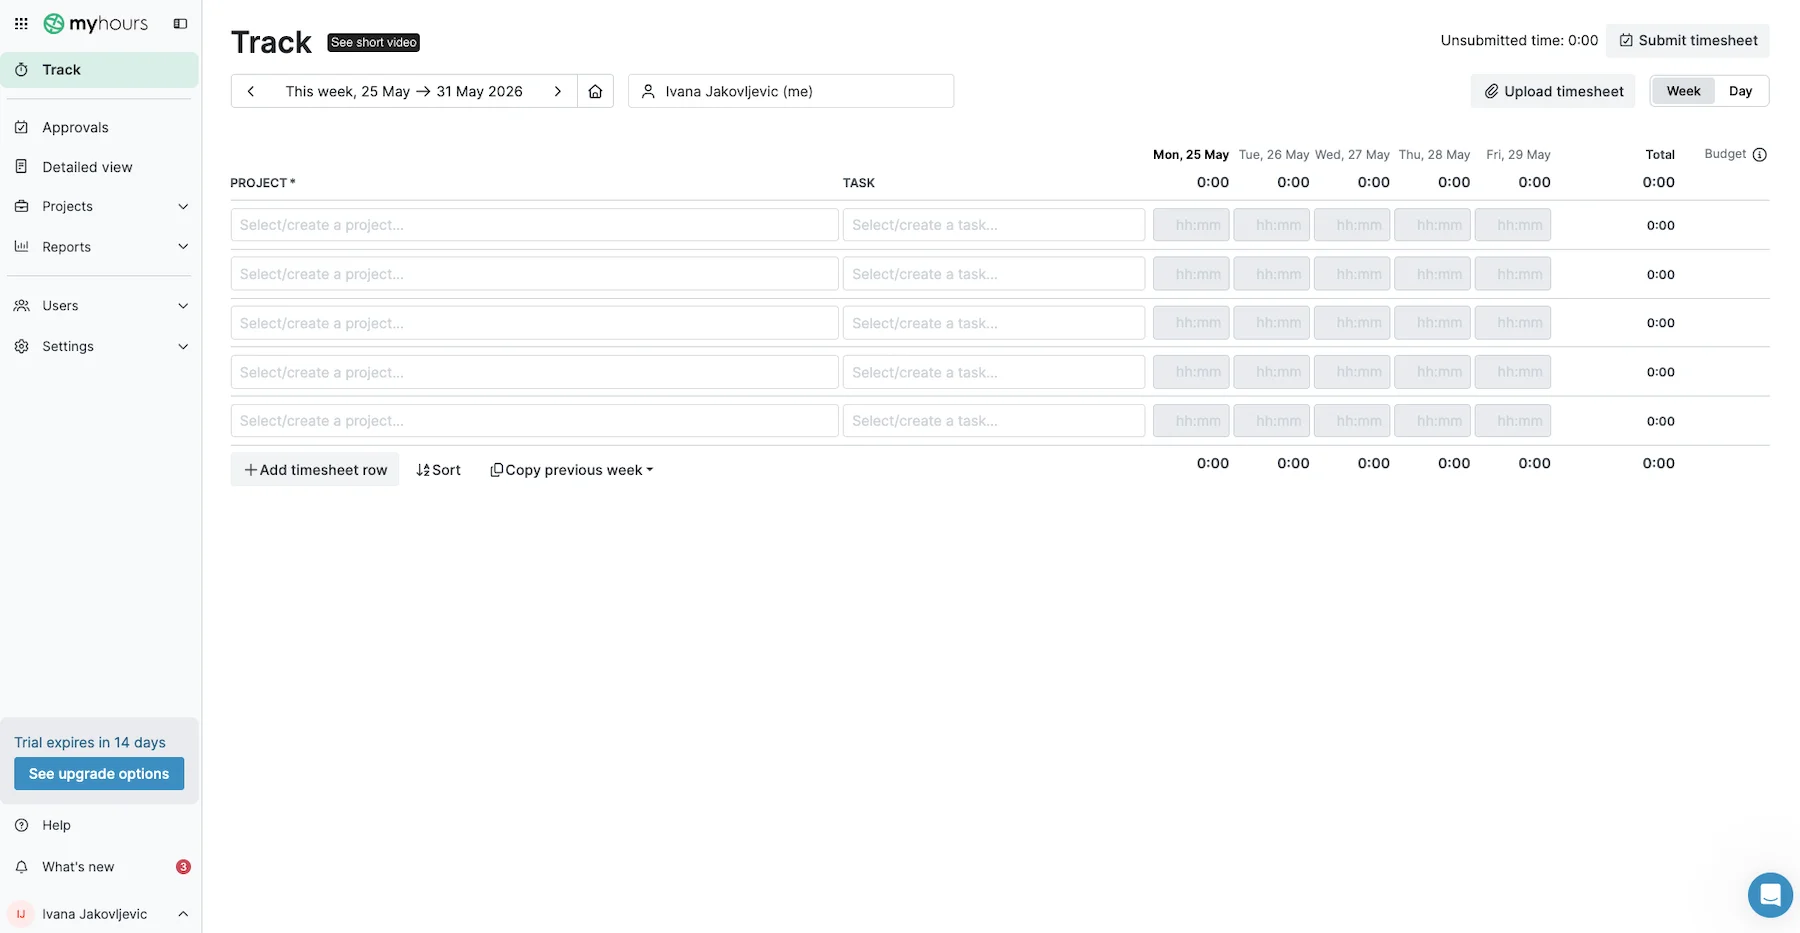
Being one of the best time tracking apps for freelancers and small teams, My Hours has almost everything you need for efficient time tracking and work organization.
How does My Hours work?
Once I create my account, I can track time in My Hours by entering work hours manually. To do so, I need to:
- Go to the Track page,
- Select a project I’m working on,
- Choose a task (optional), and
- Enter my work hours in the appropriate time slot.
My first impression was that this page looked outdated and clunky, especially with all the gray.
To edit my time log, I need to click on the pen icon within a time slot field. Then, I can:
- Change the project or task related to that entry,
- Add description or tags,
- Adjust start and end times, or
- Change the entry’s billable status.
To apply the changes, I simply click the Save button.

As one of the best free time tracking apps for employees, My Hours gives users flexibility in how they track their time by offering several time recording options. However, the app lacks offline tracking capabilities, which is a bit disappointing.
Why is My Hours best for creating task templates?
Instead of recreating the same tasks for each new project, with My Hours, I can apply a pre-built template and save time.
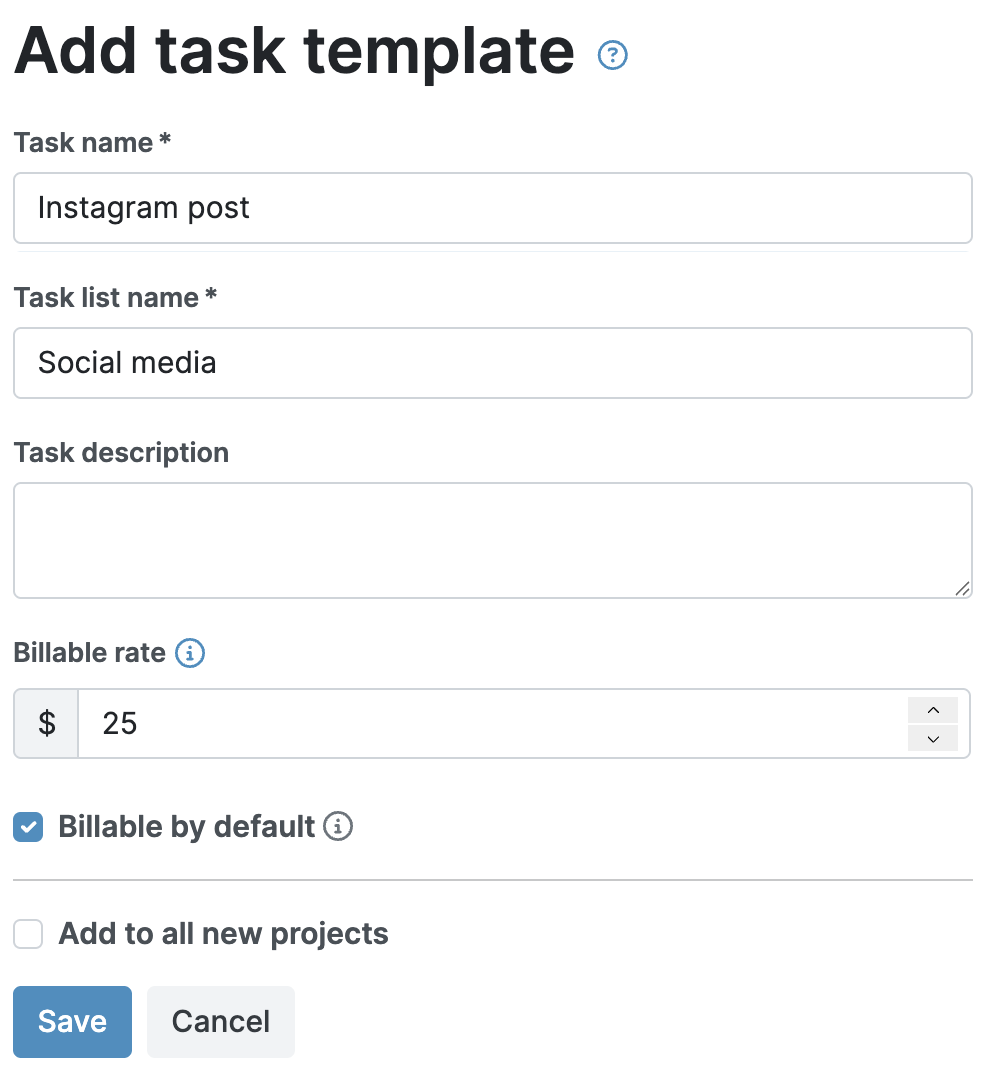
To create a task template in My Hours, I need to:
- Go to the Settings menu in the sidebar,
- Select the Task templates option, and
- Click the + New Task template button.
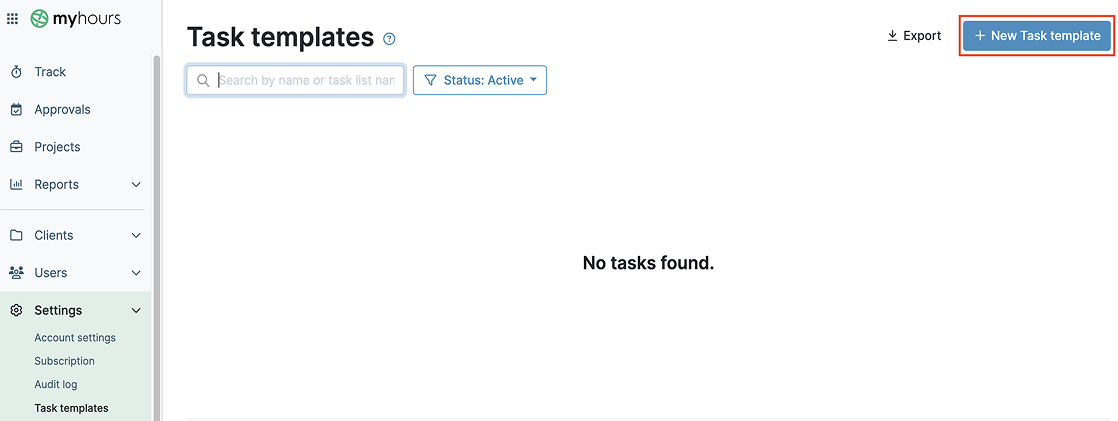
Then, I need to name my task template and enter a description or billable rate. I can also check the Billable by default box. This way, the task from this template will always be added to projects as billable.
After entering all the relevant details, I save a template by clicking the Save button.
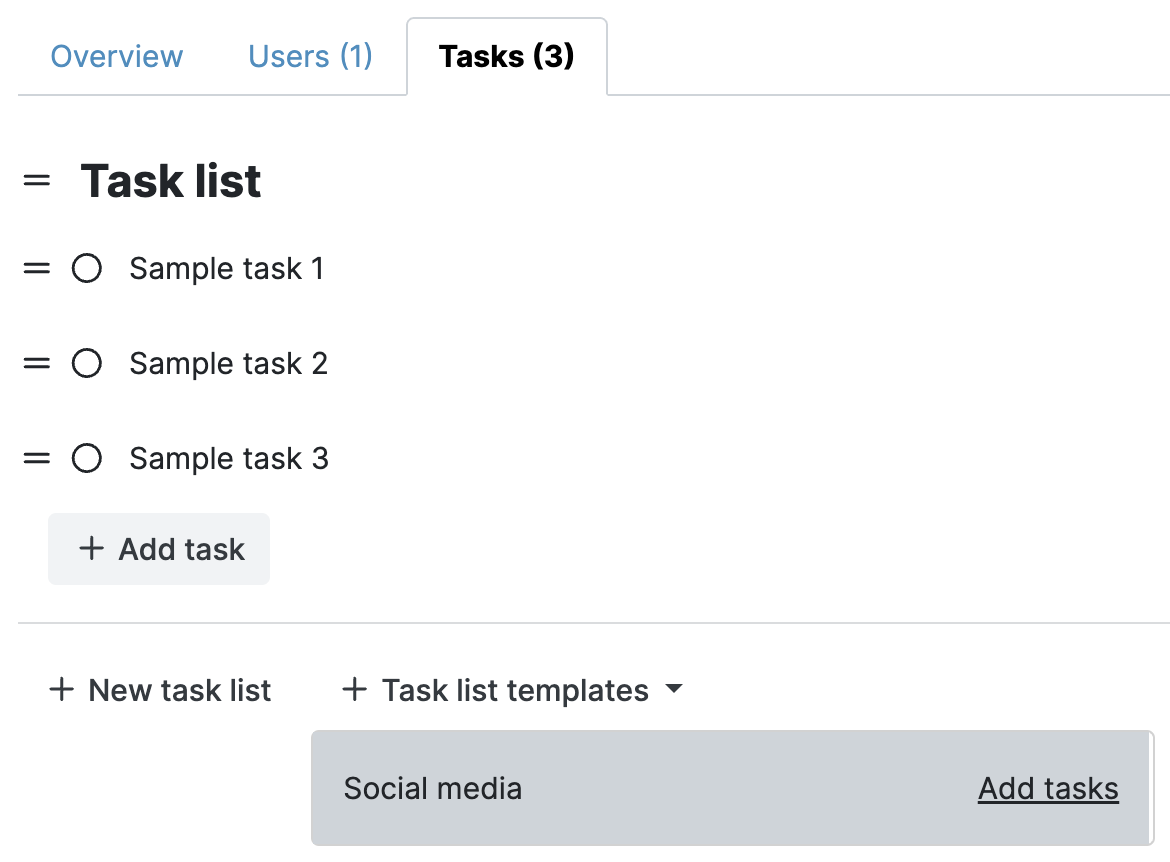
In My Hours, all task templates with the same task list name are automatically grouped in the same task list. And when I add a template to a project, I add a task list, not individual tasks. I found this convenient, as it allows me to add several tasks at once and set up my project faster.
To add a task list template to a project in My Hours, I have to:
- Select the Projects section from the sidebar,
- Choose a project (in my case, Sample Project), and
- Click on the Tasks tab.
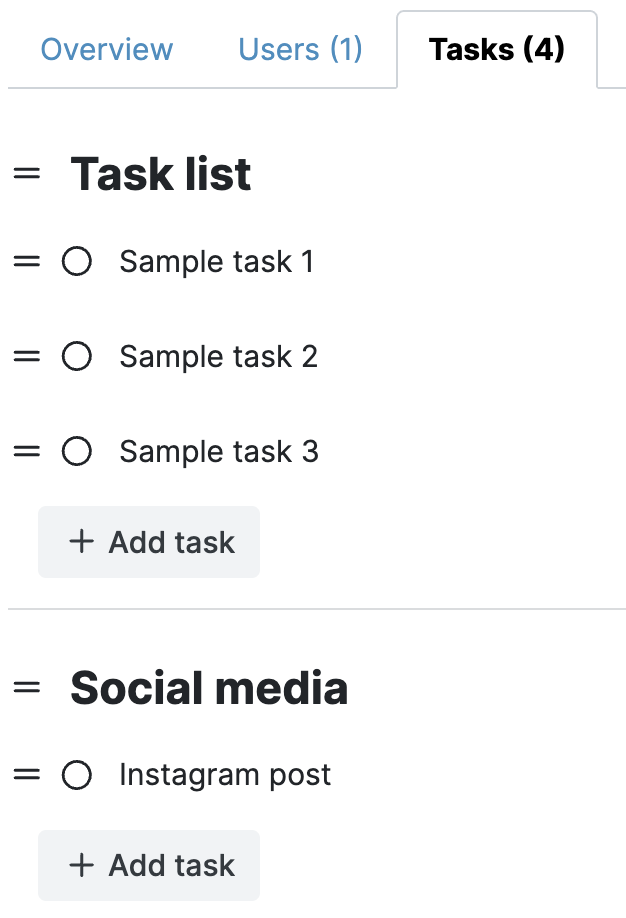
After that, I click on the + Task list templates menu and choose a template I want to use (in this case, Social media).
As soon as I click on Add tasks, the template is automatically applied, which I found helpful for my workflow.
My final take in this segment is that My Hours helps save time and effort on repetitive tasks, allowing users to work more efficiently.
What additional features does My Hours have?
Apart from allowing me to easily submit and approve timesheets, My Hours lets me:
- Organize tasks and projects,
- Track my project budget,
- Set hourly rates,
- Mark projects or tasks as billable or non-billable,
- Turn approved work and expenses into client invoices,
- Analyze my team’s progress, and
- Move data in bulk.
The app also integrates with several business tools. However, the number of available integrations is limited compared to its competitors.
How easy is it to use My Hours?
The tool has an uncluttered interface, which makes tracking time and managing projects a breeze.
My Hours offers timekeeping without complexity, allowing users to focus on their tasks rather than figuring out how to use complicated software.
My Hours pros
The main My Hours advantages:
- It allows you to set hour targets for employees (per day or week) and send them email reminders when they’re over or under their targets, and
- It lets you export client invoices in a PDF or XLS format.
My Hours cons
The biggest disadvantages of using My Hours:
- It doesn’t have a feature for resource scheduling, and
- Certain options, like the ability to calculate rates or set budget alerts, are only available in paid plans.
What’s new in My Hours?
As of April 2026, you can assign teams directly to projects. If a team member is added to or removed from the team, they are added to/removed from the project as well.
| Free trial | Yes, 14-day free trial |
| Free plan | Yes |
| Cheapest paid plan | $4/user/month if billed annually |
| Availability | Android, iOS, Web (Chrome, Firefox, and Edge browser extensions), Mac, Windows |
Best suited for: Small teams and freelancers in industries like legal, consulting, or research and development.
FAQs about time tracking apps
In the next section, I’ll provide answers to some of the frequently asked questions about time tracking tools.
What is the best free time tracking app?
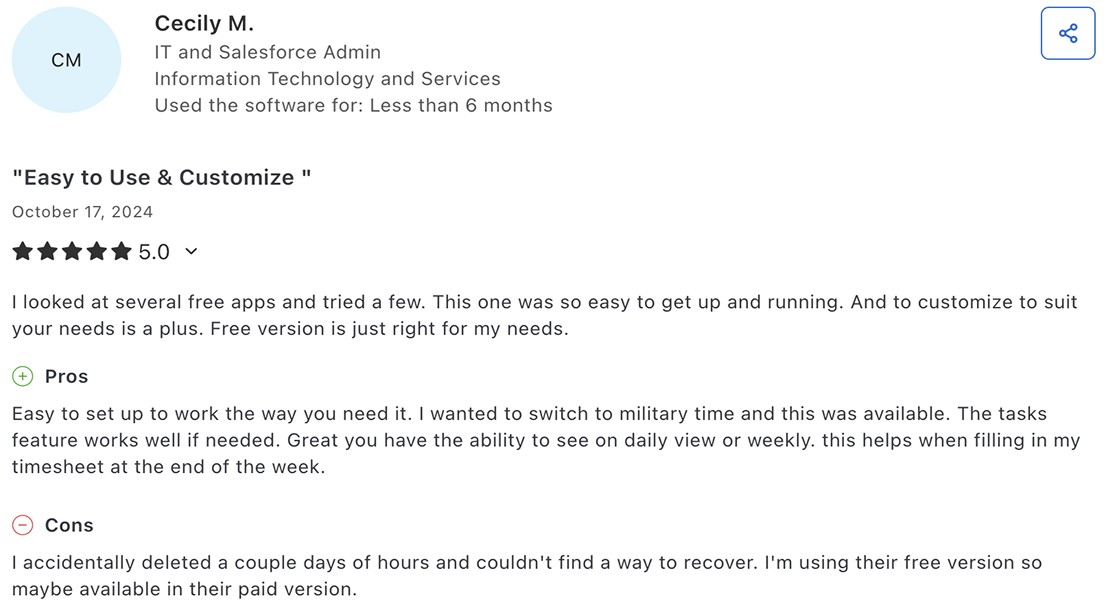
For a balance of rich features and ease of use, I find that the best free time tracking app is Clockify. According to thousands of reviews, this app is known for being user-friendly and offering a range of useful features — even on its free plan.
Clockify offers a comprehensive free plan with unlimited projects and plenty of integrations, making it a top choice for teams of all sizes across industries.
What are the best time card apps with expense tracking features?
Some of the most popular time card apps with expense tracking functionality include Clockify and Harvest. Both of these apps have options to track and manage project-related expenses, allowing users to bill their clients accurately.
What are the best apps for tracking time and schedules?
Clockify is one of the best apps for tracking time and schedules. With its useful scheduling feature, Clockify simplifies project planning and task delegation, enabling effective workload management.
🎓 Employee Scheduling Software
Which time tracker app works for everyone?
While Clockify, Toggl Track, and Everhour are essentially work-hour trackers, Time Doctor has proven to be a great tool for monitoring productivity. However, a thorough analysis of these apps’ features has shown that only Clockify performs strongly in every professional scenario and can be used by organizations of all sizes.
Which time tracking app is the easiest to use?
Clockify is the easiest time tracking app to use. Clockify has a feature-rich yet streamlined user interface that allows users to clearly see what they’ve been up to and helps them focus on what needs to get done next.
Which time tracking app is the most affordable?
As I’ve been inspecting the best time tracking apps, I noticed that most of the tools (except Time Doctor) offer a free plan. However, the majority of these free plans come with numerous limitations, and upgrading to paid plans often turns out to be a costly choice.
The only time tracker that stands out from the crowd is Clockify, whose paid plans are tangibly more affordable than any of its competitors.
Use Clockify by CAKE.com as your all-in-one time tracking solution
As one of the best apps for time tracking on the market, Clockify lets you:
- Manage multiple projects,
- Record billable time,
- Schedule tasks,
- Track expenses, and
- Create professional invoices.
With the options to track both in-office work hours and remote team activities, Clockify supports different work environments and makes team time management easy.
Additionally, Clockify offers a useful kiosk. This feature enables employees to clock in and out via a shared device (tablet, computer, or phone) by entering their PIN.
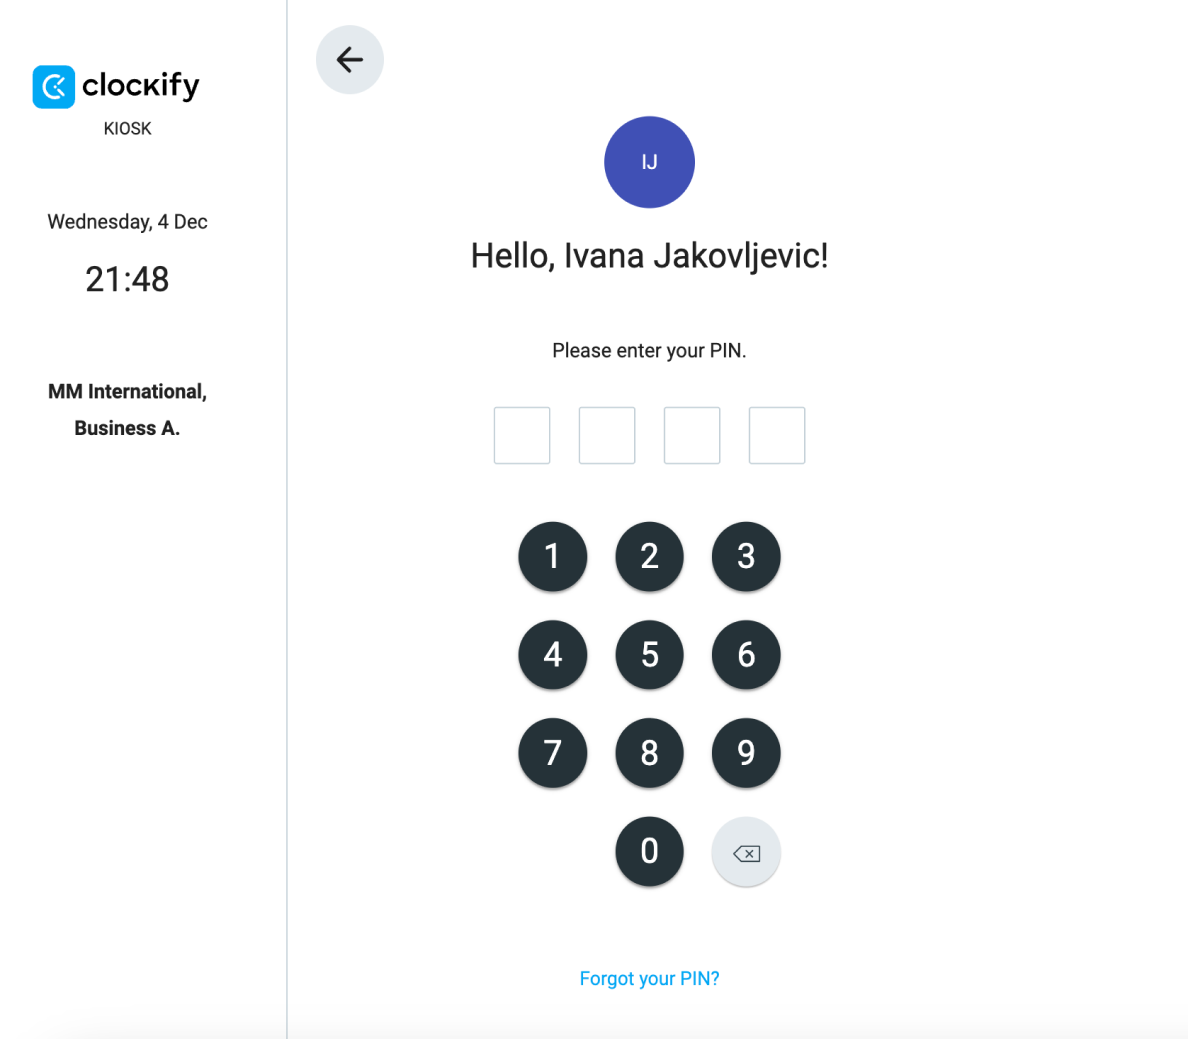
This allows for streamlined employee timekeeping and reduced time theft in your company.
Additionally, if you want to boost your team’s productivity, sign up for the CAKE.com Bundle to get all 3 productivity tools at a special price:
- Clockify — a reliable time tracking software,
- Plaky — an easy-to-use project management tool, and
- Pumble — an intuitive team communication app.
Optimize your team’s performance with the 3 powerful productivity apps.
