You’ve tracked every billable hour in Clockify. But now, you’re manually copying those entries into your invoicing tool — again.
If this sounds familiar, you’re losing time and potentially money.
Clockify and invoicing apps don’t have to work separately. Actually, Clockify invoicing integrations can shorten and automate your billing process.
Read on to learn how.

What does Clockify invoicing integration do?
Invoice integration in Clockify by CAKE.com lets you connect your time tracking data directly to your invoicing software. Instead of manually transferring hours, you automatically sync time entries with invoicing — this eliminates the busywork and associated errors.
Think of it as building a bridge between the two tools. Your time entries move straight from Clockify into your online invoices without you lifting a finger.
Most importantly, you get to enjoy the accuracy, speed, and peace of mind that every billable hour gets captured and billed.
💡 CLOCKIFY PRO TIP
What’s the difference between billable and non-billable hours? Learn all about it in this article:
Why integrating Clockify with invoicing tools matters
You already know how to track time with Clockify by CAKE.com. But if you’re then manually copying hours into an invoicing template, you’re giving up some of the biggest benefits of time tracking.

Still think you can just copy and paste your hours in about 5 minutes? Well, think again.
Here’s why that logic falls apart when you’re managing multiple clients, projects, and rates.
Reason #1: Billing errors add up fast
One forgotten entry here, a manual transcription mistake there, and you’ve just lost revenue. Every business relies on accurate billing. For freelancers and small business owners especially, these mistakes can be harmful.
If you bill more than, let’s say, $100K annually as a small business, even just a 2% improvement in captured billable time can contribute to a meaningful revenue recovery.
As revealed by Daniel Meursing, CEO of a company that specializes in managing teams for the biggest events across the US, billing was a manual, error-prone process that often delayed client invoicing and affected cash flow:

“Once we connected time tracking with invoicing, every approved shift or project hour automatically generated accurate, itemized entries ready for billing. This automation not only eliminated human error but also gave us real-time insight into project profitability. It allowed our finance team to focus on analysis and forecasting rather than data entry.”
Reason #2: Time is a finite resource
Small businesses and agencies simply don’t have time to manually reconcile hours across multiple projects.
Even a freelancer who manually invoices 5 clients for 5 hours every month (an hour for each client per month) can save 60 hours a year. At a $50 hourly rate, that’s $3,000 saved from recovered time. For small businesses and agencies, the math gets even better.
Reason #3: Cash flow depends on speed
The faster you invoice, the quicker you get paid. Manual invoicing delays billing, which then delays payments.
Assume you need to spend a full day manually transferring time entries to invoices. Syncing Clockify with your invoicing tool lets you send invoices 1 day sooner and receive payments 1 day sooner.
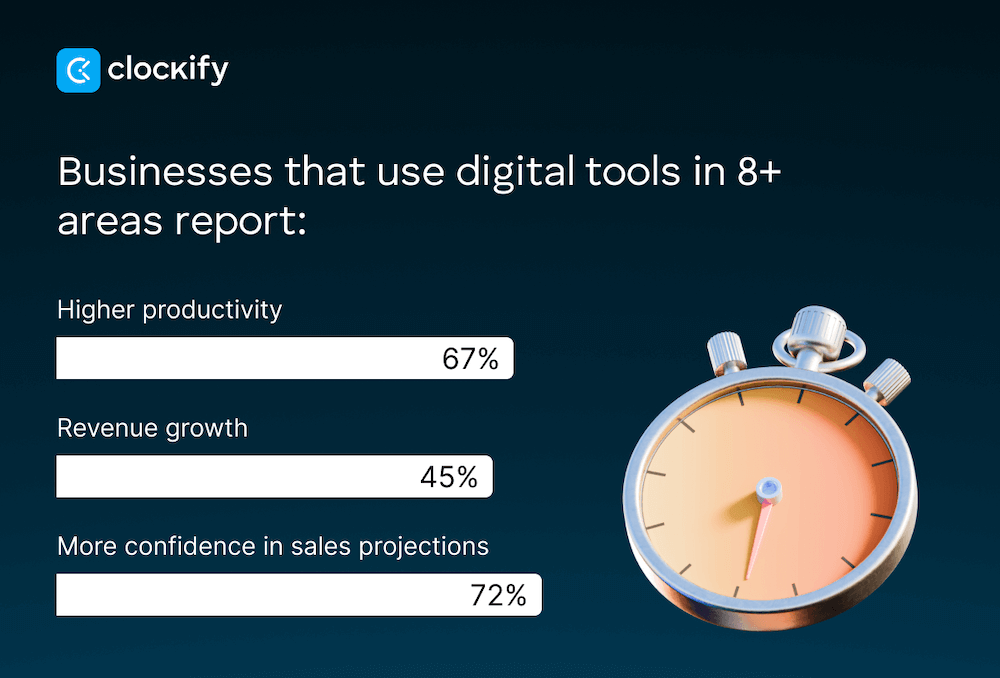
After all, according to the 2025 Small Business Index Annual Report, 45% of small businesses reported increased revenue after adopting digital tools.
Reason #4: Scaling is problematic without automation
If you’re working with a small number of clients now, manual invoicing might be manageable. But add another client, another project, or another team member, and the whole process might break.
In contrast, integration scales with you, whether you’re invoicing 1 or 50 clients.
And for small teams, automated invoicing frees up time for actual client work rather than back-office tasks.
Reason #5: Professionalism counts
Clients notice when invoices are detailed, accurate, and sent promptly. Linking time tracking to invoicing ensures your invoices always include complete time entries without the gaps or inconsistencies that come with manual data entry.
When clients receive consistent and detailed invoices on time, they’re more likely to trust you and be prepared to send payments on the expected dates for future projects.
💡 CLOCKIFY PRO TIP
If you’re still looking for the ideal invoicing software that won’t cost you an arm and a leg, check out our list:
How Clockify invoicing integration works
It’s helpful to understand the 2 main methods that most automated integrations work through:
- Direct integrations connect Clockify to specific invoicing tools (like QuickBooks) and instantly import data from one tool to another. As you track time in Clockify, the data syncs with QuickBooks automatically.
- Automation platforms like Zapier act as middlemen, connecting Clockify’s time tracking to invoicing apps. Since Zapier connects Clockify with more than 2,900 apps, you’ll find the invoicing tool you already use. Even though this method requires a bit more setup initially, it’s still very flexible and supports automated invoicing.
Bonus option: You can export data from Clockify and then manually import the CSV file to your invoicing software. While this is the least automated solution, it still reduces administrative workload and the risk of transcription errors.
Track billable hours in Clockify
Direct integration: Clockify and QuickBooks
Clockify by CAKE.com offers direct integration with QuickBooks Online (Essentials or Plus plan). For the integration to work, you need to have and log in to both your Clockify and QuickBooks accounts.
To get started, make sure that all team members who will be sending time data from Clockify to QuickBooks have the same name in both apps.

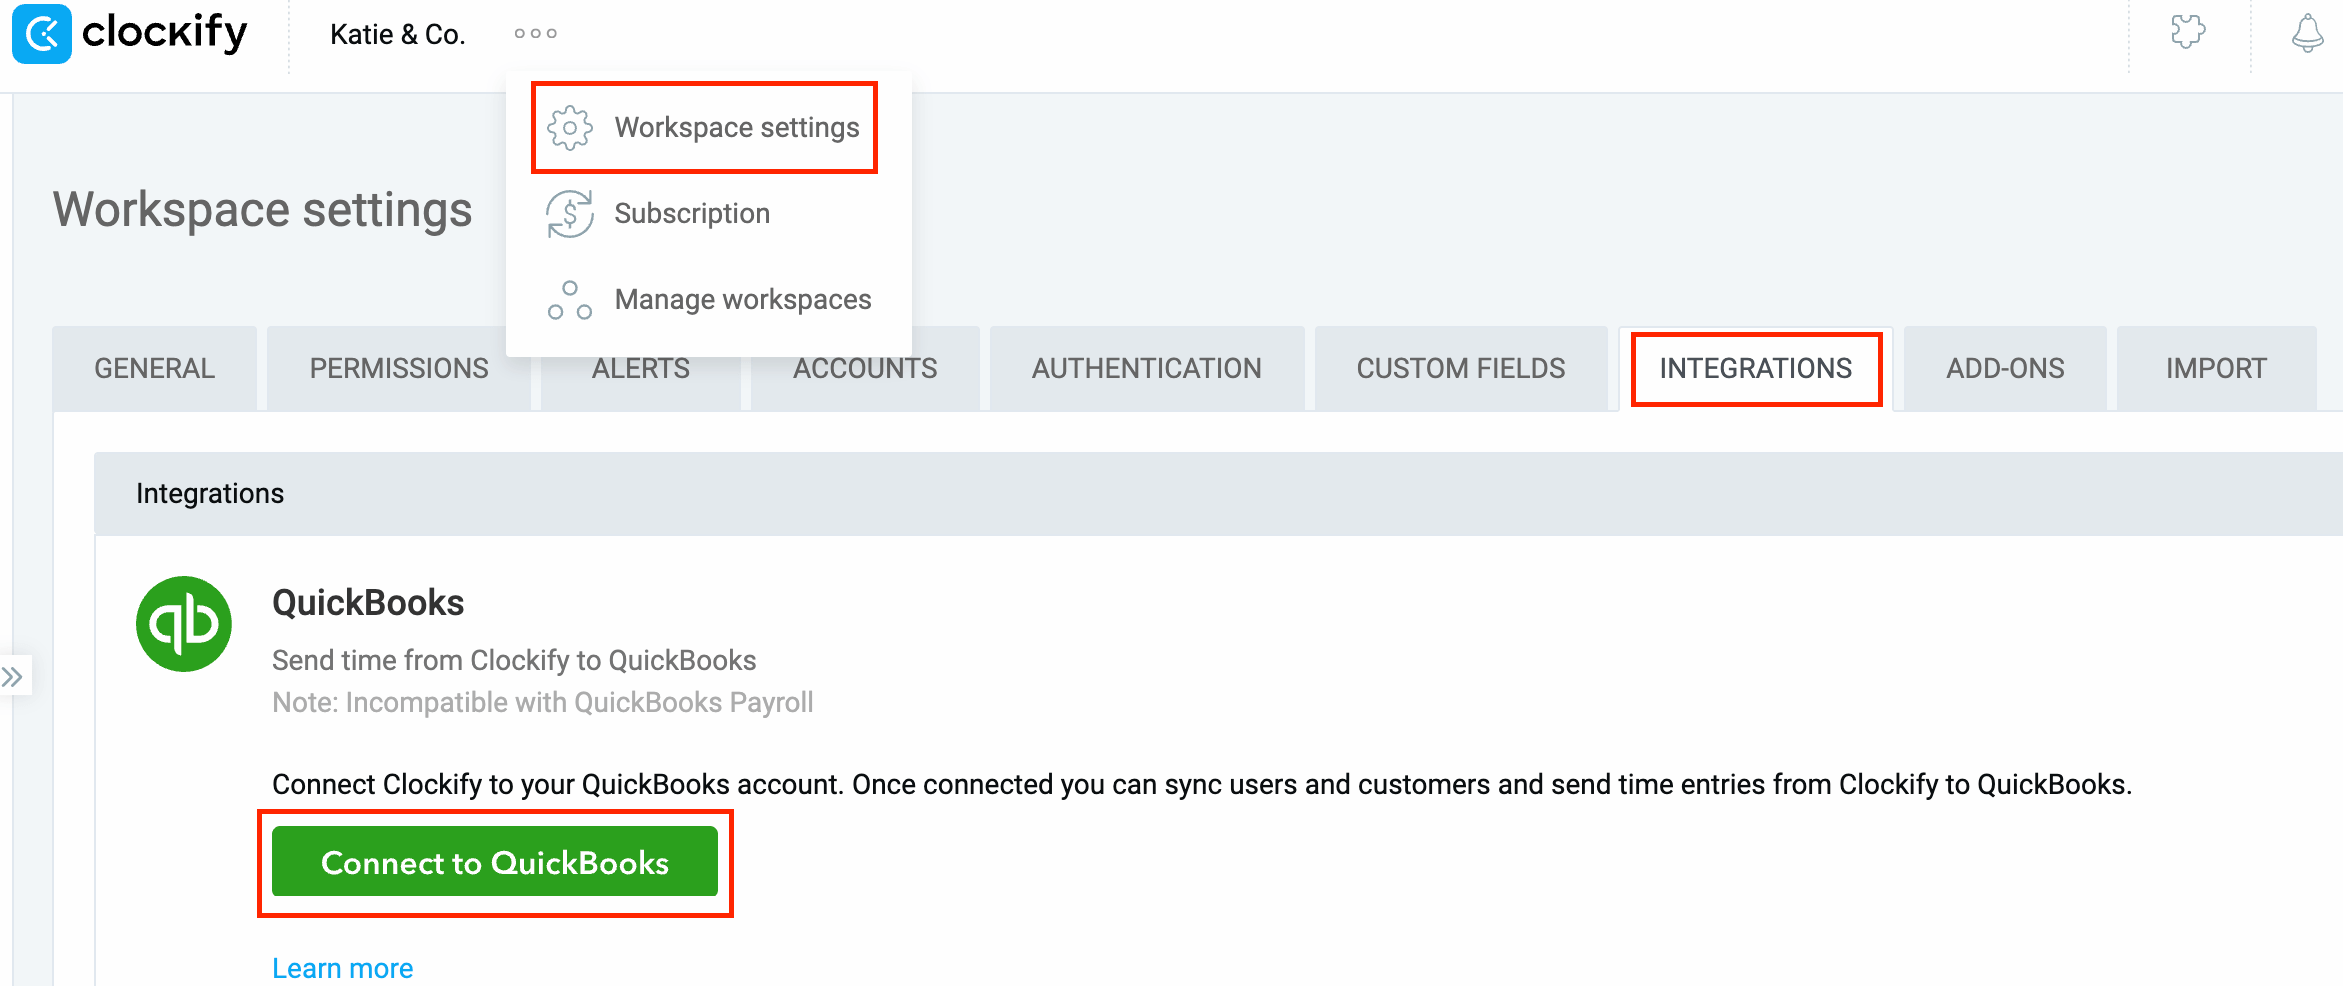
To connect Clockify and QuickBooks, you need to:
- Go to the Workspace settings in Clockify,
- Click on the Integrations tab,
- Expand QuickBooks, and then
- Click the “Connect to QuickBooks” button.
Make sure you’ve already logged in to QuickBooks so you can quickly authorize access.

1: Sync users and projects
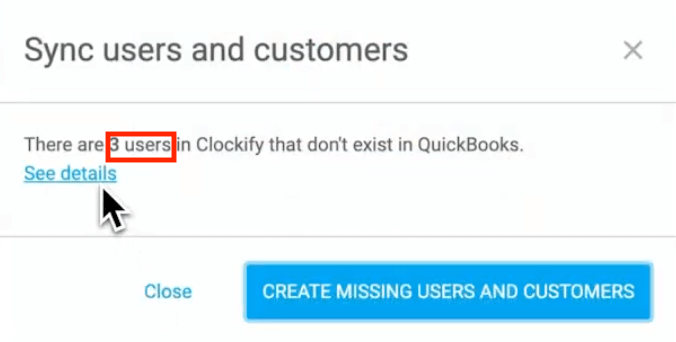
Now that you’re connected, the next step is to sync users and projects.
First, the sync will check all users in Clockify who have the same name as they do in QuickBooks. If there’s a user in Clockify that’s missing in QuickBooks, Clockify will automatically create them for QuickBooks.
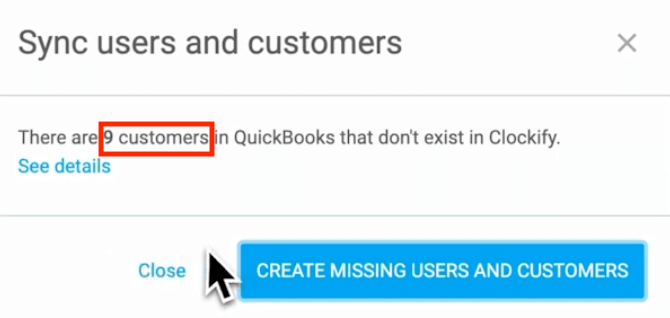
Next, Clockify checks projects and clients you have in QuickBooks, which are treated as projects in Clockify.
If there’s a project or a customer in QuickBooks that doesn’t exist in Clockify, Clockify will pull and create them automatically.
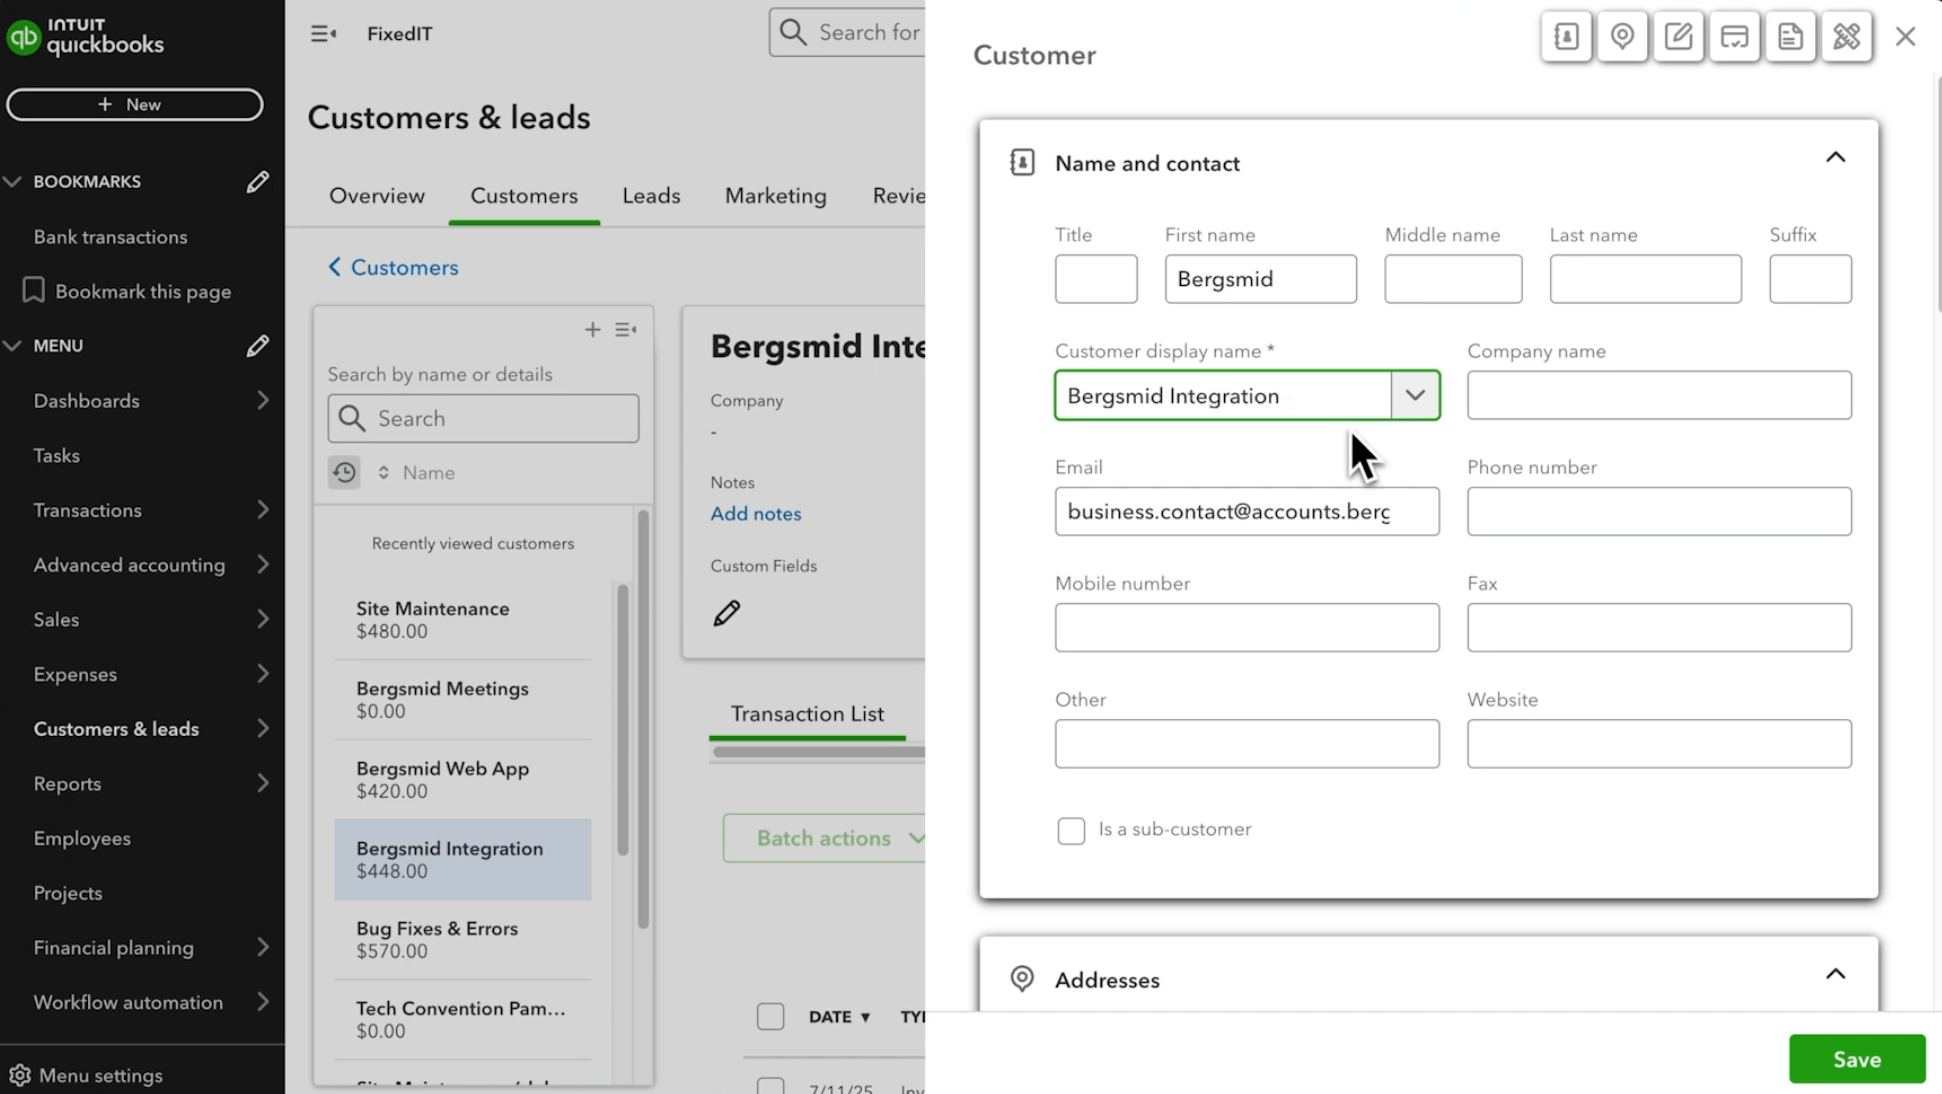
But if you have a project in Clockify that doesn’t exist in QuickBooks, either as a project or a customer, you’ll need to create them manually in QuickBooks using the same name they have in Clockify.
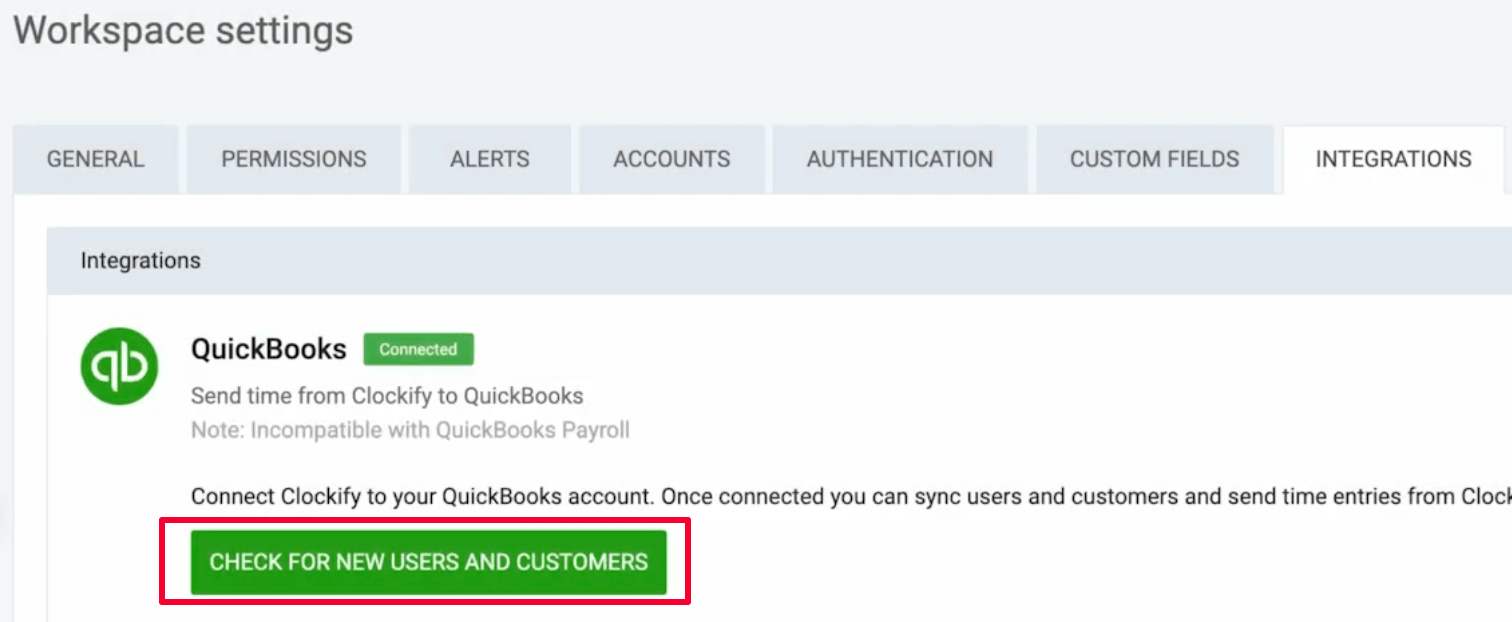
Then, run the sync again by clicking the “Check for new users and customers” in Clockify’s Integrations tab — as below:
2: Track time in Clockify and send it to QuickBooks
Once everything’s synced, you and your team can track the time you spend on projects using a timer in Clockify, or by entering hours manually in a timesheet.
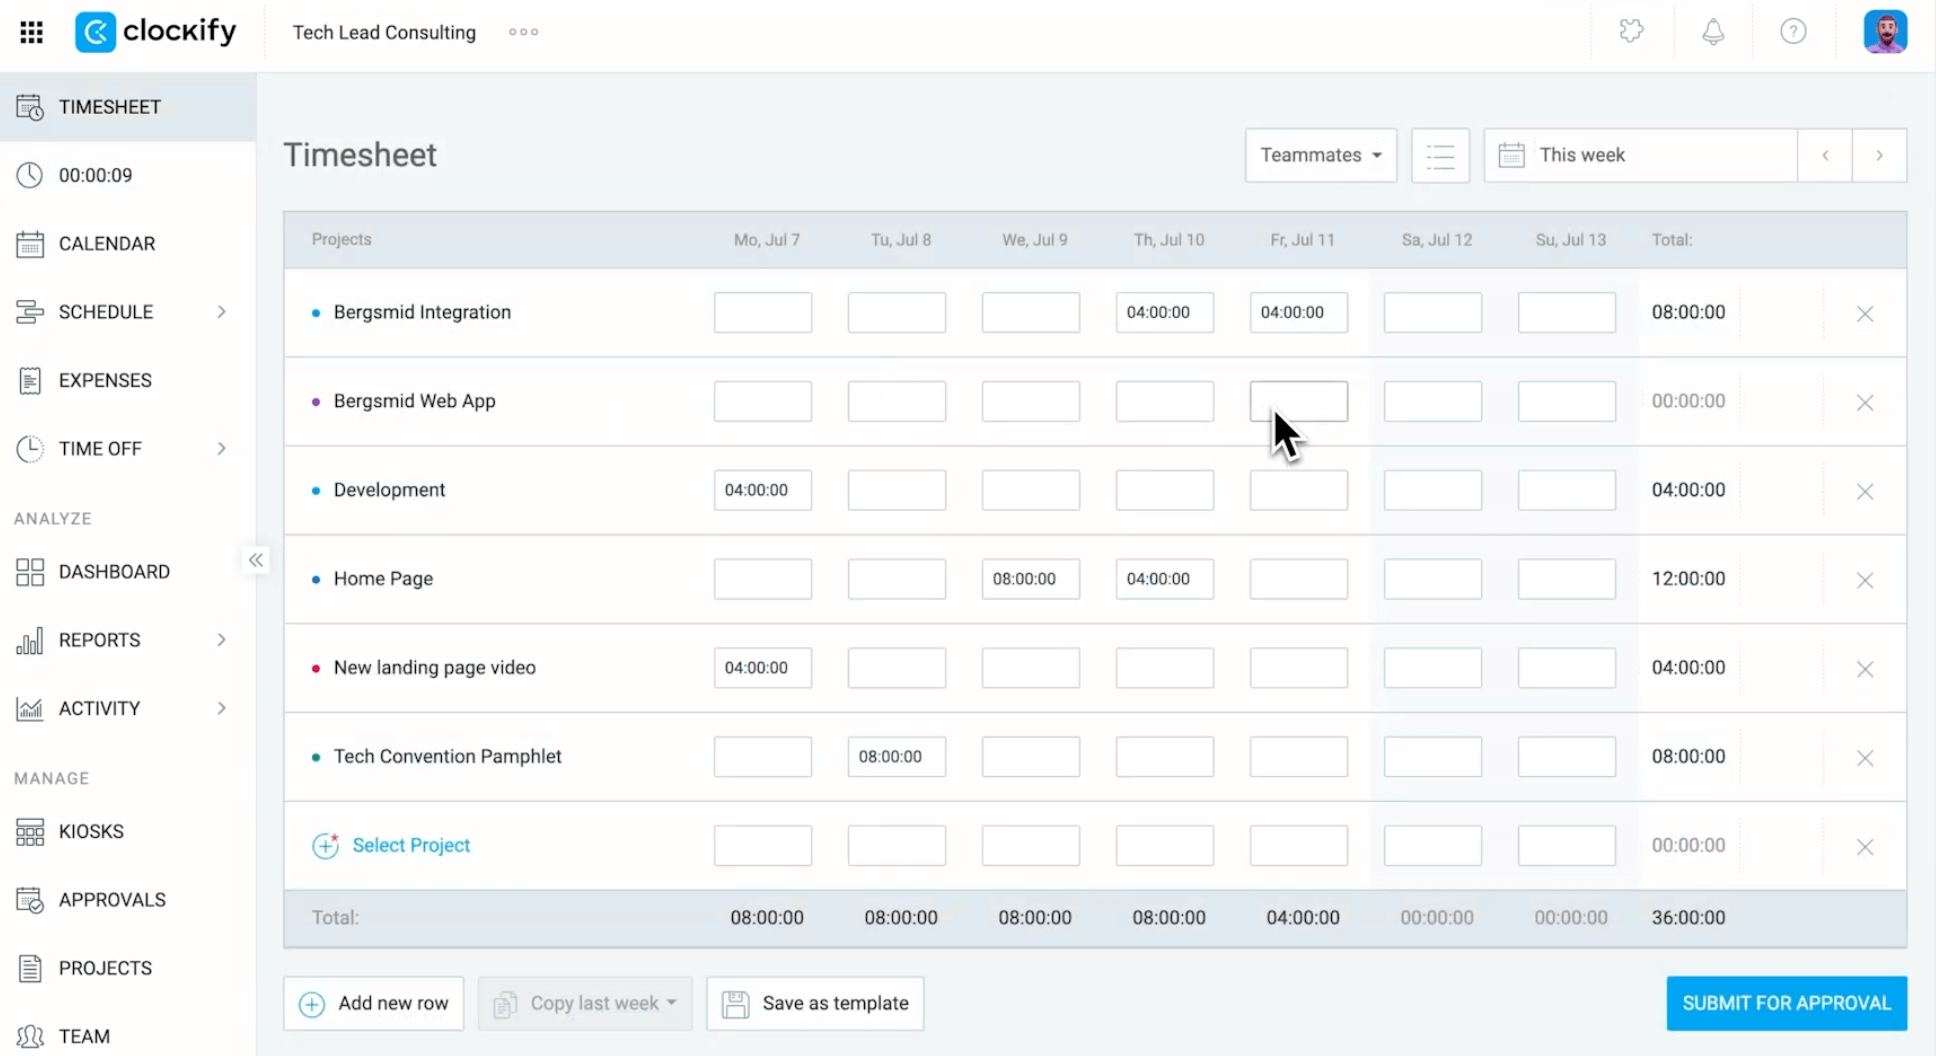
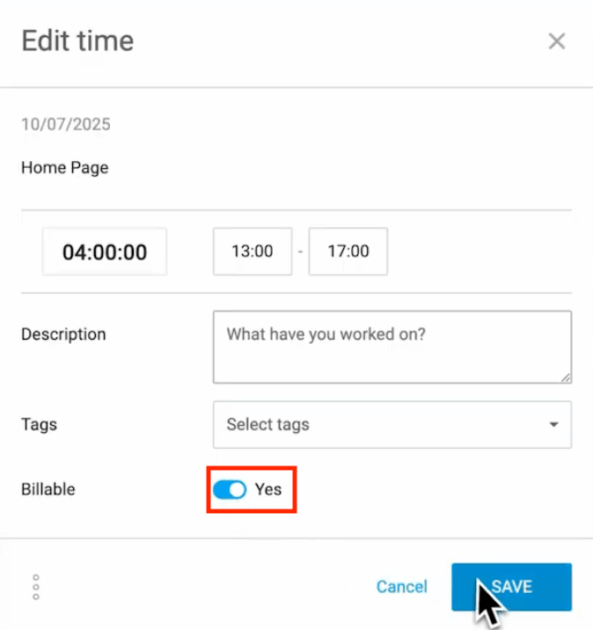
Also, make sure to set hourly rates and mark them as billable if you wish to send the billing data to QuickBooks.
Start tracking time in Clockify
All tracked time is available in the detailed report. Here’s how you can send tracked time over to QuickBooks:
#1: Click the QuickBooks button, and you’ll see all the time entries that haven’t been sent yet. You can be confident that the list shows only those entries that haven’t already been sent when you see “Showing not sent entries” next to the button.
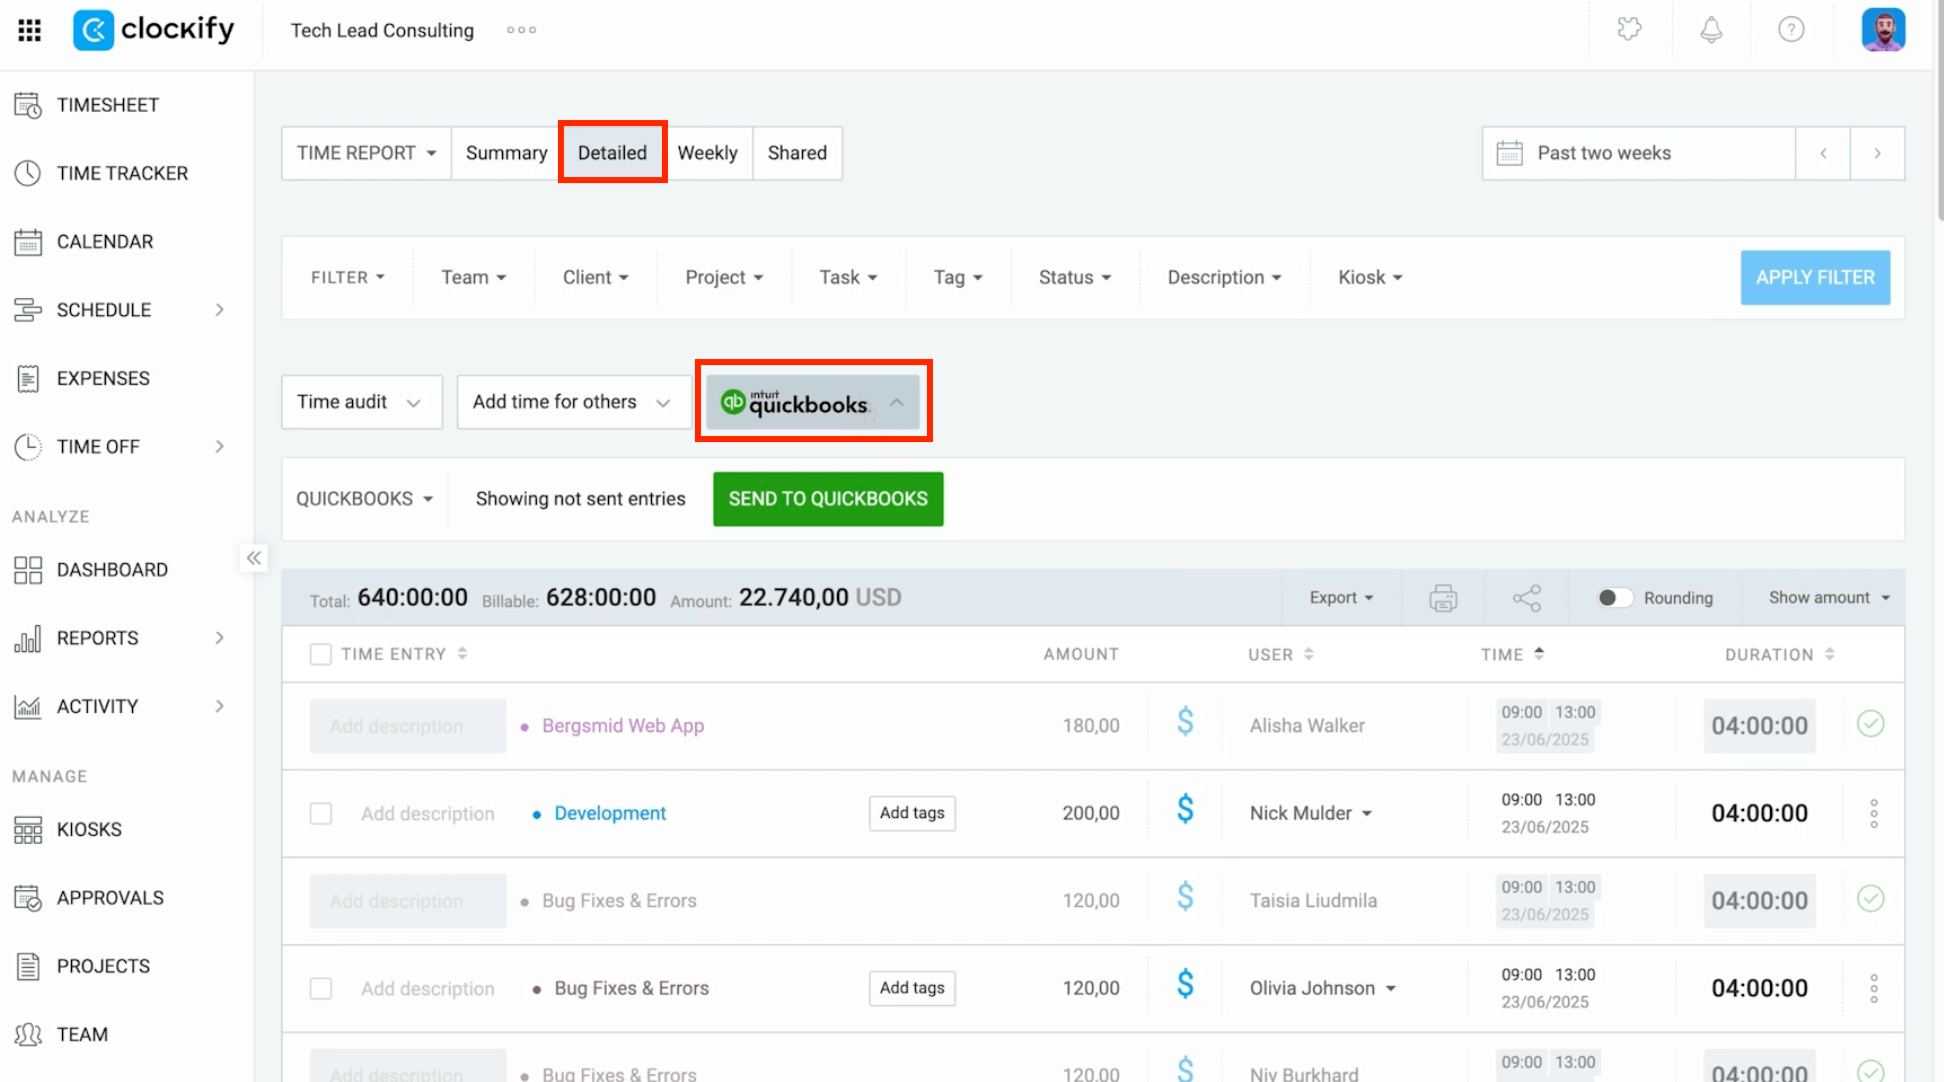
Entries that still aren’t approved (clickable entries) can be further edited from this page as well.
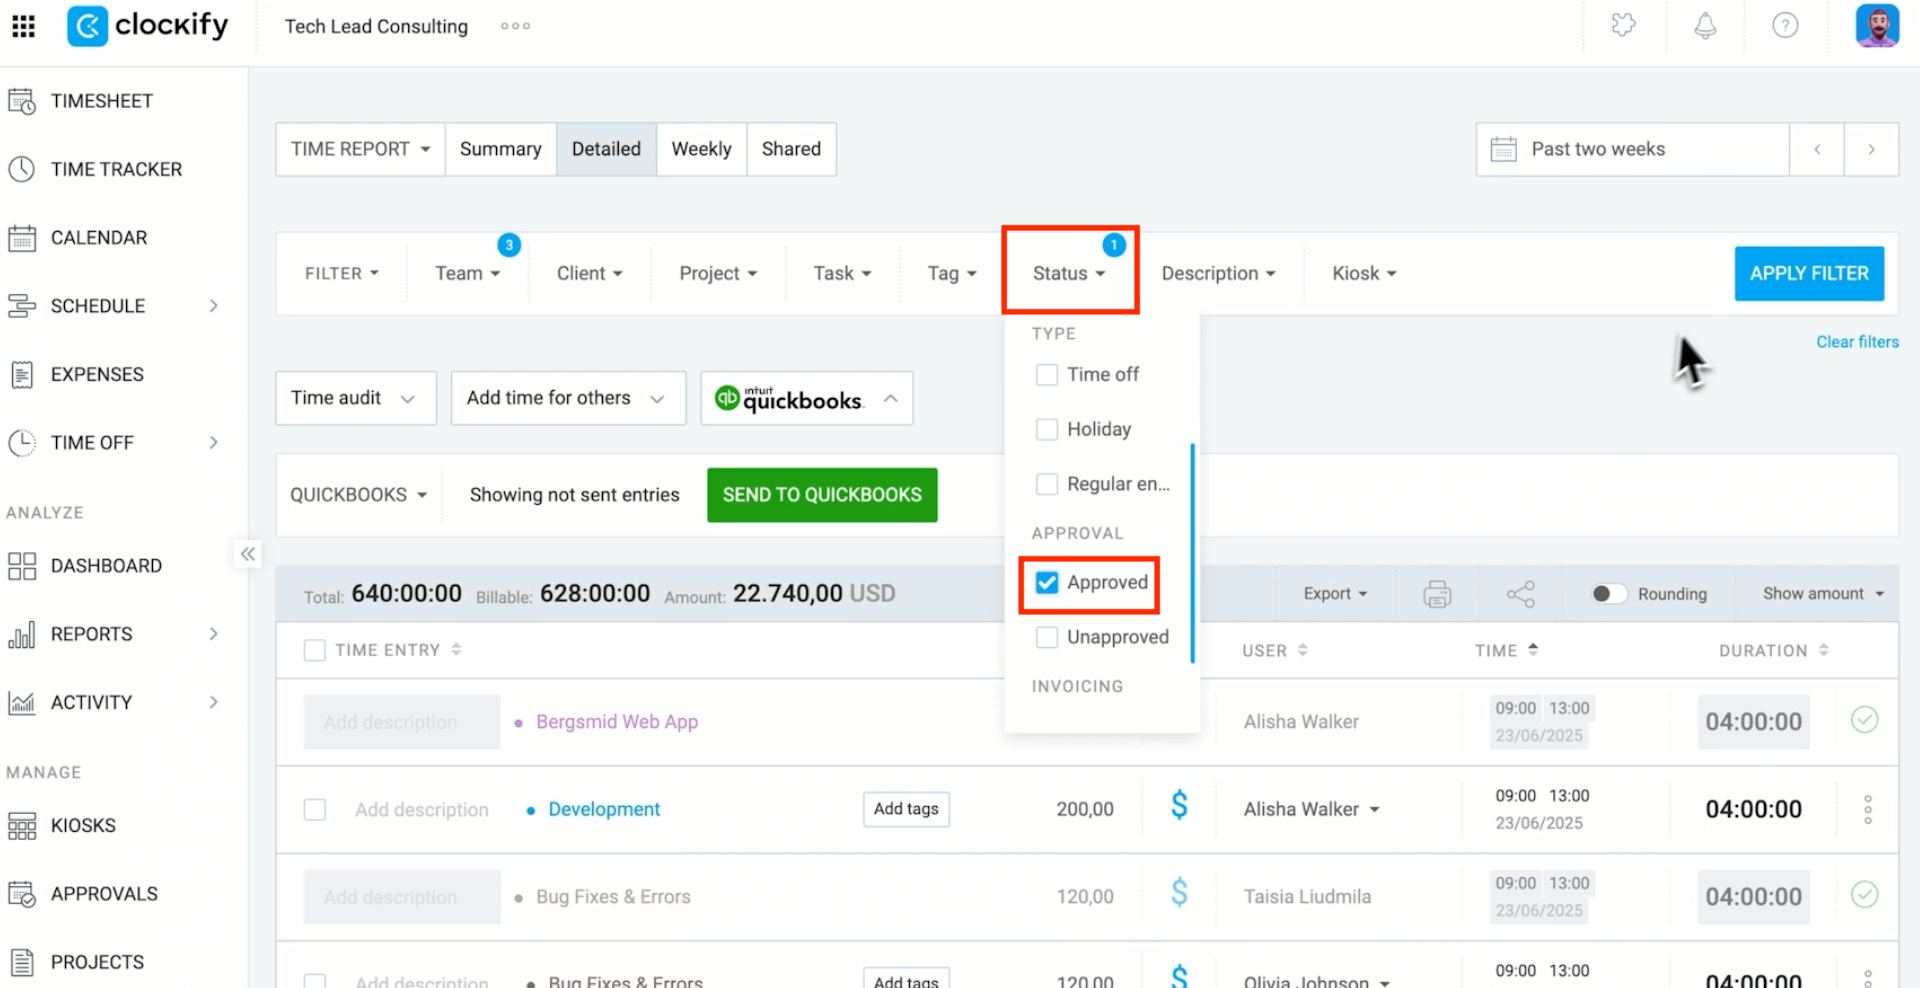
#2: Review if everything’s in order and edit if necessary. You can also filter time entries by choosing only approved time.
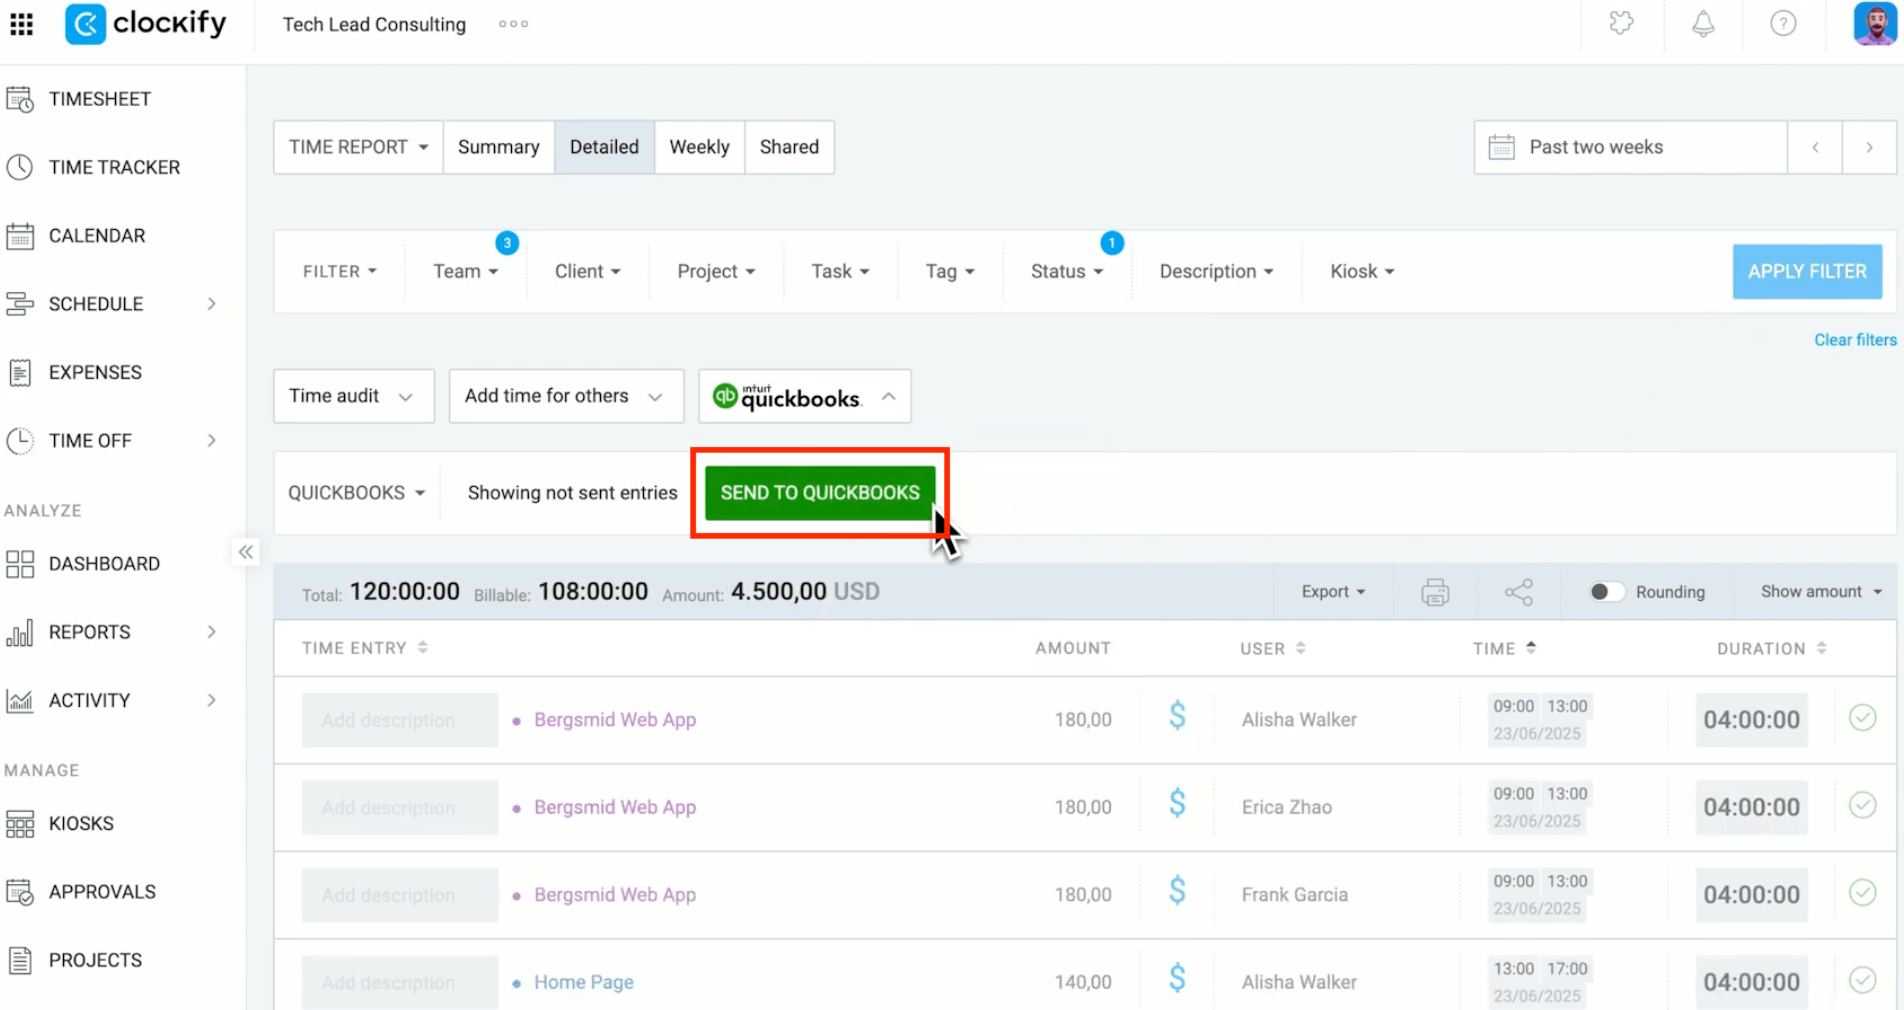
#3: When you’re ready, click the “Send to QuickBooks” button.
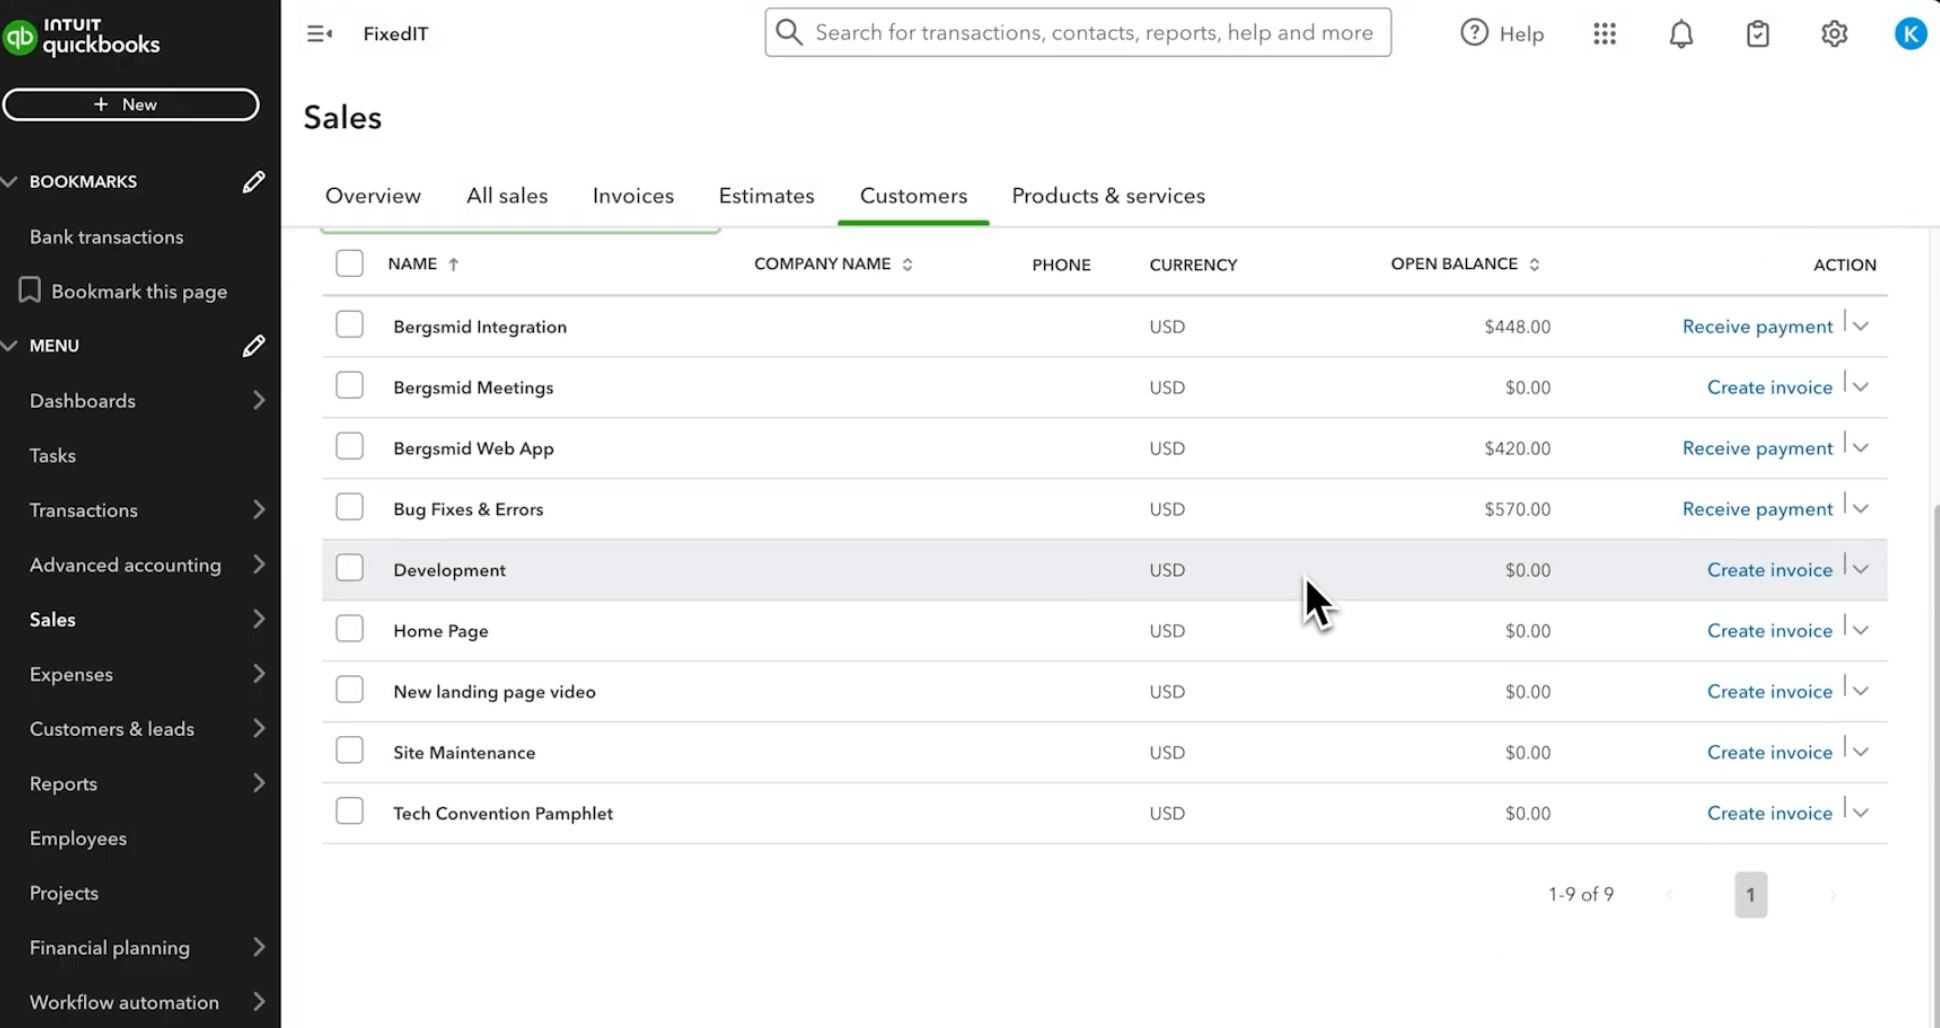
#4: Go to QuickBooks, and you’ll see that all the time data has been sent there.
3: Get more tips for better Clockify and QuickBooks sync
You can only send an entry once. If you make changes to sent entries in Clockify, those changes will not appear in QuickBooks unless you update the time in QuickBooks as well.
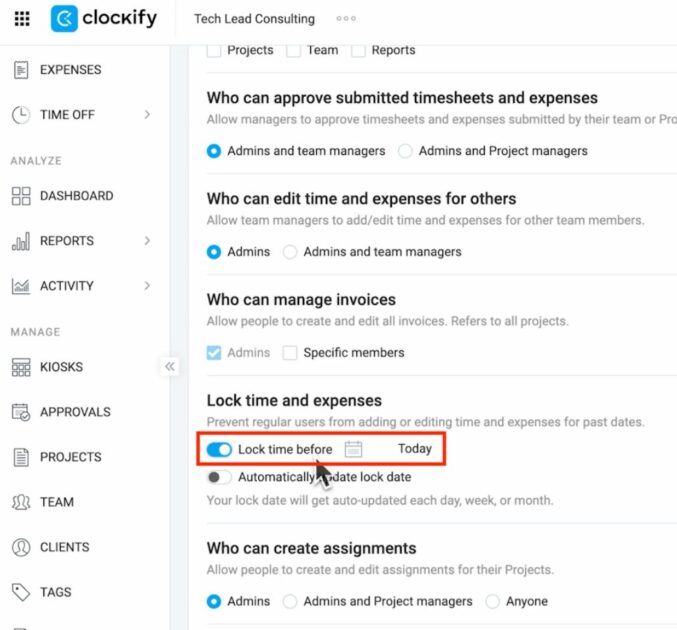
To ensure data stays consistent in Clockify and QuickBooks, simply lock and approve timesheets so no one can make subsequent changes. Find this option in the Permissions tab of your Workspace settings.
As you add new users and projects, remember to sync them before sending new time data to QuickBooks. Otherwise, you won’t be able to send time for them to QuickBooks.
Zapier platform: Zoho Invoice integration with Clockify by CAKE.com
Even though you can use direct invoice integration in Clockify with QuickBooks, you’re not limited to the QuickBooks app for automated invoicing. Thanks to Zapier, you can connect Clockify’s time tracking to invoicing with any app that supports Zapier. As an example, we’ll use Zoho Invoice.
For starters, you need to have and log into your:
- Clockify,
- Zoho Invoice, and
- Zapier accounts.
Remember: For this integration to work, the names of your customers in Zoho Invoice should match their names in Clockify!
1: Configure the setup
The first step is to tell Zapier what event should trigger the automation. In this case, it’s a new time entry in Clockify.
#1: Log in to Zapier and click the “+ Create” button.

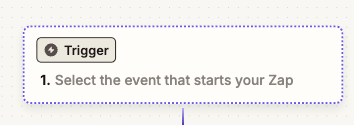
#2: Click on the Trigger box.
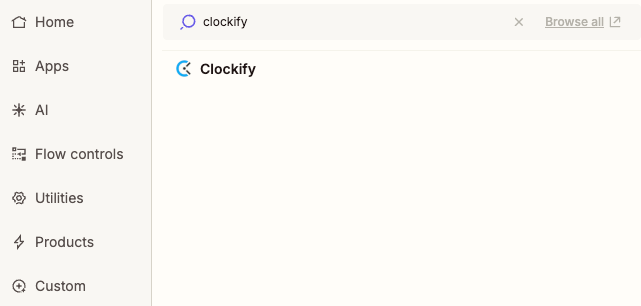
#3: Search for and select Clockify as your app.
#4: To choose the trigger event, select “New Time Entry” from the drop-down list.

#5: Connect your Clockify account by copying the Clockify API key from Clockify’s profile settings and pasting it into the Zapier prompt.
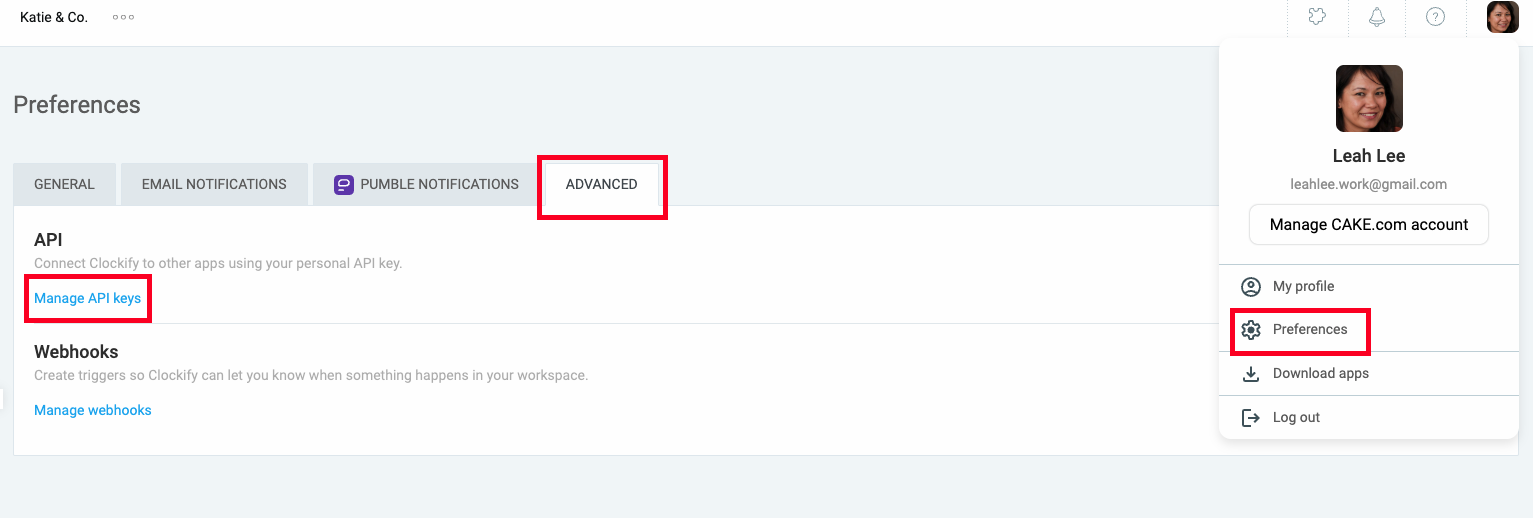
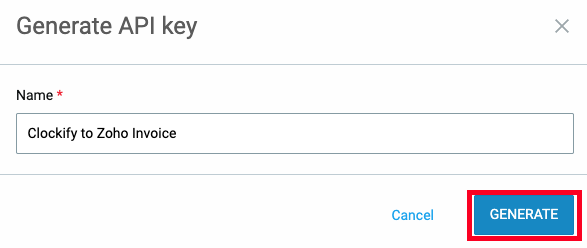
Click the “Generate new” button in the upper right corner.

Type in the name of your new API key. You can choose whatever name you want, but it’s always helpful that the name mentions the purpose of the API.
Copy the API key, then paste it into the Zapier prompt to connect the apps.
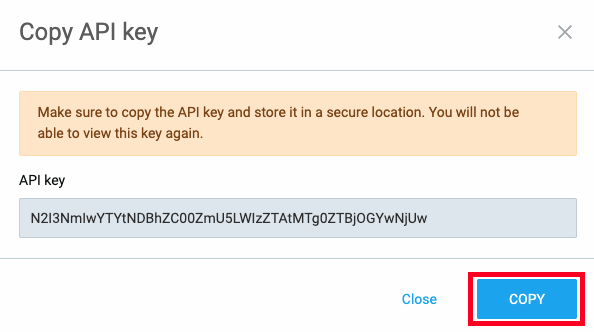
↓
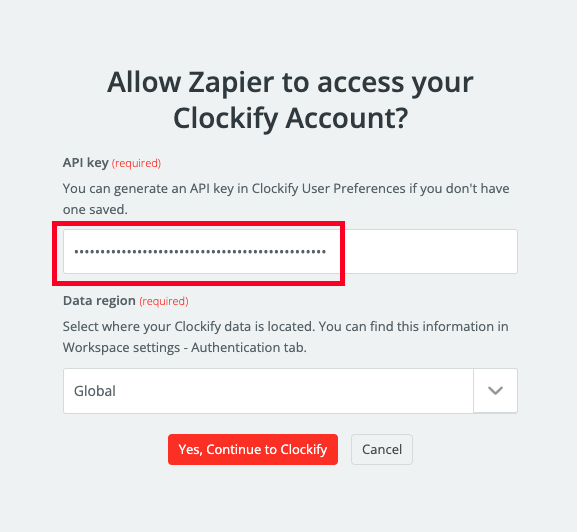
#6: Click to continue to Clockify, and your accounts will be connected.
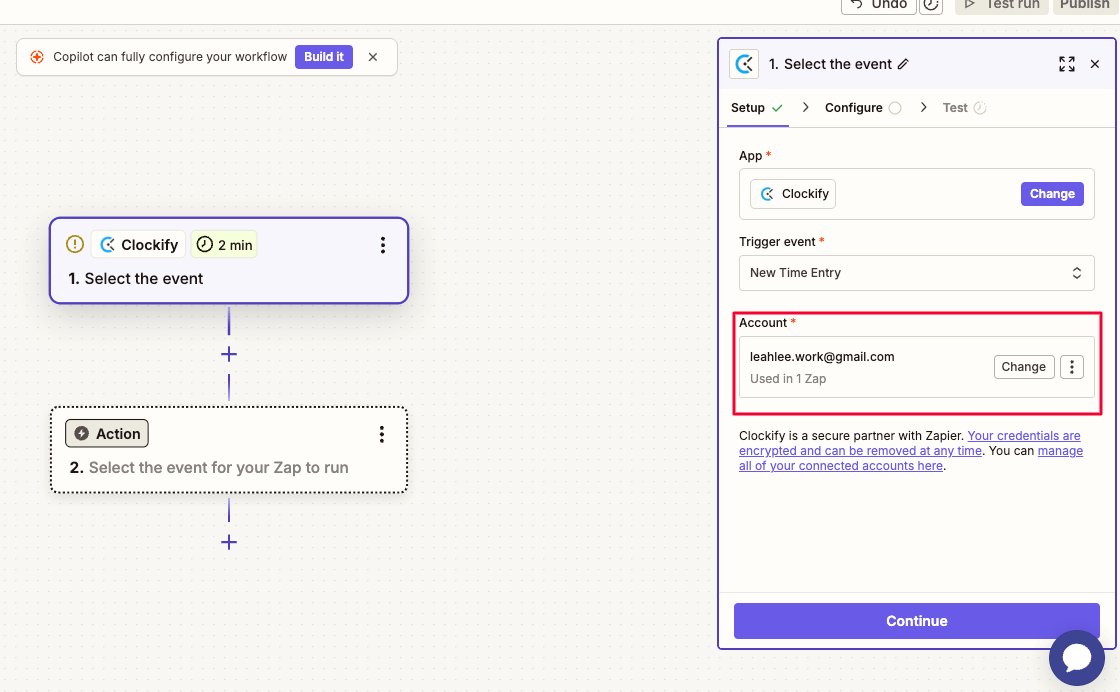
#7: Set up the trigger by selecting the Workspace you want to monitor for new time entries.

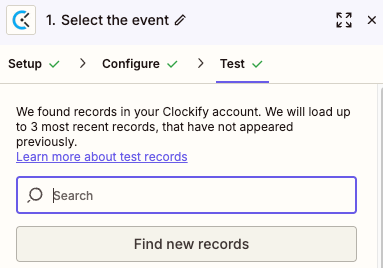
#8: To test the event and check if everything works, find new time entries in Clockify. Click on “Find new records” and choose the most recent one.
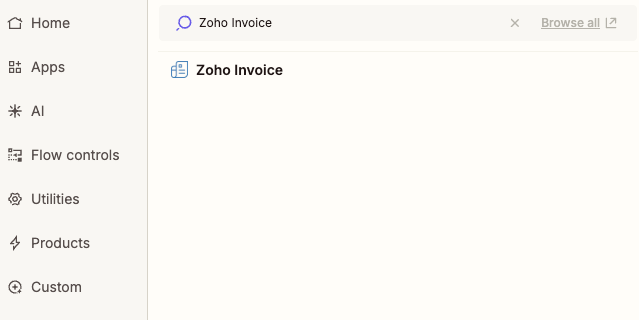
#9: Choose your Action app just like you picked Clockify as your Trigger app.
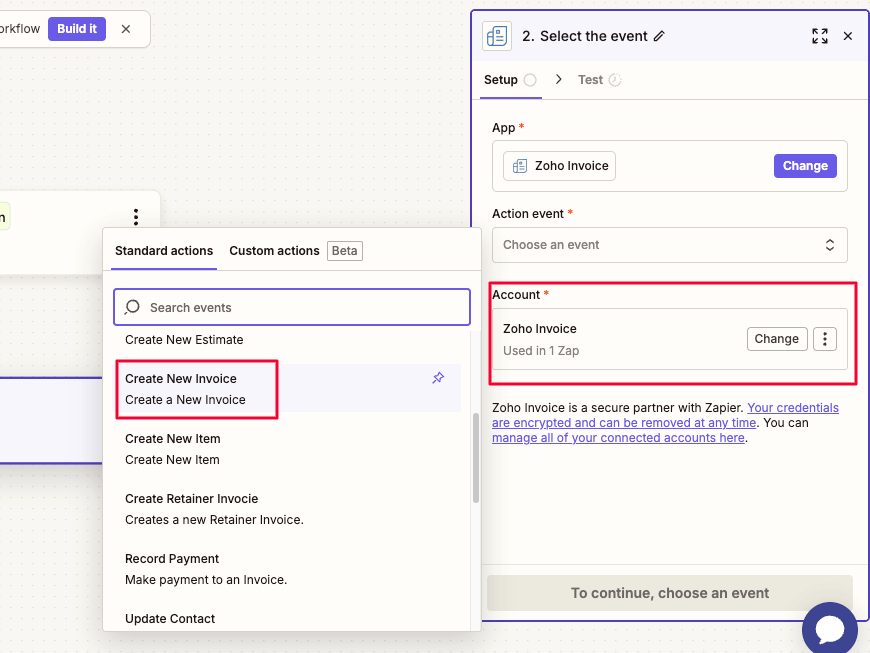
#10: Set the Action event to “Create New Invoice” and connect your Zoho Invoice account.
#11: Configure the sync by adding information about a particular client. Zapier pulls this info from both your Zoho Invoice and Clockify accounts, so you can choose from the drop-down list.
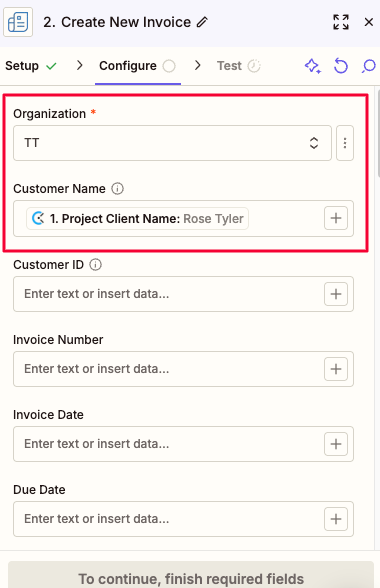
Proceed to add Line Item Name, Rate, and Quantity (in this case, the project duration).

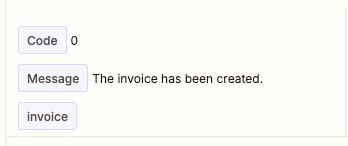
#12: Test the sync to see if everything works as it should.

#13: If the test is successful, the message will say so.
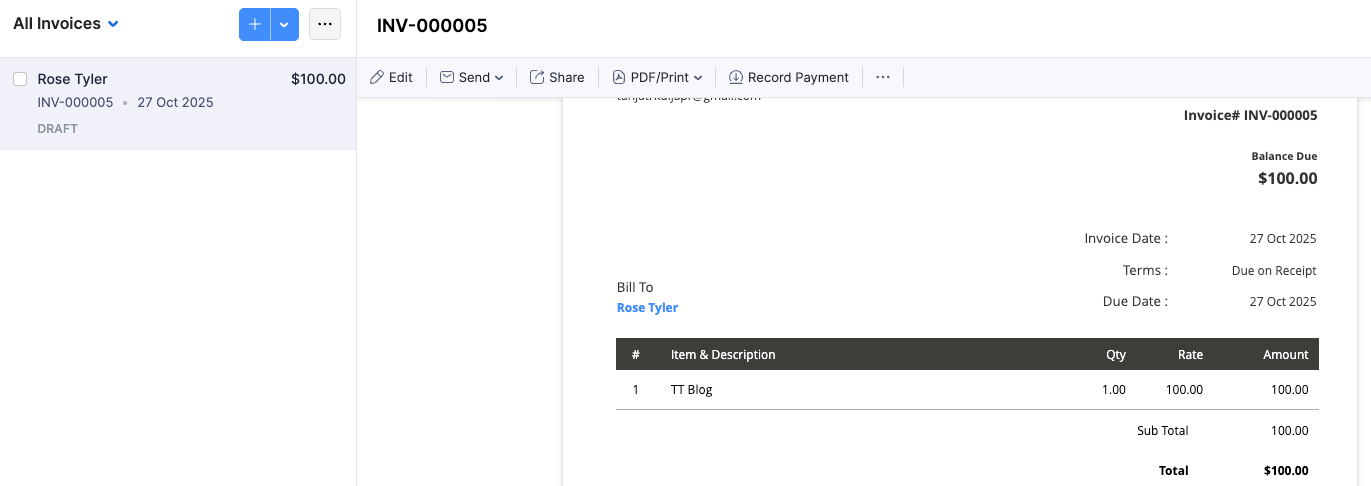
#14: Go to your Zoho Invoice account, where you can see the newly created invoice.
#15: Test run this sync properly, and if you’re content, rename your Zap and publish it.

Just as with direct integrations, make sure to resync after you make changes to your hourly rates, clients, or projects in Clockify.
2: Use troubleshooting in Zapier
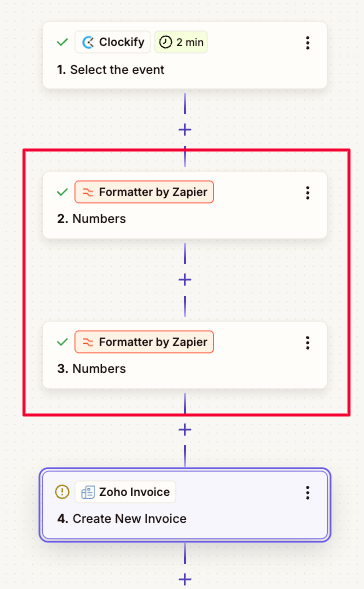
Setting up your Zapier integration might take a bit more time and effort to ensure everything works smoothly later. That said, you can use Formatter by Zapier as your fix app between the trigger and action events, like in the image below.
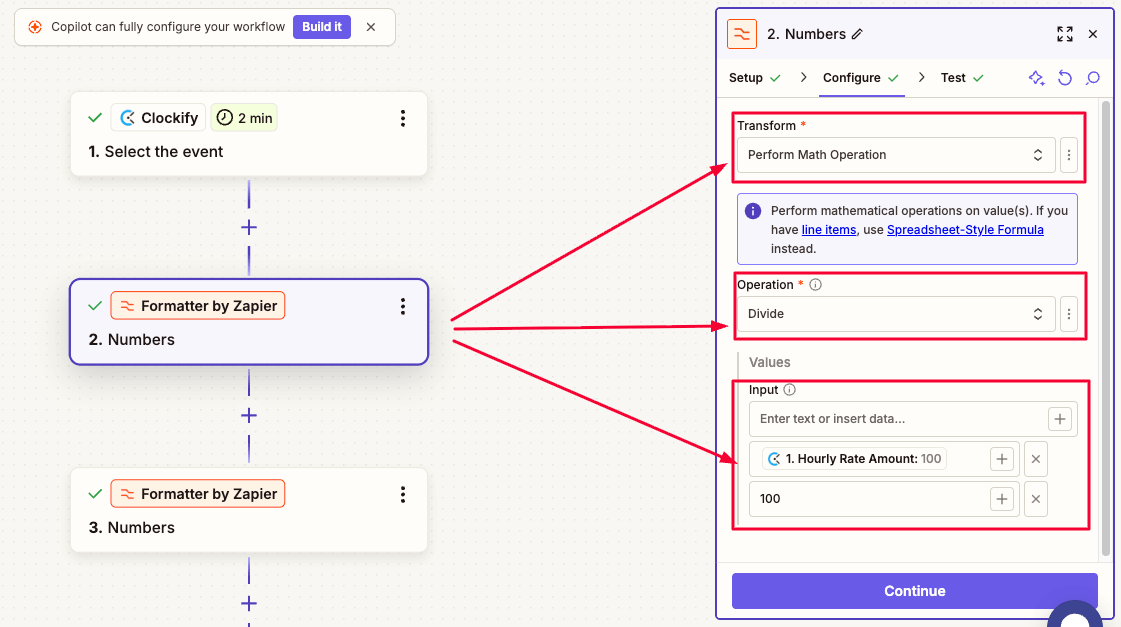
Potential issue #1: Fix the hourly rate amount if it shows 2 extra zeroes (e.g., $100 instead of $1):
- Add Formatter by clicking the + sign between Clockify and Zoho Invoice,
- Choose “Numbers” as your event,
- Set “Perform Math Operation” for Transform,
- Pick “Divide” as your operation, and
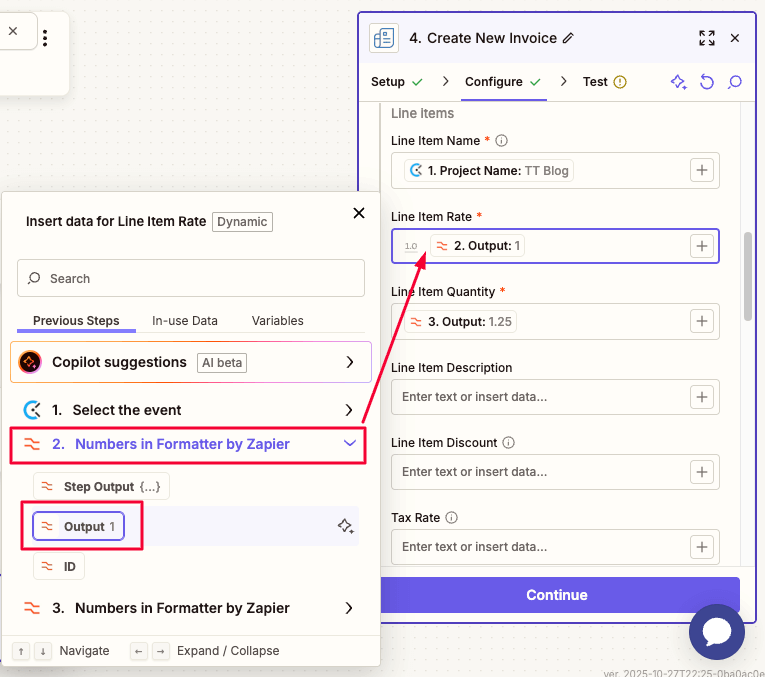
- Choose “Hourly Rate Amount” from the drop-down list, then type in 100 in the Values input boxes, as shown in the image below.
To solve the issue of extra zeroes in your hourly rate when invoicing, choose Numbers in Formatter by Zapier > Output as your Line Item Rate when configuring the Zoho Invoice action event.
Potential issue #2: Fix the quantity by turning hours, minutes, and seconds into a decimal value:
- Add Formatter by clicking the + sign between the previous Formatter and Zoho Invoice,
- Choose “Numbers” as your event,
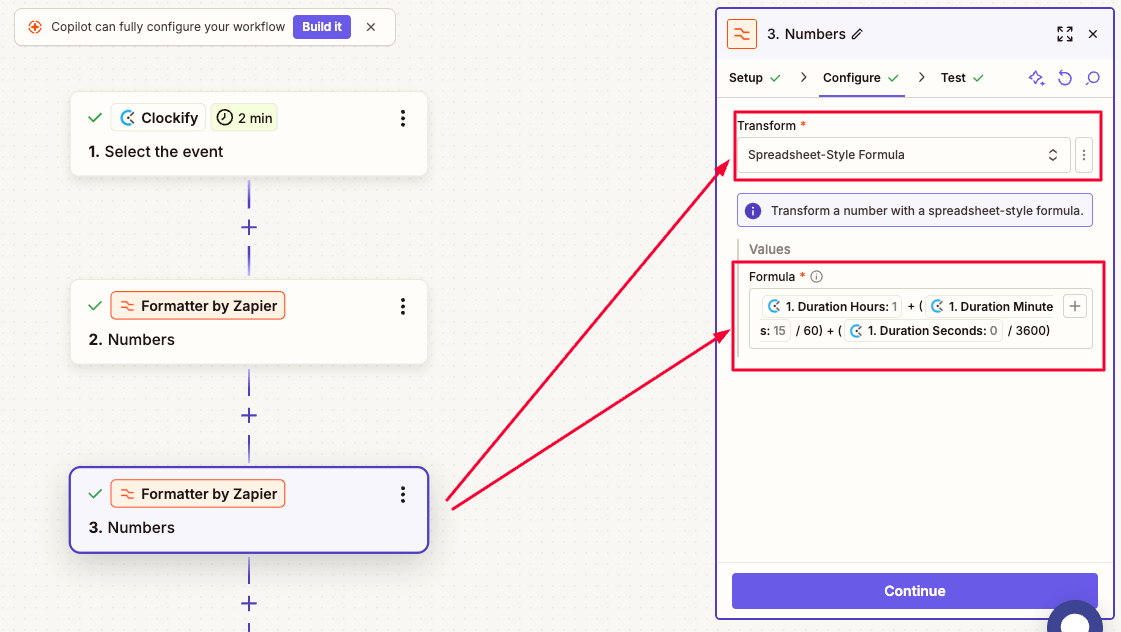
- Set “Spreadsheet-Style Formula” for Transform, and then
- Type the following formula in the Values box: Duration Hours + (Duration Minutes / 60) + (Duration Seconds / 3600), as shown in the image below.
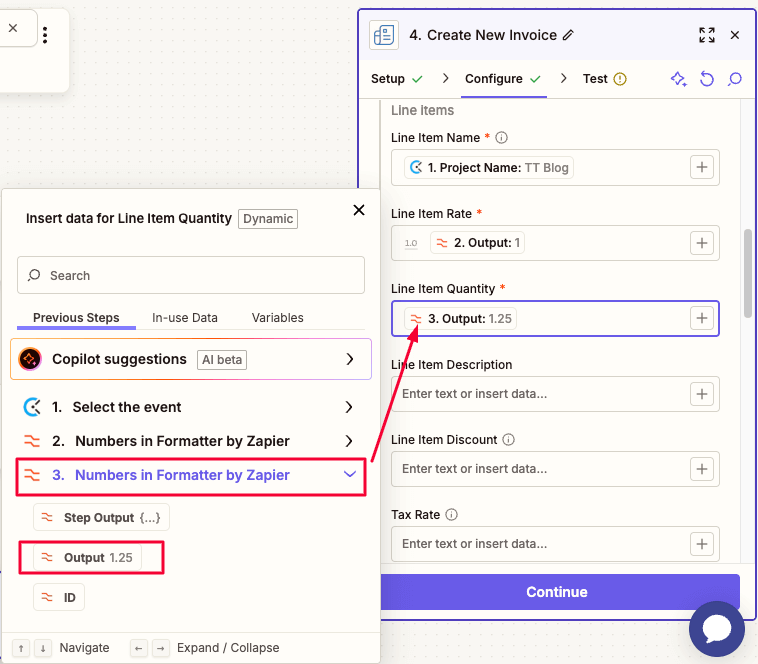
To solve the issue of quantity when invoicing, choose Numbers in Formatter by Zapier > Output as your Line Item Quantity when configuring the Zoho Invoice action event.
You can fill all this information manually, but this is how you completely automate the process.
💡 CLOCKIFY PRO TIP
If you want a quick and easy way to turn your hours, minutes, and seconds into decimal hours (and vice versa), check out our free decimal converter:
Best practices for getting results from Clockify invoicing integration
Even with the integration all set up, here are some extra tips to get the maximum value when you sync Clockify with invoice apps:
- Tag everything consistently — create a tagging system in Clockify with tags like “billable,” “client name,” or “project phase.” This lets you filter exactly which entries should sync to invoices.
- Set billable rates in Clockify — invoicing tools pull rates from Clockify, so make sure they’re accurate. If you charge different rates for different projects or clients, set those rates in Clockify before syncing.
- Schedule syncs for when you’re not working in the invoicing tool — if you plan to schedule your syncs, do so for periods when you’re not actively working in your invoice tool. You don’t want to be in the middle of editing an invoice while new Clockify time entries are syncing.
- Review the first few invoices manually — don’t go immediately from setting up your integration to sending invoices to clients. Create a few test invoices first and review them for accuracy to ensure everything works properly before automating the process.
- Keep your Clockify account clean — delete or archive old projects you’re no longer working on. This prevents them from appearing as options when creating online invoices and keeps your workspace uncluttered.
Use Clockify for better invoicing
Common mistakes to avoid when you sync Clockify with invoice apps
Time and expense tracking data from Clockify by CAKE.com will reduce the risk of billing errors in your invoices. But to make the whole system foolproof, here’s a list of things to avoid:
- Not testing before going live — to catch potential issues before they reach clients, test the integration with dummy entries first.
- Syncing everything without filtering — the goal of automation is to sync only billable entries, so make sure to filter out non-billable ones from the get-go.
- Ignoring differences in rates and hours — if synced data doesn’t match, check your setup for further tweaks.
- Not documenting your integration setup — document how your integration works and what entries sync, especially if you work with a team or an accountant.
- Forgetting to update rates when they change — every time you change your rates for a client or a project, update them in Clockify as well.
- Leaving integration on autopilot without review — even if everything runs smoothly with your time tracking to invoicing integration, do regular checkups.
Track time and expenses in Clockify
FAQs about automated invoicing and time tracking
For more information on how to go from time tracking to invoicing, check out the following section.
How is Clockify better than other third-party apps?
Clockify’s interface is intuitive, which matters when you’re setting up integrations. You don’t need to be tech-savvy to connect Clockify to your invoicing tool.
Also, Clockify’s pricing is transparent — invoice integration with Clockify via Zapier is available in the free plan, while direct integration with QuickBooks is part of the Standard plan.
According to one of our customers who has tried several project management and freelance all-in-one solutions, most of them completely flop in time tracking:
“Clockify fills that gap and makes it easy to attach timesheets or reports to invoices in other software.”
The same customer said that Clockify is lightweight and easy to use:
“You can make it as robust as you’d like by adding tags, projects, and tasks, but you can also keep it super simple with just time tracking. You can easily choose to grant access to clients, use it as a solopreneur, or expand to include a full team.”
Why do I need a time tracking app for my invoicing tool? How does using both apps benefit me?
Your invoicing tool creates bills. Your time-tracking app captures what you did and what you need to bill for.
Using both together means you’re billing for the work you performed and not guessing at it weeks later. Not to mention that when it’s time to invoice, your data is already compiled.
Real estate investor and CEO of a real estate platform, Ben Mizes, runs multiple real estate businesses, and syncing time tracking with invoicing has helped streamline operations across his ventures:

“The ability to push tracked hours directly into the invoice means there’s none of that chasing notes or randomly guessing how much time was billable after a long week of sitting in site visits. This also makes reporting and budgeting a lot neater when it comes to expense presentations to partners or planning for deals in the future.”
How can I export/import my data effortlessly? Is it automated? If so, how do I do it?
Yes, exporting and importing your data is automated — assuming you set up integration properly.
Direct integrations (like Clockify with QuickBooks) sync automatically. You log time in Clockify, and it appears in your invoicing tool without you doing anything.
Zapier integrations work similarly. Once your Zap is set up and active, new time entries trigger the automation, so you don’t have to manually export or import anything.
However, if you don’t want to use any integration, Clockify also has manual export options:
- Go to Reports,
- Select the client, date range, and projects,
- Export to PDF, CSV, or Excel, and then
- Import the data file into your invoicing software.
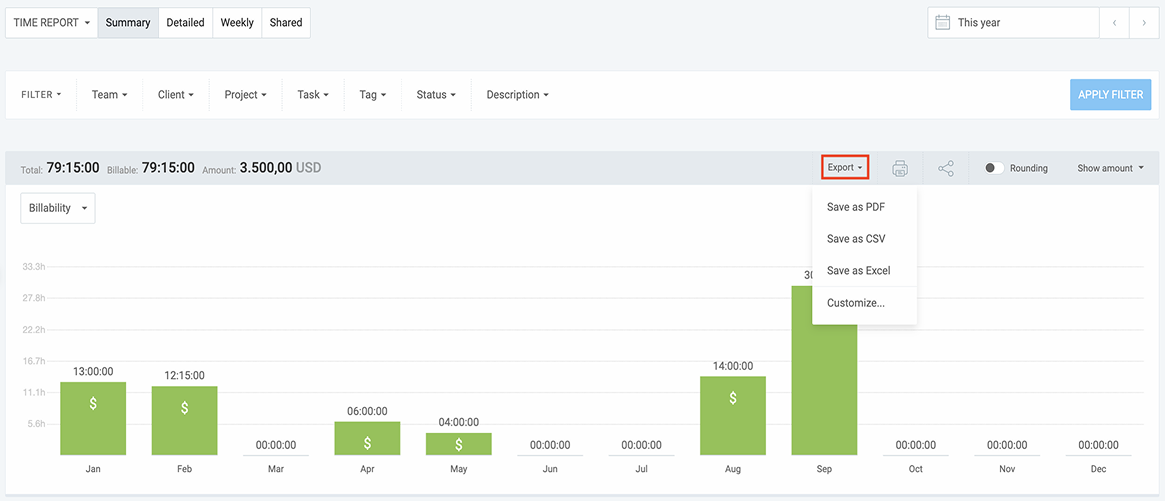
Remember: You can export data from Clockify as CSV, Excel, and PDF files, but most invoicing tools recognize only CSV and/or Excel for importing information.
💡 CLOCKIFY PRO TIP
If you want to automate your client billing and time tracking in a single, no-nonsense tool, check out this article:
The best way to invoice is with the Clockify invoicing tool
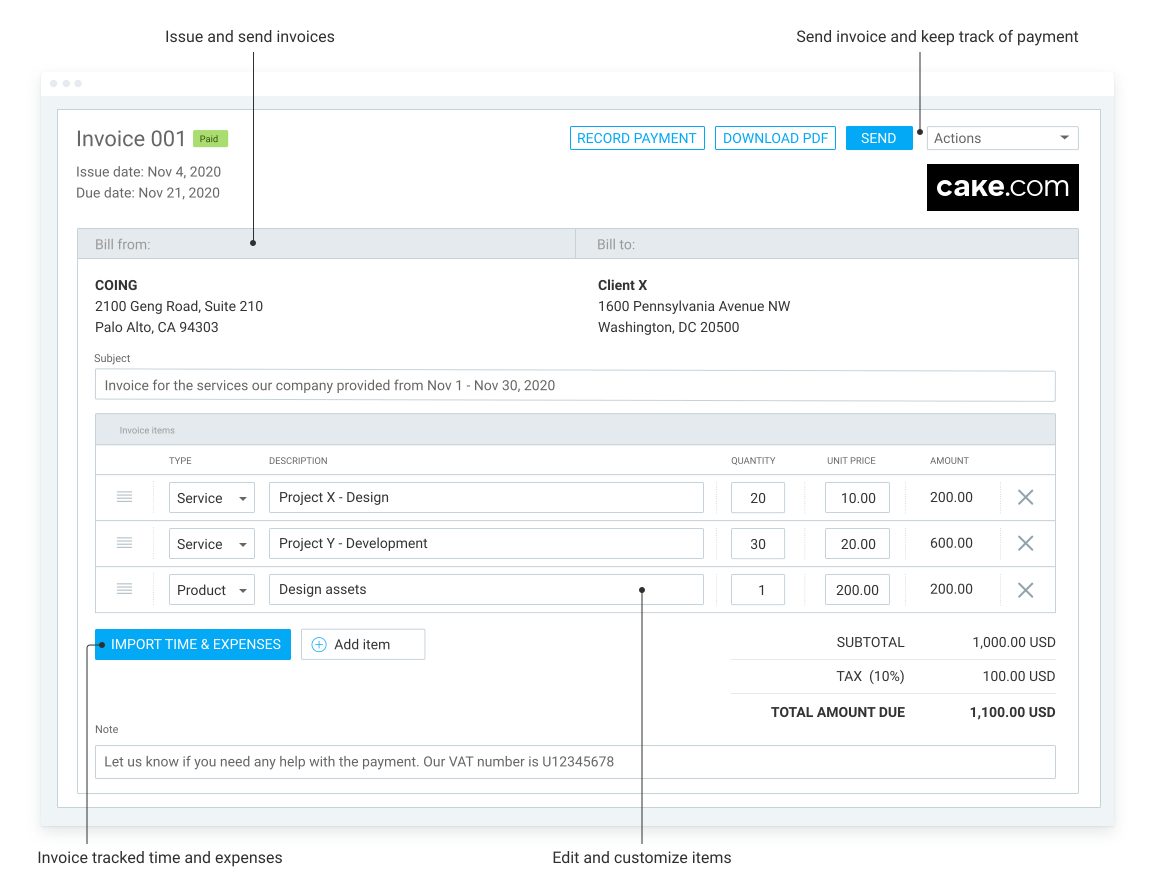
If you’re still not keen on integration or want an all-in-one solution for your time tracking and invoicing software for small businesses, Clockify lets you create and send invoices directly from the platform.
Here’s how to generate an invoice in Clockify:
- Go to the Invoices section and click “Create invoice,”
- Select the client, project, and date range for the invoice,
- Change the issue/due dates, currency, and invoice number if necessary,
- Add the payment terms and any additional information in the notes section, and
- Send the invoice directly to your client via email or download it as PDF.
You can also customize the invoice with your own branding.
The advantage here is simplicity. You’re working in one tool, with time tracking and invoicing in the same place — no need for data transfer or integration setup.
To further streamline your entire business workflow (and not just time tracking and invoicing), check out the CAKE.com Productivity Bundle.
The suite combines essential business tools into one package — at 53% cheaper:
- Clockify for time tracking and billing,
- Plaky for project management, and
- Pumble for team communication.