Creating budget reports can be a real nightmare for project managers — especially if they don’t use the right tool to track the time spent on projects.
Recording time spent on tasks and projects via paper timesheets is inefficient and prone to errors, which leads to inaccurate budget data and reporting.
Luckily, Clockify by CAKE.com allows you to track time and expenses on projects — and easily generate accurate annual and quarterly Clockify budget reports for improved cost analysis, decision-making, and overall profitability.

Step #1: Create a project and tasks in Clockify
To track your project’s progress, first, create a project in Clockify. Creating a project and tasks within that project also enables you to get precise information when generating Clockify budget reports (like how much billable time was tracked on each task).
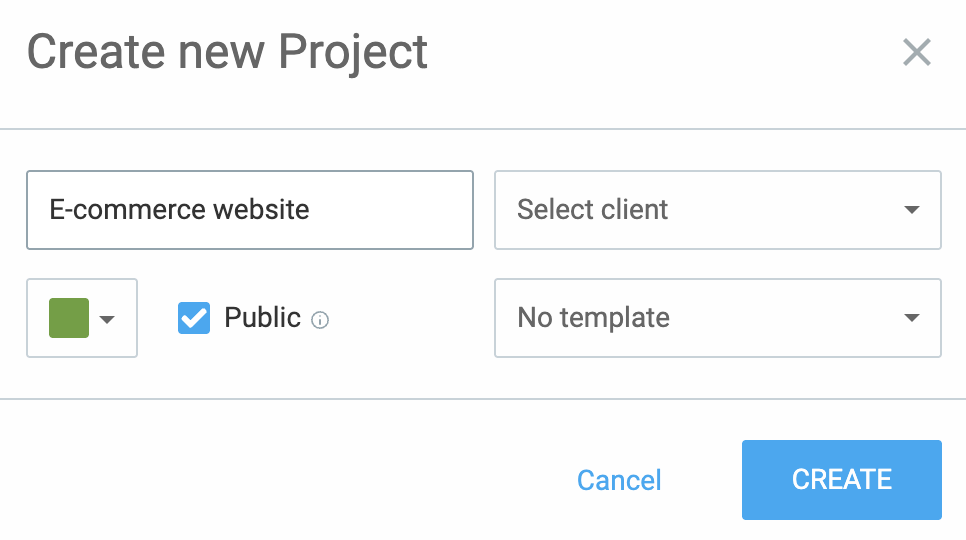
To create a project in Clockify by CAKE.com, open the Projects page from the sidebar and do the following:
- Click on the Create new project button,
- Name your project,
- Select a client,
- Choose a project color, and
- Check the Public box if you want to make your project visible to all users.
Finally, click Create to save your project.
To create a task in Clockify, open the Projects page and choose your project. Then, enter the name of your task in the right field, click the Add button, and your task will appear in your list of tasks.
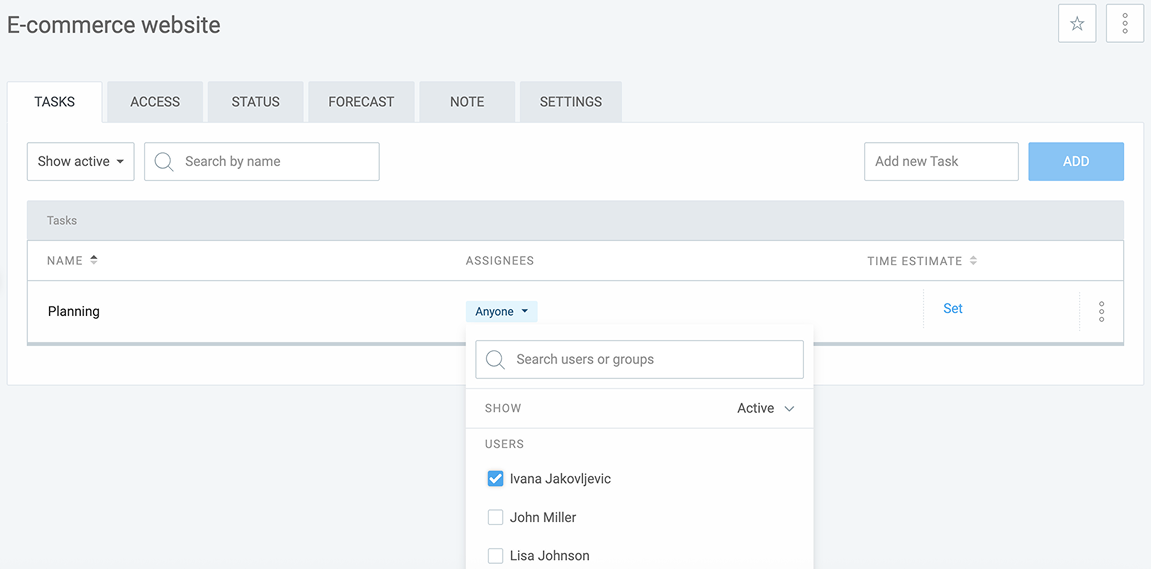
As shown in the screenshot above, once you add tasks, you can also assign them to your team members so everyone knows exactly what their responsibilities are.
💡 CLOCKIFY PRO TIP
Plan your finances and control your spending with the help of our free budgeting templates:
Step #2: Set a project budget in Clockify
If you have a fixed-fee project, you can track its progress and see how much of the budget has been spent by setting a monetary estimate in Clockify, including:
- Manual (to set an overall project budget), and
- Task-based (to define a budget for each task on the project).
To set the budget for the whole project, open the Projects page, choose your project, and click the Settings tab.
After that, do the following:
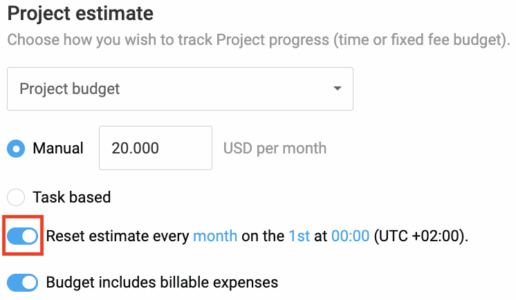
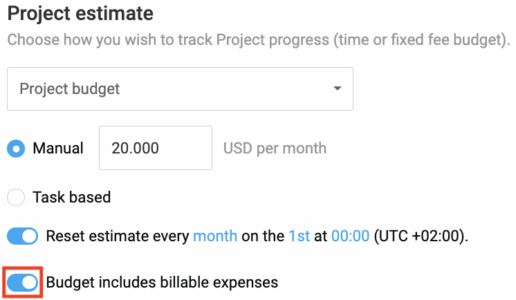
- Scroll down to the Project estimate section,
- Choose Project budget from the dropdown menu,
- Select the Manual option, and
- Enter your estimated project budget in the right field.
To include billable expenses in your budget, enable that option.
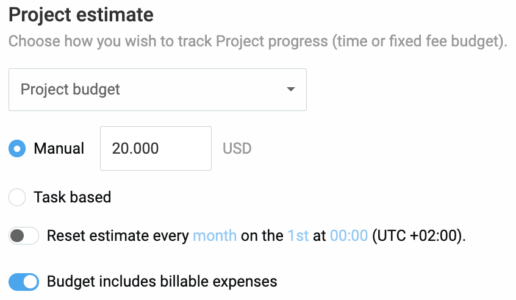
You can also enable the option to reset the estimate weekly, monthly, or yearly, if you’re working on retainer projects.
Before your team starts working on a project, set the hourly rates for your team members in Clockify. This way, you’ll be able to track billable time spent on the project, which is crucial for accurate budgeting and billing.
Step #3: Define hourly rates in Clockify
To set hourly rates for your team members who work on a specific project, open the Projects page in Clockify by CAKE.com and select that project. Then, choose the Access tab and click on the Change option, as shown below:
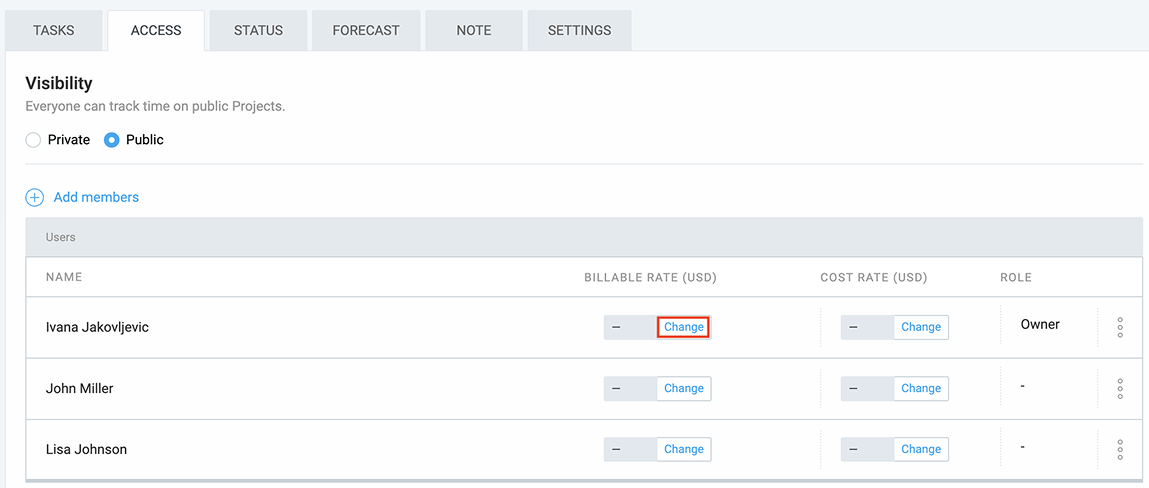
After that, enter your team member’s hourly rate in the right field and click Save.
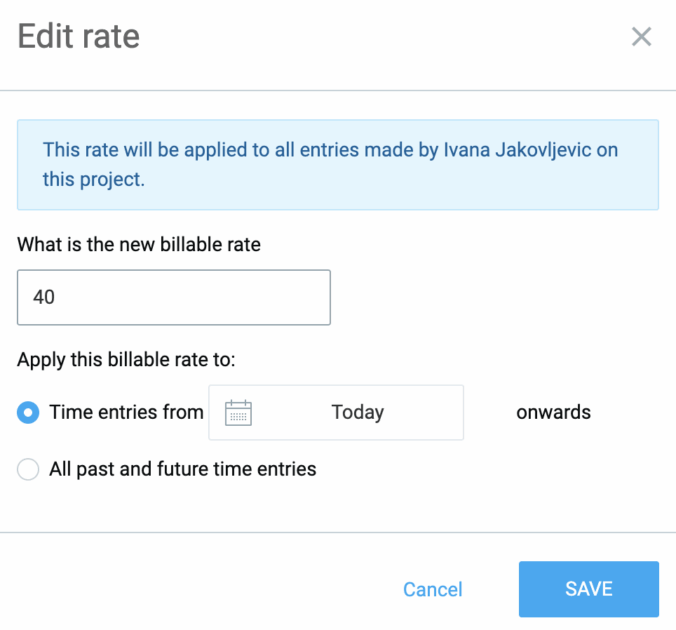
This rate will apply to all time entries made by that team member while working on the project.
In the Access tab, you can add team members to your project or remove them, allowing you to manage your team more efficiently.
After you define hourly rates for your team members, they can start tracking billable time in Clockify.
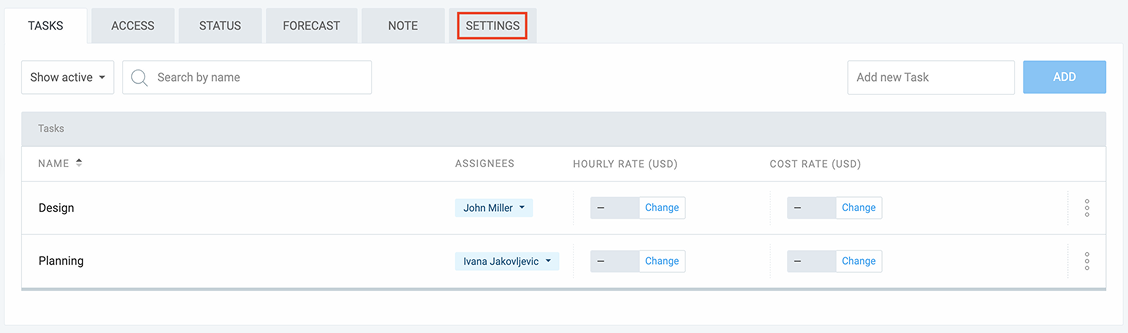
Step #4: Set cost rates in Clockify
Besides setting billable rates, you can also define cost rates for your team members in Clockify. This way, you’ll be able to see what you charge your client vs. what you pay your team — and track project profitability.
To set a cost rate for a team member working on a specific project, open the Projects page in Clockify, select that project, and choose the Access tab. After that, click the Change option, as shown below:
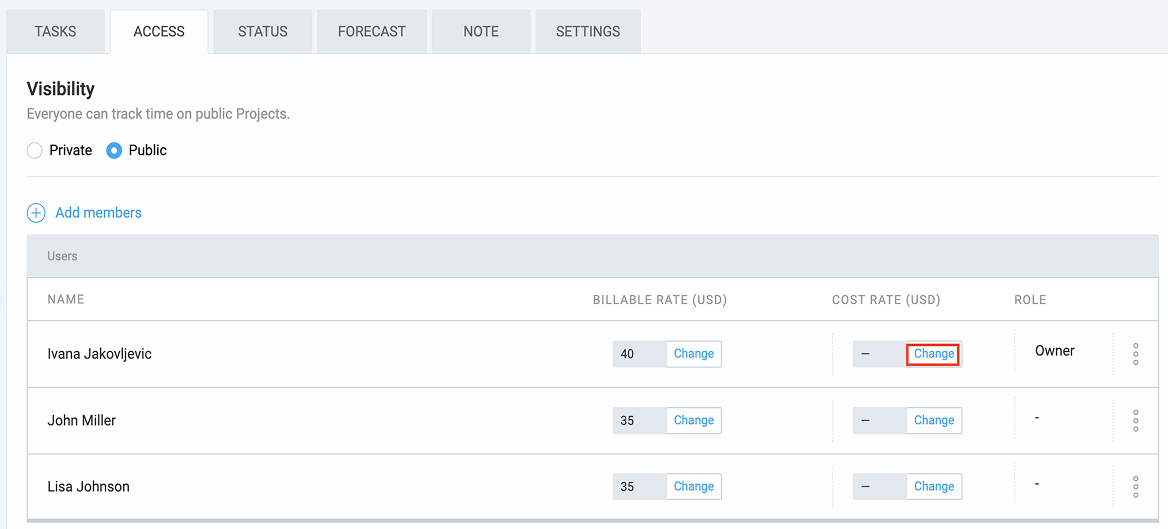
Finally, enter your team member’s cost rate in the right field and click Save.
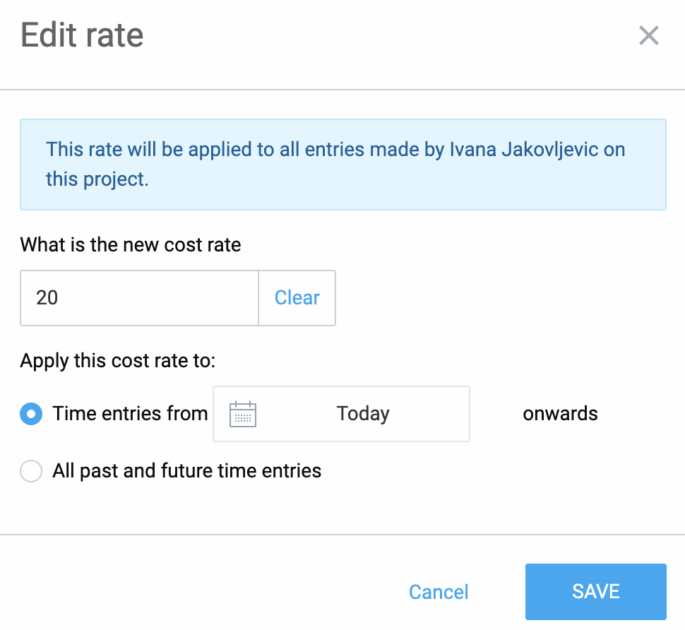
Once you set the cost rate for a team member, it will apply to all time entries made by that team member.
Later, when you run a report in Clockify by CAKE.com, you’ll be able to see:
- Billable amount — what you charge your client,
- Cost amount — what you pay your team, and
- Profit — the difference between billable and cost amounts.
By comparing total earnings against costs, project managers and team leads can identify which projects generate profit and which incur losses. This way, they can make informed decisions about future project selection and ultimately improve the company’s bottom line.
Step #5: Track billable time with Clockify
Your employees can use a simple timer to track their work hours in real time.
Compared to using spreadsheets or other impractical timekeeping methods, recording time with Clockify’s timer makes time tracking much easier. It also allows you, as a project manager, to get accurate data for budget reviews.
To track billable hours with Clockify’s timer, employees need to:
- Open the Time tracker page in Clockify,
- Enter what they’re working on,
- Select a project, and
- Click on the dollar sign to mark time entry as billable.

After that, they simply click the Start button to start tracking billable time. Once they finish working on a task, they click Stop to stop the timer.
Track billable time efficiently
Employees can also track non-billable hours with Clockify. Tracking both billable and non-billable hours and analyzing the data allows operations managers to:
- Identify areas where too much non-billable time is spent (e.g., excessive meetings or admin work),
- Allocate resources more effectively,
- Refine pricing strategies, and
- Improve business profitability.
To track non-billable time in Clockify by CAKE.com, employees need to open the Time tracker page, enter what they’re tracking time for (e.g., a meeting), and select a project. To mark a time entry as non-billable, they click the blue dollar sign, which will then turn grey.

Finally, they start/stop the timer to begin/finish tracking non-billable hours. As you can see, the process is simple, even if you’re not tech-savvy.
💡 CLOCKIFY PRO TIP
For more information on how to compute billable hours easily and accurately, check out the following resource:
Step #6: Track expenses with Clockify
Apart from the time spent working on a project, Clockify allows you to track expenses related as well. By keeping track of expenses, including material costs, travel expenses, and others, you can improve cost control and get accurate expense data for enhanced budget reporting.
To create an expense with Clockify, open the Expenses page from the sidebar and click the Add expense button. Then, do the following:
- Select a team member,
- Choose a project,
- Select the expense category (e.g., meals, transportation, or lodging),
- Enter the amount, and
- Mark your expense as billable (if you want to include it in the budget).
Finally, click Create to save the expense.
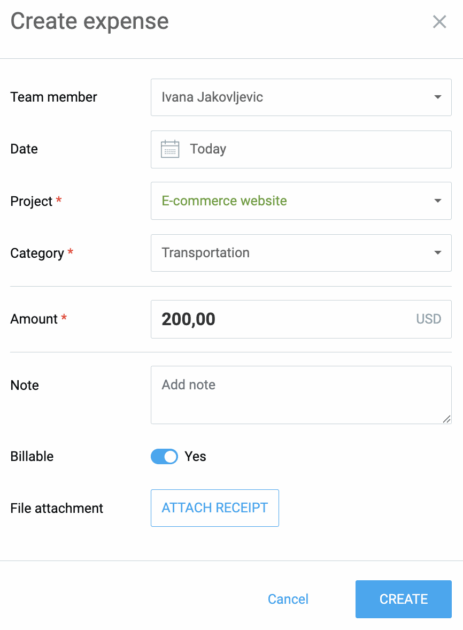
You can also attach a receipt to your expense. This allows you to confirm the expense details with clients, making the data more trustworthy.
Once recorded, expenses are included in Clockify’s expense report, along with all relevant details (date, project, category, billable amount, etc.).

Recording and analyzing project expenditures is essential for project managers, as it allows you to:
- Identify spending patterns,
- Address potential budget leaks, and
- Prevent project failure.

Step #7: Monitor project progress in Clockify
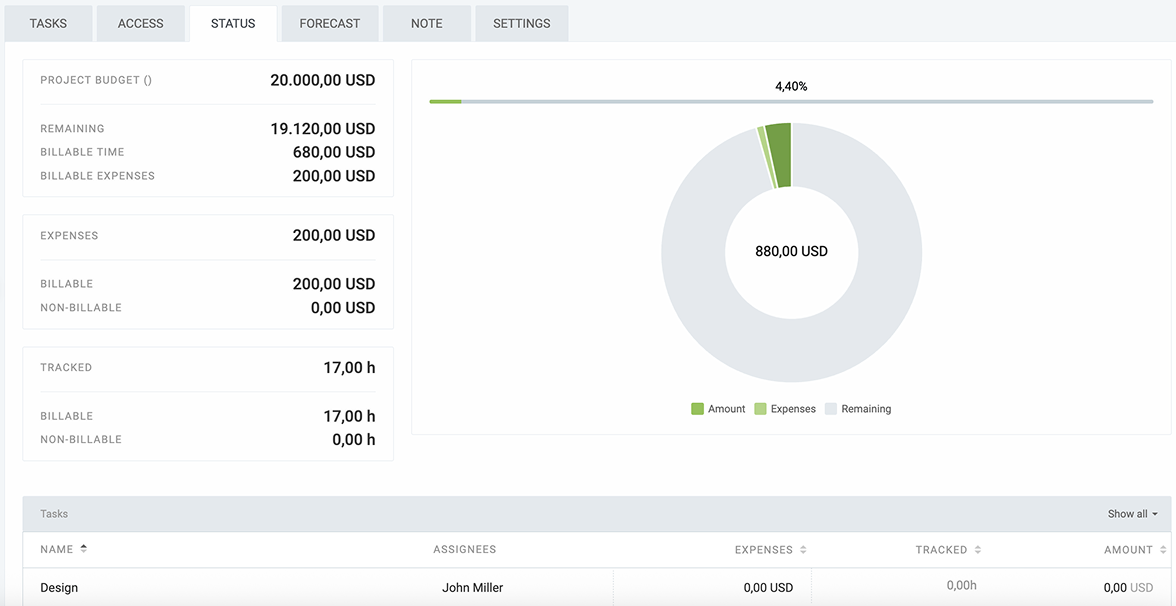
To check your project progress in Clockify by CAKE.com, open the Projects page, choose your project, and click the Status tab. There, you’ll be able to see:
- Total tracked time (billable and non-billable),
- Total expenses (billable and non-billable),
- Amount of the budget that has been spent, and
- Remaining budget (based on the set estimate).
Tracking your project progress in real time allows you to:
- Monitor budget consumption proactively to avoid unexpected expenses, and
- Adjust the project scope to avoid scope creep and ensure the project stays aligned with its original goals.
This helps you avoid overspending and make sure the project stays on track.
Moreover, you can set up alerts in Clockify to get notified when a project reaches a certain percentage of the estimate (e.g., 50%).

This way, you’ll know if your team is about to exceed a project’s budget before it happens, allowing you to prevent cost overruns.
Step #8: Generate Clockify budget reports
Once you have the time data, you can generate detailed Clockify reports. This allows for easier cost analysis.
What’s more, Clockify generates reports for any period. So, whether you conduct a quarterly or annual budget review, Clockify allows you to analyze your spending according to your needs.
First, let’s explain how to create annual budget reports with Clockify.
Annual budget reports
To analyze yearly project data, you can use a summary report in Clockify by CAKE.com.
Simply click on Reports from the sidebar and select Summary. Then, click the calendar icon in the upper-right corner and select This year.
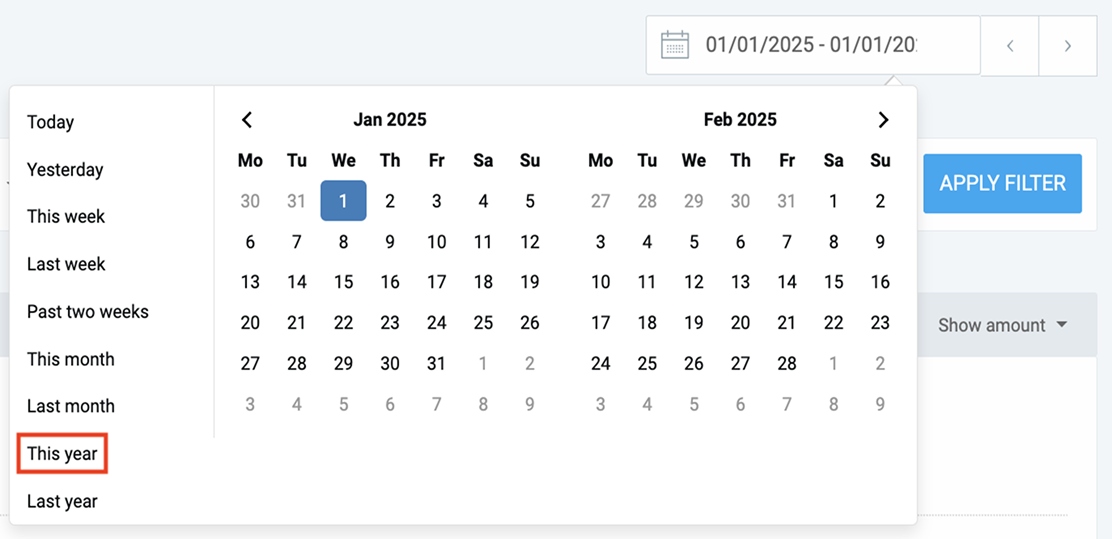
Clockify will instantly generate a report based on the time logged on all your projects this year. The report also shows the amounts earned based on tracked billable time.
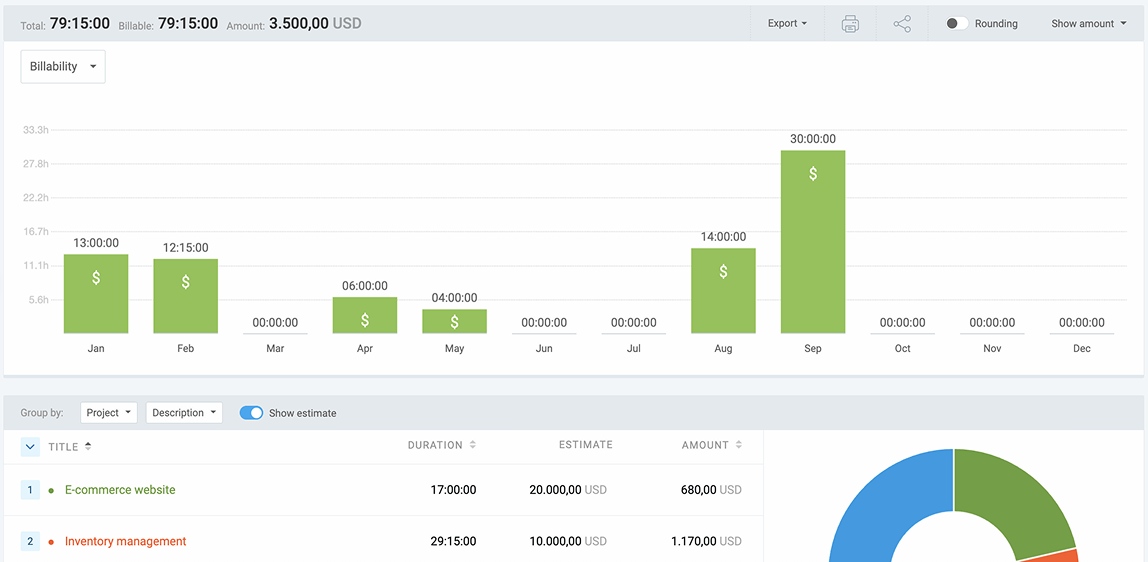
This app also offers extensive filtering options to help you segment data for a more detailed analysis. You can filter the report by:
- Client,
- Project,
- Task,
- Status,
- Description, etc.
For example, you can use filters to see total billable hours tracked on a certain project. Moreover, you can break down the data even further by groups (e.g., project, task, and user).
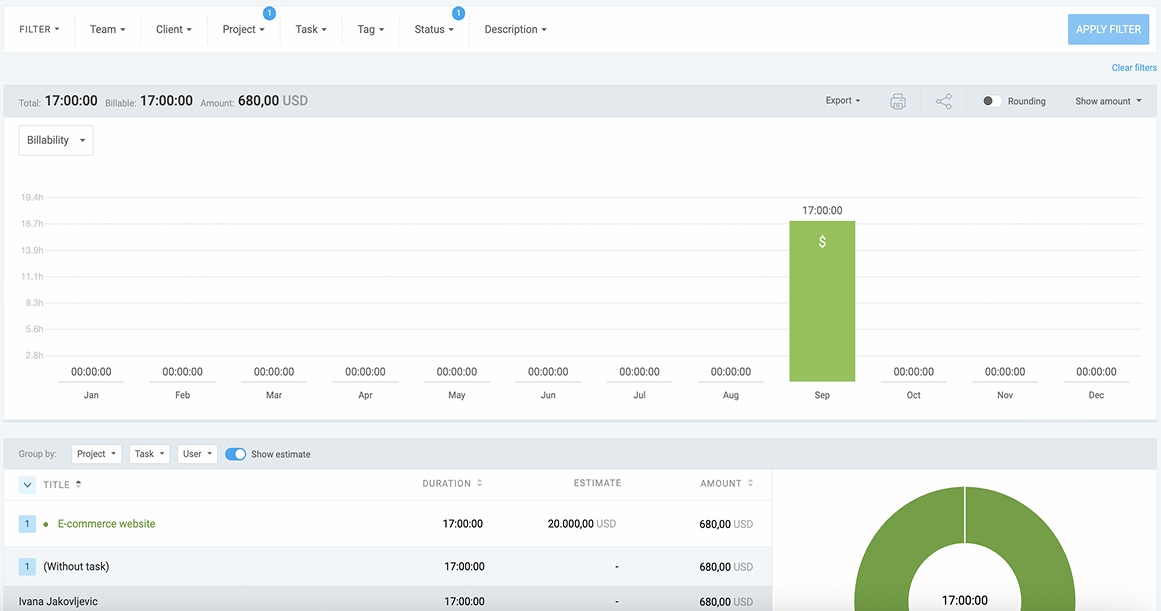
That way, you’ll have a clear picture of where your team’s time is going, as well as which tasks are consuming the most resources.
Also, by comparing the estimated and the actual budget spent on projects, you’ll know which types of projects consistently exceed budget.
This helps you identify patterns (like specific tasks that tend to take more time than planned) so you can renegotiate pricing or improve efficiency to increase profitability.
💡 CLOCKIFY PRO TIP
If you want to learn more about the planning fallacy phenomenon — our tendency to underestimate the time it takes us to complete a task or project — read this:
Quarterly budget reports
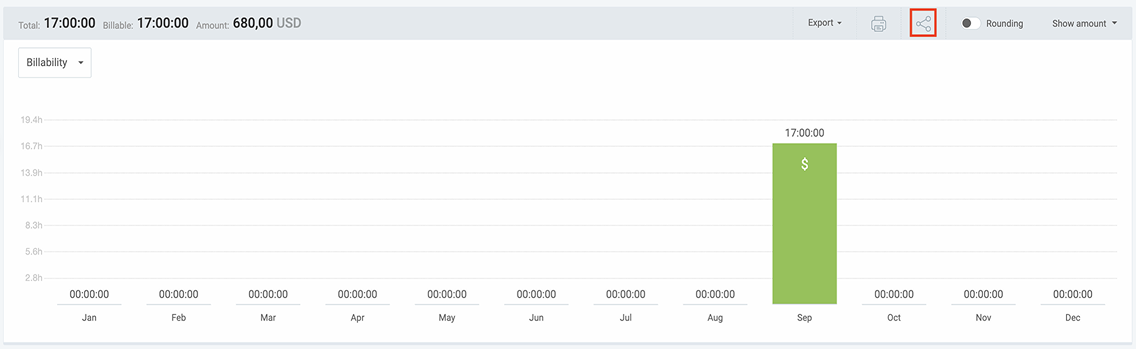
To analyze quarterly project data, open the summary report and click the calendar icon to enter start and end dates for a specific 3-month period (e.g., August 1, 2025 – October 31, 2025).
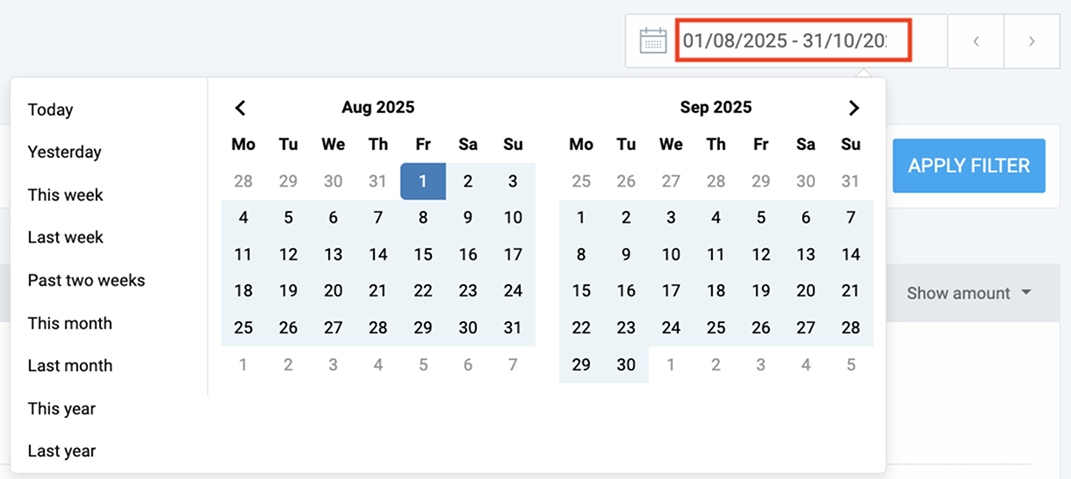
This time, Clockify will generate a report based on the time tracked on all your projects for this quarter — see below.
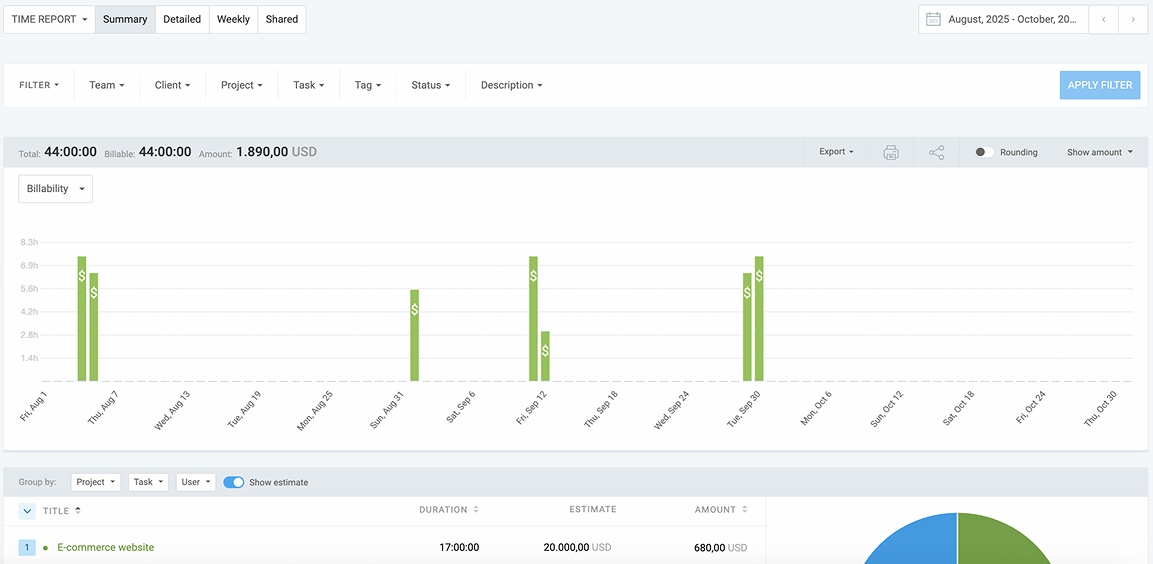
Same as with annual budget reports, you can filter and group project data to better understand:
- Where your team’s time goes, and
- Which tasks take longer than expected (and incur more costs).
With these insights, department heads and project managers can improve scoping and make better, more realistic estimates for future projects.
Additionally, you can export Clockify budget reports in a PDF, CSV, or Excel format and send them to a client to justify a budget increase or scope change.
All in all, using Clockify reports allows you to:
- Identify and eliminate bottlenecks,
- Prevent undercharging, and
- Justify decisions by offering transparent reports to your clients.
This helps you not only improve profitability but also strengthen client trust and, thus, relationships.
💡 CLOCKIFY PRO TIP
Use these 4 simple tips to build long-lasting client relationships and boost your profits:
FAQs about Clockify budget tracking and reporting
Here are the answers to some of the frequently asked questions about Clockify budget reporting and tracking.
How to download reports from Clockify?
To download Clockify reports, open the report you want to export, click on the Export option, and choose whether you want to save your report as:
- PDF,
- CSV, or
- Excel.
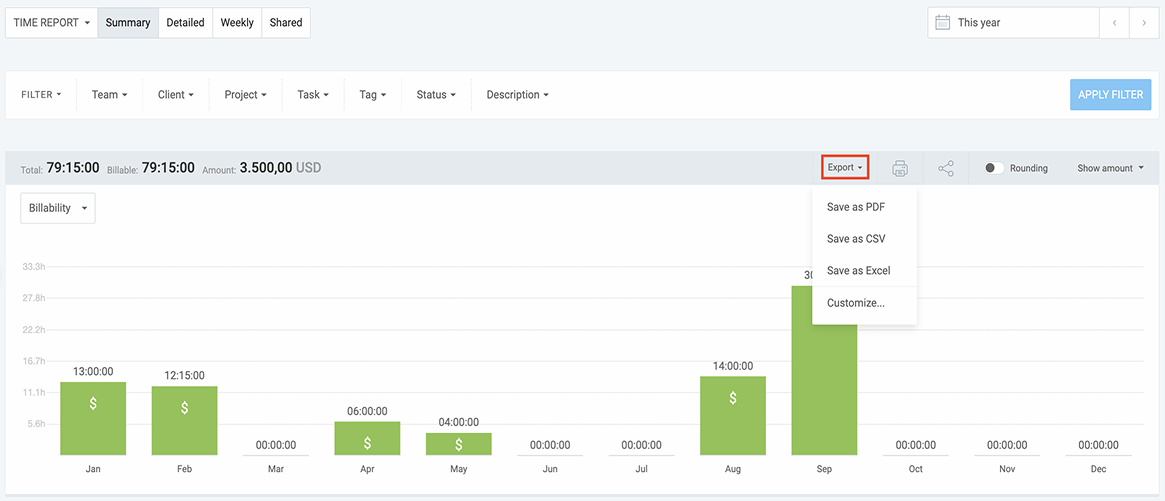
Once you select your preferred format, the report will automatically download to your computer.
You can also tailor the reports in Clockify to your needs. Click Customize, name your report, select what you want your report to show (e.g., duration in hours or decimal), and more.
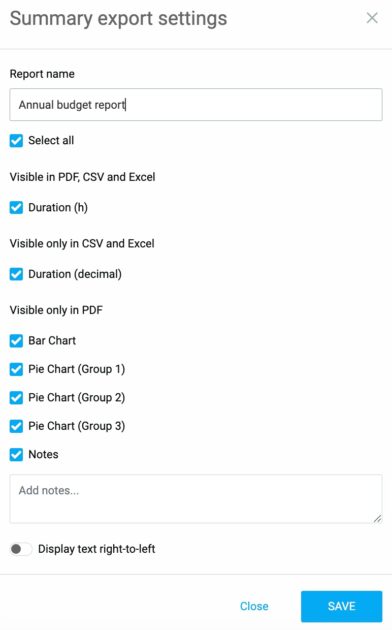
With Clockify by CAKE.com, customizing and exporting reports is easy, whether you want to analyze the data further or send it to your clients to ensure transparency.
Can I set recurring budgets for quarterly or annual reporting?
Yes, you can set recurring budgets for reporting with Clockify.
When setting a budget estimate in Clockify, you can select a weekly, monthly, or yearly reset period and the specific date and time for the reset to occur.
The app automatically resets the project budget’s progress bar to 0% at your chosen interval based on the project’s start date.

How can I see my billable vs. non-billable hours in a report?
To check your billable vs. non-billable hours in Clockify’s summary report, open the report and select the Billability option.
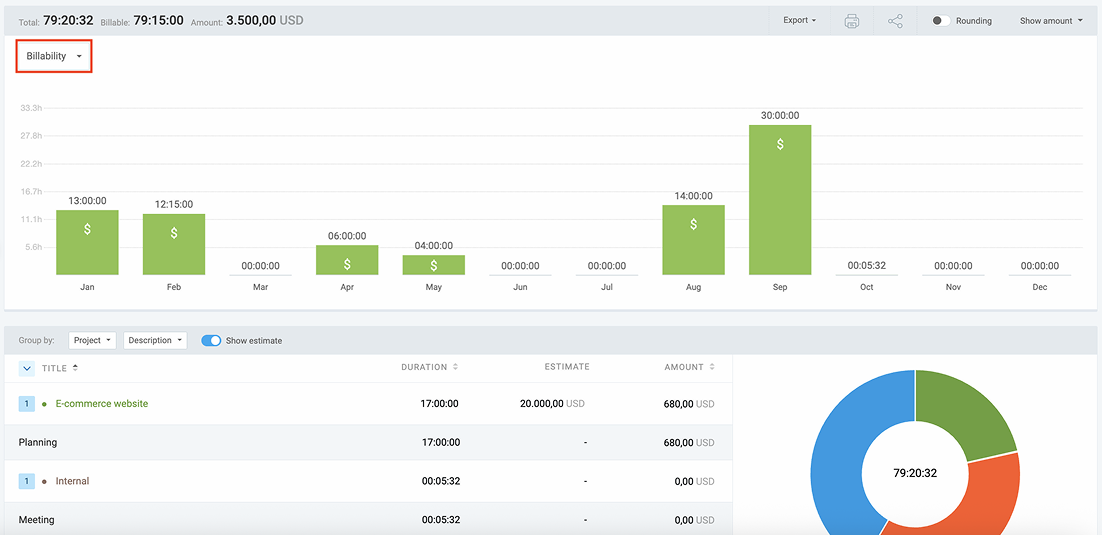
After doing so, you’ll see the total billable and non-billable time tracked by your team members. With this information, you can balance revenue-generating work with internal tasks, which helps sustain your business’s growth.
How do I include expenses in my project budgets and reports?
To include expenses in your project budget, turn on the Budget includes billable expenses switch when setting your project budget in Clockify.
Moreover, you can see all your project expenses by generating the expense report in Clockify.
You can create the report for any period and analyze your fixed costs, materials, and other project-related costs to minimize financial risks and ensure your project’s success.
How do I export my reports for further analysis in Excel or Google Sheets?
To learn how to export your Clockify report as an Excel file, refer to the How to download reports from Clockify sub-section of this FAQs section.
If you want to export your report for further analysis in Google Sheets, you can download the report as a CSV file (also explained in the How to download reports from Clockify sub-section) and then import it into Google Sheets.
Can I share a budget report with a client or team member?
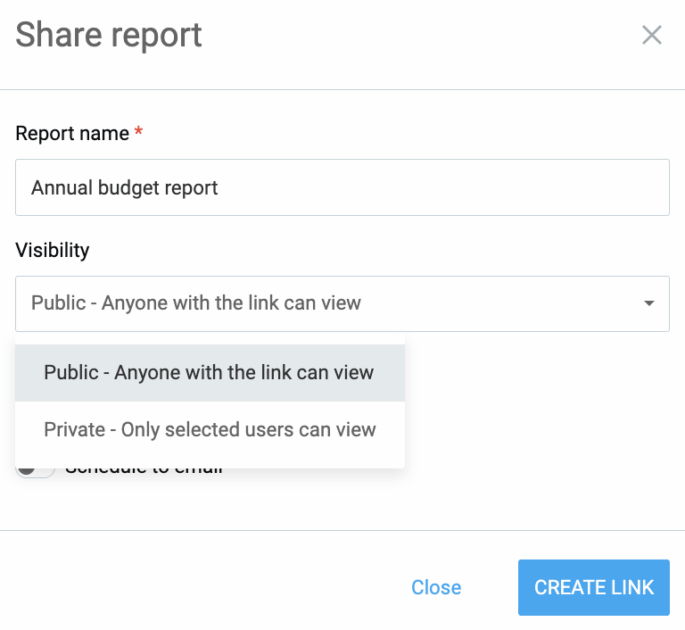
Yes, you can share budget reports with your clients or team members. To share a Clockify report with a link, open the report and click the share icon, as presented below:
After that, name your report and choose a visibility (public or private). If you want to limit who can view the report, click the Private option and add specific team members. This allows for enhanced data control and security.
Also, you can lock dates to prevent the viewer from seeing the report for different time ranges, or enable the Schedule to email option to send the report by email to yourself or anyone else in your organization. You can send a report on a daily, weekly, or monthly basis.
To save a link, click the Create link button.
When you want to share this or any other report you previously created a link for, go to Shared reports in Clockify by CAKE.com.
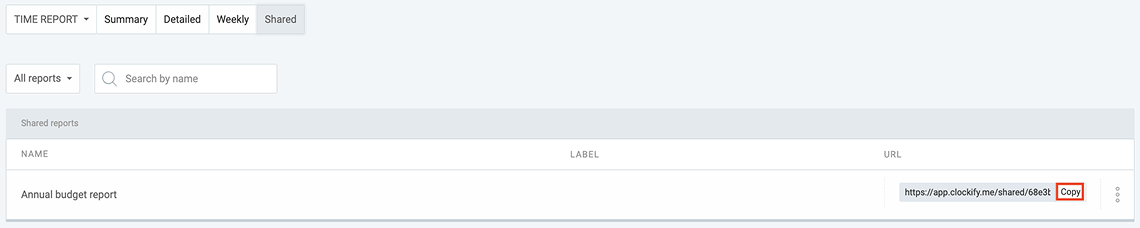
Then simply copy the report’s URL and send it to your client or your team members.
Can I analyze project profitability using Clockify?
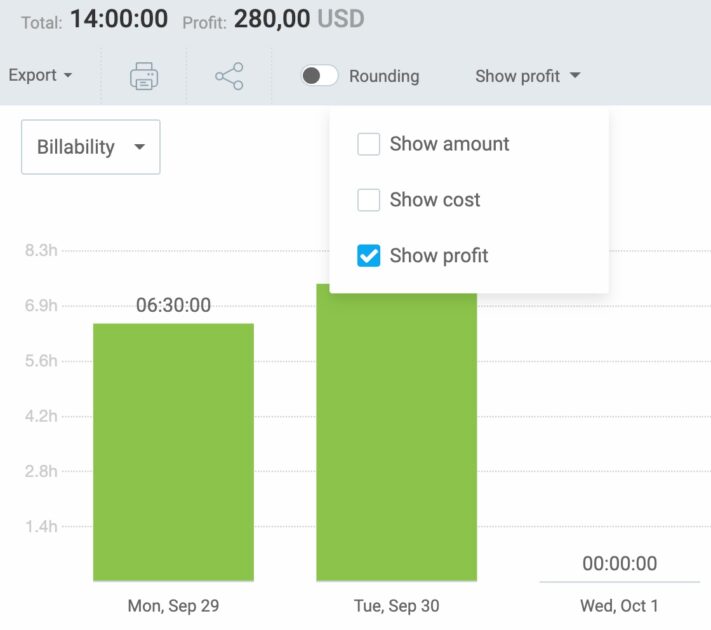
Yes, you can analyze project profitability with Clockify if you follow these steps:
- Open the summary report in Clockify,
- Filter the report by project (e.g., e-commerce website), and
- Open the Show all dropdown menu.
After that, check the Show amount, Show cost, and Show profit boxes. By checking all 3 boxes, you’ll get all the relevant information, including:
- Total tracked time on a project,
- Total billable time,
- Total amount earned based on that billable time,
- Total costs (what you pay your team), and
- The profit.
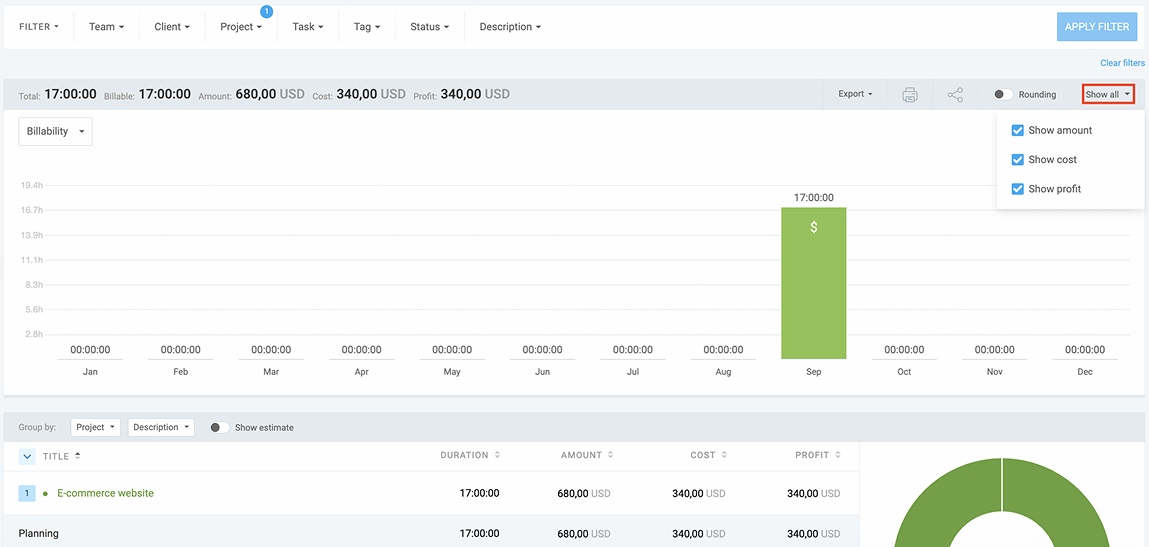
The report also shows the profit for each project-related task if you want to delve deeper into your project’s profitability.
With Clockify, department heads get all the profitability insights they need to assess their business’s performance. This allows them to make informed financial choices for their business growth.
Track time and generate financial reports easily with Clockify by CAKE.com
As a powerful time tracking software, Clockify offers many useful features to help operations managers:
- Track their team’s billable and non-billable hours,
- Record project-related expenses, and
- Track their project progress effectively.
Clockify’s built-in reporting feature lets you create accurate quarterly and annual budget reports more easily than ever.
You can generate the report for any period based on your team’s time data in just a few clicks — no need to manually update spreadsheets every week.
Additionally, you can customize the reports, export them in different formats, and send them to your clients. This enables efficient information sharing and better client communication.
On top of all this, Clockify offers free full human customer support available 24/7 (via email, chat, or phone) if you need help setting up or using Clockify.
Automate the process of tracking time and generating financial reports with Clockify to free up time for project management.
And, if you want to boost your team’s productivity, check out the CAKE.com Bundle.